Page 4625 of 5883
REAR SEAT
SE-29
< ON-VEHICLE REPAIR >
C
D
E
F
G
H
I
K
L
MA
B
SE
N
O
P
3. Remove the clips, and then remove the striker cover.
4. Remove the headrest holder.
5. To remove armrest, refer to "Disassembly of Armrest " .
6. Remove the seatback trim.
7. Remove the bolts, and then remove the rear seat lock assembly.
8. Remove the seatback pad from the seatback frame.
9. Remove the seatback center bracket bolt and then remove the seatback frame.
Assembly of Seatback Trim and Pad
Assembly is the reverse order of disassembly. Be careful of the following one point.
Before installing headrest holder, check its orientation (front/rear and right/left).
Disassembly of Seat Cushion Trim and Pad
Remove the rings to separate the trim and pad.
Assembly of Seat Cushion Trim and Pad
Assembly is the reverse order of disassembly.
PIIB2485J
PIIB4084J
PIIB2487J
Page 4704 of 5883
INTELLIGENT KEY UNIT
SEC-79
< ON-VEHICLE REPAIR >[WITH INTELLIGENT KEY SYSTEM]
C
D
E
F
G
H
I
J
L
MA
B
SEC
N
O
P
ON-VEHICLE REPAIR
INTELLIGENT KEY UNIT
Removal and InstallationINFOID:0000000001350478
INTELLIGENT KEY UNIT RH DRIVE
Removal
1. Remove the lower driver instrument cover. Refer to IP-10, "Component Parts".
2. Remove the screw (A), disconnect the electrical connector (1),
and remove the intelligent key unit and bracket(2).
Installation
Installation is in the reverse order of removal.
INTELLIGENT KEY UNIT LH DRIVE
Removal
1. Remove the glove box assembly. Refer to IP-10, "Component Parts".
2. Remove the screw (A), disconnect the electrical connector (1),
and remove the intelligent key unit and bracket(2).
Installation
Installation is in the reverse order of removal.
ALKIA0682GB
ALKIA0683GB
Page 4748 of 5883
DRIVER AIR BAG MODULE
SR-5
< ON-VEHICLE REPAIR >
C
D
E
F
G
I
J
K
L
MA
B
SR
N
O
P
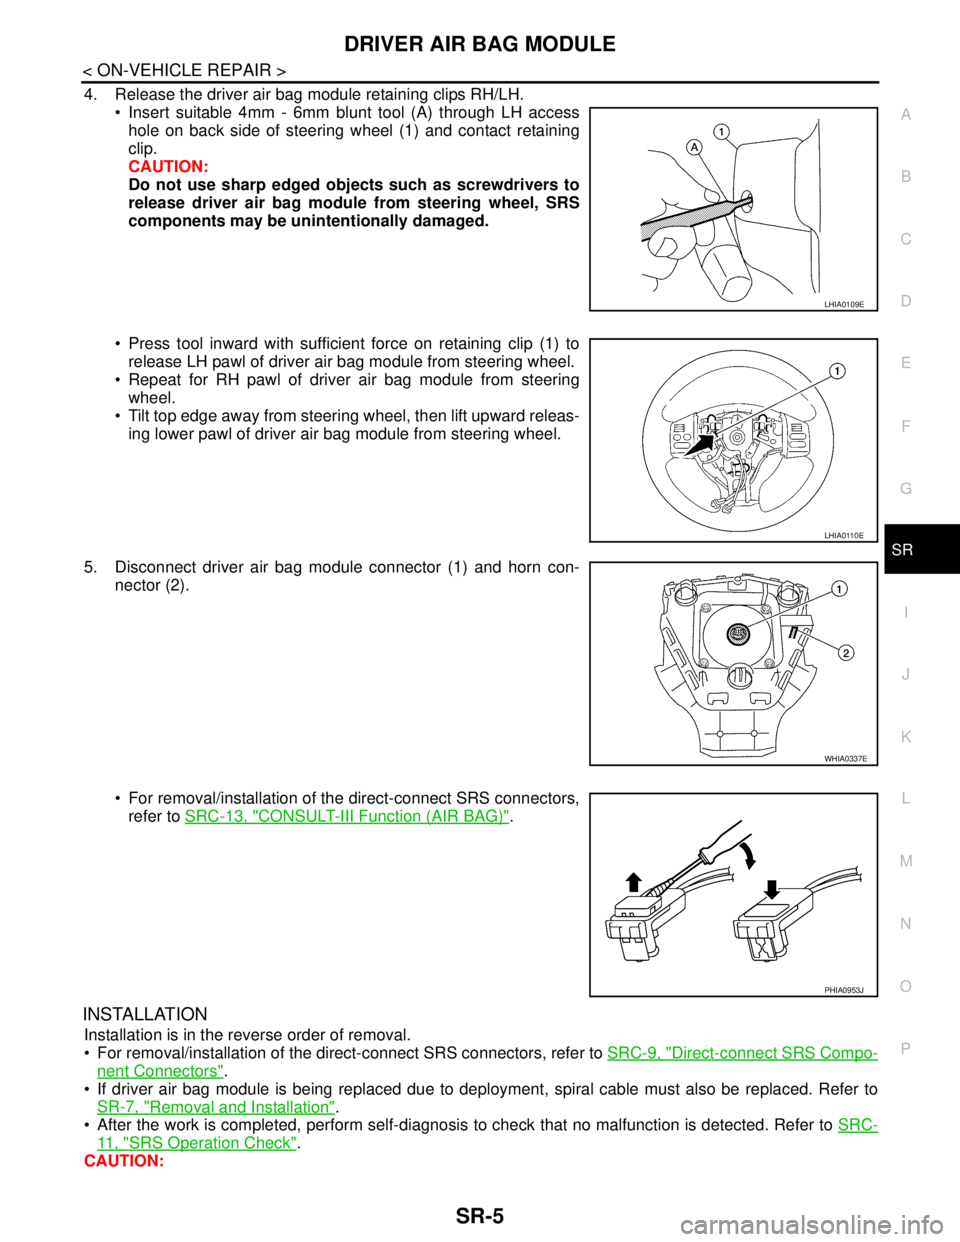
4. Release the driver air bag module retaining clips RH/LH.
Insert suitable 4mm - 6mm blunt tool (A) through LH access
hole on back side of steering wheel (1) and contact retaining
clip.
CAUTION:
Do not use sharp edged objects such as screwdrivers to
release driver air bag module from steering wheel, SRS
components may be unintentionally damaged.
Press tool inward with sufficient force on retaining clip (1) to
release LH pawl of driver air bag module from steering wheel.
Repeat for RH pawl of driver air bag module from steering
wheel.
Tilt top edge away from steering wheel, then lift upward releas-
ing lower pawl of driver air bag module from steering wheel.
5. Disconnect driver air bag module connector (1) and horn con-
nector (2).
For removal/installation of the direct-connect SRS connectors,
refer to SRC-13, "
CONSULT-III Function (AIR BAG)".
INSTALLATION
Installation is in the reverse order of removal.
For removal/installation of the direct-connect SRS connectors, refer to SRC-9, "
Direct-connect SRS Compo-
nent Connectors".
If driver air bag module is being replaced due to deployment, spiral cable must also be replaced. Refer to
SR-7, "
Removal and Installation".
After the work is completed, perform self-diagnosis to check that no malfunction is detected. Refer to SRC-
11 , "SRS Operation Check".
CAUTION:
LHIA0109E
LHIA0110E
WHIA0337E
PHIA0953J
Page 4751 of 5883
SR-8
< ON-VEHICLE REPAIR >
SPIRAL CABLE
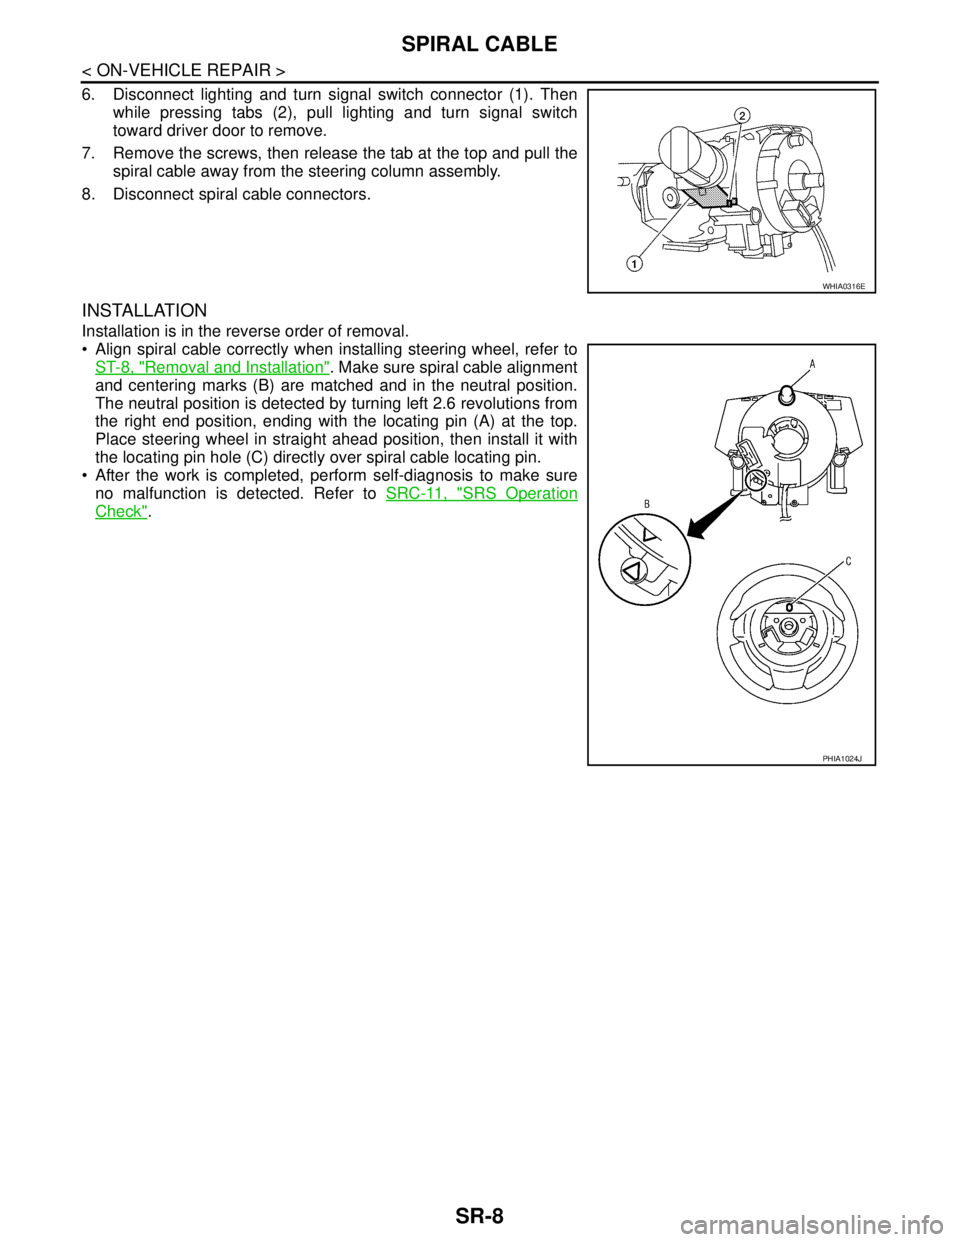
6. Disconnect lighting and turn signal switch connector (1). Then
while pressing tabs (2), pull lighting and turn signal switch
toward driver door to remove.
7. Remove the screws, then release the tab at the top and pull the
spiral cable away from the steering column assembly.
8. Disconnect spiral cable connectors.
INSTALLATION
Installation is in the reverse order of removal.
Align spiral cable correctly when installing steering wheel, refer to
ST-8, "
Removal and Installation". Make sure spiral cable alignment
and centering marks (B) are matched and in the neutral position.
The neutral position is detected by turning left 2.6 revolutions from
the right end position, ending with the locating pin (A) at the top.
Place steering wheel in straight ahead position, then install it with
the locating pin hole (C) directly over spiral cable locating pin.
After the work is completed, perform self-diagnosis to make sure
no malfunction is detected. Refer to SRC-11, "
SRS Operation
Check".
WHIA0316E
PHIA1024J
Page 4752 of 5883
FRONT PASSENGER AIR BAG MODULE
SR-9
< ON-VEHICLE REPAIR >
C
D
E
F
G
I
J
K
L
MA
B
SR
N
O
P
FRONT PASSENGER AIR BAG MODULE
Removal and InstallationINFOID:0000000001350506
REMOVAL
WARNING:
When servicing the SRS, do not work from directly in front of air bag module.
Always place front passenger air bag module with pad side facing upward.
CAUTION:
Before servicing SRS, turn the ignition switch OFF, disconnect both battery cables and wait at least
3 minutes.
Do not use old bolts after removal; replace with new bolts.
Do not insert any foreign objects (screwdriver, etc.) into air bag module or harness connectors.
Do not disassemble air bag module.
Do not expose the front passenger air bag module to temperatures exceeding 90°C (194°F).
Replace the front passenger air bag module if it has been
dropped or sustained an impact.
Do not allow oil, grease or water to come in contact with the
front passenger air bag module.
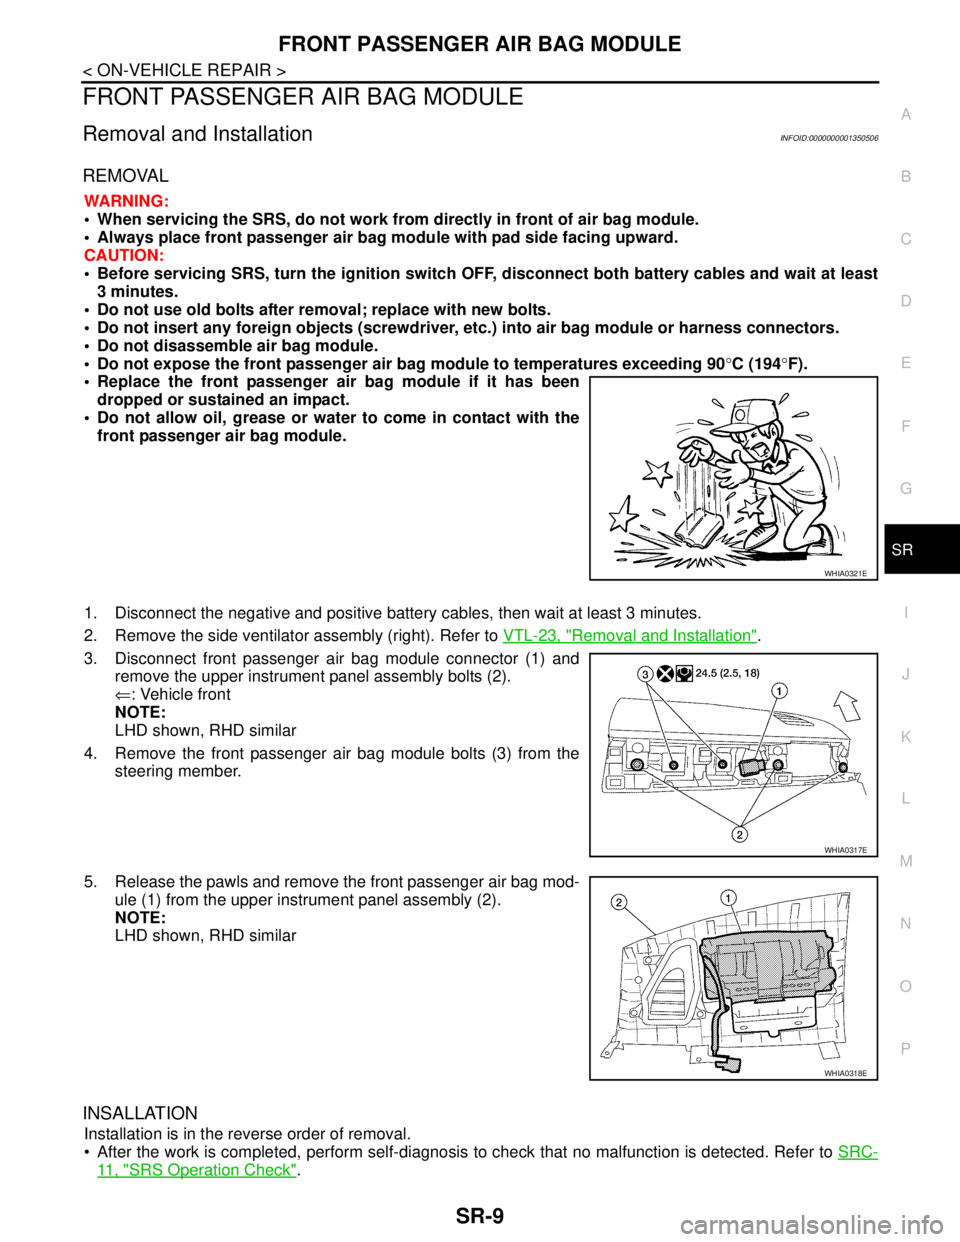
1. Disconnect the negative and positive battery cables, then wait at least 3 minutes.
2. Remove the side ventilator assembly (right). Refer to VTL-23, "
Removal and Installation".
3. Disconnect front passenger air bag module connector (1) and
remove the upper instrument panel assembly bolts (2).
⇐: Vehicle front
NOTE:
LHD shown, RHD similar
4. Remove the front passenger air bag module bolts (3) from the
steering member.
5. Release the pawls and remove the front passenger air bag mod-
ule (1) from the upper instrument panel assembly (2).
NOTE:
LHD shown, RHD similar
INSALLATION
Installation is in the reverse order of removal.
After the work is completed, perform self-diagnosis to check that no malfunction is detected. Refer to SRC-
11 , "SRS Operation Check".
WHIA0321E
WHIA0317E
WHIA0318E
Page 4754 of 5883
SIDE CURTAIN AIR BAG MODULE
SR-11
< ON-VEHICLE REPAIR >
C
D
E
F
G
I
J
K
L
MA
B
SR
N
O
P
When servicing the SRS, do not work from directly in front of air bag module.
Always place the curtain air bag module with deployment side facing upward.
Do not reuse center pillar upper garnish if removed.
CAUTION:
Before servicing SRS, turn the ignition switch OFF, disconnect both battery cables and wait at least
3 minutes.
Do not use old bolts after removal; replace with new bolts.
Do not insert any foreign objects (screwdriver, etc.) into air bag module or harness connectors.
Do not disassemble air bag module.
Do not expose the side curtain air bag module to temperatures exceeding 90°C (194°F).
Replace the side curtain air bag module if it has been dropped
or sustained an impact.
Do not allow oil, grease or water to come in contact with the
side curtain air bag module.
Do not attempt to repair or replace damaged direct-connect
SRS component connectors. If a direct-connect harness con-
nector is damaged, the harness must be replaced.
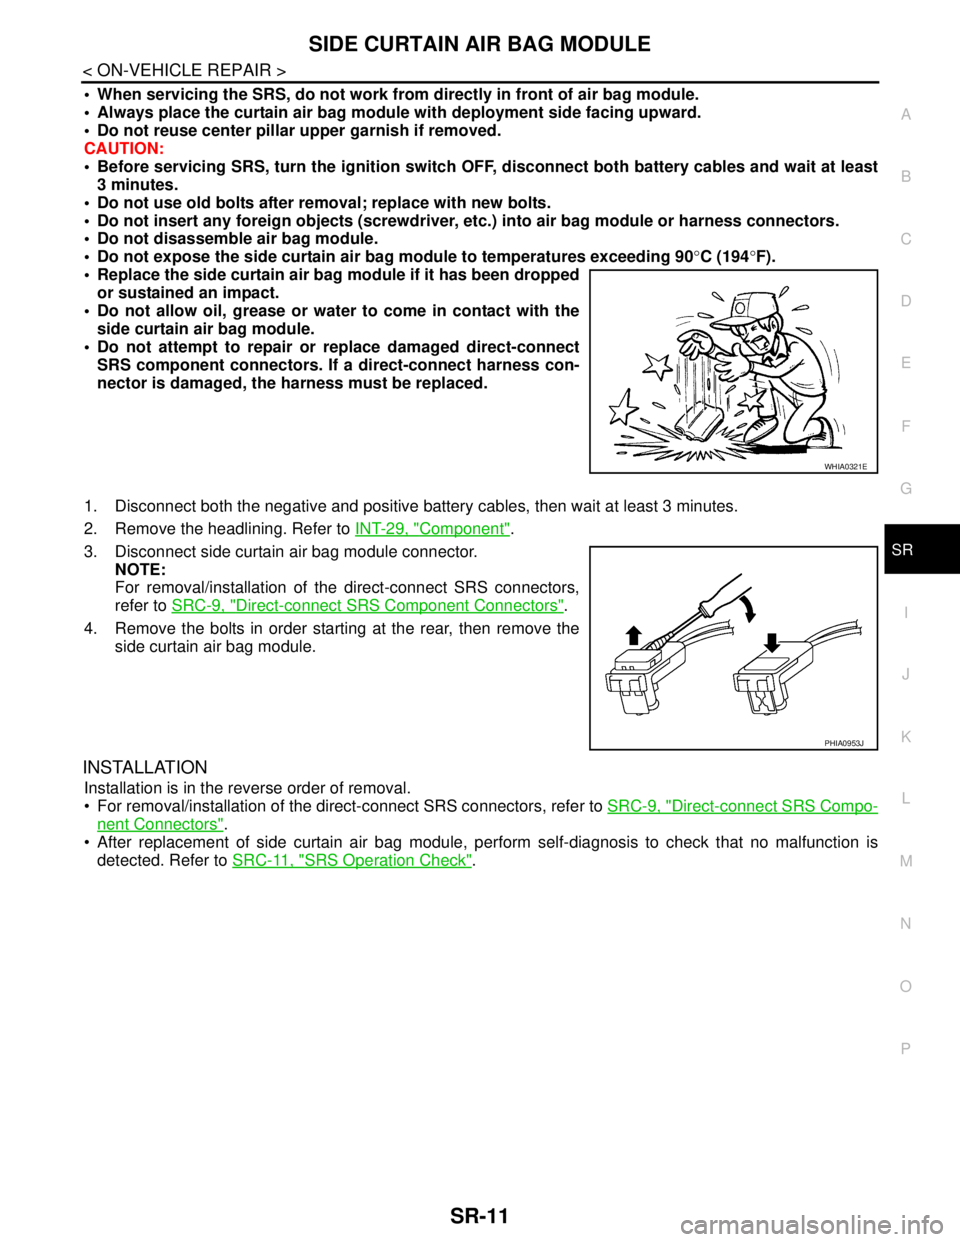
1. Disconnect both the negative and positive battery cables, then wait at least 3 minutes.
2. Remove the headlining. Refer to INT-29, "
Component".
3. Disconnect side curtain air bag module connector.
NOTE:
For removal/installation of the direct-connect SRS connectors,
refer to SRC-9, "
Direct-connect SRS Component Connectors".
4. Remove the bolts in order starting at the rear, then remove the
side curtain air bag module.
INSTALLATION
Installation is in the reverse order of removal.
For removal/installation of the direct-connect SRS connectors, refer to SRC-9, "
Direct-connect SRS Compo-
nent Connectors".
After replacement of side curtain air bag module, perform self-diagnosis to check that no malfunction is
detected. Refer to SRC-11, "
SRS Operation Check".
WHIA0321E
PHIA0953J
Page 4755 of 5883
SR-12
< ON-VEHICLE REPAIR >
SIDE AIR BAG (SATELLITE) SENSOR
SIDE AIR BAG (SATELLITE) SENSOR
Removal and InstallationINFOID:0000000001350510
REMOVAL
WARNING:
Do not reuse center pillar upper garnish if removed.
CAUTION:
Before servicing the SRS, turn ignition switch OFF, disconnect both battery cables and wait at least
3 minutes.
Do not disassemble the side air bag (satellite) sensor.
Do not use old nuts after removal; replace with new nuts.
Replace the side air bag (satellite) sensor if it has been
dropped or sustained an impact.
Check side air bag (satellite) sensor to make sure it is free of
deformities, dents, cracks or rust. If it shows any visible signs
of damage, replace it with a new one.
1. Disconnect both the negative and positive battery cables, then wait at least 3 minutes.
2. Remove the front seat belt retractor. Refer to SB-6, "
Removal and Installation of Front Seat Belt".
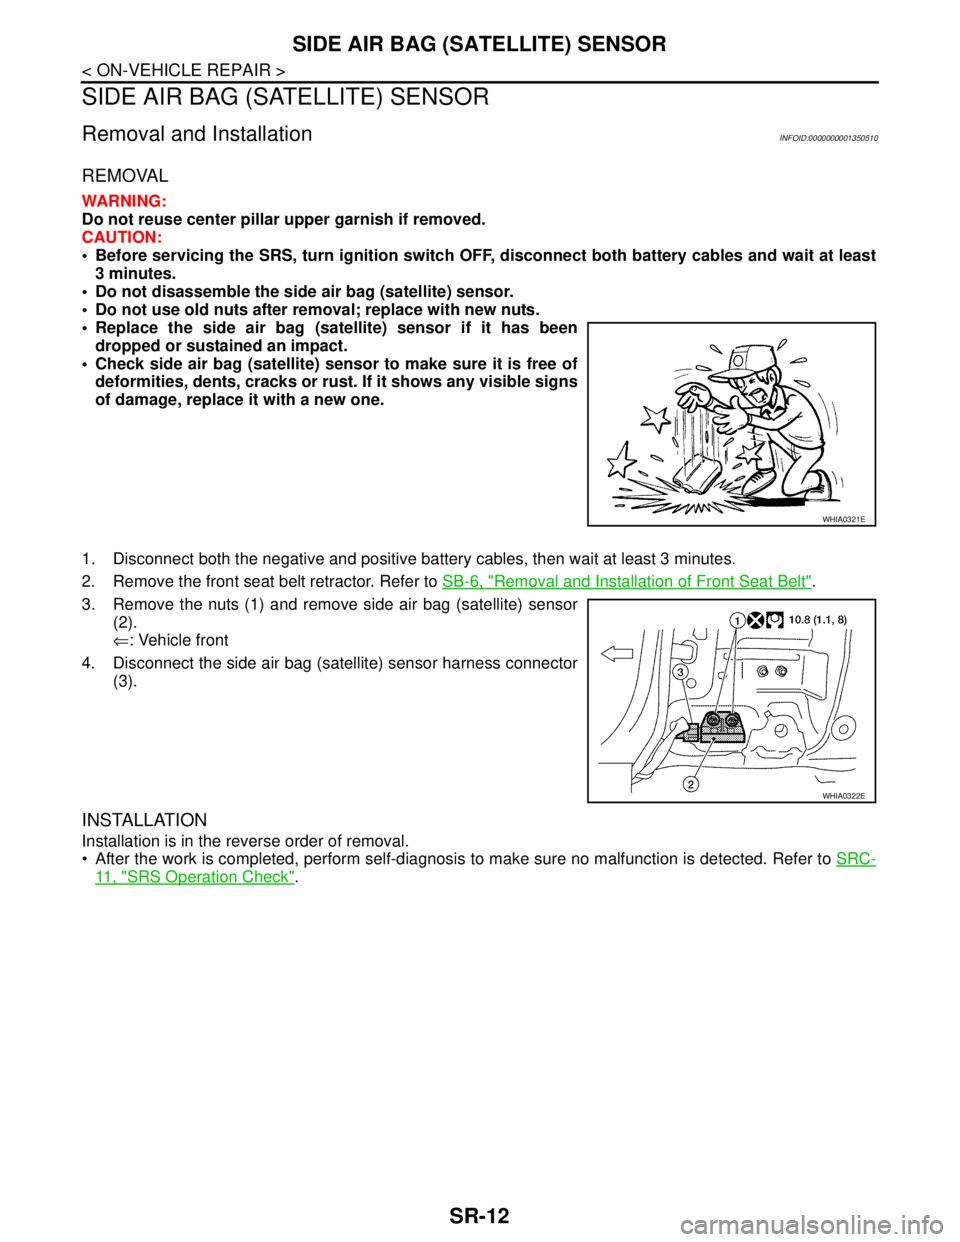
3. Remove the nuts (1) and remove side air bag (satellite) sensor
(2).
⇐: Vehicle front
4. Disconnect the side air bag (satellite) sensor harness connector
(3).
INSTALLATION
Installation is in the reverse order of removal.
After the work is completed, perform self-diagnosis to make sure no malfunction is detected. Refer to SRC-
11 , "SRS Operation Check".
WHIA0321E
WHIA0322E
Page 4756 of 5883
PASSENGER AIR BAG DEACTIVATION SWITCH
SR-13
< ON-VEHICLE REPAIR >
C
D
E
F
G
I
J
K
L
MA
B
SR
N
O
P
PASSENGER AIR BAG DEACTIVATION SWITCH
Passenger Air Bag Deactivation SwitchINFOID:0000000001404301
REMOVAL
CAUTION:
Before servicing SRS, turn ingition switch OFF, disconnect both battery cables, then wait at least 3
minutes.
1. Disconnect the negative and positive battery cables, then wait at least 3 minutes.
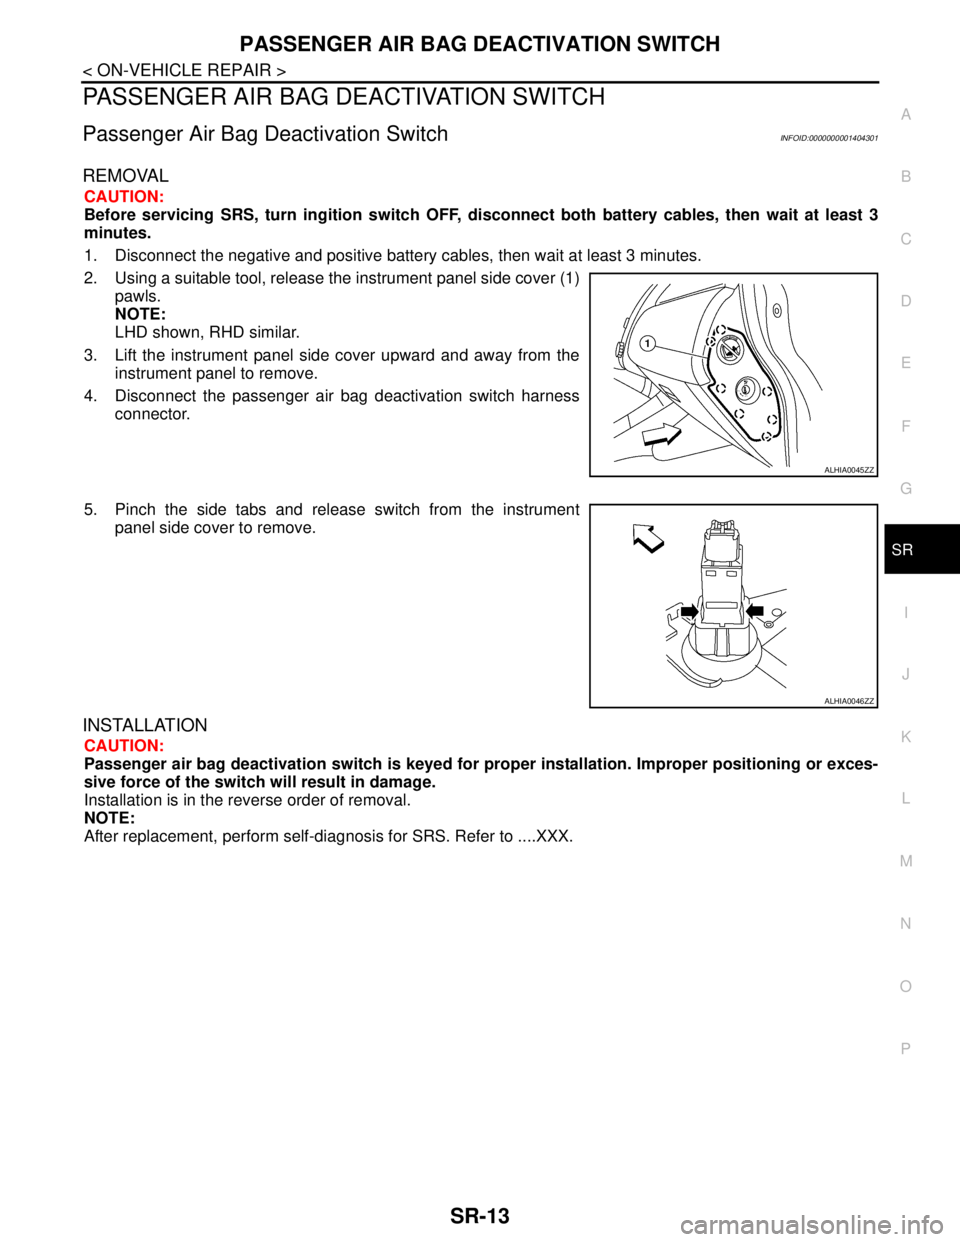
2. Using a suitable tool, release the instrument panel side cover (1)
pawls.
NOTE:
LHD shown, RHD similar.
3. Lift the instrument panel side cover upward and away from the
instrument panel to remove.
4. Disconnect the passenger air bag deactivation switch harness
connector.
5. Pinch the side tabs and release switch from the instrument
panel side cover to remove.
INSTALLATION
CAUTION:
Passenger air bag deactivation switch is keyed for proper installation. Improper positioning or exces-
sive force of the switch will result in damage.
Installation is in the reverse order of removal.
NOTE:
After replacement, perform self-diagnosis for SRS. Refer to ....XXX.
ALHIA0045ZZ
ALHIA0046ZZ