Page 3715 of 5883
INT-36
< ON-VEHICLE REPAIR >
TRUNK ROOM TRIM & TRUNK LID FINISHER
5. Release the clips, then remove the trunk rear plate.
6. Release the clips, then remove the trunk side finisher RH/LH.
7. Release the clips and remove the trunk lid finisher inner from the trunk lid.
INSTALLATION
Installation is in the reverse order of removal.
Page 3731 of 5883

IP-16
< SERVICE INFORMATION >
INSTRUMENT PANEL ASSEMBLY
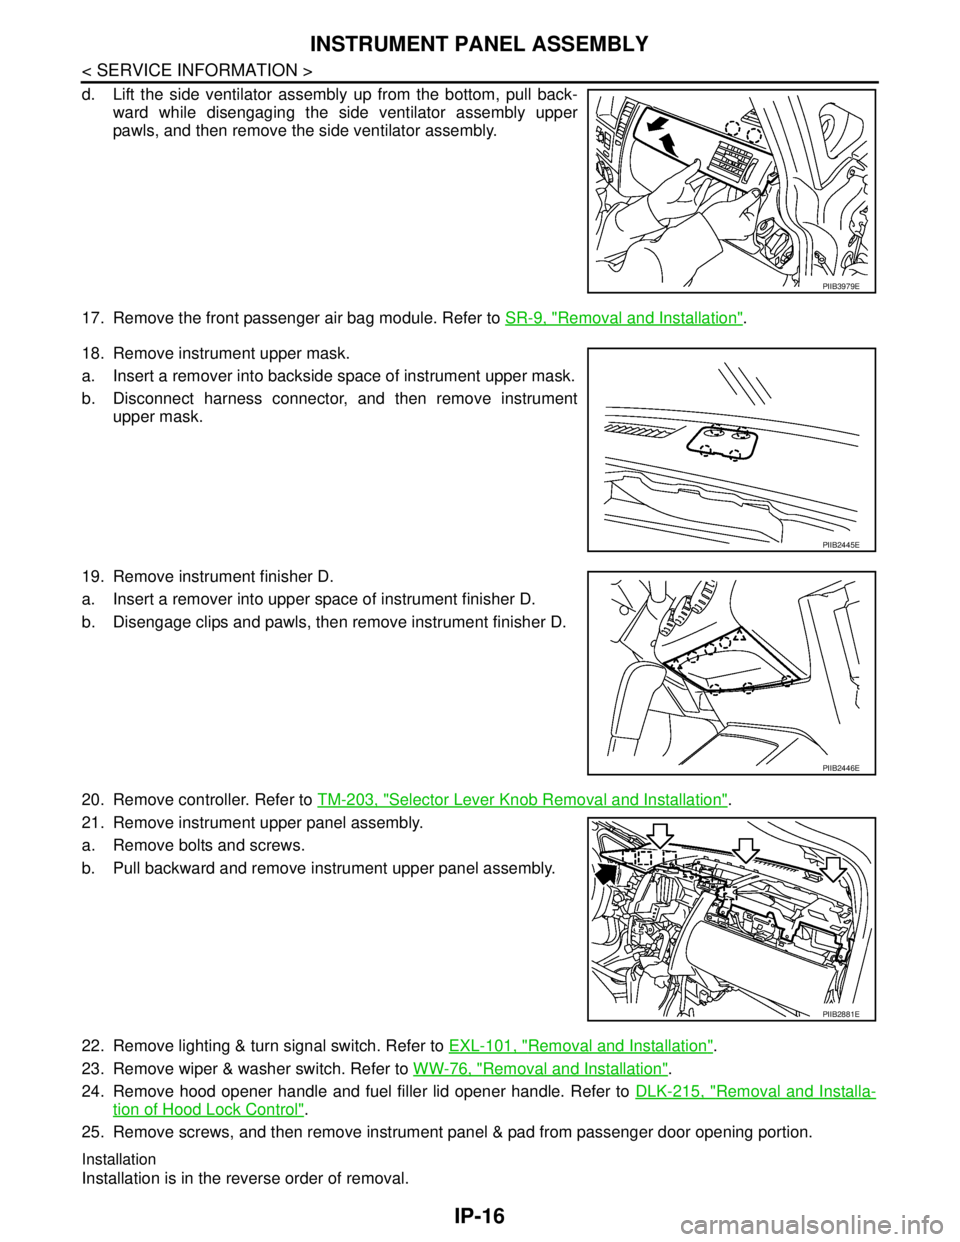
d. Lift the side ventilator assembly up from the bottom, pull back-
ward while disengaging the side ventilator assembly upper
pawls, and then remove the side ventilator assembly.
17. Remove the front passenger air bag module. Refer to SR-9, "
Removal and Installation".
18. Remove instrument upper mask.
a. Insert a remover into backside space of instrument upper mask.
b. Disconnect harness connector, and then remove instrument
upper mask.
19. Remove instrument finisher D.
a. Insert a remover into upper space of instrument finisher D.
b. Disengage clips and pawls, then remove instrument finisher D.
20. Remove controller. Refer to TM-203, "
Selector Lever Knob Removal and Installation".
21. Remove instrument upper panel assembly.
a. Remove bolts and screws.
b. Pull backward and remove instrument upper panel assembly.
22. Remove lighting & turn signal switch. Refer to EXL-101, "
Removal and Installation".
23. Remove wiper & washer switch. Refer to WW-76, "
Removal and Installation".
24. Remove hood opener handle and fuel filler lid opener handle. Refer to DLK-215, "
Removal and Installa-
tion of Hood Lock Control".
25. Remove screws, and then remove instrument panel & pad from passenger door opening portion.
Installation
Installation is in the reverse order of removal.
PIIB3979E
PIIB2445E
PIIB2446E
PIIB2881E
Page 3733 of 5883
IP-18
< SERVICE INFORMATION >
INSTRUMENT PANEL ASSEMBLY
8. Insert suitable tool into the bottom gap of side ventilator assem-
bly after removing the instrument side mask, push against A and
B as shown to disengage the pawls.
9. Lift the side ventilator up from the bottom, pull backward while
disengaging the side ventilator assembly's upper pawls, and
then remove the side ventilator.
10. Remove screws, and disengage pawls.
11. Remove steering column cover upper.
12. Remove screws from instrument upper panel right side.
13. Lift the instrument upper panel up, disengage metal clips.
14. Pull backward and disengage clips.
15. Remove cluster lid A.
Installation
Installation is in the reverse order of removal.
CLUSTER LID C
Removal
WIIA1226E
PIIB3976E
PIIB3969E
PIIB2880E
Page 3734 of 5883
INSTRUMENT PANEL ASSEMBLY
IP-19
< SERVICE INFORMATION >
C
D
E
F
G
H
I
K
L
MA
B
IP
N
O
P
1. Pull instrument finisher E backward by approximately 30
degrees while disengaging the metal clips and pawl.
2. Remove screws.
3. Pull back, and disengage pawls and metal clips.
4. Disconnect harness connector, and then remove cluster lid C.
Installation
Installation is in the reverse order of removal.
COMBINATION METER
Removal
1. Pull instrument finisher E backward by approximately 30
degrees while disengaging the metal clips and pawl.
2. Remove front pillar garnish. Refer to INT-20, "
Removal and Installation".
3. Pull up instrument side panel and disengage pawls.
4. Remove instrument side panel.
WIIA1224E
WIIA1225E
WIIA1224E
PIIB2439J
Page 3736 of 5883
INSTRUMENT PANEL ASSEMBLY
IP-21
< SERVICE INFORMATION >
C
D
E
F
G
H
I
K
L
MA
B
IP
N
O
P
12. Remove screws from instrument upper panel right side.
13. Lift the instrument upper panel up, disengage metal clips.
14. Pull backward and disengage clips.
15. Remove cluster lid A.
16. Remove screws (A) and metal clip (B), and remove combination
meter.
Installation
Installation is in the reverse order of removal.
GLOVE BOX ASSEMBLY
Removal
1. Remove the glove box screws.
2. Pull backward while disengaging the glove box assembly pawls.
3. Disconnect lamp harness connector, and then remove glove box
assembly.
Installation
Installation is in the reverse order of removal.
INSTRUMENT LOWER FINISHER
Removal
PIIB3969E
PIIB2880E
PKIC0703E
PIIB3404E
Page 3737 of 5883

IP-22
< SERVICE INFORMATION >
INSTRUMENT PANEL ASSEMBLY
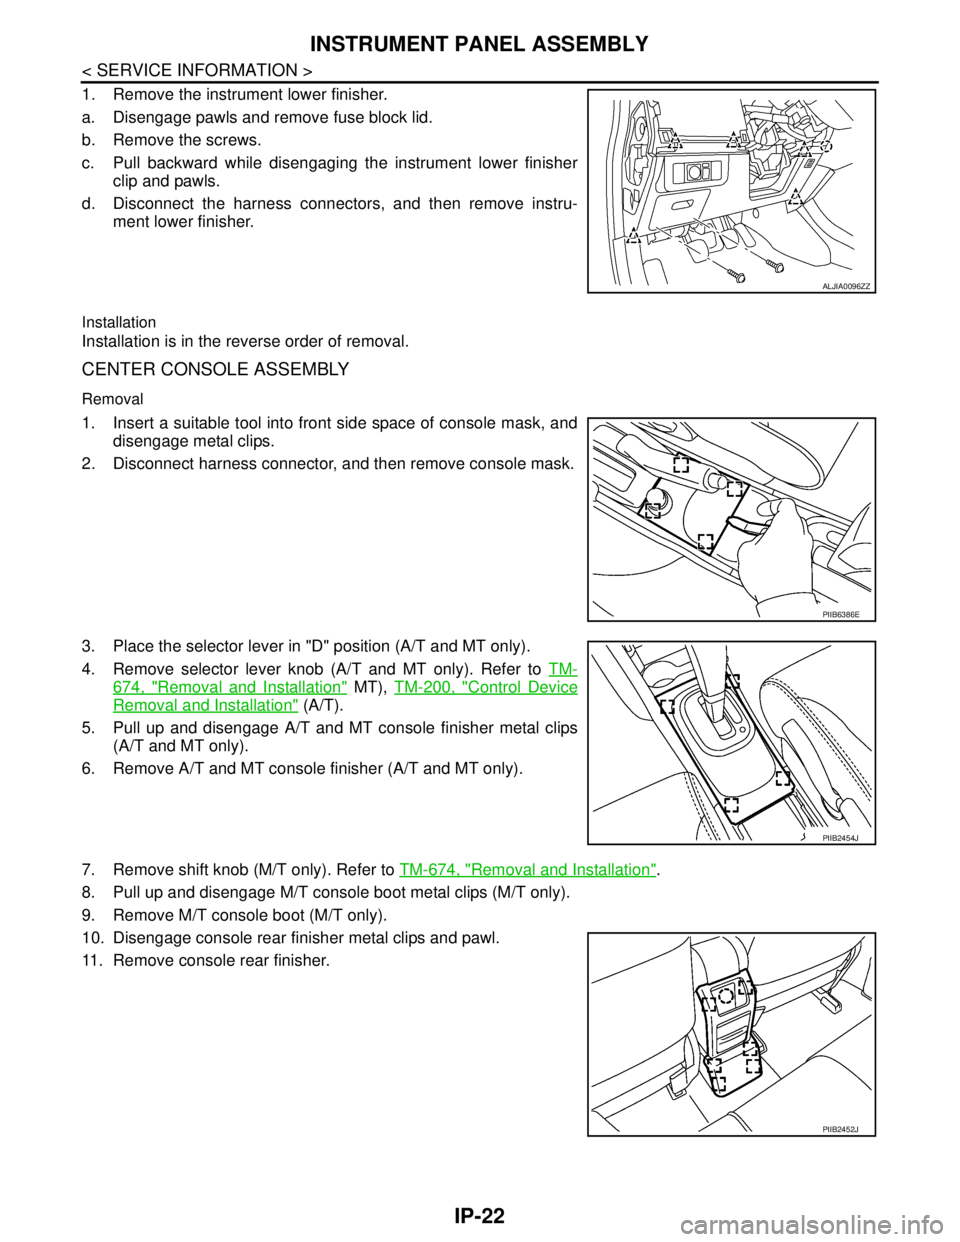
1. Remove the instrument lower finisher.
a. Disengage pawls and remove fuse block lid.
b. Remove the screws.
c. Pull backward while disengaging the instrument lower finisher
clip and pawls.
d. Disconnect the harness connectors, and then remove instru-
ment lower finisher.
Installation
Installation is in the reverse order of removal.
CENTER CONSOLE ASSEMBLY
Removal
1. Insert a suitable tool into front side space of console mask, and
disengage metal clips.
2. Disconnect harness connector, and then remove console mask.
3. Place the selector lever in "D" position (A/T and MT only).
4. Remove selector lever knob (A/T and MT only). Refer to TM-
674, "Removal and Installation" MT), TM-200, "Control Device
Removal and Installation" (A/T).
5. Pull up and disengage A/T and MT console finisher metal clips
(A/T and MT only).
6. Remove A/T and MT console finisher (A/T and MT only).
7. Remove shift knob (M/T only). Refer to TM-674, "
Removal and Installation".
8. Pull up and disengage M/T console boot metal clips (M/T only).
9. Remove M/T console boot (M/T only).
10. Disengage console rear finisher metal clips and pawl.
11. Remove console rear finisher.
ALJIA0096ZZ
PIIB6386E
PIIB2454J
PIIB2452J
Page 3738 of 5883
INSTRUMENT PANEL ASSEMBLY
IP-23
< SERVICE INFORMATION >
C
D
E
F
G
H
I
K
L
MA
B
IP
N
O
P
12. Disengage console mask cover metal clips and pawls, and then
remove console mask cover (with armrest).
13. Disengage rear cup holder metal clips and pawls (without arm-
rest).
14. Remover rear cup holder (without armrest).
15. Remove console body assembly screws and nuts.
16. Disconnect harness connector, and then remove console body assembly.
17. Remove both of the instrument lower cover LH and RH (CS101)
clips.
18. Disengage instrument lower cover LH and RH metal clips and
remove both of the instrument lower cover LH and RH.
19. Remove the screws and then remove the center console.
Installation
Installation is in the reverse order of removal.
Disassembly and AssemblyINFOID:0000000001523319
NOTE:
The LHD model shown, RHD similar.
GLOVE BOX ASSEMBLY
PIIB6387E
PIIB6388E
PIIB2882J
Page 3739 of 5883
IP-24
< SERVICE INFORMATION >
INSTRUMENT PANEL ASSEMBLY
Disassembly
1. Remove screws of damper, and then remove damper.
2. Remove screws of glove box striker, and then remove glove box striker.
3. Remove screws of glove box latch, and then remove glove box latch.
Assembly
Assembly is in the reverse order of disassembly.
CENTER CONSOLE ASSEMBLY
1. Glove box striker 2. Glove box 3. Glove box latch
4. Damper
LIIA2555E