Page 3651 of 5883
HRN-4
< ON-VEHICLE REPAIR >
HORN
ON-VEHICLE REPAIR
HORN
Removal and InstallationINFOID:0000000001728320
REMOVAL
NOTE:
Front grille, front bumper fascia and front bumper shown removed for clarity.
1. Remove the front grille. Refer to EXT-19, "
Removal and Installation".
2. Disconnect the horn connectors (A).
3. Remove the horn nuts (B), then remove the horns (1) and (2).
INSTALLATION
Installation is in the reverse order of removal.
ALLIA0657ZZ
Page 3676 of 5883

INTERIOR ROOM LAMP
INL-25
< ON-VEHICLE REPAIR >
C
D
E
F
G
H
I
J
K
MA
B
INL
N
O
P
ON-VEHICLE REPAIR
INTERIOR ROOM LAMP
Removal and InstallationINFOID:0000000001726698
MAP LAMP
Removal
1. Disconnect the negative battery cable.
2. Insert a suitable tool and release the pawl, then remove map lamp from overhead console assembly.
3. Disconnect the connectors, then remove map lamp.
Installation
Installation is in the reverse order of removal.
Bulb Replacement
1. Disconnect the negative battery cable.
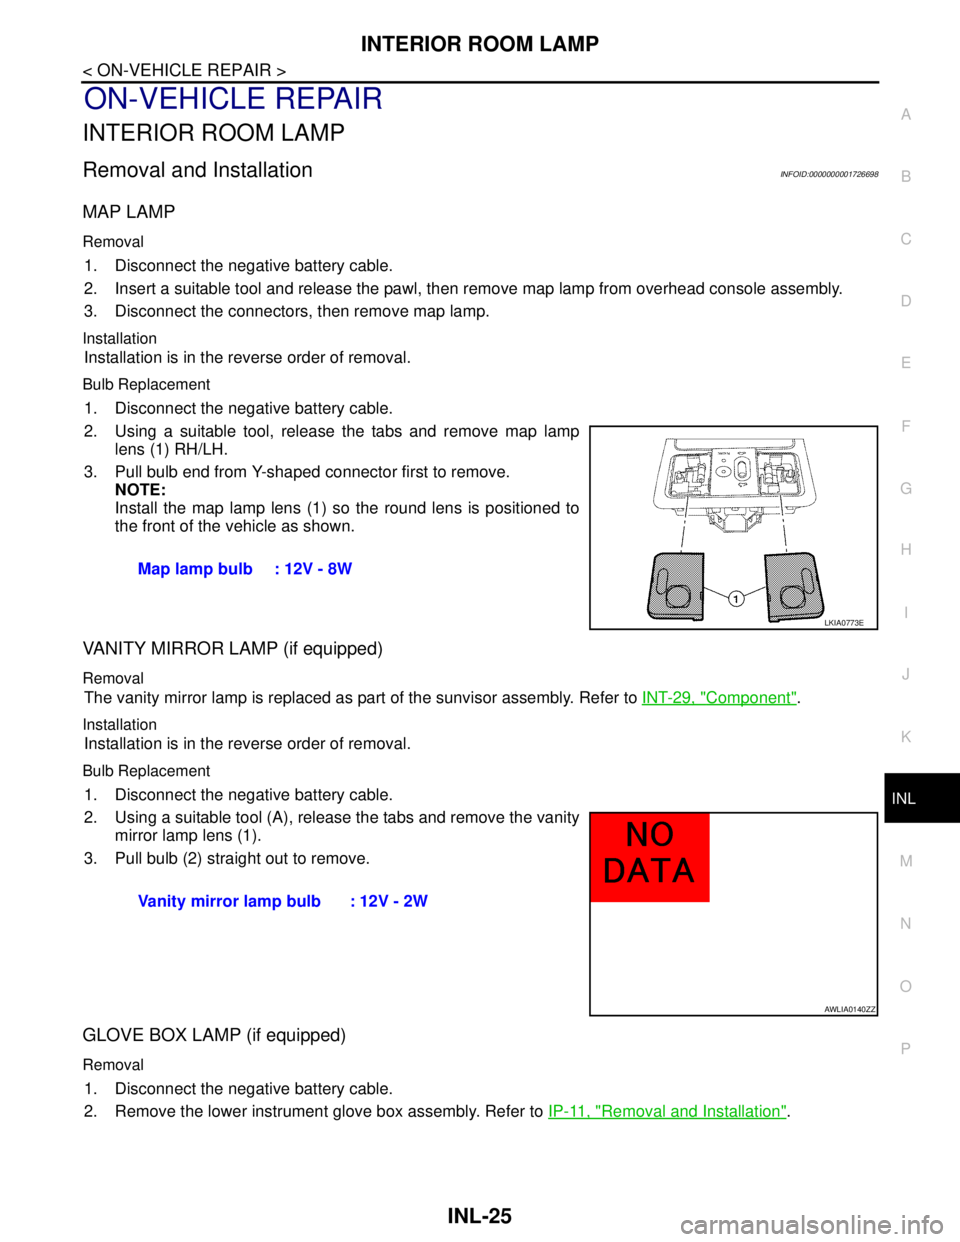
2. Using a suitable tool, release the tabs and remove map lamp
lens (1) RH/LH.
3. Pull bulb end from Y-shaped connector first to remove.
NOTE:
Install the map lamp lens (1) so the round lens is positioned to
the front of the vehicle as shown.
VANITY MIRROR LAMP (if equipped)
Removal
The vanity mirror lamp is replaced as part of the sunvisor assembly. Refer to INT-29, "Component".
Installation
Installation is in the reverse order of removal.
Bulb Replacement
1. Disconnect the negative battery cable.
2. Using a suitable tool (A), release the tabs and remove the vanity
mirror lamp lens (1).
3. Pull bulb (2) straight out to remove.
GLOVE BOX LAMP (if equipped)
Removal
1. Disconnect the negative battery cable.
2. Remove the lower instrument glove box assembly. Refer to IP-11, "
Removal and Installation". Map lamp bulb : 12V - 8W
LKIA0773E
Vanity mirror lamp bulb : 12V - 2W
AWLIA0140ZZ
Page 3677 of 5883
INL-26
< ON-VEHICLE REPAIR >
INTERIOR ROOM LAMP
3. Rotate glove box lamp socket (1) counterclockwise to remove
from lower instrument glove box assembly.
Installation
Installation is in the reverse order of removal.
Bulb Replacement
1. Disconnect the negative battery cable.
2. Remove glove box lamp socket (1).
3. Pull bulb (2) straight out from lamp socket to remove.
ROOM LAMP
Removal
1. Disconnect the negative battery cable.
2. Release the clips, then remove the room lamp (1) from the
headlining.
3. Disconnect the connector and remove room lamp.
Installation
Installation is in the reverse order of removal.
Bulb Replacement
1. Disconnect the negative battery cable.
2. Using a suitable tool, release the pawls and remove room lamp lens (3).
3. Pull bulb (2) straight out to remove.
LUGGAGE COMPARTMENT LAMP (Hatchback)
Removal
1. Disconnect the negative battery cable.
PKIC1053E
Glove box lamp bulb : 12V - 1.4W
ALLIA0654ZZ
Room lamp bulb : 12V - 8W
Page 3678 of 5883

INTERIOR ROOM LAMP
INL-27
< ON-VEHICLE REPAIR >
C
D
E
F
G
H
I
J
K
MA
B
INL
N
O
P
2. Release the pawls, then remove the room lamp (2) from the lug-
gage side finisher LH.
3. Disconnect the luggage compartment lamp connector.
Installation
Installation is in the reverse order of removal.
Bulb Replacement
1. Disconnect the negative battery cable.
2. Remove luggage compartment lamp from luggage side finisher LH.
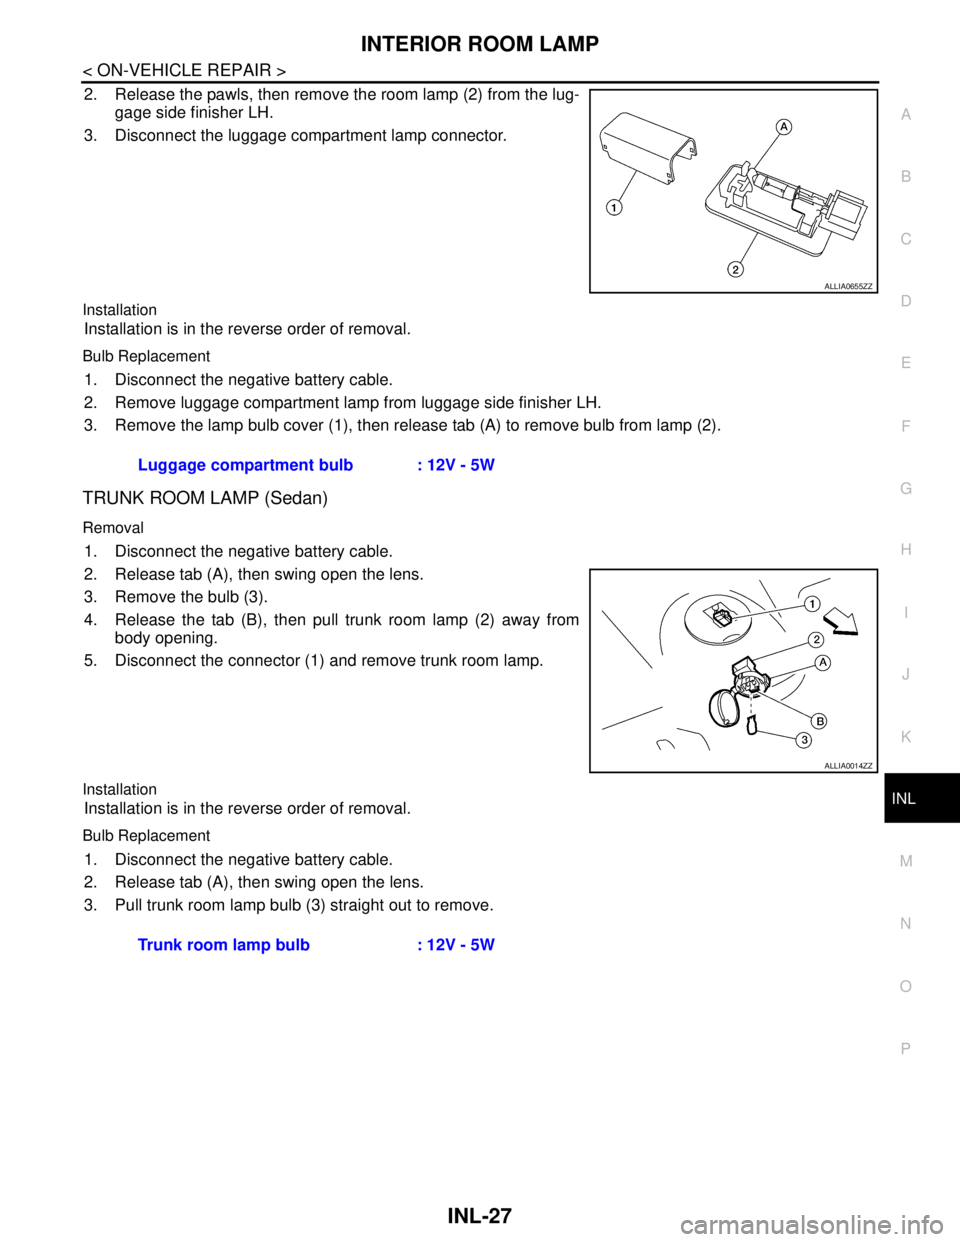
3. Remove the lamp bulb cover (1), then release tab (A) to remove bulb from lamp (2).
TRUNK ROOM LAMP (Sedan)
Removal
1. Disconnect the negative battery cable.
2. Release tab (A), then swing open the lens.
3. Remove the bulb (3).
4. Release the tab (B), then pull trunk room lamp (2) away from
body opening.
5. Disconnect the connector (1) and remove trunk room lamp.
Installation
Installation is in the reverse order of removal.
Bulb Replacement
1. Disconnect the negative battery cable.
2. Release tab (A), then swing open the lens.
3. Pull trunk room lamp bulb (3) straight out to remove.
ALLIA0655ZZ
Luggage compartment bulb : 12V - 5W
ALLIA0014ZZ
Trunk room lamp bulb : 12V - 5W
Page 3693 of 5883
INT-14
< ON-VEHICLE REPAIR >
DOOR FINISHER
4. Insert a trim stick (A) or suitable tool into back edge of front door
power window and door lock/unlock switch finisher. Lift upward
to release the clips and remove.
5. Disconnect front door power window and door lock/unlock
switch harness connector.
6. Remove the (2) front door finisher screws.
7. Release the clips, then lift front door finisher upward to remove it
from door body panel.
Installation
Installation is in the reverse order of removal.
REAR DOOR
WIIA1237E
PIIB6042E
SIIA0810E
Page 3695 of 5883
INT-16
< ON-VEHICLE REPAIR >
DOOR FINISHER
7. Release the clips, then lift rear door finisher upward to remove it
from door body panel.
Installation
Installation is in the reverse order of removal.
SIIA0810E
Page 3696 of 5883
TRUNK LID FINISHER
INT-17
< ON-VEHICLE REPAIR >
C
D
E
F
G
H
I
K
L
MA
B
INT
N
O
P
TRUNK LID FINISHER
Removal and InstallationINFOID:0000000001329115
REMOVAL
1. Disconnect the negative and positive battery cables.
2. Open trunk lid, remove trunk lid finisher inner. Refer to INT-35
.
3. Remove trunk lid finisher outer nuts.
4. Release the clips, then pull trunk lid finisher outer away from trunk lid.
5. Disconnect trunk lid opener switch connector and trunk opener request switch connector, then remove
trunk lid finisher outer.
INSTALLATION
Installation is in the reverse order of removal.
1. Trunk lid finisher outer 2. Trunk lid opener switch connector 3. Trunk opener request switch connector
A. Clip C101
WIIA1413E
Page 3697 of 5883

INT-18
< ON-VEHICLE REPAIR >
BACK DOOR TRIM
BACK DOOR TRIM
Removal and InstallationINFOID:0000000001329114
REMOVAL
CAUTION:
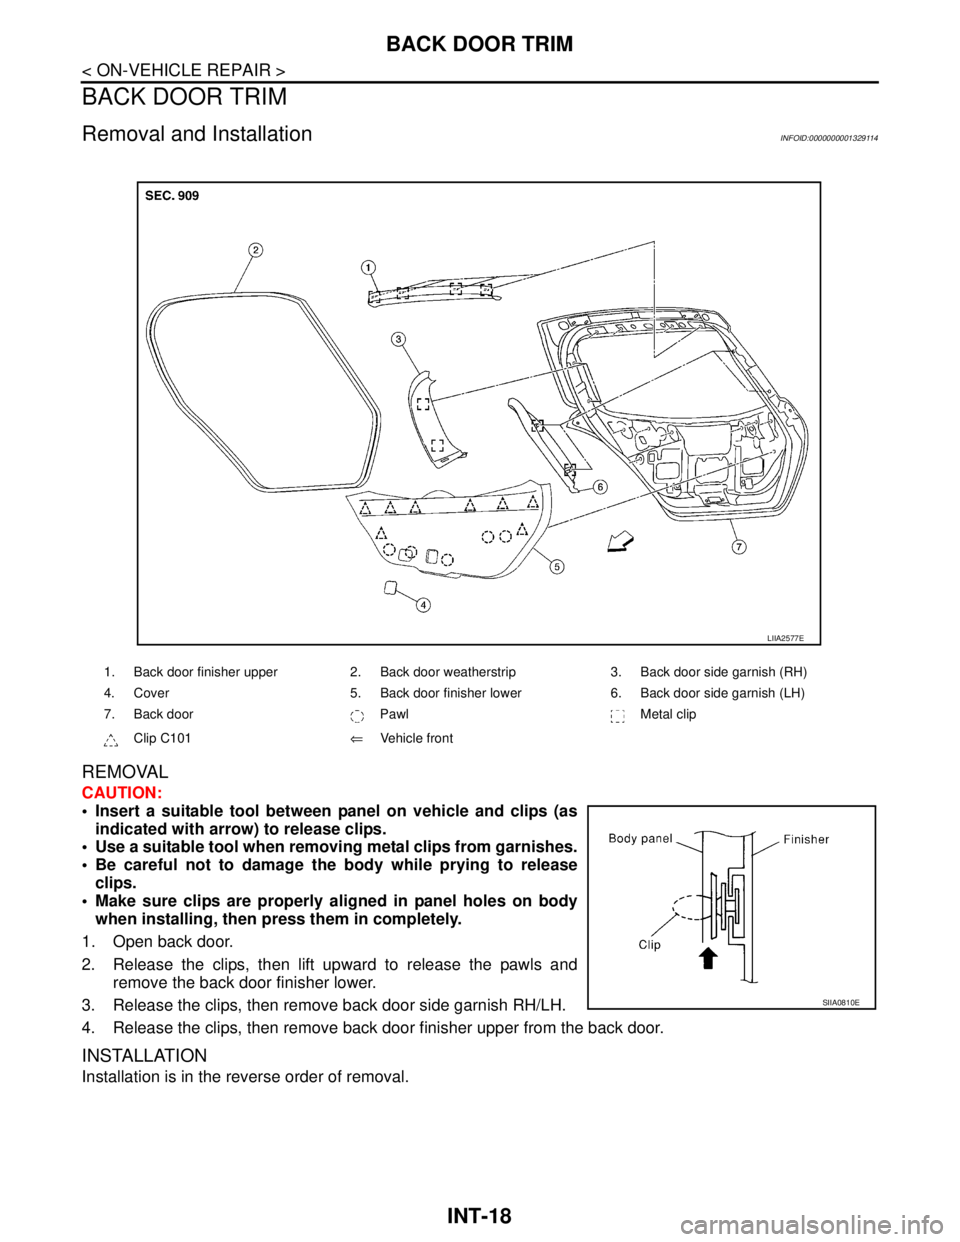
Insert a suitable tool between panel on vehicle and clips (as
indicated with arrow) to release clips.
Use a suitable tool when removing metal clips from garnishes.
Be careful not to damage the body while prying to release
clips.
Make sure clips are properly aligned in panel holes on body
when installing, then press them in completely.
1. Open back door.
2. Release the clips, then lift upward to release the pawls and
remove the back door finisher lower.
3. Release the clips, then remove back door side garnish RH/LH.
4. Release the clips, then remove back door finisher upper from the back door.
INSTALLATION
Installation is in the reverse order of removal.
1. Back door finisher upper 2. Back door weatherstrip 3. Back door side garnish (RH)
4. Cover 5. Back door finisher lower 6. Back door side garnish (LH)
7. Back door Pawl Metal clip
Clip C101⇐Vehicle front
LIIA2577E
SIIA0810E