2007 MITSUBISHI LANCER EVOLUTION rear
[x] Cancel search: rearPage 820 of 1449
MANUAL TRANSMISSION - Troubleshooting
OK OK NG
OK NG
OK OK
OK
NG
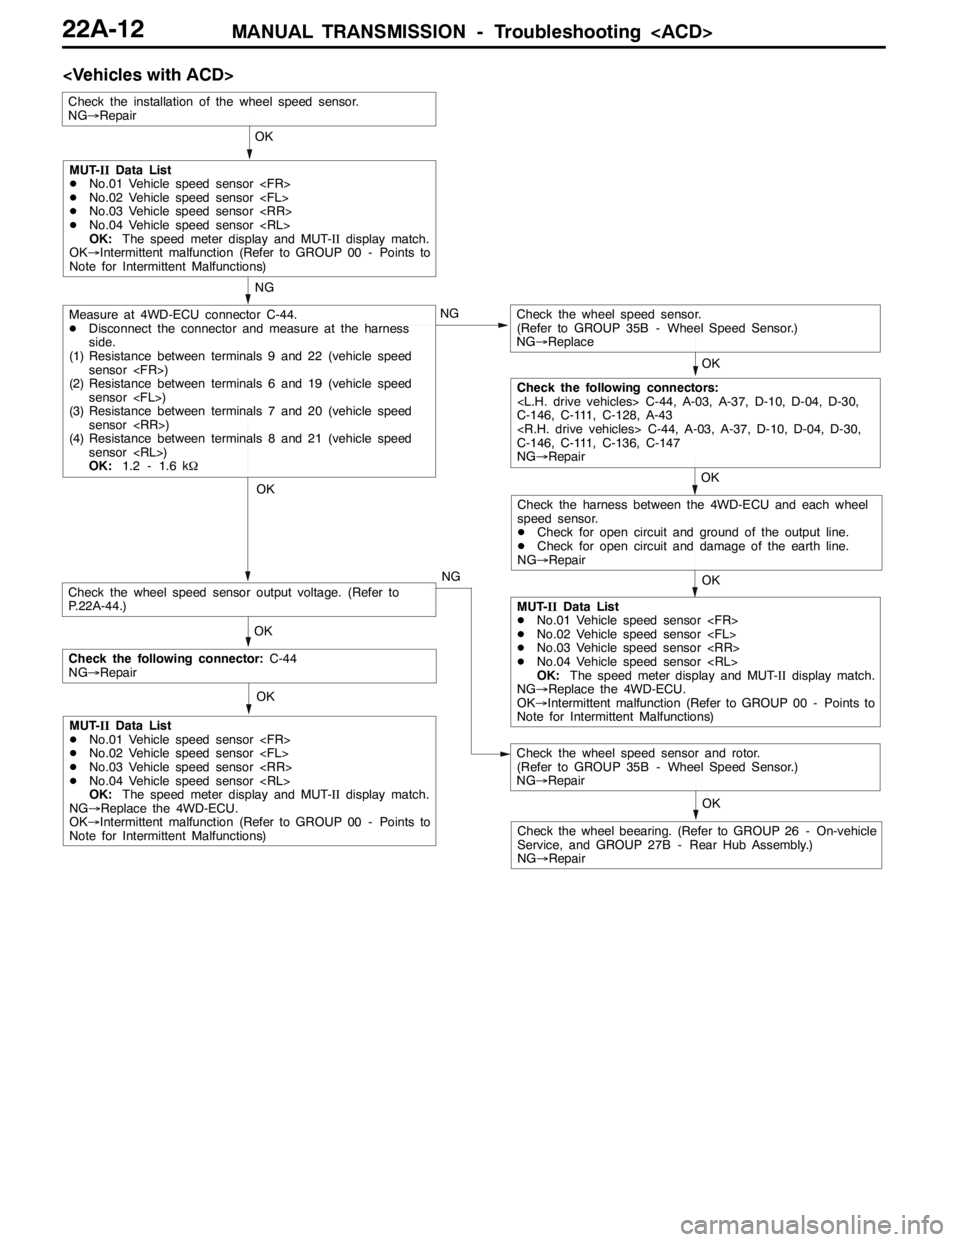
Measure at 4WD-ECU connector C-44.
DDisconnect the connector and measure at the harness
side.
(1) Resistance between terminals 9 and 22 (vehicle speed
sensor
(2) Resistance between terminals 6 and 19 (vehicle speed
sensor
(3) Resistance between terminals 7 and 20 (vehicle speed
sensor
(4) Resistance between terminals 8 and 21 (vehicle speed
sensor
OK:1.2 - 1.6 kΩCheck the wheel speed sensor.
(Refer to GROUP 35B - Wheel Speed Sensor.)
NG→Replace
Check the installation of the wheel speed sensor.
NG→Repair
Check the wheel speed sensor and rotor.
(Refer to GROUP 35B - Wheel Speed Sensor.)
NG→Repair
Check the wheel beearing. (Refer to GROUP 26 - On-vehicle
Service, and GROUP 27B - Rear Hub Assembly.)
NG→RepairOK
MUT-IIData List
DNo.01 Vehicle speed sensor
DNo.02 Vehicle speed sensor
DNo.03 Vehicle speed sensor
DNo.04 Vehicle speed sensor
OK:The speed meter display and MUT-IIdisplay match.
OK→Intermittent malfunction (Refer to GROUP 00 - Points to
Note for Intermittent Malfunctions)
Check the following connectors:
C-146, C-111, C-128, A-43
C-146, C-111, C-136, C-147
NG→Repair
Check the harness between the 4WD-ECU and each wheel
speed sensor.
DCheck for open circuit and ground of the output line.
DCheck for open circuit and damage of the earth line.
NG→Repair
MUT-IIData List
DNo.01 Vehicle speed sensor
DNo.02 Vehicle speed sensor
DNo.03 Vehicle speed sensor
DNo.04 Vehicle speed sensor
OK:The speed meter display and MUT-IIdisplay match.
NG→Replace the 4WD-ECU.
OK→Intermittent malfunction (Refer to GROUP 00 - Points to
Note for Intermittent Malfunctions) OK
Check the following connector:C-44
NG→Repair
MUT-IIData List
DNo.01 Vehicle speed sensor
DNo.02 Vehicle speed sensor
DNo.03 Vehicle speed sensor
DNo.04 Vehicle speed sensor
OK:The speed meter display and MUT-IIdisplay match.
NG→Replace the 4WD-ECU.
OK→Intermittent malfunction (Refer to GROUP 00 - Points to
Note for Intermittent Malfunctions)
Check the wheel speed sensor output voltage. (Refer to
P.22A-44.)
Page 821 of 1449
MANUAL TRANSMISSION - Troubleshooting
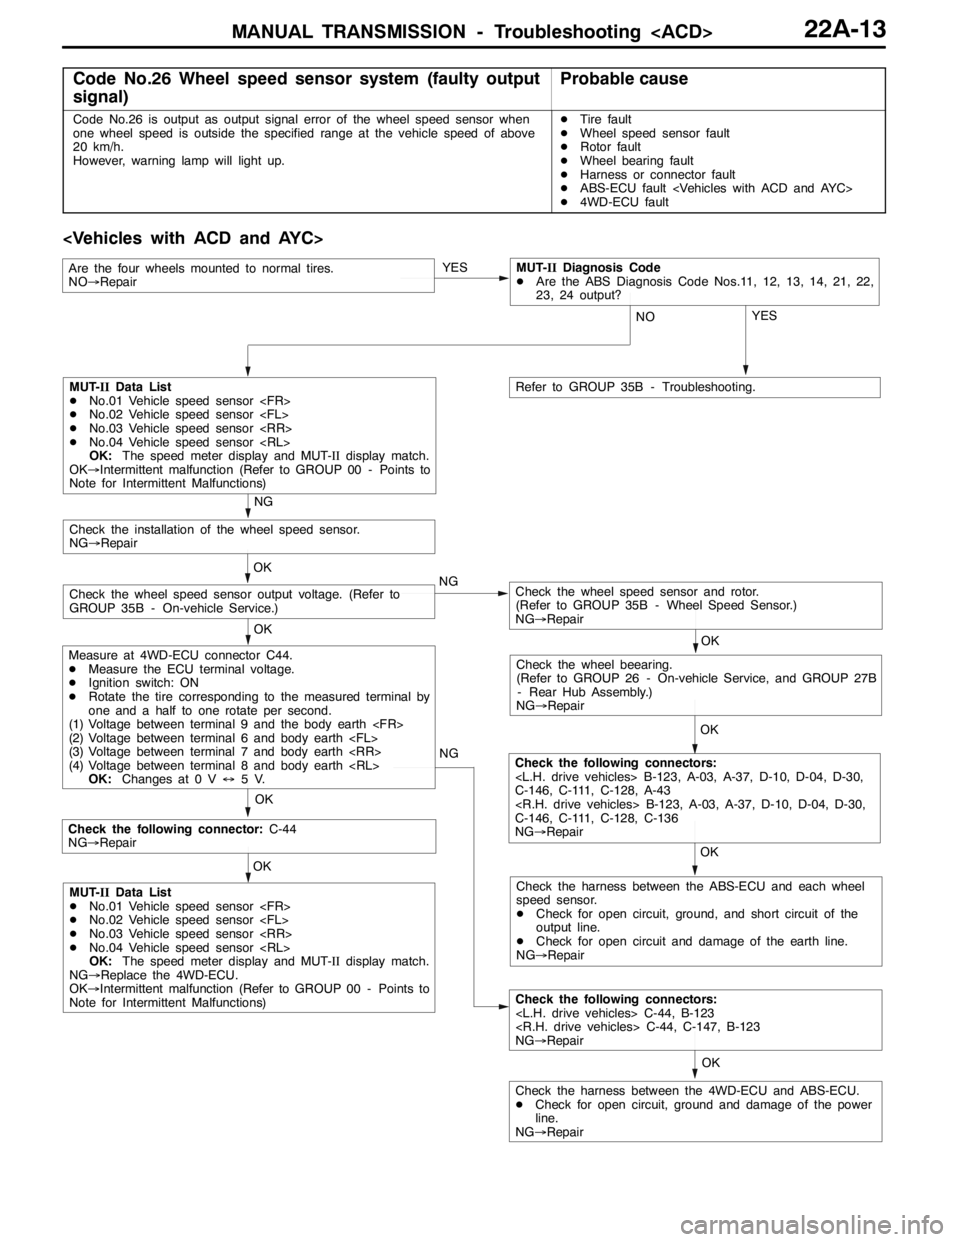
Code No.26 Wheel speed sensor system (faulty output
signal)Probable cause
Code No.26 is output as output signal error of the wheel speed sensor when
one wheel speed is outside the specified range at the vehicle speed of above
20 km/h.
However, warning lamp will light up.DTire fault
DWheel speed sensor fault
DRotor fault
DWheel bearing fault
DHarness or connector fault
DABS-ECU fault
D4WD-ECU fault
OK NG
OK
Check the following connector:C-44
NG→Repair
Check the following connectors:
NG→Repair OK
Check the harness between the 4WD-ECU and ABS-ECU.
DCheck for open circuit, ground and damage of the power
line.
NG→RepairYES
OK OK
Check the wheel speed sensor and rotor.
(Refer to GROUP 35B - Wheel Speed Sensor.)
NG→RepairCheck the wheel speed sensor output voltage. (Refer to
GROUP 35B - On-vehicle Service.)OK
Check the installation of the wheel speed sensor.
NG→Repair
NG
OK
Check the wheel beearing.
(Refer to GROUP 26 - On-vehicle Service, and GROUP 27B
- Rear Hub Assembly.)
NG→Repair
OK
Check the following connectors:
C-146, C-111, C-128, A-43
C-146, C-111, C-128, C-136
NG→Repair NG
MUT-IIData List
DNo.01 Vehicle speed sensor
DNo.02 Vehicle speed sensor
DNo.03 Vehicle speed sensor
DNo.04 Vehicle speed sensor
OK:The speed meter display and MUT-IIdisplay match.
OK→Intermittent malfunction (Refer to GROUP 00 - Points to
Note for Intermittent Malfunctions)
Measure at 4WD-ECU connector C44.
DMeasure the ECU terminal voltage.
DIgnition switch: ON
DRotate the tire corresponding to the measured terminal by
one and a half to one rotate per second.
(1) Voltage between terminal 9 and the body earth
(2) Voltage between terminal 6 and body earth
(3) Voltage between terminal 7 and body earth
(4) Voltage between terminal 8 and body earth
OK:Changes at 0 V↔5V.
MUT-IIData List
DNo.01 Vehicle speed sensor
DNo.02 Vehicle speed sensor
DNo.03 Vehicle speed sensor
DNo.04 Vehicle speed sensor
OK:The speed meter display and MUT-IIdisplay match.
NG→Replace the 4WD-ECU.
OK→Intermittent malfunction (Refer to GROUP 00 - Points to
Note for Intermittent Malfunctions)Check the harness between the ABS-ECU and each wheel
speed sensor.
DCheck for open circuit, ground, and short circuit of the
output line.
DCheck for open circuit and damage of the earth line.
NG→Repair YES
NO
Refer to GROUP 35B - Troubleshooting.
Are the four wheels mounted to normal tires.
NO→RepairMUT-IIDiagnosis Code
DAre the ABS Diagnosis Code Nos.11, 12, 13, 14, 21, 22,
23, 24 output?
Page 822 of 1449
MANUAL TRANSMISSION - Troubleshooting
OK OK NG
OK NG
OK OK
OK
NG
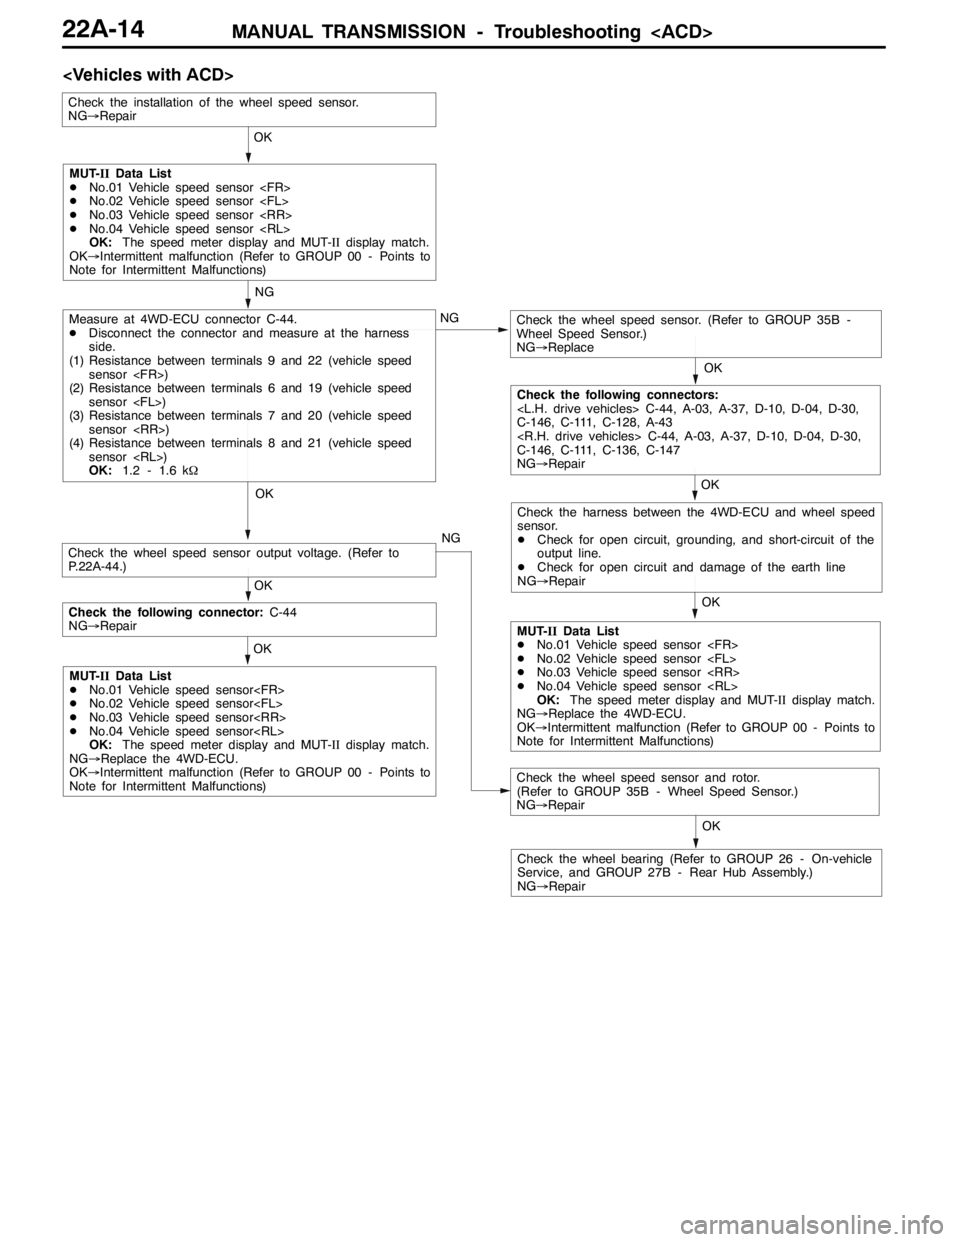
Measure at 4WD-ECU connector C-44.
DDisconnect the connector and measure at the harness
side.
(1) Resistance between terminals 9 and 22 (vehicle speed
sensor
(2) Resistance between terminals 6 and 19 (vehicle speed
sensor
(3) Resistance between terminals 7 and 20 (vehicle speed
sensor
(4) Resistance between terminals 8 and 21 (vehicle speed
sensor
OK:1.2 - 1.6 kΩCheck the wheel speed sensor. (Refer to GROUP 35B -
Wheel Speed Sensor.)
NG→Replace
Check the installation of the wheel speed sensor.
NG→Repair
Check the wheel speed sensor and rotor.
(Refer to GROUP 35B - Wheel Speed Sensor.)
NG→Repair
Check the wheel bearing (Refer to GROUP 26 - On-vehicle
Service, and GROUP 27B - Rear Hub Assembly.)
NG→RepairOK
MUT-IIData List
DNo.01 Vehicle speed sensor
DNo.02 Vehicle speed sensor
DNo.03 Vehicle speed sensor
DNo.04 Vehicle speed sensor
OK:The speed meter display and MUT-IIdisplay match.
OK→Intermittent malfunction (Refer to GROUP 00 - Points to
Note for Intermittent Malfunctions)
Check the following connectors:
C-146, C-111, C-128, A-43
C-146, C-111, C-136, C-147
NG→Repair
Check the harness between the 4WD-ECU and wheel speed
sensor.
DCheck for open circuit, grounding, and short-circuit of the
output line.
DCheck for open circuit and damage of the earth line
NG→Repair
MUT-IIData List
DNo.01 Vehicle speed sensor
DNo.02 Vehicle speed sensor
DNo.03 Vehicle speed sensor
DNo.04 Vehicle speed sensor
OK:The speed meter display and MUT-IIdisplay match.
NG→Replace the 4WD-ECU.
OK→Intermittent malfunction (Refer to GROUP 00 - Points to
Note for Intermittent Malfunctions) OK
Check the following connector:C-44
NG→Repair
MUT-IIData List
DNo.01 Vehicle speed sensor
DNo.02 Vehicle speed sensor
DNo.03 Vehicle speed sensor
DNo.04 Vehicle speed sensor
OK:The speed meter display and MUT-IIdisplay match.
NG→Replace the 4WD-ECU.
OK→Intermittent malfunction (Refer to GROUP 00 - Points to
Note for Intermittent Malfunctions)
Check the wheel speed sensor output voltage. (Refer to
P.22A-44.)
Page 839 of 1449
MANUAL TRANSMISSION - Troubleshooting
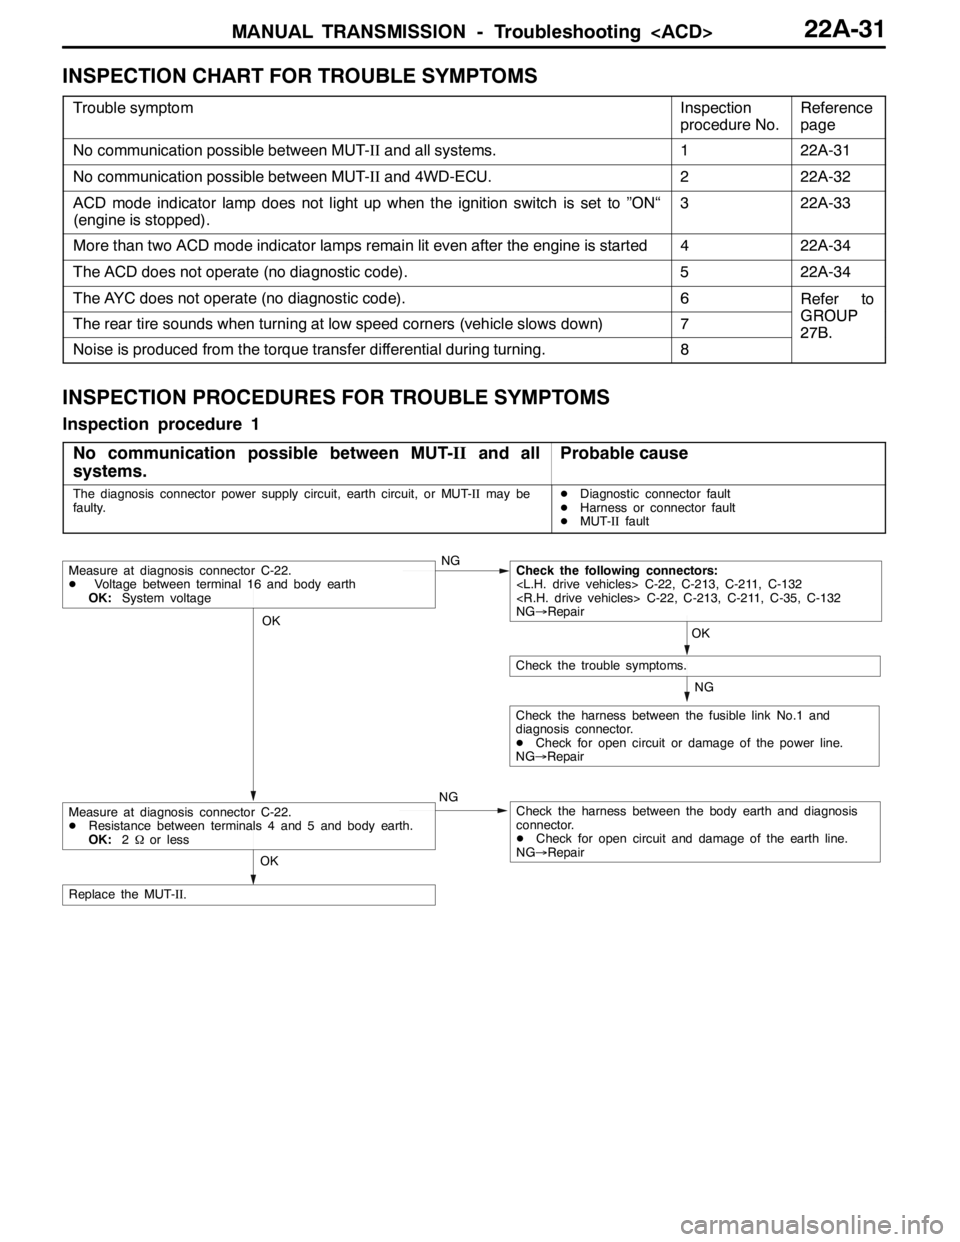
INSPECTION CHART FOR TROUBLE SYMPTOMS
Trouble symptomInspection
procedure No.Reference
page
No communication possible between MUT-IIand all systems.122A-31
No communication possible between MUT-IIand 4WD-ECU.222A-32
ACD mode indicator lamp does not light up when the ignition switch is set to ”ON“
(engine is stopped).322A-33
More than two ACD mode indicator lamps remain lit even after the engine is started422A-34
The ACD does not operate (no diagnostic code).522A-34
The AYC does not operate (no diagnostic code).6Refer to
GROUPThe rear tire sounds when turning at low speed corners (vehicle slows down)7GROUP
27B.
Noise is produced from the torque transfer differential during turning.8
27B.
INSPECTION PROCEDURES FOR TROUBLE SYMPTOMS
Inspection procedure 1
No communication possible between MUT-IIand all
systems.
Probable cause
The diagnosis connector power supply circuit, earth circuit, or MUT-IImay be
faulty.DDiagnostic connector fault
DHarness or connector fault
DMUT-IIfault
OK
NG
NG
Check the harness between the fusible link No.1 and
diagnosis connector.
DCheck for open circuit or damage of the power line.
NG→Repair
OK
Check the trouble symptoms.
Measure at diagnosis connector C-22.
DVoltage between terminal 16 and body earth
OK:System voltageNGCheck the following connectors:
NG→Repair
Check the harness between the body earth and diagnosis
connector.
DCheck for open circuit and damage of the earth line.
NG→Repair
OK
Replace the MUT-II.
Measure at diagnosis connector C-22.
DResistance between terminals 4 and 5 and body earth.
OK:2Ωor less
Page 845 of 1449

MANUAL TRANSMISSION - Troubleshooting
ACTUATOR TEST JUDGEMENT VALUE
Item
no.Check itemTest descriptionNormal state
01Bleeding
according to the steering angle, and operate
the Proportional valve for five minutes.Make sure no air leaks from the bleeder
screw on the transfer.
02Bleeding
according to the steering angle, and operate
the directional valve for five minutes.Make sure no air leaks from the bleeder
screw on the torque transfer differential.
03Check the oil vol-
umeOperate the directional valve to the left and
right for 20 seconds.Check that the oil volume of the reservoir
tank is appropriate.
04Electric pump
driveOperate the electric pump for 5 seconds.Operation sounds of the electric pump
can be heard.
05Check the opera-
tions of the ACDOperate the Proportional valve
supply the maximum oil pressure to the multi
plate clutch.9Generate the tight corner braking
phenomenon.
06Check clutch op-
erations
maximum oil pressure to the left clutch.When the wheels are lifted, speed
difference will occur between the rear
left and right wheels.
07Check clutch op-
erations
maximum oil pressure to the right clutch.When the wheels are lifted, speed
difference will occur between the rear
left and right wheels.
08Control OFFTurn OFF the electric pump relay, and turn
OFF the control of the ACD and AYC.In actual driving, there is difference
between control ON and OFF.
(1) The actuator test can be executed only when all the following conditions are satisfied.
DAll wheel speed sensor inputs below 20 km/h
DNo system malfunction detected
DSteering angle is within±30 degrees from the neutral position
(2) When the actuator test corresponds to one of the following conditions, forced driving will be cleared.
DWhen any one of the wheel speed sensor input is detected to be above 20 km/h (excluding
Item No.08 “Control OFF”.)
DWhen system malfunction is detected (excluding diagnostic code No.82, 84, and 85)
DWhen the forced drive time is exceeded
DWhen the MUT-IIis removed
DWhen the Clear key of the MUT-IIis operated
Page 851 of 1449

MANUAL TRANSMISSION - On-vehicle Service22A-43
4. Set the gear to the 2nd gear or above, operate the MUT-II,
and check from the service data (Item No.09) that the
wheel speed is within 10 km/h to 20 km/h.
NOTE
(1) Set the steering wheel to the neutral position
(2) The ACD may continue operating (operation sounds
can be heard) when the steering wheel is steered,
this is not a system fault. In this case, set the steering
wheel to the neutral position, and perform the following
operations to stop the ACD.
DRelease the clutch.
DSet the gear to “N”.
DStop the engine
5. Perform the MUT-IIactuator test (Item No.05), and forcibly
drive the transfer.
NOTE
(1) The actuator test (Item No. 05: ACD Operation Check
Mode) is performed for 1 minute, after which it will
be cleared automatically. Drive can also be cleared
during forced driving using the clear key of the MUT-II.
(2) If the hydraulic unit function has been stopped by
fail-safe, the transfer cannot be forcibly driven.
6. Check that the front and rear wheel speeds satisfy the
following in the MUT-IIactuator test (Item No.05).
The front wheel will be faster than the back wheels by
more than 2 km/h.
NOTE
If the above are not satisfied, check the oil pressure as
the system may be faulty.
HYDRAULIC PRESSURE CHECK
1. Lift up the vehicle.
2. Set the MUT-IIto the 16-pin diagnosis connector.
Caution
Turn the ignition switch to the “LOCK”(OFF) position
before connecting or disconnecting the MUT-II.
3. Disconnect the hydraulic unit and transfer connector
assembly, and connect the special tool to the hydraulic
unit.
4. Turn the ignition switch to “ON”.
5. Perform the MUT-IIactuator test (Item No.05), and forcibly
drive the hydraulic unit.
NOTE
(1) The actuator test (Item No. 05 ACD Operation Check
Mode) is performed for 1 minute, after which it will
be cleared automatically. Drive can also be cleared
during forced driving using the clear key of the MUT-II.
MD998330
MB991705
Page 852 of 1449

MANUAL TRANSMISSION - On-vehicle Service22A-44
(2) If the hydraulic unit function has been stopped by
fail-safe, the hydraulic unit cannot be forcibly driven.
6. Check that the generated oil pressure of the hydraulic
unit satisfies the standard value.
Standard value: 1.0 – 1.6 MPa
Caution
While the oil pressure is checked, add fluid as
necessary to ensure that it is left in the oil reservoir
during the entire procedure.
7. If the measured value exceeds the standard value, replace
the hydraulic unit.
8. Connect the hydraulic unit and transfer connector
assembly, and tighten the flare nut at the specified torque.
Tightening torque: 34±5 N·m (when screw is dry)
26±4 N·m (when screw is applied with oil)
9. Supply the specified fluid up to the MAX level of the
oil reservoir, and bleed the oil pressure pipes.
Specified fluid: DIA QUEEN ATF SP III
Quantity:
0.9 dm
3
1.0 dm3
WHEEL SPEED SENSOR OUTPUT VOLTAGE
MEASUREMENT
1. Lift the vehicle, and release the parking brake.
2. Disconnect the 4WD-ECU connector, and measure at
the connector of the harness.
Caution
Insert the probe from the harness of the connector.
Inserting in the terminal side may cause contact fault.
3. Rotate the measured wheel by about 1/2 to 1
rotations/second, and check the output voltage between
the following terminals using a circuit tester (AC mV range)
or oscilloscope.
Terminal No.
Front leftFront rightRear leftRear right
6987
19222120
Page 853 of 1449
MANUAL TRANSMISSION - On-vehicle Service22A-45
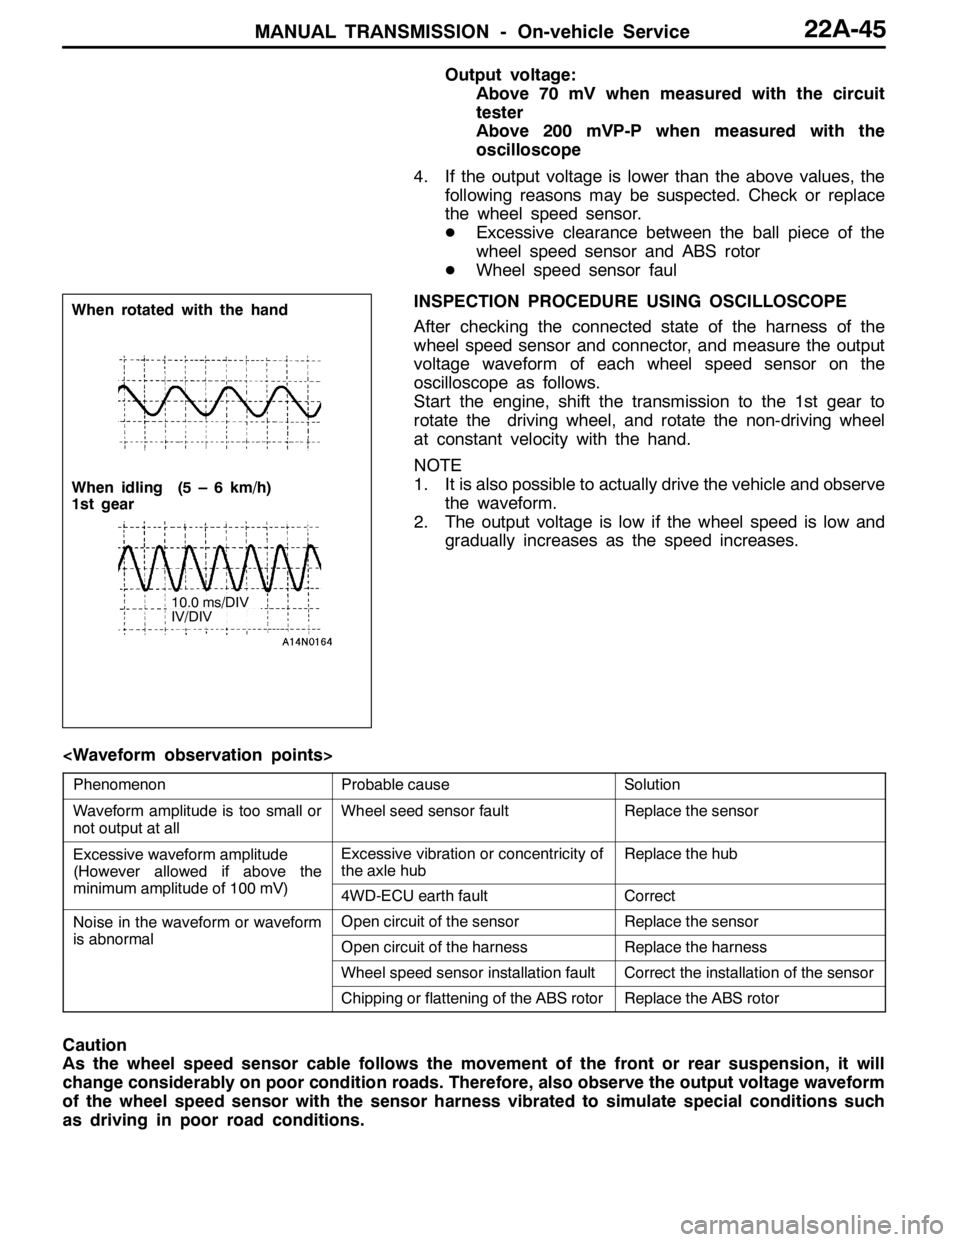
Output voltage:
Above 70 mV when measured with the circuit
tester
Above 200 mVP-P when measured with the
oscilloscope
4. If the output voltage is lower than the above values, the
following reasons may be suspected. Check or replace
the wheel speed sensor.
DExcessive clearance between the ball piece of the
wheel speed sensor and ABS rotor
DWheel speed sensor faul
INSPECTION PROCEDURE USING OSCILLOSCOPE
After checking the connected state of the harness of the
wheel speed sensor and connector, and measure the output
voltage waveform of each wheel speed sensor on the
oscilloscope as follows.
Start the engine, shift the transmission to the 1st gear to
rotate the driving wheel, and rotate the non-driving wheel
at constant velocity with the hand.
NOTE
1. It is also possible to actually drive the vehicle and observe
the waveform.
2. The output voltage is low if the wheel speed is low and
gradually increases as the speed increases.
PhenomenonProbable causeSolution
Waveform amplitude is too small or
not output at allWheel seed sensor faultReplace the sensor
Excessive waveform amplitude
(However allowed if above the
iilit df100V)
Excessive vibration or concentricity of
the axle hubReplace the hub
(
minimum amplitude of 100 mV)4WD-ECU earth faultCorrect
Noise in the waveform or waveform
ibl
Open circuit of the sensorReplace the sensor
is abnormalOpen circuit of the harnessReplace the harness
Wheel speed sensor installation faultCorrect the installation of the sensor
Chipping or flattening of the ABS rotorReplace the ABS rotor
Caution
As the wheel speed sensor cable follows the movement of the front or rear suspension, it will
change considerably on poor condition roads. Therefore, also observe the output voltage waveform
of the wheel speed sensor with the sensor harness vibrated to simulate special conditions such
as driving in poor road conditions.
When rotated with the hand
When idling (5 – 6 km/h)
1st gear
10.0 ms/DIV
IV/DIV