2007 INFINITI QX56 fuse box
[x] Cancel search: fuse boxPage 2301 of 3061

LT-94
< SERVICE INFORMATION >
TRAILER TOW
TRAILER TOW
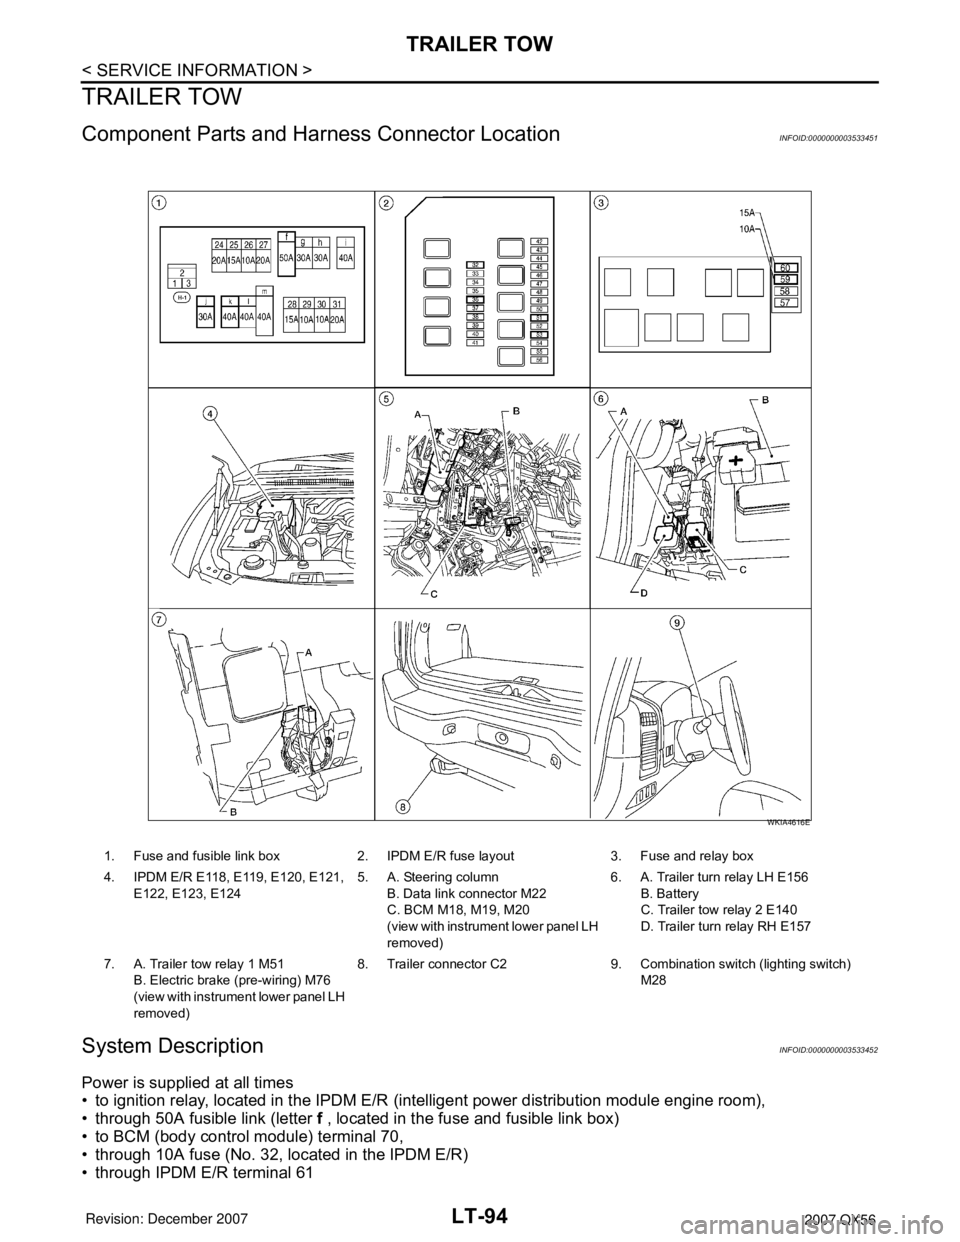
Component Parts and Harness Connector LocationINFOID:0000000003533451
System DescriptionINFOID:0000000003533452
Power is supplied at all times
• to ignition relay, located in the IPDM E/R (intelligent power distribution module engine room),
• through 50A fusible link (letter f , located in the fuse and fusible link box)
• to BCM (body control module) terminal 70,
• through 10A fuse (No. 32, located in the IPDM E/R)
• through IPDM E/R terminal 61
1. Fuse and fusible link box 2. IPDM E/R fuse layout 3. Fuse and relay box
4. IPDM E/R E118, E119, E120, E121,
E122, E123, E1245. A. Steering column
B. Data link connector M22
C. BCM M18, M19, M20
(view with instrument lower panel LH
removed)6. A. Trailer turn relay LH E156
B. Battery
C. Trailer tow relay 2 E140
D. Trailer turn relay RH E157
7. A. Trailer tow relay 1 M51
B. Electric brake (pre-wiring) M76
(view with instrument lower panel LH
removed)8. Trailer connector C2 9. Combination switch (lighting switch)
M28
WKIA4616E
Page 2302 of 3061

TRAILER TOW
LT-95
< SERVICE INFORMATION >
C
D
E
F
G
H
I
J
L
MA
B
LT
N
O
P
• to trailer tow relay 1 terminal 3,
• through 20A fuse (No. 53, located in the IPDM E/R)
• to CPU (central processing unit) of the IPDM E/R,
• through 30A fusible link (letter j , located in the fuse and fusible link box)
• to trailer tow relay 2 terminals 3 and 6, and
• through 40A fusible link (letter k , located in the fuse and fusible link box)
• to electric brake (pre-wiring) terminal 5.
With the ignition switch in the ON or START position, power is supplied
• to ignition relay, located in the IPDM E/R,
• through 10A fuse (No. 59, located in the fuse and relay box)
• to BCM terminal 38, and
• through 10A fuse (No. 51, located in the IPDM E/R)
• to trailer tow relay 2 terminal 1.
Ground is supplied
• to BCM terminal 67
• to electric brake (pre-wiring) terminal 1,
• through grounds M57, M61 and M79,
• to IPDM E/R terminals 38 and 59
• to trailer tow relay 1 terminal 2
• to trailer tow relay 2 terminal 2, and
• to trailer connector terminal 2
• to trailer turn relay LH and RH terminal 2
• through grounds E9, E15 and E24.
TRAILER TAIL LAMP OPERATION
The trailer tail lamps are controlled by the trailer tow relay 1.
With the lighting switch in the parking and tail lamp ON (1ST) position, AUTO position (and the auto light sys-
tem is activated) or headlamp ON (2ND) position, power is supplied
• through the tail lamp relay, located in the IPDM E/R
• through 10A fuse (No. 36, located in the IPDM E/R)
• through IPDM E/R terminal 49
• to trailer tow relay 1 terminal 1.
When energized, trailer tow relay 1 supplies tail lamp power to trailer connector terminal 6.
TRAILER TURN SIGNAL AND HAZARD LAMP OPERATION
The trailer turn signal and hazard lamps are controlled by the BCM through trailer turn relays (LH and RH). If
either turn signal or the hazard lamps are turned on, the BCM supplies voltage to the trailer turn relays (LH
and RH) to make them cycle on and off.
Trailer turn relay LH output is supplied
• through BCM terminal 52
• to trailer turn relay LH terminal 1.
Trailer turn relay RH output is supplied
• through BCM terminal 51
• to trailer turn relay RH terminal 1.
Left turn signal and hazard lamp output is supplied
• through trailer turn relay LH terminal 3
• to trailer connector terminal 1.
Right turn signal and hazard lamp output is supplied
• through trailer turn relay RH terminal 3
• to trailer connector terminal 4.
TRAILER STOP LAMP OPERATION
The trailer stop lamps are controlled by the electric brake. The electric brake receives stop lamp switch signal
when the brake pedal is pressed.
When the brake pedal is pressed, power is supplied
• through electric brake (pre-wiring) terminal 3
• to trailer connector terminal 3.
TRAILER POWER SUPPLY OPERATION
The trailer power supply is controlled by the trailer tow relay 2.
When the ignition switch is in the ON or START position, power is supplied
• through 10A fuse (No. 51, located in the IPDM E/R)
Page 2309 of 3061

LT-102
< SERVICE INFORMATION >
INTERIOR ROOM LAMP
switch LH, unlock signal from keyfob, door lock and unlock switch, front door lock assembly LH (key cylinder
switch), ignition switch, and glass hatch ajar switch.
When room lamp and personal lamp turns ON, there is a gradual brightening over 1 second. When room lamp
and personal lamp turns OFF, there is a gradual dimming over 1 second.
The room lamp and personal lamp timer is controlled by the BCM (body control module).
Room lamp and personal lamp timer control settings can be changed with CONSULT-II.
Ignition keyhole illumination turns ON when front door LH is opened (door switch ON) or key is removed from
key cylinder. Illumination turns OFF when front door LH is closed (door switch OFF).
Step and foot lamps turn ON when front or rear doors are opened (door switch ON). Lamps turn OFF when
front and rear doors are closed (all door switches OFF).
POWER SUPPLY AND GROUND
Power is supplied at all times
• through 10A fuse [No. 19, located in the fuse block (J/B)]
• to key switch and key lock solenoid terminal 3,
• through 15A fuse [No. 22, located in the fuse block (J/B)]
• to BCM terminal 57, and
• through 50A fusible link (letter f , located in the fuse and fusible link box)
• to BCM terminal 70.
When the key is inserted in key switch and key lock solenoid, power is supplied
• through the key switch and key lock solenoid terminal 4
• to BCM terminal 37.
With the ignition switch in the ON or START position, power is supplied
• through 10A fuse (No. 59, located in the fuse and relay box)
• to BCM terminal 38.
Ground is supplied
• to BCM terminal 67
• through grounds M57, M61 and M79.
When the front door LH is opened, ground is supplied
• to BCM terminal 47
• through case ground of front door switch LH.
When the front door RH is opened, ground is supplied
• to BCM terminal 12
• through case ground of front door switch RH.
When the rear door LH is opened, ground is supplied
• to BCM terminal 48
• through case ground of rear door switch LH.
When the rear door RH is opened, ground is supplied
• to BCM terminal 13
• through case ground of rear door switch RH.
When the liftgate is opened, ground is supplied
• to BCM terminal 43
• through back door latch (door ajar switch) terminal 7
• through back door latch (door ajar switch) terminal 8
• through grounds B7 and B19.
When the glass hatch is opened, ground is supplied
• to BCM terminal 42
• through case ground of glass hatch ajar switch.
When the front door LH or front door RH door is unlocked by the door lock and unlock switch, BCM receives
serial data
• to BCM terminal 22
• through main power window and door lock/unlock switch terminal 14 or power window and door lock/unlock
switch RH terminal 16
• through main power window and door lock/unlock switch terminal 17 or power window and door lock/unlock
switch RH terminal 11
• through grounds M57, M61 and M79.
When the front door LH is unlocked by the key, the BCM receives serial data
• to BCM terminal 22
• through main power window and door lock/unlock switch terminal 14
• through main power window and door lock/unlock switch terminal 6
• through front door lock assembly LH (key cylinder switch) terminal 6
• through front door lock assembly LH (key cylinder switch) terminal 5
Page 2327 of 3061

LT-120
< SERVICE INFORMATION >
ILLUMINATION
ILLUMINATION
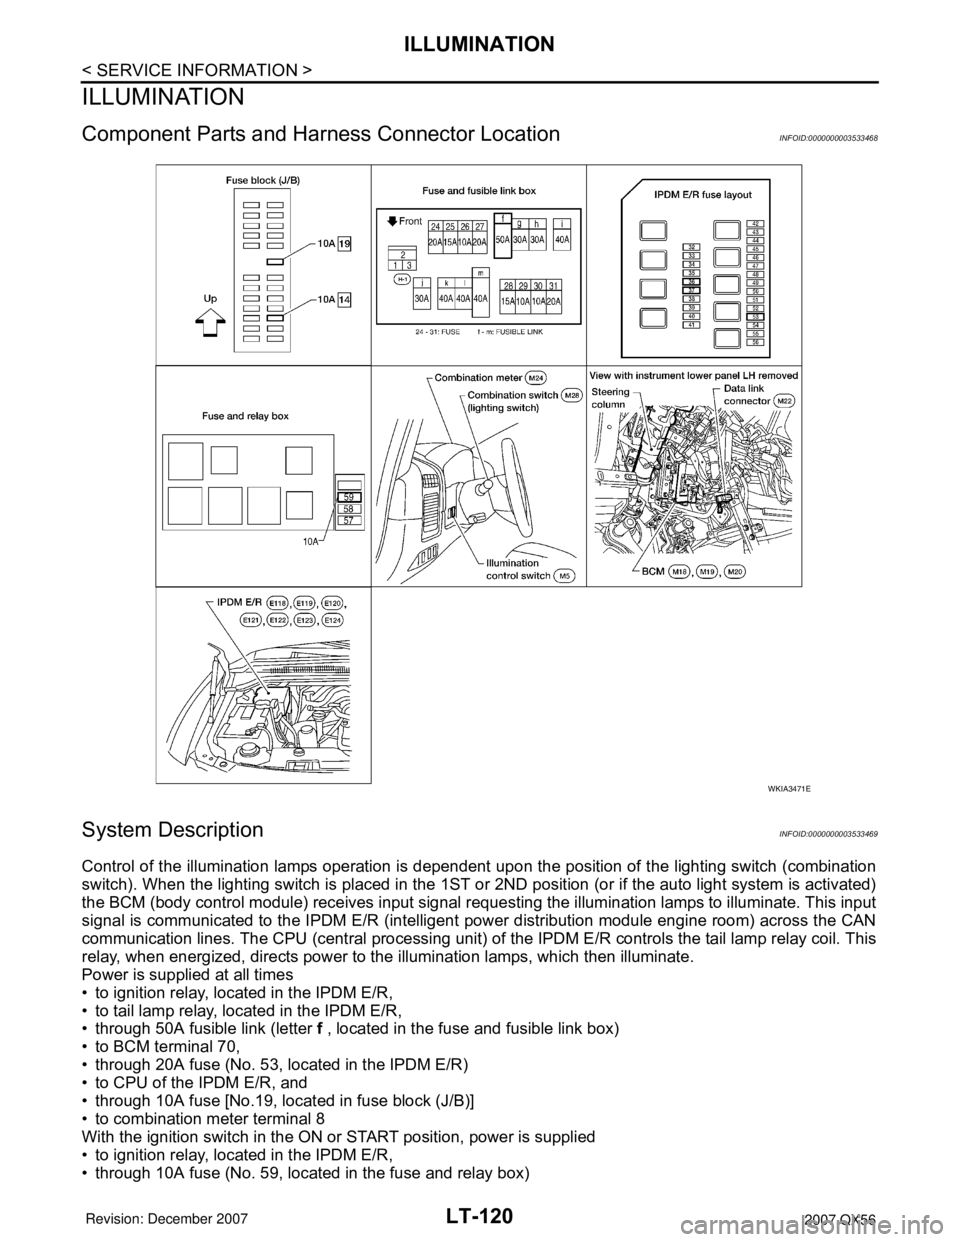
Component Parts and Harness Connector LocationINFOID:0000000003533468
System DescriptionINFOID:0000000003533469
Control of the illumination lamps operation is dependent upon the position of the lighting switch (combination
switch). When the lighting switch is placed in the 1ST or 2ND position (or if the auto light system is activated)
the BCM (body control module) receives input signal requesting the illumination lamps to illuminate. This input
signal is communicated to the IPDM E/R (intelligent power distribution module engine room) across the CAN
communication lines. The CPU (central processing unit) of the IPDM E/R controls the tail lamp relay coil. This
relay, when energized, directs power to the illumination lamps, which then illuminate.
Power is supplied at all times
• to ignition relay, located in the IPDM E/R,
• to tail lamp relay, located in the IPDM E/R,
• through 50A fusible link (letter f , located in the fuse and fusible link box)
• to BCM terminal 70,
• through 20A fuse (No. 53, located in the IPDM E/R)
• to CPU of the IPDM E/R, and
• through 10A fuse [No.19, located in fuse block (J/B)]
• to combination meter terminal 8
With the ignition switch in the ON or START position, power is supplied
• to ignition relay, located in the IPDM E/R,
• through 10A fuse (No. 59, located in the fuse and relay box)
WKIA3471E
Page 2328 of 3061
![INFINITI QX56 2007 Factory Service Manual ILLUMINATION
LT-121
< SERVICE INFORMATION >
C
D
E
F
G
H
I
J
L
MA
B
LT
N
O
P
• to BCM terminal 38, and
• through 10A fuse [No. 14, located in the fuse block (J/B)]
• to combination meter terminal INFINITI QX56 2007 Factory Service Manual ILLUMINATION
LT-121
< SERVICE INFORMATION >
C
D
E
F
G
H
I
J
L
MA
B
LT
N
O
P
• to BCM terminal 38, and
• through 10A fuse [No. 14, located in the fuse block (J/B)]
• to combination meter terminal](/manual-img/42/57029/w960_57029-2327.png)
ILLUMINATION
LT-121
< SERVICE INFORMATION >
C
D
E
F
G
H
I
J
L
MA
B
LT
N
O
P
• to BCM terminal 38, and
• through 10A fuse [No. 14, located in the fuse block (J/B)]
• to combination meter terminal 24.
Ground is supplied
• to BCM terminal 67
• to combination meter terminal 17
• through grounds M57, M61 and M79, and
• to IPDM E/R terminals 38 and 59
• through grounds E9, E15 and E24.
ILLUMINATION OPERATION BY LIGHTING SWITCH
With the lighting switch in the 1ST or 2ND position (or if the auto light system is activated), the BCM receives
input signal requesting the illumination lamps to illuminate. This input signal is communicated to the IPDM E/R
across the CAN communication lines. The CPU of the IPDM E/R controls the tail lamp relay coil, which, when
energized, directs power
• through 10A fuse (No. 36, located in the IPDM E/R)
• through IPDM E/R terminal 49
• to illumination control switch terminal 1
• to power liftgate switch terminal 3
• to front room/map lamp assembly (console box illumination) terminal 7
• to hazard switch terminal 3
• to rear sonar system OFF switch terminal 3
• to glove box lamp terminal 1
• to door mirror remote control switch terminal 16
• to display control unit terminal 14
• to power window and door lock/unlock switch RH terminal 5 (early production)
• to main power window and door lock/unlock switch LH terminal 16 (early production)
• to 4WD shift switch terminal 7 (with 4-wheel drive)
• to front air control terminal 23
• to rear power vent window switch terminal 5
• to DVD player terminal 12 (with DVD entertainment system)
• to NAVI control unit terminal 61
• to pedal adjusting switch terminal 5
• to electric brake (pre-wiring) terminal 4 (with trailer tow)
• to front and rear heated seat switch LH and RH terminal 5
• to A/T device terminal 11
• to VDC OFF switch terminal 3
• to tow mode switch terminal 3
• to headlamp aiming switch terminal 3
• to clock terminal 3, and
• through 10A fuse (No. 37, located in the IPDM E/R)
• through IPDM E/R terminal 57
• to AV switch terminal 3
• to audio unit terminal 8
• to rear air control terminal 1 and
• to rear audio remote control unit terminal 6.
The illumination control switch controls illumination intensity by varying the ground to the following
• through illumination control switch terminal 2
• to power liftgate switch terminal 4
• to front room/map lamp assembly (console box illumination) terminal 8
• to AV switch terminal 4
• to hazard switch terminal 4
• to audio unit terminal 7
• to rear sonar system OFF switch terminal 4
• to power window and door lock/unlock switch RH terminal 1 (early production)
• to main power window and door lock/unlock switch LH terminal 12 (early production)
• to 4WD switch terminal 8 (with 4-wheel drive)
• to front air control terminal 24
• to rear power vent window switch terminal 6
• to DVD player terminal 10 (with DVD entertainment system)
• to pedal adjusting switch terminal 6
• to A/T device terminal 12
Page 2403 of 3061

PG-1
ELECTRICAL
C
D
E
F
G
H
I
J
L
M
SECTION PG
A
B
PG
N
O
P
CONTENTS
POWER SUPPLY, GROUND & CIRCUIT ELEMENTS
SERVICE INFORMATION ............................2
PRECAUTIONS ...................................................2
Precaution for Supplemental Restraint System
(SRS) "AIR BAG" and "SEAT BELT PRE-TEN-
SIONER" ...................................................................
2
POWER SUPPLY ROUTING CIRCUIT ...............3
Schematic .................................................................3
Wiring Diagram - POWER - ......................................5
Fuse ........................................................................16
Fusible Link .............................................................16
Circuit Breaker (Built Into BCM) ..............................16
IPDM E/R (INTELLIGENT POWER DISTRI-
BUTION MODULE ENGINE ROOM) .................
17
System Description .................................................17
CAN Communication System Description ...............18
Function of Detecting Ignition Relay Malfunction ....18
CONSULT-II Function (IPDM E/R) ..........................18
Auto Active Test ......................................................20
Terminal and Reference Value for IPDM E/R .........22
IPDM E/R Terminal Arrangement ...........................26
IPDM E/R Power/Ground Circuit Inspection ...........26
Inspection with CONSULT-II (Self-Diagnosis) ........27
Removal and Installation of IPDM E/R ....................28
GROUND CIRCUIT ............................................29
Ground Distribution ..................................................29
HARNESS .........................................................39
Harness Layout .......................................................39
Wiring Diagram Codes (Cell Codes) .......................59
ELECTRICAL UNITS LOCATION ....................63
Electrical Units Location ..........................................63
HARNESS CONNECTOR .................................66
Description ...............................................................66
ELECTRICAL UNITS ........................................68
Terminal Arrangement .............................................68
STANDARDIZED RELAY .................................69
Description ...............................................................69
SUPER MULTIPLE JUNCTION (SMJ) .............71
Terminal Arrangement .............................................71
FUSE BLOCK - JUNCTION BOX (J/B) ............73
Terminal Arrangement .............................................73
FUSE AND FUSIBLE LINK BOX ......................74
Terminal Arrangement .............................................74
FUSE AND RELAY BOX ..................................75
Terminal Arrangement .............................................75
Page 2419 of 3061

IPDM E/R (INTELLIGENT POWER DISTRIBUTION MODULE ENGINE ROOM)
PG-17
< SERVICE INFORMATION >
C
D
E
F
G
H
I
J
L
MA
B
PG
N
O
P
IPDM E/R (INTELLIGENT POWER DISTRIBUTION MODULE ENGINE
ROOM)
System DescriptionINFOID:0000000003533835
• IPDM E/R (Intelligent Power Distribution Module Engine Room) integrates the relay box and fuse block
which were originally placed in engine compartment. It controls integrated relays via IPDM E/R control cir-
cuits.
• IPDM E/R-integrated control circuits perform ON-OFF operation of relays, CAN communication control, etc.
• It controls operation of each electrical component via ECM, BCM and CAN communication lines.
CAUTION:
None of the IPDM E/R integrated relays can be removed.
SYSTEMS CONTROLLED BY IPDM E/R
1. Lamp control
Using CAN communication lines, it receives signals from the BCM and controls the following lamps:
• Headlamps (Hi, Lo)
• Parking lamps
• Tail and license lamps
• Front fog lamps
2. Wiper control
Using CAN communication lines, it receives signals from the BCM and controls the front wipers.
3. Rear window defogger relay control
Using CAN communication lines, it receives signals from the BCM and controls the rear window defogger
relay.
4. A/C compressor control
Using CAN communication lines, it receives signals from the ECM and controls the A/C compressor
(magnetic clutch).
5. Starter control
Using CAN communication lines, it receives signals from the BCM and controls the starter relay.
6. Cooling fan control
Using CAN communication lines, it receives signals from the ECM and controls the cooling fan relays.
7. Horn control
Using CAN communication lines, it receives signals from the BCM and controls the horn relay.
CAN COMMUNICATION LINE CONTROL
With CAN communication, by connecting each control unit using two communication lines (CAN L-line, CAN
H-line), it is possible to transmit a maximum amount of information with minimum wiring. Each control unit can
transmit and receive data, and reads necessary information only.
1. Fail-safe control
• When CAN communication with other control units is impossible, IPDM E/R performs fail-safe control.
After CAN communication returns to normal operation, it also returns to normal control.
• Operation of control parts by IPDM E/R during fail-safe mode is as follows:
Controlled system Fail-safe mode
Headlamp• With the ignition switch ON, the headlamp (low) is ON.
• With the ignition switch OFF, the headlamp (low) is OFF.
Tail and parking lamps• With the ignition switch ON, the tail and parking lamps are ON.
• With the ignition switch OFF, the tail and parking lamps are OFF.
Cooling fan• With the ignition switch ON, the cooling fan HI operates.
• With the ignition switch OFF, the cooling fan stops.
Front wiperUntil the ignition switch is turned off, the front wiper LO and HI remains in the same status it
was in just before fail−safe control was initiated.
Rear window defogger Rear window defogger relay OFF
A/C compressor A/C compressor OFF
Front fog lamps Front fog lamp relay OFF
Page 2475 of 3061

FUSE BLOCK - JUNCTION BOX (J/B)
PG-73
< SERVICE INFORMATION >
C
D
E
F
G
H
I
J
L
MA
B
PG
N
O
P
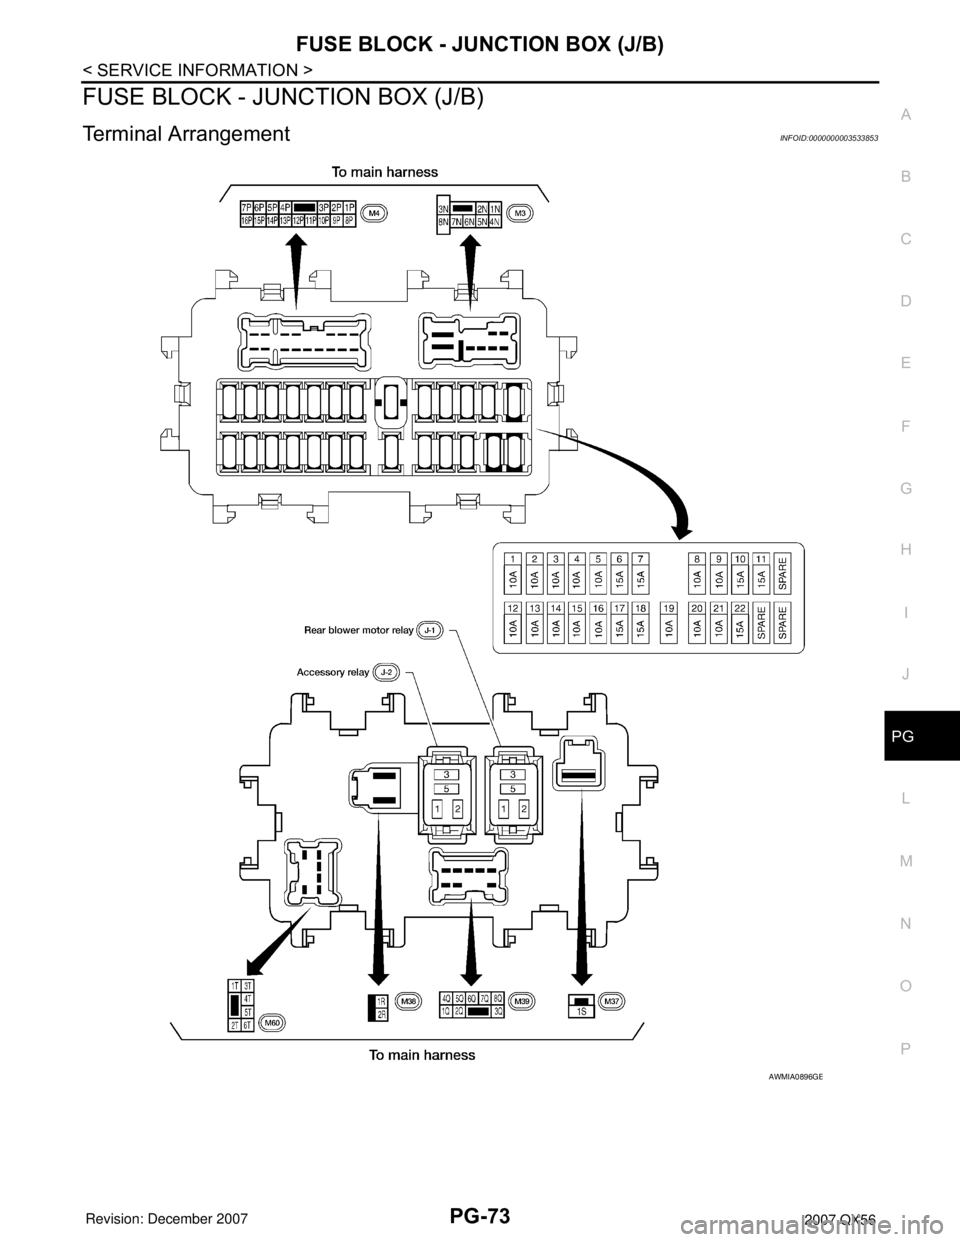
FUSE BLOCK - JUNCTION BOX (J/B)
Terminal ArrangementINFOID:0000000003533853
AWMIA0896GB