Page 1832 of 3061
EM-62
< SERVICE INFORMATION >
OIL SEAL
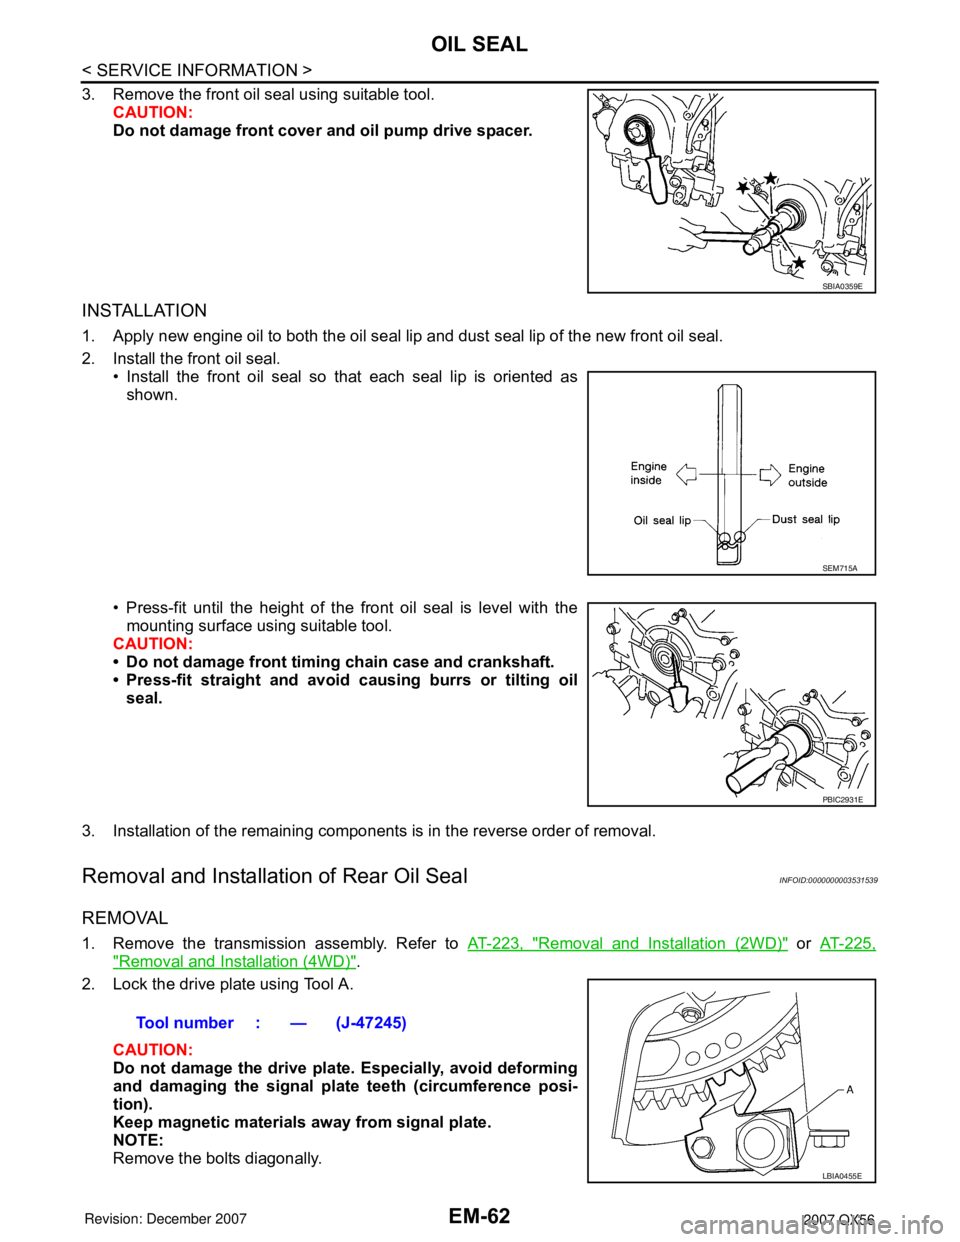
3. Remove the front oil seal using suitable tool.CAUTION:
Do not damage front cover and oil pump drive spacer.
INSTALLATION
1. Apply new engine oil to both the oil seal lip and dust seal lip of the new front oil seal.
2. Install the front oil seal.• Install the front oil seal so that each seal lip is oriented as
shown.
• Press-fit until the height of the front oil seal is level with the mounting surface using suitable tool.
CAUTION:
• Do not damage front timing chain case and crankshaft.
• Press-fit straight and avoid causing burrs or tilting oil
seal.
3. Installation of the remaining components is in the reverse order of removal.
Removal and Installation of Rear Oil SealINFOID:0000000003531539
REMOVAL
1. Remove the transmission assembly. Refer to AT-223, "Removal and Installation (2WD)" or AT-225,
"Removal and Installation (4WD)".
2. Lock the drive plate using Tool A.
CAUTION:
Do not damage the drive plat e. Especially, avoid deforming
and damaging the signal plat e teeth (circumference posi-
tion).
Keep magnetic materials away from signal plate.
NOTE:
Remove the bolts diagonally.
SBIA0359E
SEM715A
PBIC2931E
Tool number : — (J-47245)
LBIA0455E
Page 1833 of 3061
OIL SEALEM-63
< SERVICE INFORMATION >
C
DE
F
G H
I
J
K L
M A
EM
NP
O
3. Remove the drive plate.
CAUTION:
Place the drive plate with the si gnal plate surface facing upward.
4. Remove the engine rear plate.
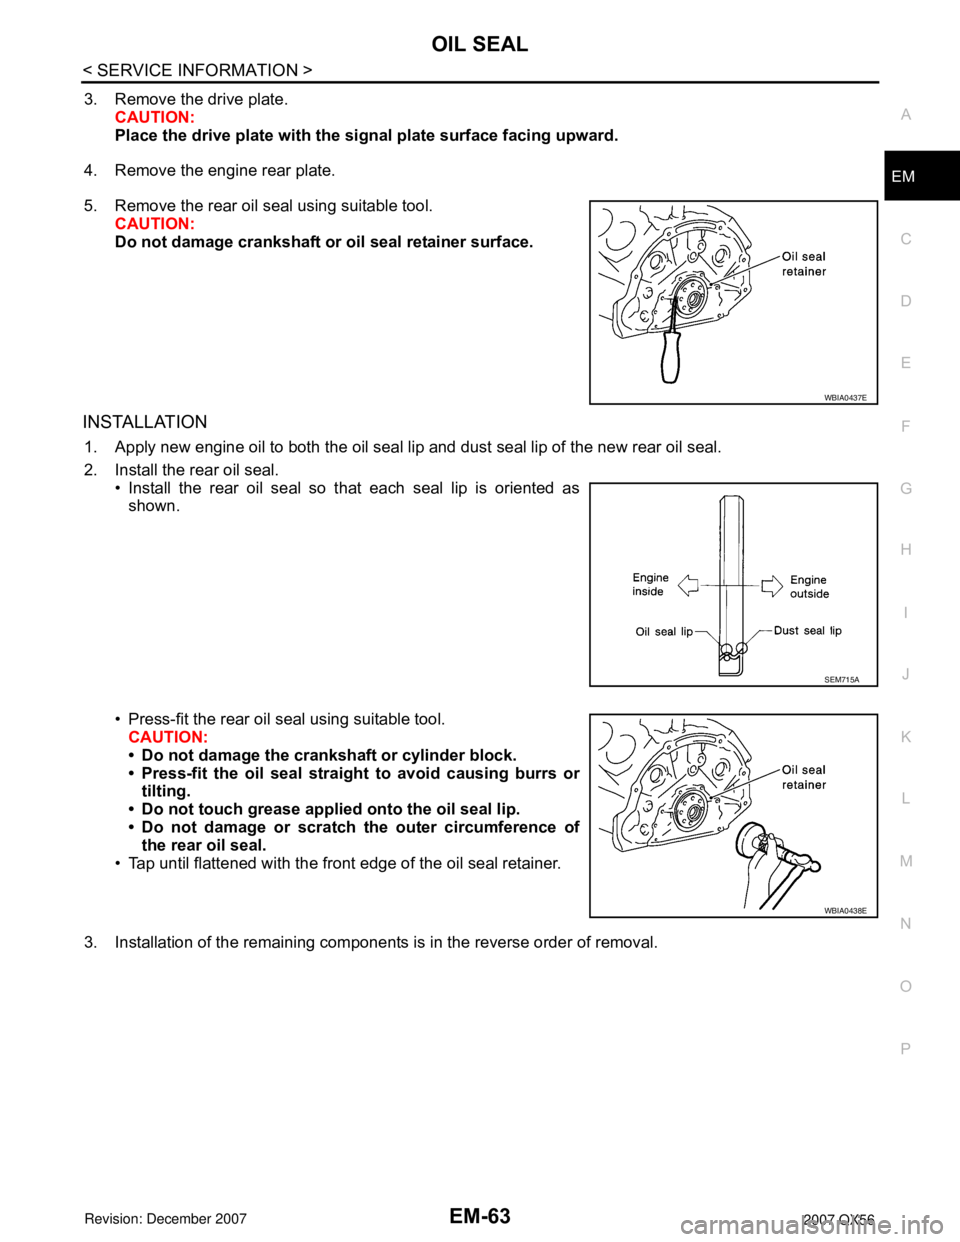
5. Remove the rear oil seal using suitable tool. CAUTION:
Do not damage crankshaft or oil seal retainer surface.
INSTALLATION
1. Apply new engine oil to both the oil seal lip and dust seal lip of the new rear oil seal.
2. Install the rear oil seal.• Install the rear oil seal so that each seal lip is oriented asshown.
• Press-fit the rear oil seal using suitable tool. CAUTION:
• Do not damage the crankshaft or cylinder block.
• Press-fit the oil seal straight to avoid causing burrs or
tilting.
• Do not touch grease applied onto the oil seal lip.
• Do not damage or scratch the outer circumference of the rear oil seal.
• Tap until flattened with the front edge of the oil seal retainer.
3. Installation of the remaining components is in the reverse order of removal.
WBIA0437E
SEM715A
WBIA0438E
Page 1836 of 3061
EM-66
< SERVICE INFORMATION >
CYLINDER HEAD
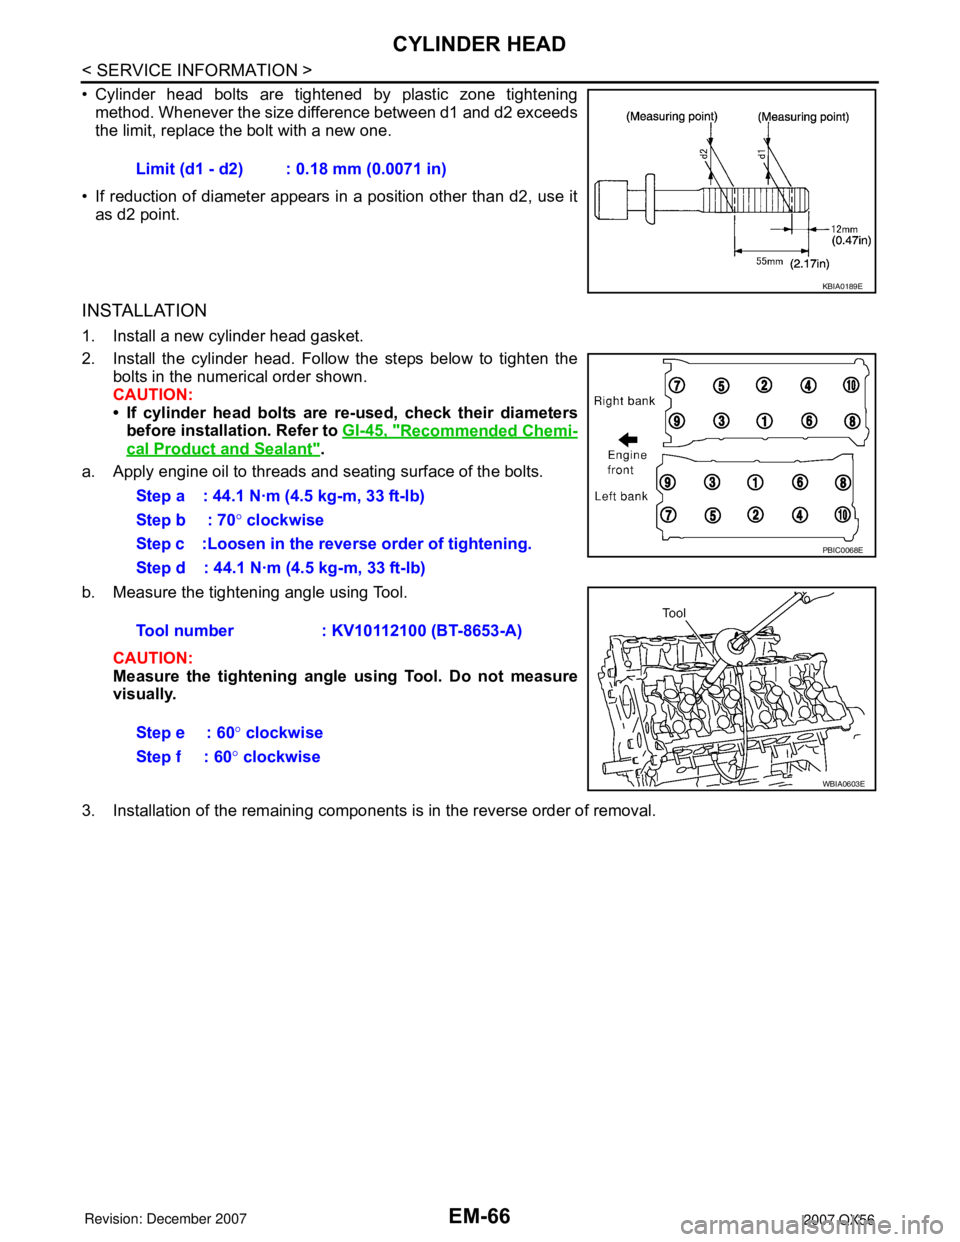
•Cylinder head bolts are tight ened by pla stic zone tight ening
method.
Whenever the size diff erence between d1 and d2 exceeds
t he limit, r eplace the bolt with a new one.
•If reduction of diameter appears in a position other than d2, use it
as
d2 point.
I NST ALLA TION
1.Install a new cylinder head ga sket.
2. Install the cylinder head. Follow the steps below to tighten the
bol
ts in the numerical order shown.
CAUTIO
N:
•If cy lind er head bolts are re -u se d, check their diameters
before
inst allation. Refer to GI-45, "Reco mme nded Chemi-
cal Product and Sealant".
a. Apply engine oil to threads and seating surface of the bolts.
b. Measure the tightening angle using T ool.
CAUTIO
N:
M easure the tighte ning angle using Tool. Do not measure
visuall
y.
3.I nstallation of t he remaining components is in t he reverse order of removal.
Limit
(d1 - d2): 0.18 mm (0.0071 in)
KBIA 0189E
Step a: 44.1 N·m (4.5 kg -m, 33 f t- lb )
Step c :Loosen in the reverse order of tightening.
Step d : 44.1 N·m (4.5 kg-m, 33 ft-lb)
PBIC0068E
Tool number: KV101 12100 (BT-8653-A)
St ep e : 60° clockwise
Step b : 70° clockwise
Step f : 60° clockwise
WBIA 0603E
Page 1846 of 3061
EM-76
< SERVICE INFORMATION >
ENGINE ASSEMBLY
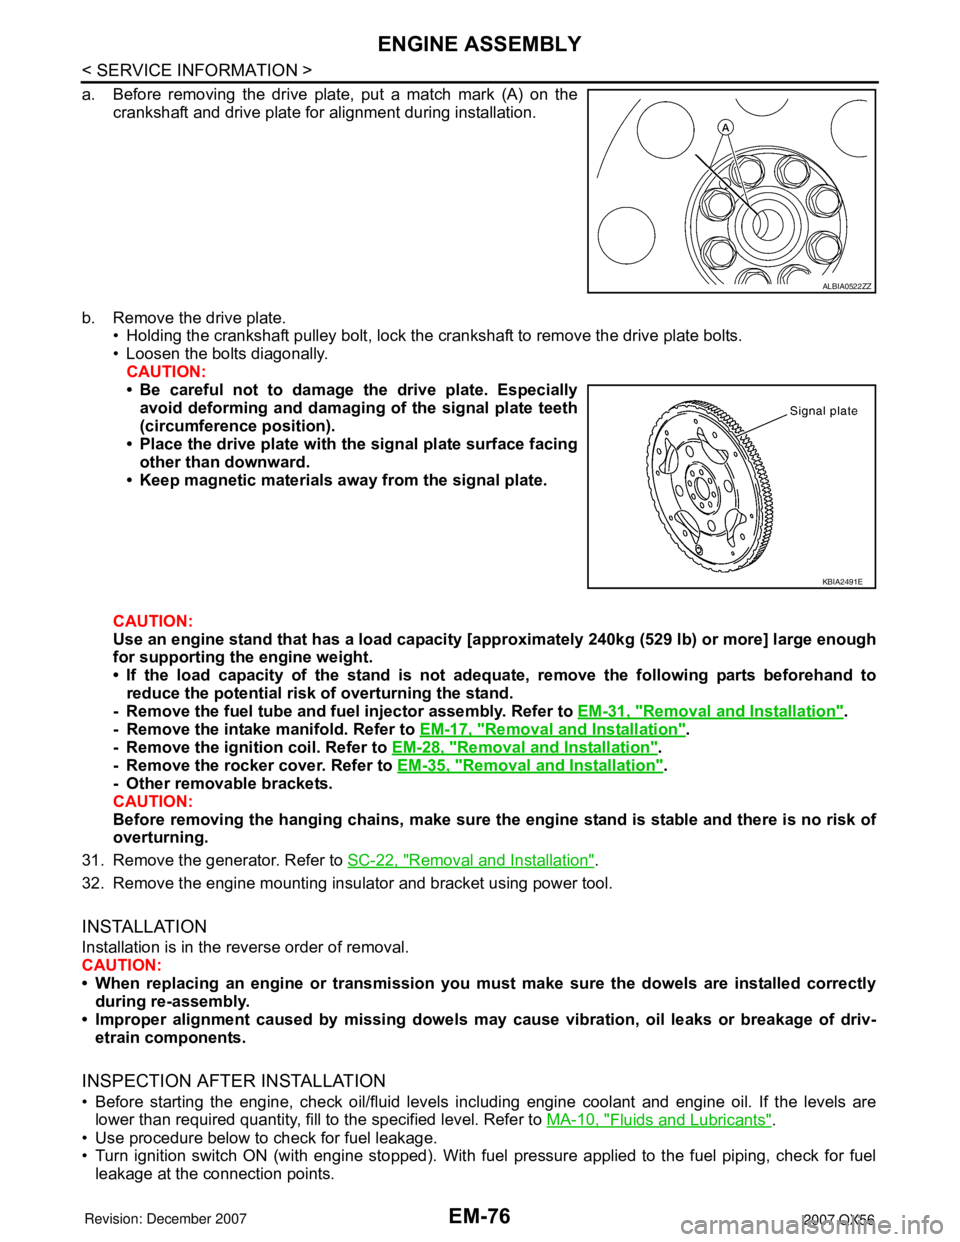
a. Before removing the drive plate, put a match mark (A) on the
crankshaft and drive plate for alignment during installation.
b. Remove the drive plate.
• Holding the crankshaft pulley bolt, lock the crankshaft to remove the drive plate bolts.
• Loosen the bolts diagonally.
CAUTION:
• Be careful not to damage the drive plate. Especially
avoid deforming and damaging of the signal plate teeth
(circumference position).
• Place the drive plate with the signal plate surface facing
other than downward.
• Keep magnetic materials away from the signal plate.
CAUTION:
Use an engine stand that has a load capacity [approximately 240kg (529 lb) or more] large enough
for supporting the engine weight.
• If the load capacity of the stand is not adequate, remove the following parts beforehand to
reduce the potential risk of overturning the stand.
- Remove the fuel tube and fuel injector assembly. Refer to EM-31, "
Removal and Installation".
- Remove the intake manifold. Refer to EM-17, "
Removal and Installation".
- Remove the ignition coil. Refer to EM-28, "
Removal and Installation".
- Remove the rocker cover. Refer to EM-35, "
Removal and Installation".
- Other removable brackets.
CAUTION:
Before removing the hanging chains, make sure the engine stand is stable and there is no risk of
overturning.
31. Remove the generator. Refer to SC-22, "
Removal and Installation".
32. Remove the engine mounting insulator and bracket using power tool.
INSTALLATION
Installation is in the reverse order of removal.
CAUTION:
• When replacing an engine or transmission you must make sure the dowels are installed correctly
during re-assembly.
• Improper alignment caused by missing dowels may cause vibration, oil leaks or breakage of driv-
etrain components.
INSPECTION AFTER INSTALLATION
• Before starting the engine, check oil/fluid levels including engine coolant and engine oil. If the levels are
lower than required quantity, fill to the specified level. Refer to MA-10, "
Fluids and Lubricants".
• Use procedure below to check for fuel leakage.
• Turn ignition switch ON (with engine stopped). With fuel pressure applied to the fuel piping, check for fuel
leakage at the connection points.
ALBIA0522ZZ
KBIA2491E
Page 1848 of 3061
EM-78
< SERVICE INFORMATION >
CYLINDER BLOCK
CYLINDER BLOCK
Disassembly and AssemblyINFOID:0000000003531545
1. Knock sensor sub-harness 2. Knock sensor 3. Cylinder block
4. Main bearing upper 5. Top ring 6. Second ring
7. Oil ring 8. Crankshaft key 9. Piston
10. Connecting rod 11. Snap ring 12. Piston pin
13. Connecting rod bearing 14. Connecting rod bearing cap 15. Main bearing cap
16. Thrust bearing lower 17. Main bearing lower 18. Crankshaft
19. Pilot converter 20. Thrust bearing upper 21. Side bolt
WBIA0471E
Page 1849 of 3061
CYLINDER BLOCK
EM-79
< SERVICE INFORMATION >
C
D
E
F
G
H
I
J
K
L
MA
EM
N
P O
DISASSEMBLY
NOTE:
Explained here is how to disassemble with engine stand supporting transmission surface. When using differ-
ent type of engine stand, some steps may be different.
1. Remove engine assembly and mount to engine stand. Refer to EM-74, "
Removal and Installation".
CAUTION:
Before removing the hanging chains, make sure engine stand is stable and there is no risk of over-
turning.
2. Drain engine oil. Refer to LU-9, "
Changing Engine Oil".
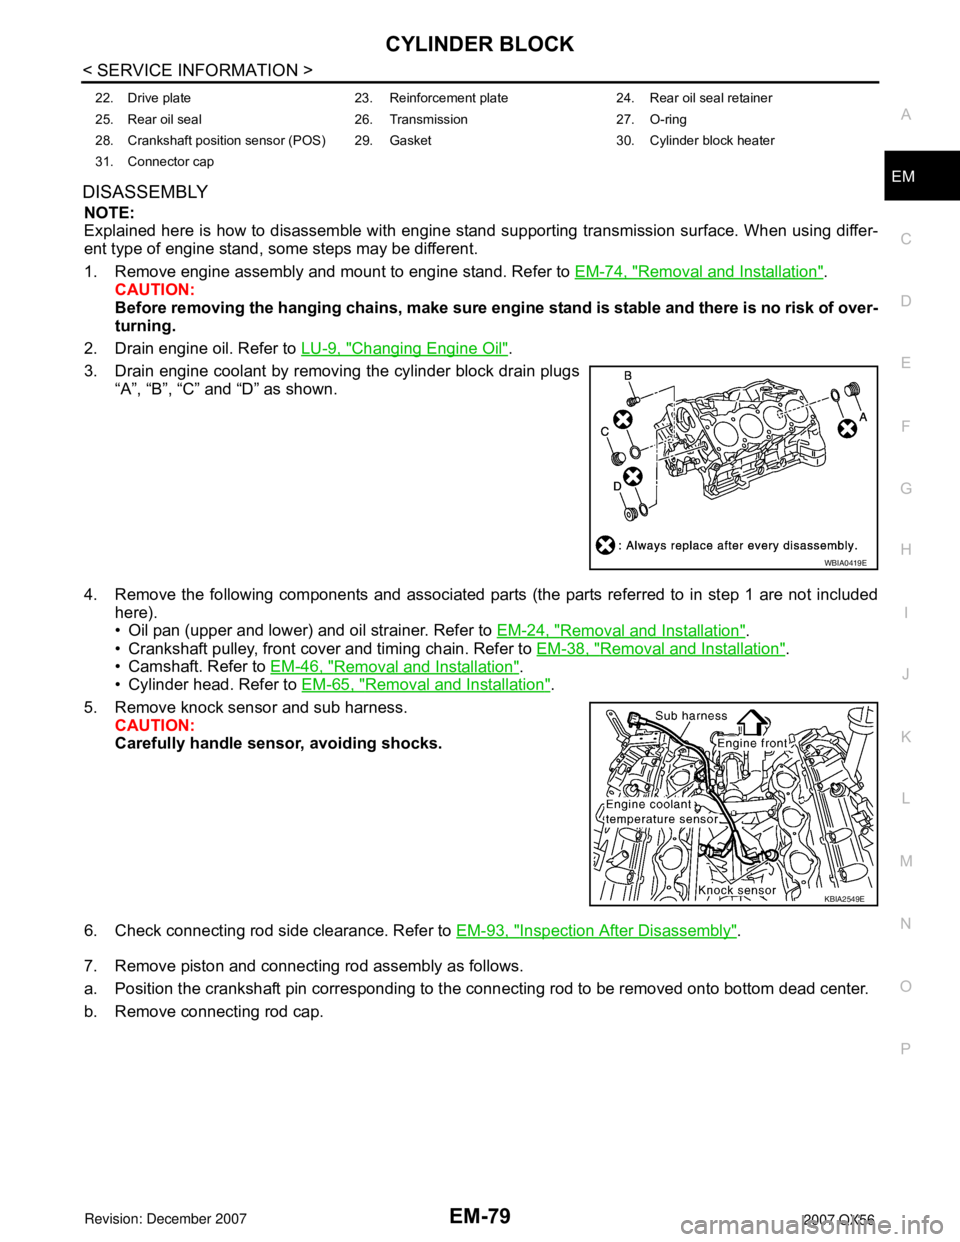
3. Drain engine coolant by removing the cylinder block drain plugs
“A”, “B”, “C” and “D” as shown.
4. Remove the following components and associated parts (the parts referred to in step 1 are not included
here).
• Oil pan (upper and lower) and oil strainer. Refer to EM-24, "
Removal and Installation".
• Crankshaft pulley, front cover and timing chain. Refer to EM-38, "
Removal and Installation".
• Camshaft. Refer to EM-46, "
Removal and Installation".
• Cylinder head. Refer to EM-65, "
Removal and Installation".
5. Remove knock sensor and sub harness.
CAUTION:
Carefully handle sensor, avoiding shocks.
6. Check connecting rod side clearance. Refer to EM-93, "
Inspection After Disassembly".
7. Remove piston and connecting rod assembly as follows.
a. Position the crankshaft pin corresponding to the connecting rod to be removed onto bottom dead center.
b. Remove connecting rod cap.
22. Drive plate 23. Reinforcement plate 24. Rear oil seal retainer
25. Rear oil seal 26. Transmission 27. O-ring
28. Crankshaft position sensor (POS) 29. Gasket 30. Cylinder block heater
31. Connector cap
WBIA0419E
KBIA2549E
Page 1850 of 3061
EM-80
< SERVICE INFORMATION >
CYLINDER BLOCK
c. Push the piston and connecting rod assembly out to the cylinder
head side using suitable tool.
8. Remove connecting rod bearings.
CAUTION:
When removing them, note the installation position. Keep them in the correct order.
9. Check piston ring side clearance. Refer to EM-93, "
Inspection After Disassembly".
10. Remove piston rings from piston using suitable tool.
CAUTION:
• Do not damage piston.
• Do not damage piston rings by expanding them exces-
sively.
11. Remove piston from connecting rod as follows.
a. Remove snap ring using suitable tool.
b. Heat piston to 60° to 70°C (140° to 158°F) using suitable tool.
PBIC0086E
PBIC0087E
PBIC0260E
PBIC0261E
Page 1851 of 3061
CYLINDER BLOCK
EM-81
< SERVICE INFORMATION >
C
D
E
F
G
H
I
J
K
L
MA
EM
N
P O
c. Push out piston pin using suitable tool.
12. Separate and remove rear oil seal retainer from cylinder block.
CAUTION:
Do not damage mating surface.
13. Remove rear oil seal from rear oil seal retainer.
14. Measure the crankshaft side clearance. Refer to EM-93, "
Inspection After Disassembly".
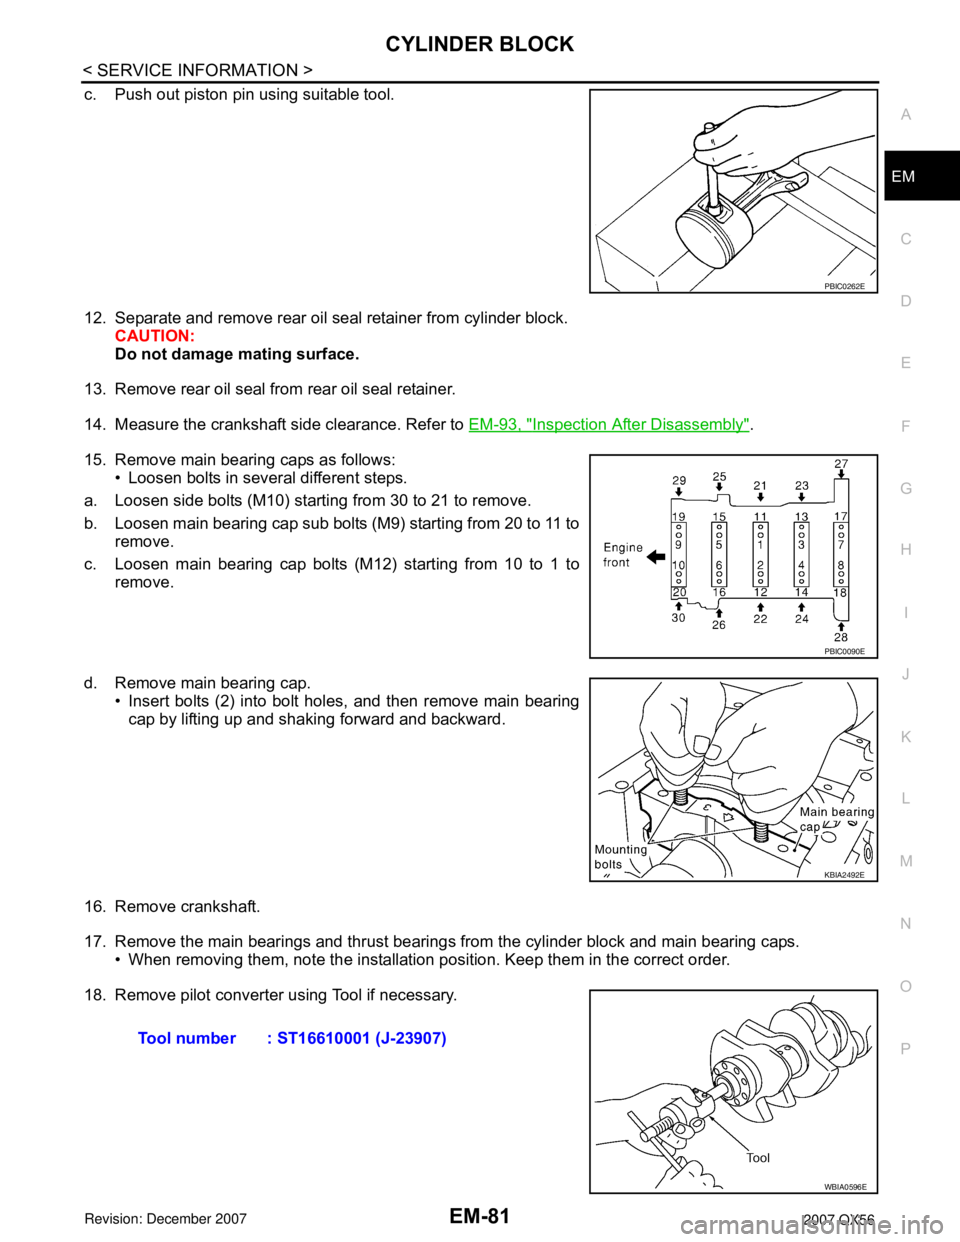
15. Remove main bearing caps as follows:
• Loosen bolts in several different steps.
a. Loosen side bolts (M10) starting from 30 to 21 to remove.
b. Loosen main bearing cap sub bolts (M9) starting from 20 to 11 to
remove.
c. Loosen main bearing cap bolts (M12) starting from 10 to 1 to
remove.
d. Remove main bearing cap.
• Insert bolts (2) into bolt holes, and then remove main bearing
cap by lifting up and shaking forward and backward.
16. Remove crankshaft.
17. Remove the main bearings and thrust bearings from the cylinder block and main bearing caps.
• When removing them, note the installation position. Keep them in the correct order.
18. Remove pilot converter using Tool if necessary.
PBIC0262E
PBIC0090E
KBIA2492E
Tool number : ST16610001 (J-23907)
WBIA0596E