Page 1331 of 2000
U241E AUTOMATIC TRANSAXLE – DIFFERENTIAL CASEAX–261
AX
Standard adjusting shim thickness
(f) Remove the 16 bolts.
(g) Using a practic-faced hammer, remove the
transaxle housing.
(h) Remove the differential.
Mark Thickness
0 1.90 mm (0.074 in.)
1 1.95 mm (0.077 in.)
2 2.00 mm (0.079 in.)
3 2.05 mm (0.081 in.)
4 2.10 mm (0.083 in.)
5 2.15 mm (0.085 in.)
6 2.20 mm (0.087 in.)
7 2.25 mm (0.089 in.)
8 2.30 mm (0.091 in.)
9 2.35 mm (0.093 in.)
A 2.40 mm (0.094 in.)
B 2.45 mm (0.096 in.)
C 2.50 mm (0.098 in.)
D 2.55 mm (0.100 in.)
E 2.60 mm (0.102 in.)
F 2.65 mm (0.104 in.)
G 2.70 mm (0.106 in.)
H 2.75 mm (0.108 in.)
J 2.80 mm (0.110 in.)
D009182E01
C083139E01
Page 1332 of 2000
AX–262U241E AUTOMATIC TRANSAXLE – DIFFERENTIAL CASE
AX
9. INSTALL TRANSAXLE HOUSING OIL SEAL
(a) Coat the lip of a new oil seal with a little amount of
MP grease.
(b) Using SST and a hammer, tap in the oil seal.
SST 09350-32014 (09351-32150), 09950-70010
(09951-07150)
10. INSTALL DIFFERENTIAL SIDE BEARING RETAINER
OIL SEAL
(a) Coat the lip of a new oil seal with a little amount of
MP grease.
(b) Using SST and a hammer, tap in the oil seal.
SST 09350-32014 (09351-32150), 09950-70010
(09951-07150)
D025606E01
D025605E01
Page 1363 of 2000
DRIVE SHAFT – FRONT DRIVE SHAFT ASSEMBLY (for 2WD)DS–7
DS
REMOVAL
(2005/11-2006/01)
1. REMOVE FRONT WHEEL
2. DRAIN AUTOMATIC TRANSAXLE FLUID
(a) Drain the automatic transaxle fluid for U140F (see
page AX-147).
(b) Drain the automatic transaxle fluid for U241E (see
page AX-146).
3. REMOVE FRONT AXLE HUB NUT (See page AH-6)
4. DISCONNECT FRONT SPEED SENSOR LH
(a) Disconnect the speed sensor (see page BC-191).
5. DISCONNECT FRONT SPEED SENSOR RH
HINT:
Use the same procedures described for the LH side.
6. DISCONNECT FRONT DISC BRAKE CYLINDER
ASSEMBLY LH (See page BR-40)
7. DISCONNECT FRONT DISC BRAKE CALIPER
ASSEMBLY RH
HINT:
Use the same procedures described for the LH side.
8. REMOVE FRONT STABILIZER LINK ASSEMBLY LH
(See page SP-30)
9. REMOVE FRONT STABILIZER LINK ASSEMBLY RH
HINT:
Use the same procedures described for the LH side.
10. DISCONNECT FRONT SUSPENSION LOWER NO. 1
ARM SUB-ASSEMBLY LH (See page AH-7)
11. DISCONNECT FRONT SUSPENSION LOWER NO. 1
ARM SUB-ASSEMBLY RH
HINT:
Use the same procedures described for the LH side.
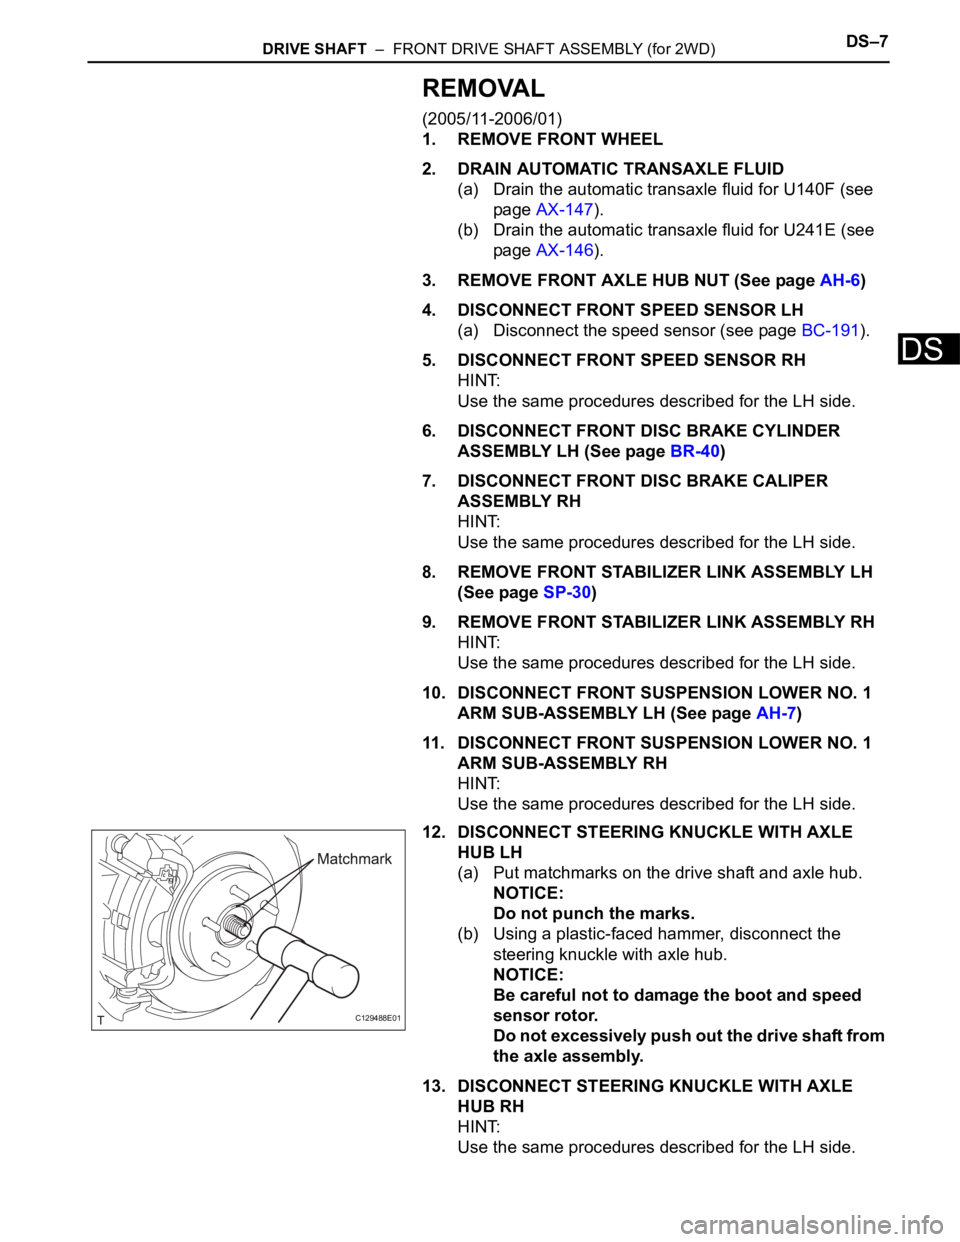
12. DISCONNECT STEERING KNUCKLE WITH AXLE
HUB LH
(a) Put matchmarks on the drive shaft and axle hub.
NOTICE:
Do not punch the marks.
(b) Using a plastic-faced hammer, disconnect the
steering knuckle with axle hub.
NOTICE:
Be careful not to damage the boot and speed
sensor rotor.
Do not excessively push out the drive shaft from
the axle assembly.
13. DISCONNECT STEERING KNUCKLE WITH AXLE
HUB RH
HINT:
Use the same procedures described for the LH side.
C129488E01
Page 1364 of 2000
DS–8DRIVE SHAFT – FRONT DRIVE SHAFT ASSEMBLY (for 2WD)
DS
14. DISCONNECT TIE ROD END SUB-ASSEMBLY LH
(See page PS-42)
15. DISCONNECT TIE ROD END SUB-ASSEMBLY RH
HINT:
Use the same procedures described for the LH side.
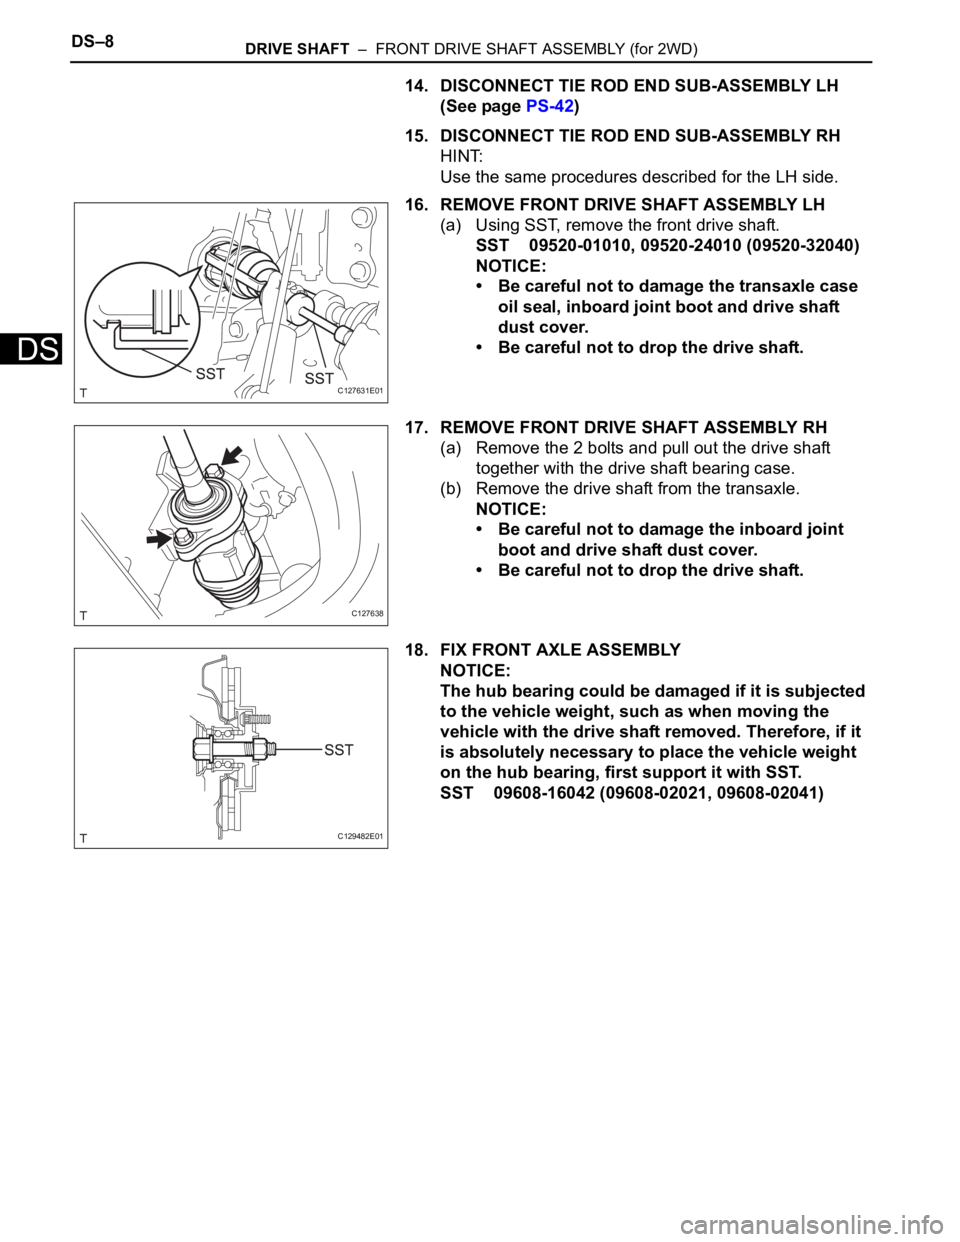
16. REMOVE FRONT DRIVE SHAFT ASSEMBLY LH
(a) Using SST, remove the front drive shaft.
SST 09520-01010, 09520-24010 (09520-32040)
NOTICE:
• Be careful not to damage the transaxle case
oil seal, inboard joint boot and drive shaft
dust cover.
• Be careful not to drop the drive shaft.
17. REMOVE FRONT DRIVE SHAFT ASSEMBLY RH
(a) Remove the 2 bolts and pull out the drive shaft
together with the drive shaft bearing case.
(b) Remove the drive shaft from the transaxle.
NOTICE:
• Be careful not to damage the inboard joint
boot and drive shaft dust cover.
• Be careful not to drop the drive shaft.
18. FIX FRONT AXLE ASSEMBLY
NOTICE:
The hub bearing could be damaged if it is subjected
to the vehicle weight, such as when moving the
vehicle with the drive shaft removed. Therefore, if it
is absolutely necessary to place the vehicle weight
on the hub bearing, first support it with SST.
SST 09608-16042 (09608-02021, 09608-02041)
C127631E01
C127638
C129482E01
Page 1365 of 2000
DRIVE SHAFT – FRONT DRIVE SHAFT ASSEMBLY (for 2WD)DS–9
DS
REMOVAL
(2006/01- )
1. REMOVE FRONT WHEEL
2. DRAIN AUTOMATIC TRANSAXLE FLUID
(a) Drain the automatic transaxle fluid for U140F (see
page AX-147).
(b) Drain the automatic transaxle fluid for U241E (see
page AX-146).
(c) Drain the automatic transaxle fluid for U151E (see
page AX-172).
3. REMOVE FRONT AXLE HUB NUT (See page AH-8)
4. DISCONNECT FRONT SPEED SENSOR LH
(a) Disconnect the speed sensor (see page BC-191).
5. REMOVE FRONT SPEED SENSOR RH
HINT:
Use the same procedures described for the LH side.
6. DISCONNECT FRONT DISC BRAKE CYLINDER
ASSEMBLY LH (See page BR-40)
7. DISCONNECT FRONT DISC BRAKE CYLINDER
ASSEMBLY RH
HINT:
Use the same procedures described for the LH side.
8. REMOVE FRONT STABILIZER LINK ASSEMBLY LH
(See page SP-30)
9. REMOVE FRONT STABILIZER LINK ASSEMBLY RH
HINT:
Use the same procedures described for the LH side.
10. DISCONNECT FRONT SUSPENSION LOWER NO. 1
ARM SUB-ASSEMBLY LH (See page SP-21)
11. DISCONNECT FRONT SUSPENSION LOWER NO. 1
ARM SUB-ASSEMBLY RH
HINT:
Use the same procedures described for the LH side.
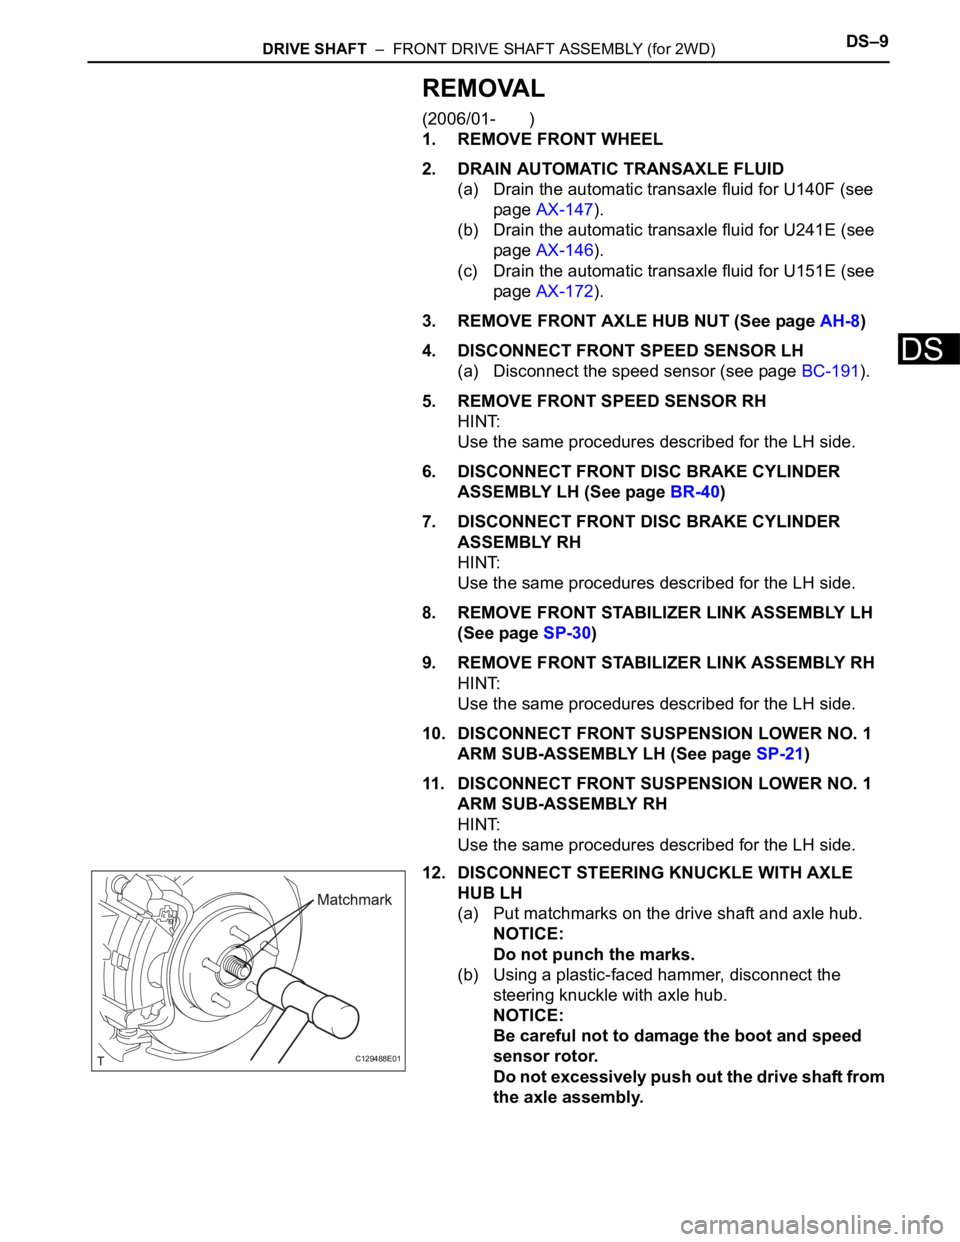
12. DISCONNECT STEERING KNUCKLE WITH AXLE
HUB LH
(a) Put matchmarks on the drive shaft and axle hub.
NOTICE:
Do not punch the marks.
(b) Using a plastic-faced hammer, disconnect the
steering knuckle with axle hub.
NOTICE:
Be careful not to damage the boot and speed
sensor rotor.
Do not excessively push out the drive shaft from
the axle assembly.
C129488E01
Page 1366 of 2000
DS–10DRIVE SHAFT – FRONT DRIVE SHAFT ASSEMBLY (for 2WD)
DS
13. DISCONNECT STEERING KNUCKLE WITH AXLE
HUB RH
HINT:
Use the same procedures described for the LH side.
14. DISCONNECT TIE ROD END SUB-ASSEMBLY LH
(See page PS-42)
15. DISCONNECT TIE ROD END SUB-ASSEMBLY RH
HINT:
Use the same procedures described for the LH side.
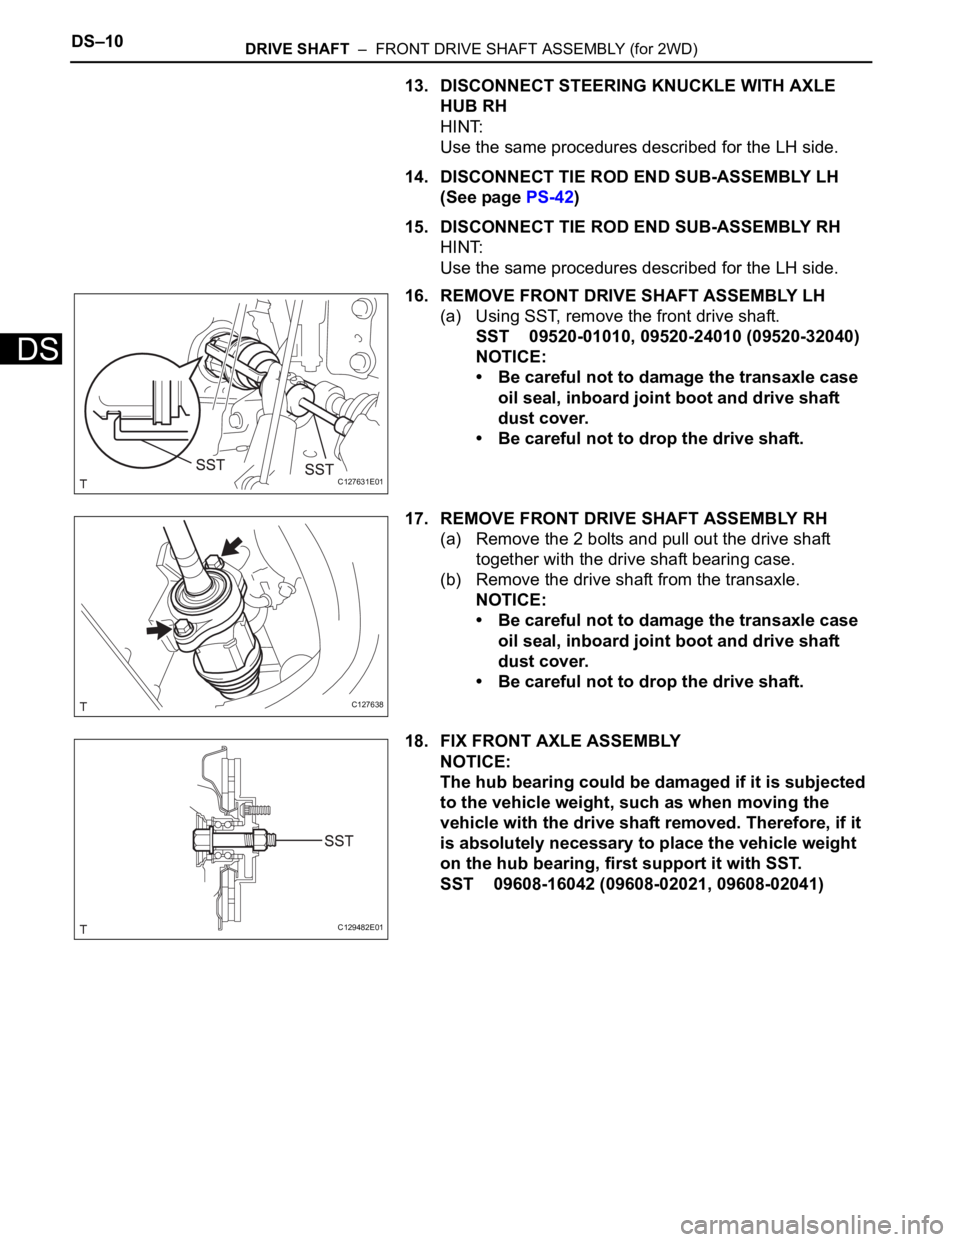
16. REMOVE FRONT DRIVE SHAFT ASSEMBLY LH
(a) Using SST, remove the front drive shaft.
SST 09520-01010, 09520-24010 (09520-32040)
NOTICE:
• Be careful not to damage the transaxle case
oil seal, inboard joint boot and drive shaft
dust cover.
• Be careful not to drop the drive shaft.
17. REMOVE FRONT DRIVE SHAFT ASSEMBLY RH
(a) Remove the 2 bolts and pull out the drive shaft
together with the drive shaft bearing case.
(b) Remove the drive shaft from the transaxle.
NOTICE:
• Be careful not to damage the transaxle case
oil seal, inboard joint boot and drive shaft
dust cover.
• Be careful not to drop the drive shaft.
18. FIX FRONT AXLE ASSEMBLY
NOTICE:
The hub bearing could be damaged if it is subjected
to the vehicle weight, such as when moving the
vehicle with the drive shaft removed. Therefore, if it
is absolutely necessary to place the vehicle weight
on the hub bearing, first support it with SST.
SST 09608-16042 (09608-02021, 09608-02041)
C127631E01
C127638
C129482E01
Page 1389 of 2000
DRIVE SHAFT – FRONT DRIVE SHAFT ASSEMBLY (for 2WD)DS–33
DS
12. CONNECT FRONT SPEED SENSOR RH
HINT:
Use the same procedures described for the LH side.
13. INSTALL FRONT AXLE HUB NUT (See page AH-10)
14. INSTALL FRONT WHEEL
Torque: 103 N*m (1,050 kgf*cm, 76 ft.*lbf)
15. ADD AUTOMATIC TRANSAXLE FLUID
(a) Add automatic transaxle fluid for U140F (see page
AX-152).
(b) Add automatic transaxle fluid for U241E (see page
AX-151).
16. CHECK FOR AUTOMATIC TRANSAXLE OIL
LEAKAGE
17. INSPECT AND ADJUST FRONT WHEEL ALIGNMENT
(a) Inspect and adjust the front wheel alignment (see
page SP-3).
INSTALLATION
(2006/01- )
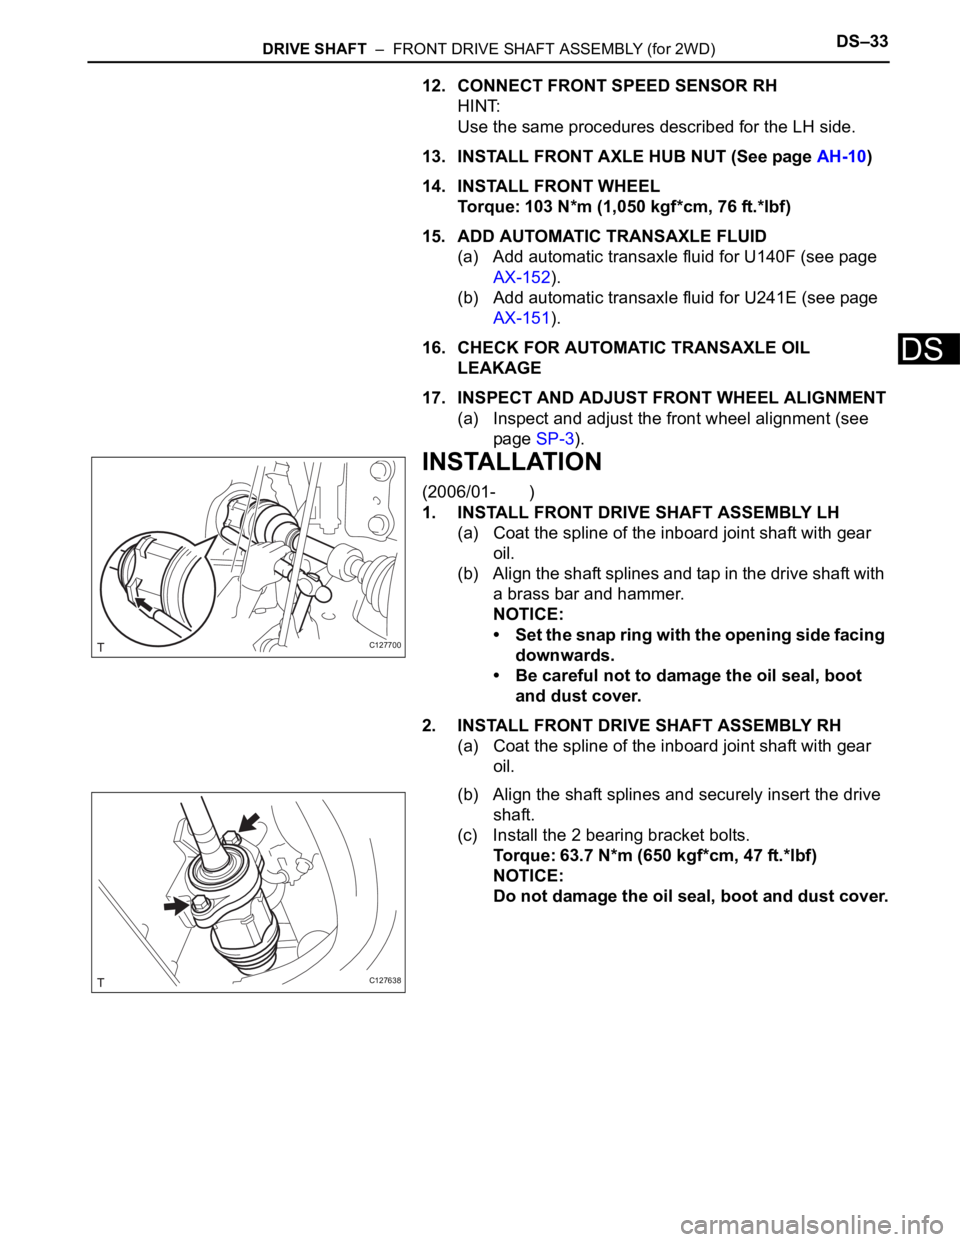
1. INSTALL FRONT DRIVE SHAFT ASSEMBLY LH
(a) Coat the spline of the inboard joint shaft with gear
oil.
(b) Align the shaft splines and tap in the drive shaft with
a brass bar and hammer.
NOTICE:
• Set the snap ring with the opening side facing
downwards.
• Be careful not to damage the oil seal, boot
and dust cover.
2. INSTALL FRONT DRIVE SHAFT ASSEMBLY RH
(a) Coat the spline of the inboard joint shaft with gear
oil.
(b) Align the shaft splines and securely insert the drive
shaft.
(c) Install the 2 bearing bracket bolts.
Torque: 63.7 N*m (650 kgf*cm, 47 ft.*lbf)
NOTICE:
Do not damage the oil seal, boot and dust cover.
C127700
C127638
Page 1390 of 2000
DS–34DRIVE SHAFT – FRONT DRIVE SHAFT ASSEMBLY (for 2WD)
DS
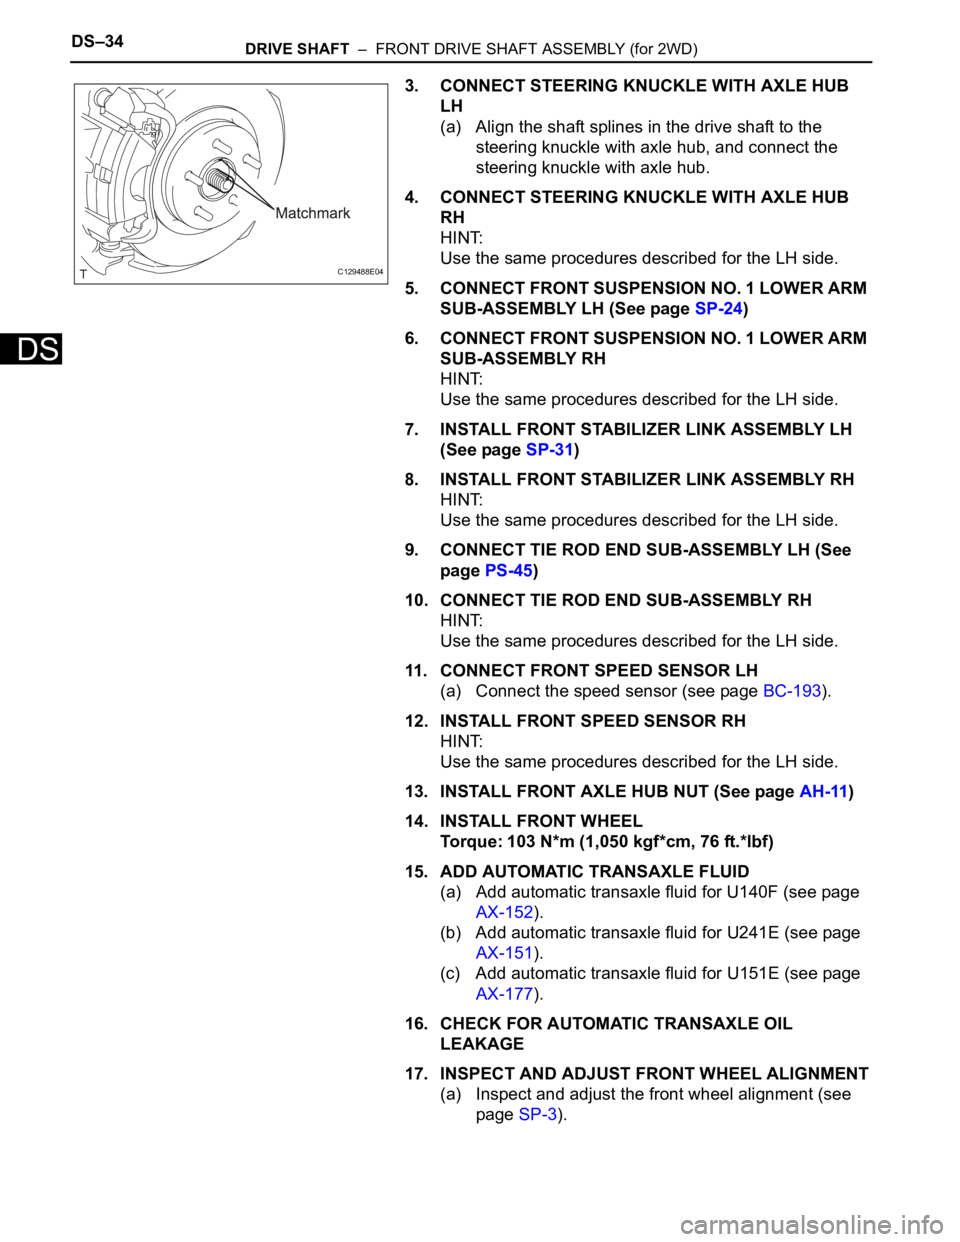
3. CONNECT STEERING KNUCKLE WITH AXLE HUB
LH
(a) Align the shaft splines in the drive shaft to the
steering knuckle with axle hub, and connect the
steering knuckle with axle hub.
4. CONNECT STEERING KNUCKLE WITH AXLE HUB
RH
HINT:
Use the same procedures described for the LH side.
5. CONNECT FRONT SUSPENSION NO. 1 LOWER ARM
SUB-ASSEMBLY LH (See page SP-24)
6. CONNECT FRONT SUSPENSION NO. 1 LOWER ARM
SUB-ASSEMBLY RH
HINT:
Use the same procedures described for the LH side.
7. INSTALL FRONT STABILIZER LINK ASSEMBLY LH
(See page SP-31)
8. INSTALL FRONT STABILIZER LINK ASSEMBLY RH
HINT:
Use the same procedures described for the LH side.
9. CONNECT TIE ROD END SUB-ASSEMBLY LH (See
page PS-45)
10. CONNECT TIE ROD END SUB-ASSEMBLY RH
HINT:
Use the same procedures described for the LH side.
11. CONNECT FRONT SPEED SENSOR LH
(a) Connect the speed sensor (see page BC-193).
12. INSTALL FRONT SPEED SENSOR RH
HINT:
Use the same procedures described for the LH side.
13. INSTALL FRONT AXLE HUB NUT (See page AH-11)
14. INSTALL FRONT WHEEL
Torque: 103 N*m (1,050 kgf*cm, 76 ft.*lbf)
15. ADD AUTOMATIC TRANSAXLE FLUID
(a) Add automatic transaxle fluid for U140F (see page
AX-152).
(b) Add automatic transaxle fluid for U241E (see page
AX-151).
(c) Add automatic transaxle fluid for U151E (see page
AX-177).
16. CHECK FOR AUTOMATIC TRANSAXLE OIL
LEAKAGE
17. INSPECT AND ADJUST FRONT WHEEL ALIGNMENT
(a) Inspect and adjust the front wheel alignment (see
page SP-3).
C129488E04