Page 1307 of 2000
U241E AUTOMATIC TRANSAXLE – AUTOMATIC TRANSAXLE UNITAX–203
AX
(b) Install the underdrive clutch assembly to the 1-way
clutch. Rotate the underdrive clutch to check the
rotating direction for the lock or free operation.
(c) Install the 1-way clutch to the transaxle.
NOTICE:
Make sure that the mark on the 1-way clutch
outer race is visible.
(d) Using a screwdriver, install the snap ring to the
transaxle.
28. INSTALL UNDERDRIVE CLUTCH
(a) Coat the bearing and bearing race with petroleum
jelly, and install them onto the underdrive clutch.
Standard race diameter
(b) Install the underdrive clutch assembly to the
transaxle.
29. INSTALL UNDERDRIVE PLANETARY GEAR
ASSEMBLY
(a) Install the parking lock pawl pin and torsion spring to
the parking lock pawl.
D003925E02
C050158E01
D003581E02
D003580E02
Item Inside Outside
Bearing 37.73 mm (1.4854 in.) 58.0 mm (2.283 in.)
Race 29.9 mm (1.177 in.) 55.5 mm (2.185 in.)
D009691E02
Page 1308 of 2000
AX–204U241E AUTOMATIC TRANSAXLE – AUTOMATIC TRANSAXLE UNIT
AX
(b) Temporarily install the parking lock pawl, shaft and
spring to the transaxle case as shown in the
illustration.
(c) Install the underdrive planetary gear assembly to
the transaxle.
NOTICE:
Engage all the discs of the underdrive clutch
and hub splines of the underdrive planetary gear
assembly firmly and assemble them securely.
(d) Install the parking lock pawl shaft.
(e) Install the pawl shaft clamp with the bolt.
Torque: 9.8 N*m (100 kgf*cm, 87 in.*lbf)
(f) Using a straightedge and vernier caliper as shown
in the illustration, measure the gap between the top
of the differential drive pinion in the underdrive
planetary gear and contact surface of the transaxle
and housing (Dimension D).
NOTICE:
Note down the dimension D as it is necessary
for the following process.
D009692E01
D003579E04
D009693E01
D003576E03
D003875E02
Page 1309 of 2000

U241E AUTOMATIC TRANSAXLE – AUTOMATIC TRANSAXLE UNITAX–205
AX
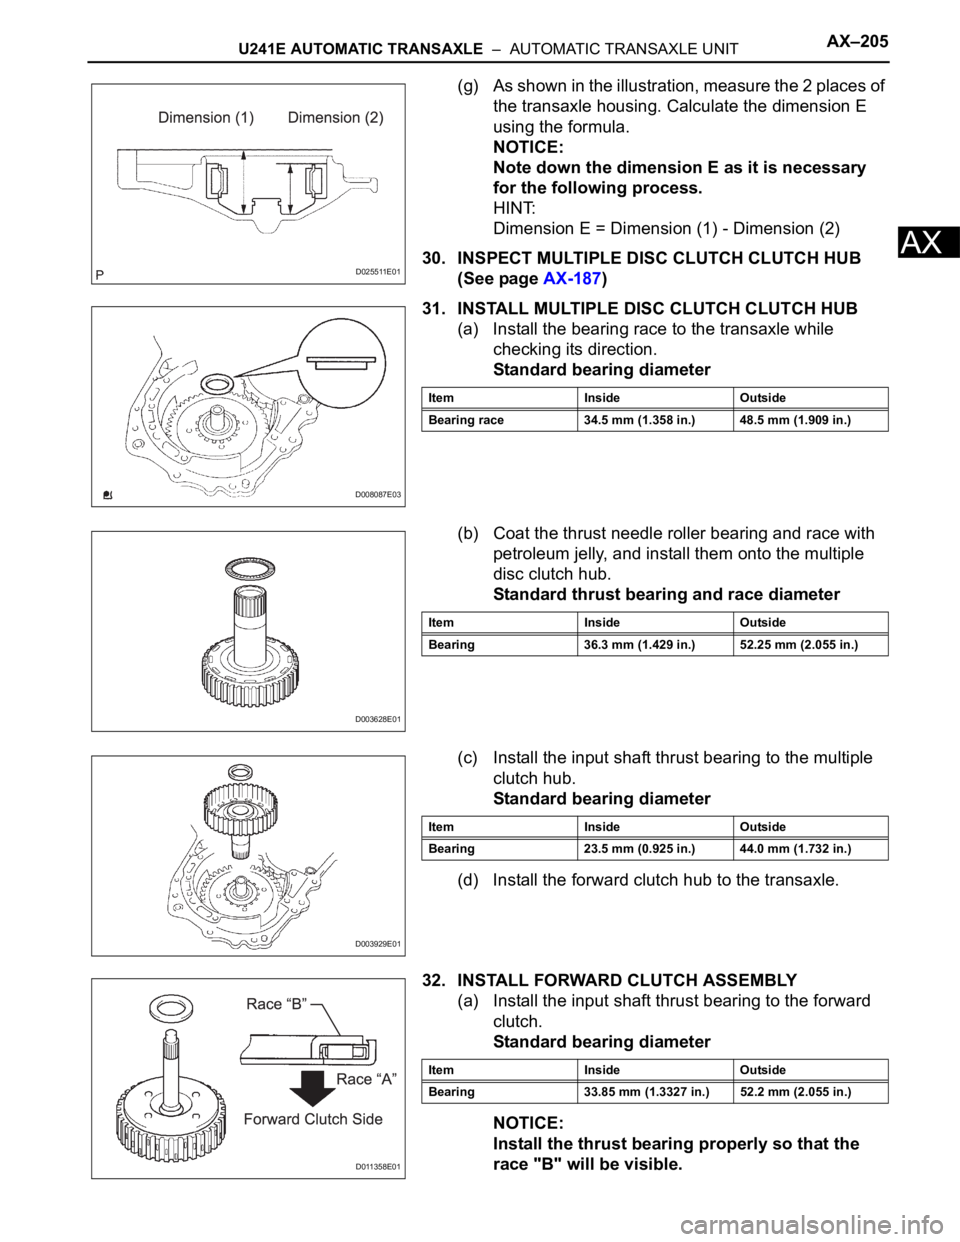
(g) As shown in the illustration, measure the 2 places of
the transaxle housing. Calculate the dimension E
using the formula.
NOTICE:
Note down the dimension E as it is necessary
for the following process.
HINT:
Dimension E = Dimension (1) - Dimension (2)
30. INSPECT MULTIPLE DISC CLUTCH CLUTCH HUB
(See page AX-187)
31. INSTALL MULTIPLE DISC CLUTCH CLUTCH HUB
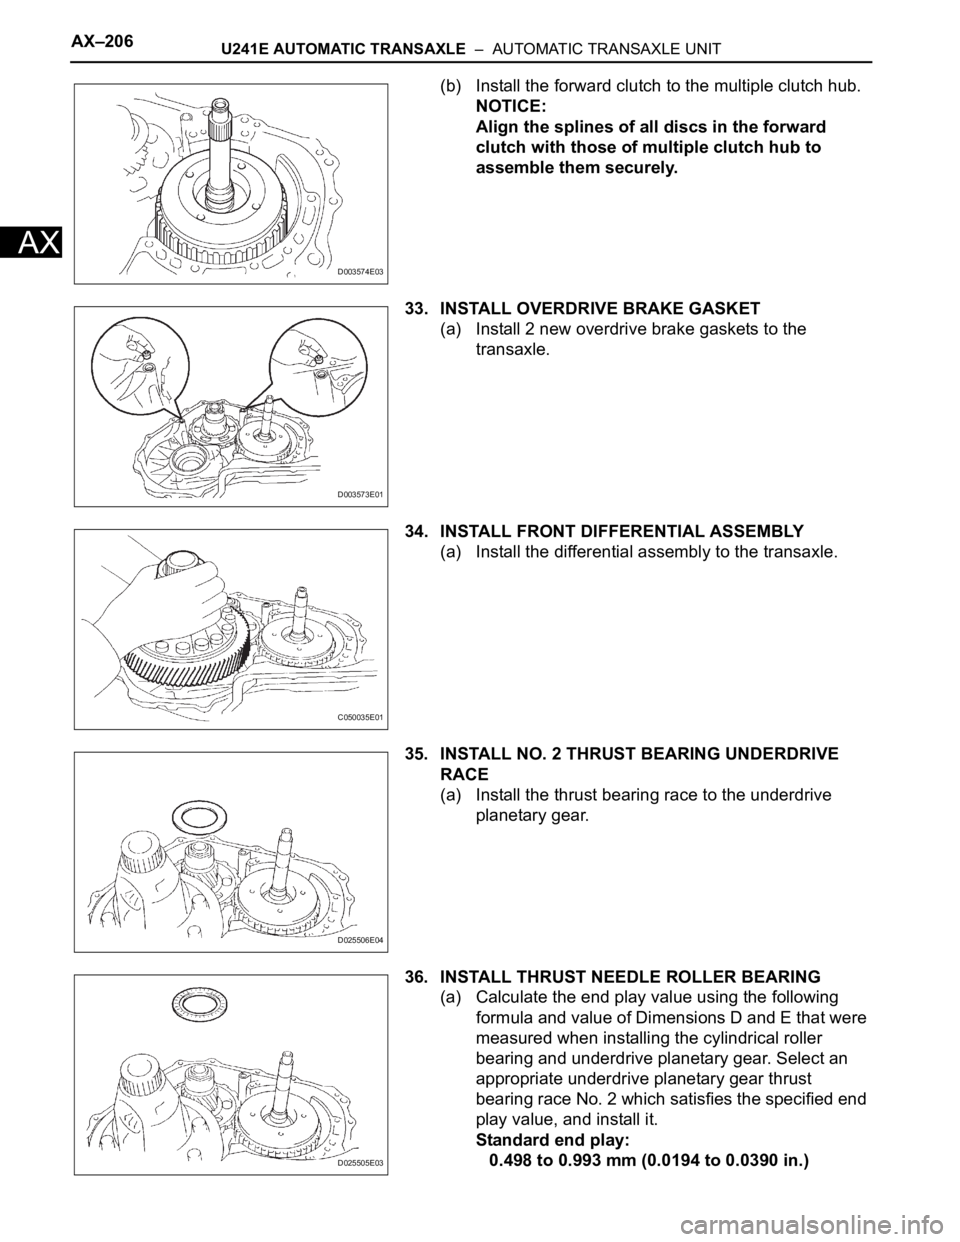
(a) Install the bearing race to the transaxle while
checking its direction.
Standard bearing diameter
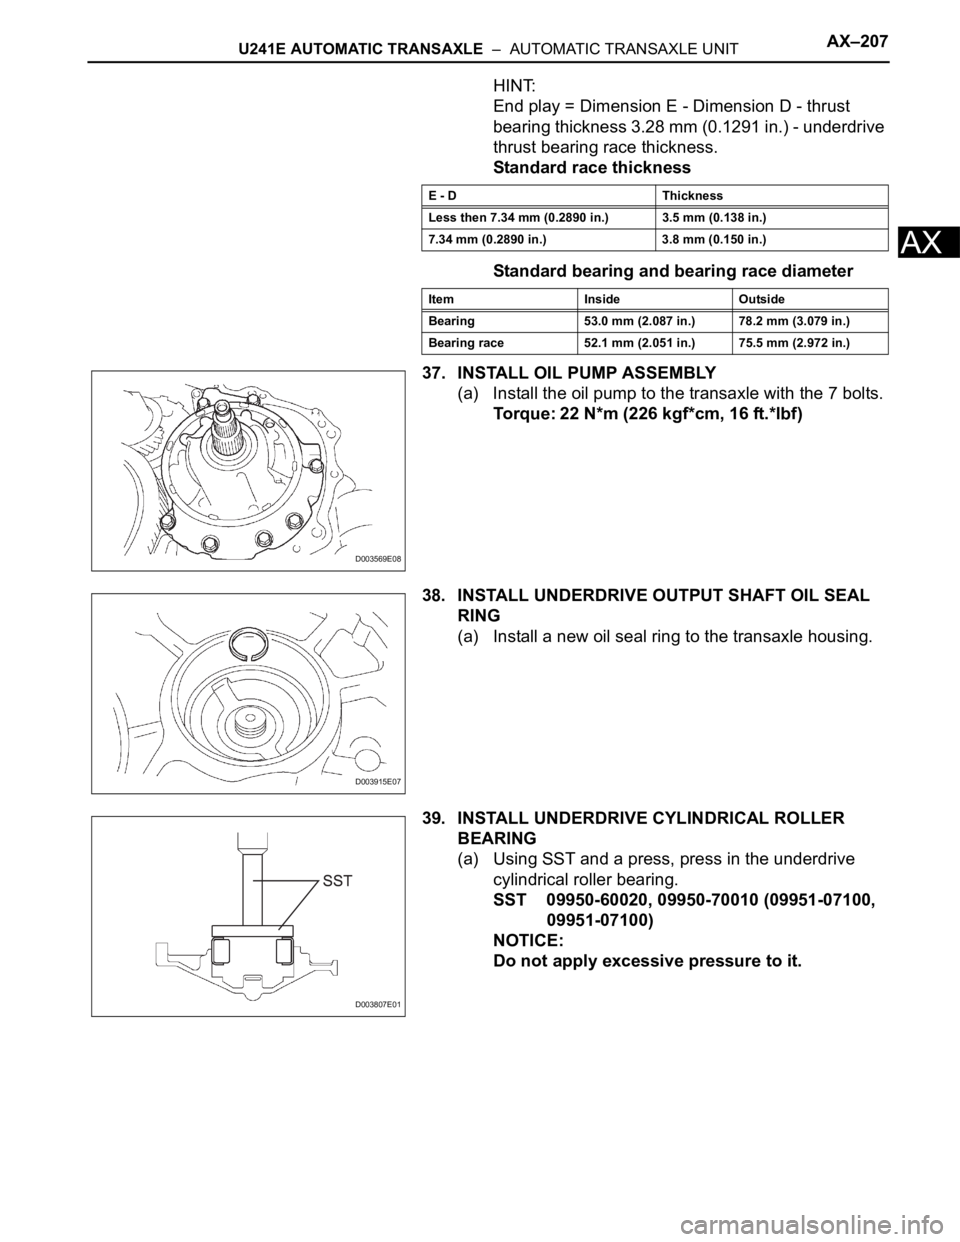
(b) Coat the thrust needle roller bearing and race with
petroleum jelly, and install them onto the multiple
disc clutch hub.
Standard thrust bearing and race diameter
(c) Install the input shaft thrust bearing to the multiple
clutch hub.
Standard bearing diameter
(d) Install the forward clutch hub to the transaxle.
32. INSTALL FORWARD CLUTCH ASSEMBLY
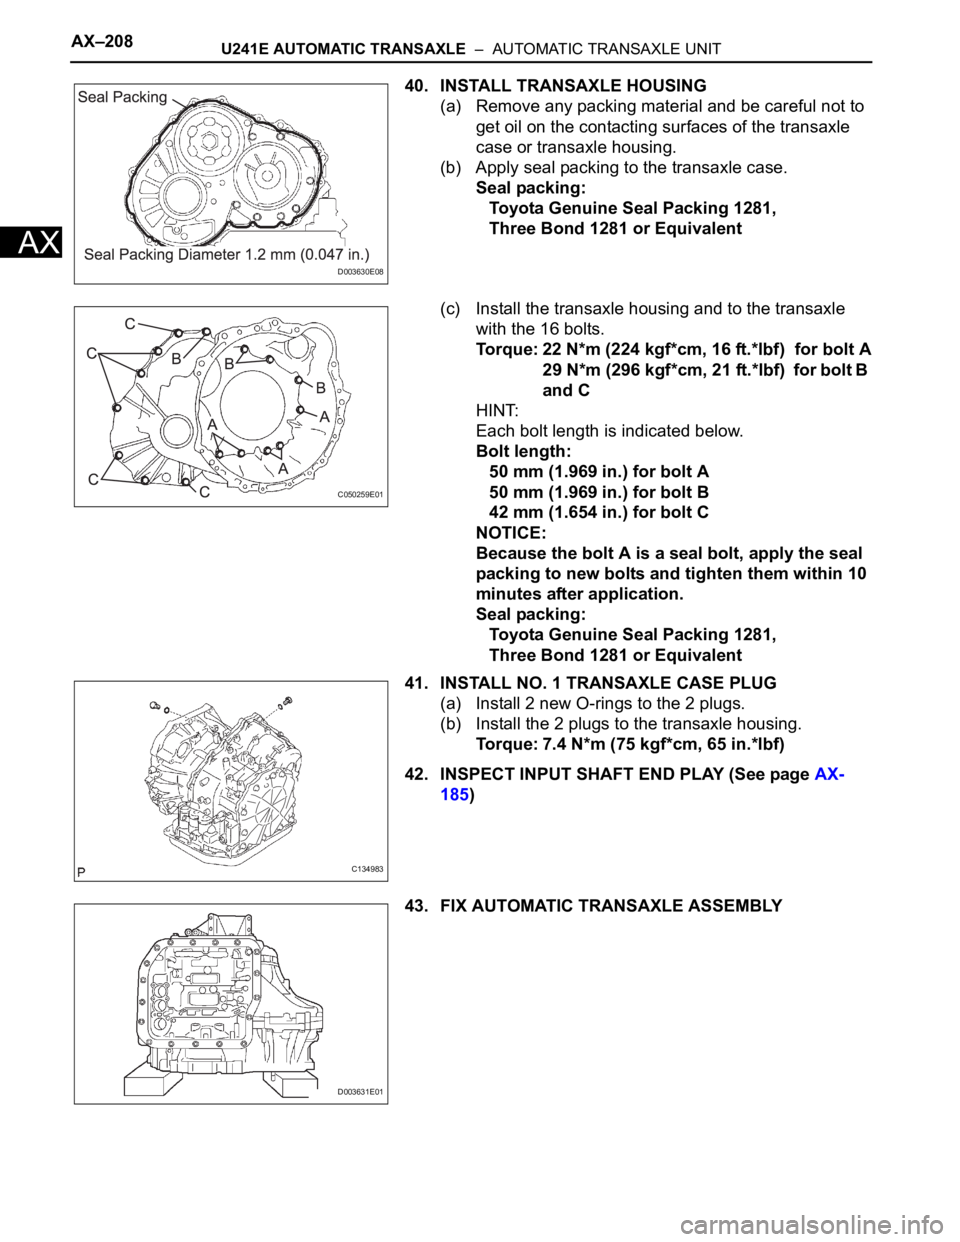
(a) Install the input shaft thrust bearing to the forward
clutch.
Standard bearing diameter
NOTICE:
Install the thrust bearing properly so that the
race "B" will be visible.
D025511E01
D008087E03
Item Inside Outside
Bearing race 34.5 mm (1.358 in.) 48.5 mm (1.909 in.)
D003628E01
Item Inside Outside
Bearing 36.3 mm (1.429 in.) 52.25 mm (2.055 in.)
D003929E01
Item Inside Outside
Bearing 23.5 mm (0.925 in.) 44.0 mm (1.732 in.)
D011358E01
Item Inside Outside
Bearing 33.85 mm (1.3327 in.) 52.2 mm (2.055 in.)
Page 1310 of 2000

AX–206U241E AUTOMATIC TRANSAXLE – AUTOMATIC TRANSAXLE UNIT
AX
(b) Install the forward clutch to the multiple clutch hub.
NOTICE:
Align the splines of all discs in the forward
clutch with those of multiple clutch hub to
assemble them securely.
33. INSTALL OVERDRIVE BRAKE GASKET
(a) Install 2 new overdrive brake gaskets to the
transaxle.
34. INSTALL FRONT DIFFERENTIAL ASSEMBLY
(a) Install the differential assembly to the transaxle.
35. INSTALL NO. 2 THRUST BEARING UNDERDRIVE
RACE
(a) Install the thrust bearing race to the underdrive
planetary gear.
36. INSTALL THRUST NEEDLE ROLLER BEARING
(a) Calculate the end play value using the following
formula and value of Dimensions D and E that were
measured when installing the cylindrical roller
bearing and underdrive planetary gear. Select an
appropriate underdrive planetary gear thrust
bearing race No. 2 which satisfies the specified end
play value, and install it.
Standard end play:
0.498 to 0.993 mm (0.0194 to 0.0390 in.)
D003574E03
D003573E01
C050035E01
D025506E04
D025505E03
Page 1311 of 2000

U241E AUTOMATIC TRANSAXLE – AUTOMATIC TRANSAXLE UNITAX–207
AX
HINT:
End play = Dimension E - Dimension D - thrust
bearing thickness 3.28 mm (0.1291 in.) - underdrive
thrust bearing race thickness.
Standard race thickness
Standard bearing and bearing race diameter
37. INSTALL OIL PUMP ASSEMBLY
(a) Install the oil pump to the transaxle with the 7 bolts.
Torque: 22 N*m (226 kgf*cm, 16 ft.*lbf)
38. INSTALL UNDERDRIVE OUTPUT SHAFT OIL SEAL
RING
(a) Install a new oil seal ring to the transaxle housing.
39. INSTALL UNDERDRIVE CYLINDRICAL ROLLER
BEARING
(a) Using SST and a press, press in the underdrive
cylindrical roller bearing.
SST 09950-60020, 09950-70010 (09951-07100,
09951-07100)
NOTICE:
Do not apply excessive pressure to it.
E - D Thickness
Less then 7.34 mm (0.2890 in.) 3.5 mm (0.138 in.)
7.34 mm (0.2890 in.) 3.8 mm (0.150 in.)
Item Inside Outside
Bearing 53.0 mm (2.087 in.) 78.2 mm (3.079 in.)
Bearing race 52.1 mm (2.051 in.) 75.5 mm (2.972 in.)
D003569E08
D003915E07
D003807E01
Page 1312 of 2000

AX–208U241E AUTOMATIC TRANSAXLE – AUTOMATIC TRANSAXLE UNIT
AX
40. INSTALL TRANSAXLE HOUSING
(a) Remove any packing material and be careful not to
get oil on the contacting surfaces of the transaxle
case or transaxle housing.
(b) Apply seal packing to the transaxle case.
Seal packing:
Toyota Genuine Seal Packing 1281,
Three Bond 1281 or Equivalent
(c) Install the transaxle housing and to the transaxle
with the 16 bolts.
Torque: 22 N*m (224 kgf*cm, 16 ft.*lbf) for bolt A
29 N*m (296 kgf*cm, 21 ft.*lbf) for bolt B
and C
HINT:
Each bolt length is indicated below.
Bolt length:
50 mm (1.969 in.) for bolt A
50 mm (1.969 in.) for bolt B
42 mm (1.654 in.) for bolt C
NOTICE:
Because the bolt A is a seal bolt, apply the seal
packing to new bolts and tighten them within 10
minutes after application.
Seal packing:
Toyota Genuine Seal Packing 1281,
Three Bond 1281 or Equivalent
41. INSTALL NO. 1 TRANSAXLE CASE PLUG
(a) Install 2 new O-rings to the 2 plugs.
(b) Install the 2 plugs to the transaxle housing.
Torque: 7.4 N*m (75 kgf*cm, 65 in.*lbf)
42. INSPECT INPUT SHAFT END PLAY (See page AX-
185)
43. FIX AUTOMATIC TRANSAXLE ASSEMBLY
D003630E08
C050259E01
C134983
D003631E01
Page 1313 of 2000
U241E AUTOMATIC TRANSAXLE – AUTOMATIC TRANSAXLE UNITAX–209
AX
44. INSTALL MANUAL VALVE LEVER SHAFT OIL SEAL
(a) Coat a new oil seal with ATF, and install it to the
transaxle.
(b) Install the oil seal to the transaxle.
45. INSTALL PARKING LOCK ROD SUB-ASSEMBLY
(a) Install the parking lock rod to the manual valve lever.
46. INSTALL MANUAL VALVE LEVER SUB-ASSEMBLY
(a) Install a new spacer and manual valve lever shaft to
the transaxle.
(b) Using a pin punch and hammer, tap in a new pin.
(c) Turn the spacer and lever shaft to align the small
hole for locating the staking position in the spacer
with the staking position mark on the lever shaft.
(d) Using a pin punch, stake the spacer through the
small hole.
(e) Check that the spacer does not turn.
D003632E01
D003905E01
D003565E02
D003564E01
D003930E01
Page 1314 of 2000
AX–210U241E AUTOMATIC TRANSAXLE – AUTOMATIC TRANSAXLE UNIT
AX
47. INSTALL MANUAL VALVE LEVER SHAFT RETAINER
SPRING
(a) Using needle-nose pliers, install the retainer spring.
48. INSTALL PARKING LOCK PAWL BRACKET
(a) Install the parking lock pawl bracket with the 2 bolts.
Torque: 20 N*m (204 kgf*cm, 15 ft.*lbf)
Bolt length:
25 mm (0.984 in.)
49. INSTALL MANUAL DETENT SPRING SUB-
ASSEMBLY
(a) Install the manual detent spring with the 2 bolts.
NOTICE:
Make sure to install the manual detent spring
and cover in this order.
Torque: 20 N*m (204 kgf*cm, 15 ft.*lbf) for bolt A
12 N*m (122 kgf*cm, 9 ft.*lbf) for bolt B
HINT:
Each bolt length is indicated below.
Bolt length:
27 mm (1.063 in.) for bolt A
16 mm (0.630 in.) for bolt B
50. INSTALL B-3 ACCUMULATOR PISTON
(a) Coat a new O-ring with ATF, and install it to the B-3
accumulator piston.
D003559E01
D003561E02
D003560E01
D003904E05