2006 TOYOTA RAV4 rese ignition
[x] Cancel search: rese ignitionPage 66 of 2000
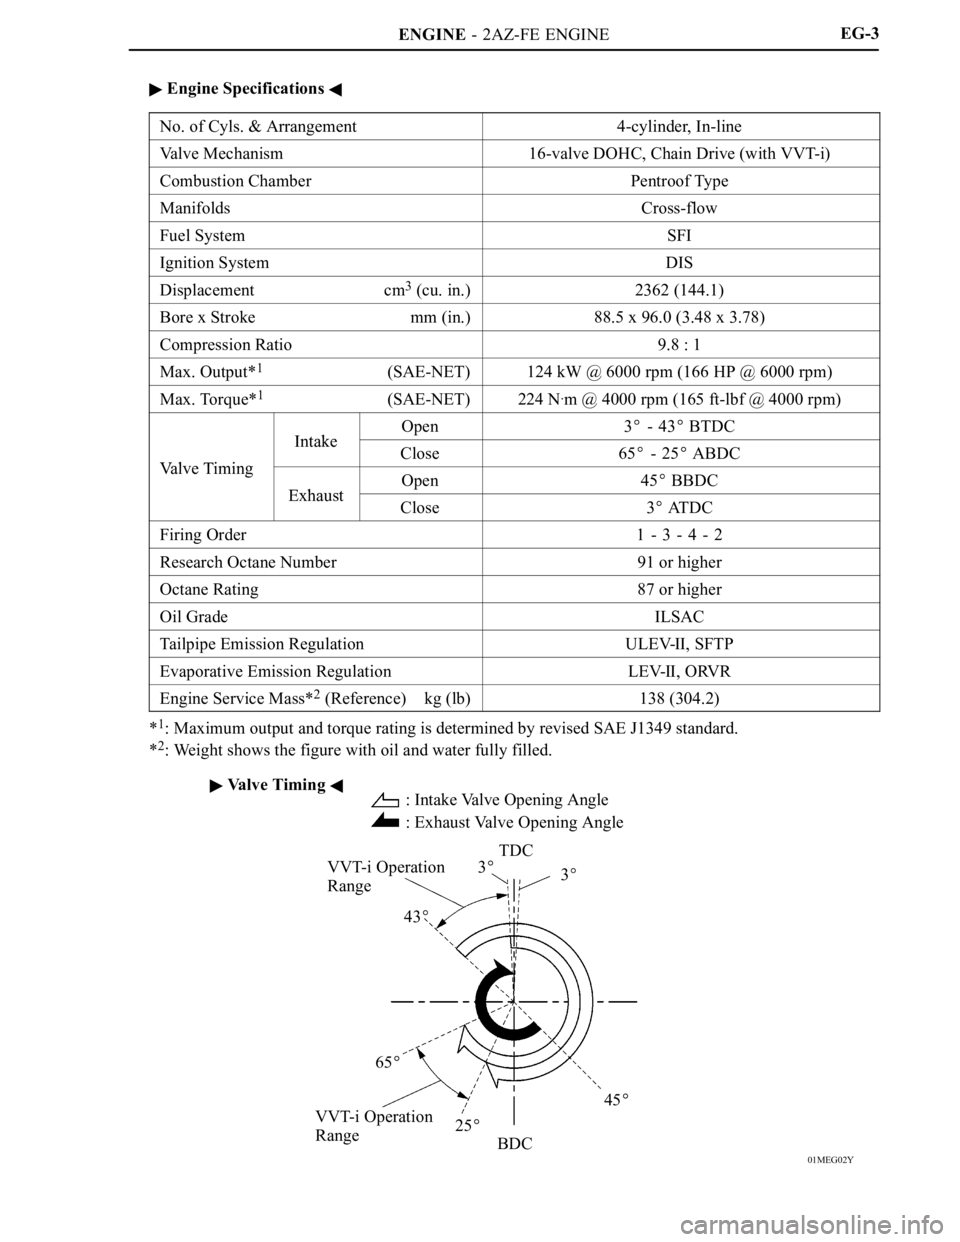
ENGINE - 2AZ-FE ENGINE
01MEG02Y
Valve Timing : Intake Valve Opening Angle
: Exhaust Valve Opening Angle
VVT-i Operation
Range
VVT-i Operation
RangeTDC
3
3
43
65
25
45
BDCEG-3
Engine Specifications
No. of Cyls. & Arrangement4-cylinder, In-line
Valve Mechanism16-valve DOHC, Chain Drive (with VVT-i)
Combustion ChamberPentroof Type
ManifoldsCross-flow
Fuel SystemSFI
Ignition SystemDIS
Displacement cm3 (cu. in.)2362 (144.1)
Bore x Stroke mm (in.)88.5 x 96.0 (3.48 x 3.78)
Compression Ratio9.8 : 1
Max. Output*1(SAE-NET)124 kW @ 6000 rpm (166 HP @ 6000 rpm)
Max. Torque*1(SAE-NET)224 N.m @ 4000 rpm (165 ft-lbf @ 4000 rpm)
IntakeOpen3 - 43 BTDC
Valve Timing
IntakeClose65 - 25 ABDCVa l v e T i m i n g
ExhaustOpen45 BBDCExhaustClose3 ATDC
Firing Order1 - 3 - 4 - 2
Research Octane Number91 or higher
Octane Rating87 or higher
Oil GradeILSAC
Tailpipe Emission RegulationULEV-II, SFTP
Evaporative Emission RegulationLEV-II, ORVR
Engine Service Mass*2 (Reference) kg (lb)138 (304.2)
*1: Maximum output and torque rating is determined by revised SAE J1349 standard.
*
2: Weight shows the figure with oil and water fully filled.
Page 383 of 2000
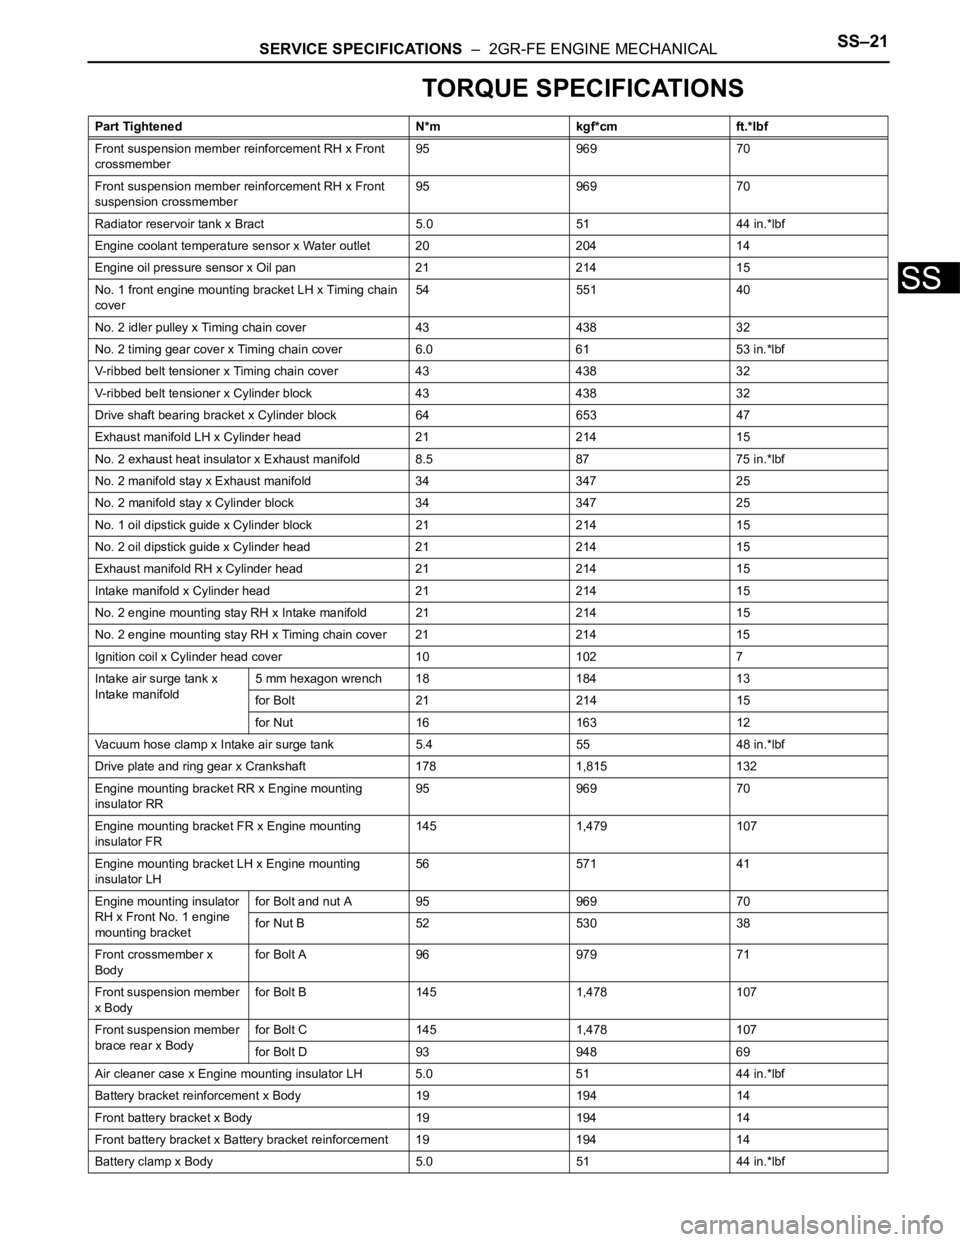
SERVICE SPECIFICATIONS – 2GR-FE ENGINE MECHANICALSS–21
SS
TORQUE SPECIFICATIONS
Part Tightened N*m kgf*cm ft.*lbf
Front suspension member reinforcement RH x Front
crossmember95 969 70
Front suspension member reinforcement RH x Front
suspension crossmember95 969 70
Radiator reservoir tank x Bract 5.0 51 44 in.*lbf
Engine coolant temperature sensor x Water outlet 20 204 14
Engine oil pressure sensor x Oil pan 21 214 15
No. 1 front engine mounting bracket LH x Timing chain
cover54 551 40
No. 2 idler pulley x Timing chain cover 43 438 32
No. 2 timing gear cover x Timing chain cover 6.0 61 53 in.*lbf
V-ribbed belt tensioner x Timing chain cover 43 438 32
V-ribbed belt tensioner x Cylinder block 43 438 32
Drive shaft bearing bracket x Cylinder block 64 653 47
Exhaust manifold LH x Cylinder head 21 214 15
No. 2 exhaust heat insulator x Exhaust manifold 8.5 87 75 in.*lbf
No. 2 manifold stay x Exhaust manifold 34 347 25
No. 2 manifold stay x Cylinder block 34 347 25
No. 1 oil dipstick guide x Cylinder block 21 214 15
No. 2 oil dipstick guide x Cylinder head 21 214 15
Exhaust manifold RH x Cylinder head 21 214 15
Intake manifold x Cylinder head 21 214 15
No. 2 engine mounting stay RH x Intake manifold 21 214 15
No. 2 engine mounting stay RH x Timing chain cover 21 214 15
Ignition coil x Cylinder head cover 10 102 7
Intake air surge tank x
Intake manifold5 mm hexagon wrench 18 184 13
for Bolt 21 214 15
for Nut 16 163 12
Vacuum hose clamp x Intake air surge tank 5.4 55 48 in.*lbf
Drive plate and ring gear x Crankshaft 178 1,815 132
Engine mounting bracket RR x Engine mounting
insulator RR95 969 70
Engine mounting bracket FR x Engine mounting
insulator FR145 1,479 107
Engine mounting bracket LH x Engine mounting
insulator LH56 571 41
Engine mounting insulator
RH x Front No. 1 engine
mounting bracketfor Bolt and nut A 95 969 70
for Nut B 52 530 38
Front crossmember x
Bodyfor Bolt A 96 979 71
Front suspension member
x Bodyfor Bolt B 145 1,478 107
Front suspension member
brace rear x Bodyfor Bolt C 145 1,478 107
for Bolt D 93 948 69
Air cleaner case x Engine mounting insulator LH 5.0 51 44 in.*lbf
Battery bracket reinforcement x Body 19 194 14
Front battery bracket x Body 19 194 14
Front battery bracket x Battery bracket reinforcement 19 194 14
Battery clamp x Body 5.0 51 44 in.*lbf
Page 885 of 2000

2AZ-FE IGNITION – IGNITION SYSTEMIG–5
IG
ON-VEHICLE INSPECTION
1. CHECK IGNITION COIL ASSEMBLY AND PERFORM
SPARK TEST
NOTICE:
In this section, the terms "cold" and "hot" refer to
the temperature of the coils. "Cold" means
approximately -10 to 50
C (14 to 122F). "Hot" means
approximately 50 to 100
C (122 to 212F).
(a) Check the DTCs.
NOTICE:
If a DTC is present, perform troubleshooting in
accordance with the procedure for that DTC.
(b) Check that sparks occur.
(1) Remove the No. 1 engine cover.
(2) Remove the bolt and ignition coil.
(3) Using a 16 mm spark plug wrench, remove the
spark plug.
(4) Disconnect the 4 fuel injector connectors.
(5) Install the spark plug into the ignition coil, and
then connect the ignition coil connectors.
(6) Ground the spark plug.
(7) Check that sparks occur at the spark plug while
the engine is being cranked.
NOTICE:
• Be sure to ground the spark plugs when
checking them.
• If the ignition coil has been struck or
dropped, replace it.
• Do not crank the engine for more than 2
seconds.
If sparks do not occur, Perform the spark test.
(8) Using a 16 mm plug wrench, install the spark
plug.
Torque: 25 N*m (254 kgf*cm, 18 ft.*lbf)
A124849E01
A097448E01
A124396
Page 895 of 2000

2GR-FE IGNITION – IGNITION SYSTEMIG–5
IG
ON-VEHICLE INSPECTION
1. CHECK IGNITION COIL ASSEMBLY AND PERFORM
SPARK TEST
NOTICE:
In this section, the terms "Cold" and "Hot" refer to
the temperature of the sensor. "Cold" means
approximately -10 to 50
C (14 to 122F). "Hot" means
approximately 50 to 100
C (122 to 212F).
(a) Check the DTCs.
NOTICE:
If a DTC is present, perform troubleshooting in
accordance with the procedure for that DTC.
(b) Check that sparks occur.
(1) Remove the V-bank cover.
(2) Remove the intake air surge tank (see page
EM-27).
(3) Remove the bolt and ignition coil.
(4) Using a 16 mm spark plug wrench, remove the
spark plug.
(5) Disconnect the 6 fuel injector connectors.
(6) Install the spark plug into the ignition coil, and
then connect the ignition coil connectors.
(7) Ground the spark plug.
(8) Check that sparks occur at the spark plug while
the engine is being cranked.
NOTICE:
• Be sure to ground the spark plugs when
checking them.
• If the ignition coil has been struck or
dropped, replace it.
• Do not crank the engine for more than 2
seconds.
If sparks do not occur, perform troubleshooting
using the spark test flowchart.
(9) Using a 16 mm plug wrench, install the spark
plug.
Torque: 25 N*m (254 kgf*cm, 18 ft.*lbf)
(10) Install the ignition coil with the bolt.
Torque: 10 N*m (102 kgf*cm, 7 ft.*lbf)
(11) Connect the 6 fuel injector connectors.
(12) Install the intake air surge tank (see page EM-
34).
(13) Install the V-bank cover.
A136823
A136826
Page 956 of 2000
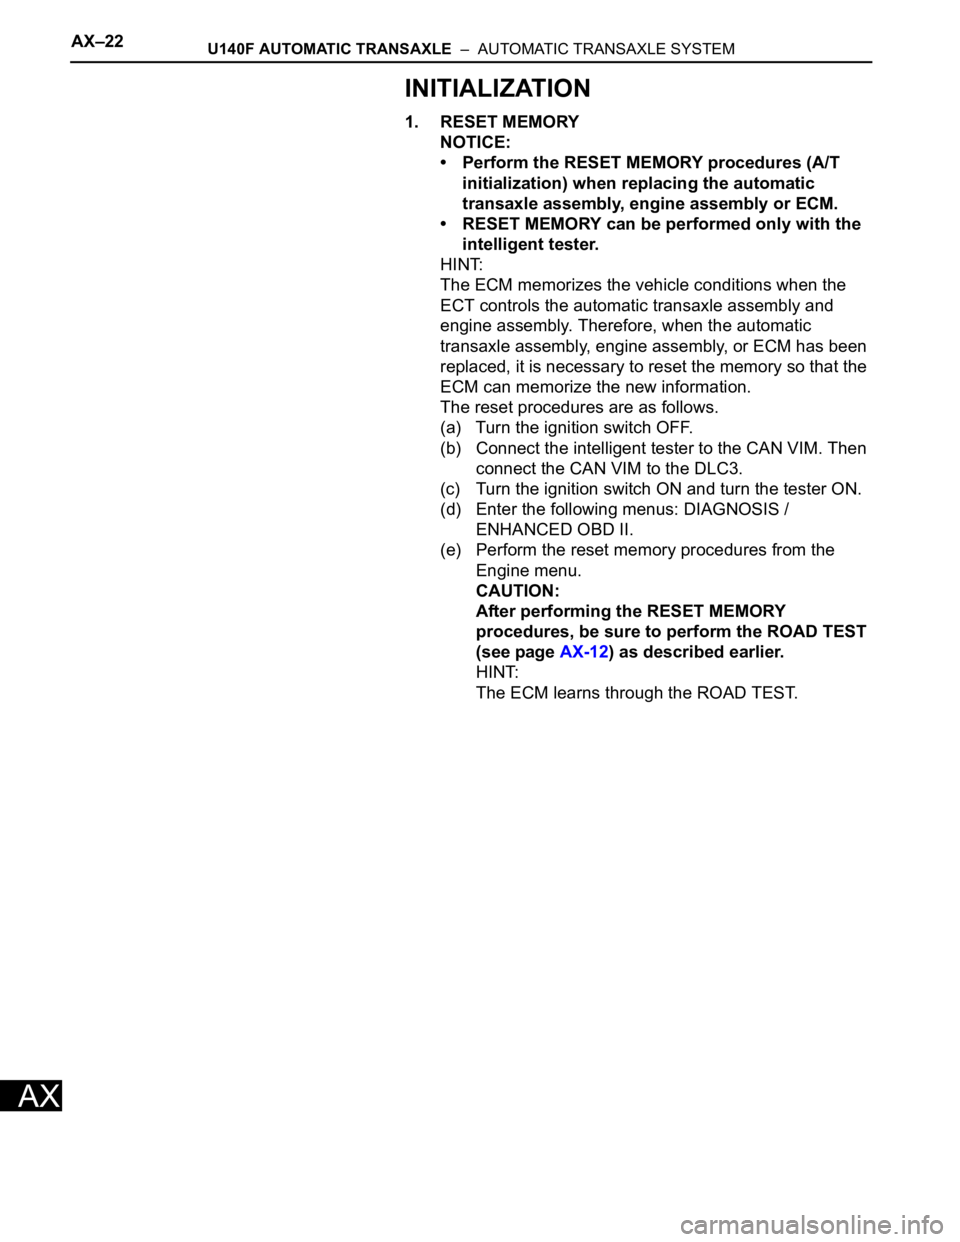
AX–22U140F AUTOMATIC TRANSAXLE – AUTOMATIC TRANSAXLE SYSTEM
AX
INITIALIZATION
1. RESET MEMORY
NOTICE:
• Perform the RESET MEMORY procedures (A/T
initialization) when replacing the automatic
transaxle assembly, engine assembly or ECM.
• RESET MEMORY can be performed only with the
intelligent tester.
HINT:
The ECM memorizes the vehicle conditions when the
ECT controls the automatic transaxle assembly and
engine assembly. Therefore, when the automatic
transaxle assembly, engine assembly, or ECM has been
replaced, it is necessary to reset the memory so that the
ECM can memorize the new information.
The reset procedures are as follows.
(a) Turn the ignition switch OFF.
(b) Connect the intelligent tester to the CAN VIM. Then
connect the CAN VIM to the DLC3.
(c) Turn the ignition switch ON and turn the tester ON.
(d) Enter the following menus: DIAGNOSIS /
ENHANCED OBD II.
(e) Perform the reset memory procedures from the
Engine menu.
CAUTION:
After performing the RESET MEMORY
procedures, be sure to perform the ROAD TEST
(see page AX-12) as described earlier.
HINT:
The ECM learns through the ROAD TEST.
Page 1039 of 2000

U151E AUTOMATIC TRANSAXLE – AUTOMATIC TRANSAXLE SYSTEMAX–23
AX
INITIALIZATION
1. RESET MEMORY
NOTICE:
• Perform the RESET MEMORY procedures (A/T
initialization) when replacing the automatic
transaxle assembly, engine assembly or ECM.
• RESET MEMORY can be performed only with the
intelligent tester.
HINT:
The ECM memorizes the vehicle conditions when the
ECT controls the automatic transaxle assembly and
engine assembly. Therefore, when the automatic
transaxle assembly, engine assembly, or ECM has been
replaced, it is necessary to reset the memory so that the
ECM can memorize the new information.
The reset procedures are as follows.
(a) Turn the ignition switch OFF.
(b) Connect the intelligent tester to the CAN VIM. Then
connect the CAN VIM to the DLC3.
(c) Turn the ignition switch ON and turn the tester ON.
(d) Enter the following menus: DIAGNOSIS /
ENHANCED OBD II.
(e) Perform the reset memory procedures from the
Engine menu.
CAUTION:
After performing the RESET MEMORY
procedures, be sure to perform the ROAD TEST
(see page AX-13) as described earlier.
HINT:
The ECM learns through the ROAD TEST.
Page 1142 of 2000
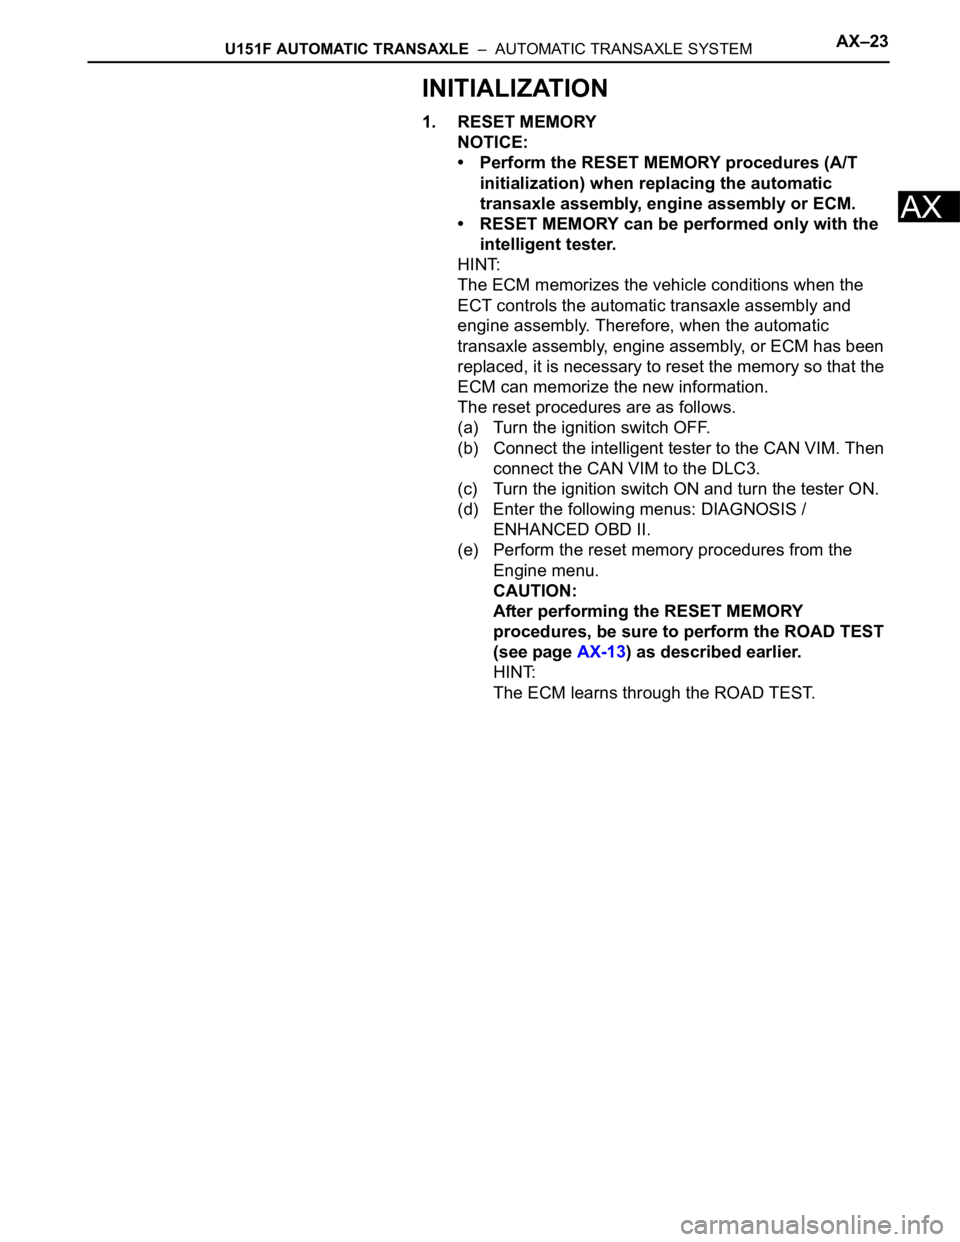
U151F AUTOMATIC TRANSAXLE – AUTOMATIC TRANSAXLE SYSTEMAX–23
AX
INITIALIZATION
1. RESET MEMORY
NOTICE:
• Perform the RESET MEMORY procedures (A/T
initialization) when replacing the automatic
transaxle assembly, engine assembly or ECM.
• RESET MEMORY can be performed only with the
intelligent tester.
HINT:
The ECM memorizes the vehicle conditions when the
ECT controls the automatic transaxle assembly and
engine assembly. Therefore, when the automatic
transaxle assembly, engine assembly, or ECM has been
replaced, it is necessary to reset the memory so that the
ECM can memorize the new information.
The reset procedures are as follows.
(a) Turn the ignition switch OFF.
(b) Connect the intelligent tester to the CAN VIM. Then
connect the CAN VIM to the DLC3.
(c) Turn the ignition switch ON and turn the tester ON.
(d) Enter the following menus: DIAGNOSIS /
ENHANCED OBD II.
(e) Perform the reset memory procedures from the
Engine menu.
CAUTION:
After performing the RESET MEMORY
procedures, be sure to perform the ROAD TEST
(see page AX-13) as described earlier.
HINT:
The ECM learns through the ROAD TEST.
Page 1246 of 2000
AX–22U241E AUTOMATIC TRANSAXLE – AUTOMATIC TRANSAXLE SYSTEM
AX
INITIALIZATION
1. RESET MEMORY
NOTICE:
• Perform the RESET MEMORY procedures (A/T
initialization) when replacing the automatic
transaxle assembly, engine assembly or ECM.
• RESET MEMORY can be performed only with the
intelligent tester.
HINT:
The ECM memorizes the vehicle conditions when the
ECT controls the automatic transaxle assembly and
engine assembly. Therefore, when the automatic
transaxle assembly, engine assembly, or ECM has been
replaced, it is necessary to reset the memory so that the
ECM can memorize the new information.
The reset procedures are as follows.
(a) Turn the ignition switch OFF.
(b) Connect the intelligent tester to the CAN VIM. Then
connect the CAN VIM to the DLC3.
(c) Turn the ignition switch ON and turn the tester ON.
(d) Enter the following menus: DIAGNOSIS /
ENHANCED OBD II.
(e) Perform the reset memory procedures from the
Engine menu.
CAUTION:
After performing the RESET MEMORY
procedures, be sure to perform the ROAD TEST
(see page AX-12) as described earlier.
HINT:
The ECM learns through the ROAD TEST.