2006 MERCEDES-BENZ SPRINTER ignition
[x] Cancel search: ignitionPage 1601 of 2305
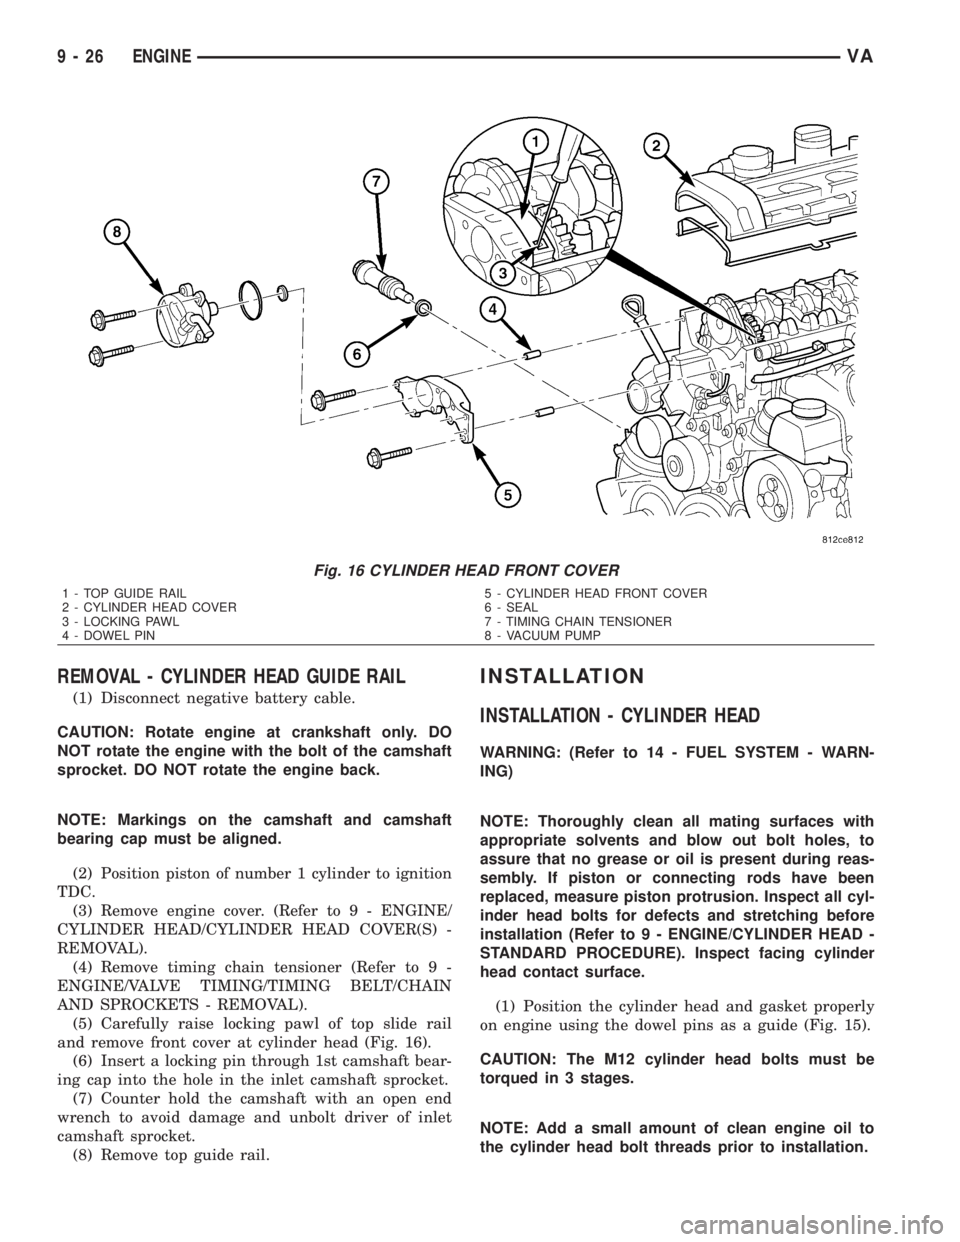
REMOVAL - CYLINDER HEAD GUIDE RAIL
(1) Disconnect negative battery cable.
CAUTION: Rotate engine at crankshaft only. DO
NOT rotate the engine with the bolt of the camshaft
sprocket. DO NOT rotate the engine back.
NOTE: Markings on the camshaft and camshaft
bearing cap must be aligned.
(2) Position piston of number 1 cylinder to ignition
TDC.
(3) Remove engine cover. (Refer to 9 - ENGINE/
CYLINDER HEAD/CYLINDER HEAD COVER(S) -
REMOVAL).
(4) Remove timing chain tensioner (Refer to 9 -
ENGINE/VALVE TIMING/TIMING BELT/CHAIN
AND SPROCKETS - REMOVAL).
(5) Carefully raise locking pawl of top slide rail
and remove front cover at cylinder head (Fig. 16).
(6) Insert a locking pin through 1st camshaft bear-
ing cap into the hole in the inlet camshaft sprocket.
(7) Counter hold the camshaft with an open end
wrench to avoid damage and unbolt driver of inlet
camshaft sprocket.
(8) Remove top guide rail.
INSTALLATION
INSTALLATION - CYLINDER HEAD
WARNING: (Refer to 14 - FUEL SYSTEM - WARN-
ING)
NOTE: Thoroughly clean all mating surfaces with
appropriate solvents and blow out bolt holes, to
assure that no grease or oil is present during reas-
sembly. If piston or connecting rods have been
replaced, measure piston protrusion. Inspect all cyl-
inder head bolts for defects and stretching before
installation (Refer to 9 - ENGINE/CYLINDER HEAD -
STANDARD PROCEDURE). Inspect facing cylinder
head contact surface.
(1) Position the cylinder head and gasket properly
on engine using the dowel pins as a guide (Fig. 15).
CAUTION: The M12 cylinder head bolts must be
torqued in 3 stages.
NOTE: Add a small amount of clean engine oil to
the cylinder head bolt threads prior to installation.
Fig. 16 CYLINDER HEAD FRONT COVER
1 - TOP GUIDE RAIL
2 - CYLINDER HEAD COVER
3 - LOCKING PAWL
4 - DOWEL PIN5 - CYLINDER HEAD FRONT COVER
6 - SEAL
7 - TIMING CHAIN TENSIONER
8 - VACUUM PUMP
9 - 26 ENGINEVA
Page 1603 of 2305

INSTALLATION - CYLINDER HEAD FRONT
COVER
NOTE: Thoroughly clean all mating surfaces with
appropriate solvents to assure that no grease or oil
is present during reassembly.
NOTE: Dowel pins are used as a guide during
assembly and must remain in the proper position to
assure a good sealing surface.
(1) Apply sealant to the marked surfaces with a
bead thickness of 1.5 0.5 mm (Fig. 18).
NOTE: Install front cover of cylinder head within 10
minutes after applying sealant. Do not spread seal-
ing bead.
(2) Raise locking pawl of top guide rail and guide
front cover onto guide pins.
(3) Install bolts attaching front cover (Fig. 16)
Tighten bolts to 14N´m (124 lbs. in.).
WARNING: NO FIRE, OPEN FLAMES OR SMOKING.
REMOVE SOURCES OF IGNITION FROM THE AREA.
WEAR PROTECTIVE CLOTHING WHEN HANDLING
FUEL. RISK OF POISONING FROM INHALING AND
SWALLOWING FUEL. RISK OF INJURY FROM SKIN
AND EYE CONTACT WITH FUEL. POUR FUELS
ONLY INTO SUITABLE AND APPROPRIATELY
MARKED CONTAINERS.
(4) Install vacuum pump (Refer to 9 - ENGINE/
ENGINE BLOCK/INTERNAL VACUUM PUMP -
INSTALLATION).NOTE: Timing chain tensioner must be installed
with a new gasket.
(5) Install timing chain tensioner (Refer to 9 -
ENGINE/VALVE TIMING/TIMING BELT/CHAIN
AND SPROCKETS - INSTALLATION).
(6) Connect negative battery cable.
WARNING: USE EXTREME CAUTION WHEN THE
ENGINE IS OPERATING. DO NOT STAND IN A
DIRECT LINE WITH THE FAN. DO NOT PUT YOUR
HANDS NEAR THE PULLEYS, BELTS OR FAN. DO
NOT WEAR LOOSE CLOTHES.
(7) Start the engine and inspect for leaks. Care
must be taken to observe the fuel system warning
(Refer to 14 - FUEL SYSTEM - WARNING)
INSTALLATION - CYLINDER HEAD GUIDE RAIL
(1) Carefully position the top guide rail onto the
guide pins.
(2) Counter hold the camshaft with an open end
wrench and install driver of inlet camshaft sprocket.
Tight bolt to 50N´m (37 lbs. ft.).
(3) Remove camshaft sprocket locking pin.
(4) Carefully raise locking pawl of top guide rail
and install front cover at cylinder head (Fig. 16).
(5) Install timing chain tensioner with new gasket
(Refer to 9 - ENGINE/VALVE TIMING/TIMING
BELT/CHAIN AND SPROCKETS - INSTALLA-
TION).
(6) Install engine cover (Refer to 9 - ENGINE/
CYLINDER HEAD/CYLINDER HEAD COVER(S) -
INSTALLATION).
(7) Reconnect negative battery cable.
WARNING: US EXTREME CAUTION WHEN THE
ENGINE IS OPERATING. DO NOT STAND IN A
DIRECT LINE WITH THE FAN. DO NOT PUT YOUR
HANDS NEAR THE PULLEYS, BELTS OR FAN. DO
NOT WEAR LOOSE CLOTHES.
(8) Start engine and inspect for leaks.
CAMSHAFT(S)
STANDARD PROCEDURE
STANDARD PROCEDURE - CHECKING CAM-
SHAFT POSITION
(1) Disconnect negative battery cable.
(2) Remove engine cover (Refer to 9 - ENGINE
COVER - REMOVAL).
WARNING: (Refer to 14 - FUEL SYSTEM - WARN-
ING)
Fig. 18 CYLINDER HEAD COVER SEALING
SURFACE
1 - CYLINDER HEAD FRONT COVER
2 - SEALANT BEAD
9 - 28 ENGINEVA
Page 1604 of 2305
(3) Remove injectors (Refer to 14 - FUEL SYS-
TEM/FUEL INJECTION/FUEL INJECTOR -
REMOVAL).
(4) Clean injectors and recesses (Refer to 14 -
FUEL SYSTEM/FUEL INJECTION/FUEL INJEC-
TOR - STANDARD PROCEDURE).
(5) Remove cylinder head cover (Refer to 9 -
ENGINE/CYLINDER HEAD/CYLINDER HEAD
COVER(S) - REMOVAL).
NOTE: Rotate engine at crankshaft only. DO NOT
crank engine at the camshaft and DO NOT rotate
the engine backward.
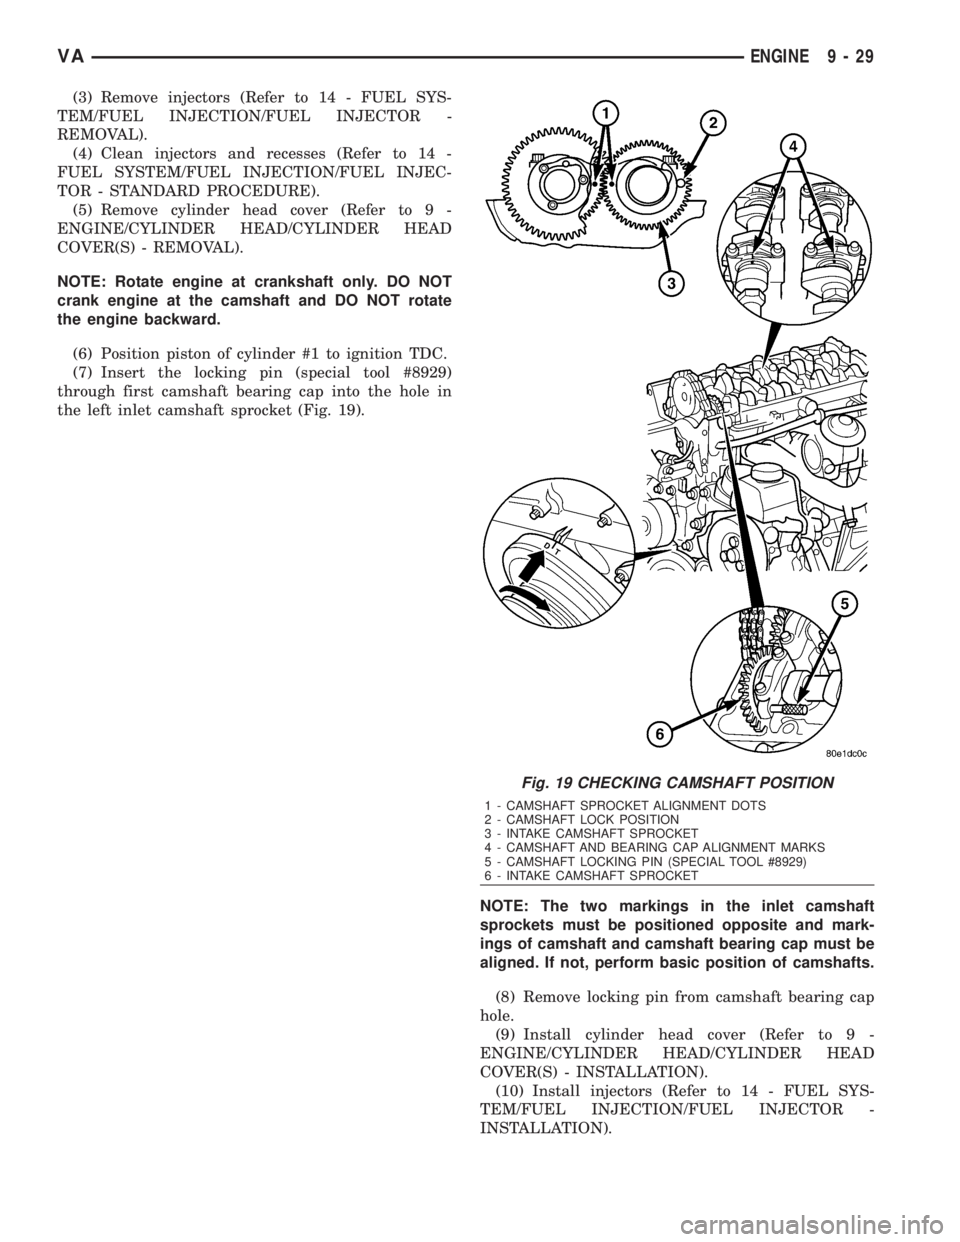
(6) Position piston of cylinder #1 to ignition TDC.
(7) Insert the locking pin (special tool #8929)
through first camshaft bearing cap into the hole in
the left inlet camshaft sprocket (Fig. 19).
NOTE: The two markings in the inlet camshaft
sprockets must be positioned opposite and mark-
ings of camshaft and camshaft bearing cap must be
aligned. If not, perform basic position of camshafts.
(8) Remove locking pin from camshaft bearing cap
hole.
(9) Install cylinder head cover (Refer to 9 -
ENGINE/CYLINDER HEAD/CYLINDER HEAD
COVER(S) - INSTALLATION).
(10) Install injectors (Refer to 14 - FUEL SYS-
TEM/FUEL INJECTION/FUEL INJECTOR -
INSTALLATION).
Fig. 19 CHECKING CAMSHAFT POSITION
1 - CAMSHAFT SPROCKET ALIGNMENT DOTS
2 - CAMSHAFT LOCK POSITION
3 - INTAKE CAMSHAFT SPROCKET
4 - CAMSHAFT AND BEARING CAP ALIGNMENT MARKS
5 - CAMSHAFT LOCKING PIN (SPECIAL TOOL #8929)
6 - INTAKE CAMSHAFT SPROCKET
VAENGINE 9 - 29
Page 1605 of 2305

WARNING: USE EXTREME CAUTION WHEN THE
ENGINE IS OPERATING. DO NOT STAND IN A
DIRECT LINE WITH THE FAN. DO NOT PUT YOUR
HANDS NEAR THE PULLEYS, BELTS OR FAN. DO
NO WEAR LOOSE CLOTHING.
(11) Start the engine and inspect for leaks.
STANDARD PROCEDURE - INSPECTING TAP-
PET CLEARANCE
(1) Check engine oil level, adjust as necessary.
(2) Warm engine to operating temperature
(approx. 80ÉC, 176ÉF).
(3) Remove the cylinder head cover (Refer to 9 -
ENGINE/CYLINDER HEAD/CYLINDER HEAD
COVER(S) - REMOVAL).
(4) Rotate the engine by the crankshaft until the
camshaft, at the tappet to be tested, is at it's base
circle (camshaft nose must point upward) (Fig. 20).
NOTE: Do not use a tool that will mar or damage
the tappet surface. If applied pressure is too strong
the tappet will appear to drop, but what happens is,
the valve opens.
(5) Use a pressing tool and apply pressure to the
tappet by hand (Fig. 20).
(6) If the tappet drops faster in comparison to the
other tappets, remove the camshaft and replace the
tappet.
REMOVAL
NOTE: Tappets are serviced Only when replacing
the camshaft housing. Inspect tappet clearance
(Refer to 9 - ENGINE/CYLINDER HEAD/CAM-
SHAFT(S) - STANDARD PROCEDURE).
(1) Disconnect negative battery cable.
(2) Remove engine cover. (Refer to 9 - ENGINE -
REMOVAL).
WARNING: (Refer to 14 - FUEL SYSTEM - WARN-
ING)
(3) Remove high pressure lines and injectors
(Refer to 14 - FUEL SYSTEM/FUEL INJECTION/
FUEL INJECTOR - REMOVAL).
(4) Remove cylinder head cover (Refer to 9 -
ENGINE/CYLINDER HEAD/CYLINDER HEAD
COVER(S) - REMOVAL).
NOTE: Rotate engine at the crankshaft only. DO
NOT rotate the engine at the camshaft. DO NOT
rotate the engine backward.
(5) Position piston of cylinder #1 to ignition TDC.
(6) Lock inlet camshaft (Fig. 21).
Fig. 20 TAPPET CLEARANCE
1 - CAMSHAFT
2 - PRESSURE APPLICATION POINT
3 - HYDRAULIC TAPPET
4 - CAMSHAFT HOLD DOWN
9 - 30 ENGINEVA
Page 1607 of 2305
INSTALLATION
CAUTION: The camshafts are sensitive to fractur-
ing. Ensure they are installed free of stress. Oil
bucket tappets and camshaft bearing points.
Inspect ease of operation of bucket tappets.
CAUTION: Pay attention to assignment of cam-
shafts. Camshaft code numbers are visible on the
thrust collar of the axial bearing. Install camshafts
so that the two holes in camshaft sprockets are
positioned opposite and the markings of the cam-
shaft and camshaft bearing cap are aligned.
(1) Install inlet and exhaust camshafts.
NOTE: Tappets are Only serviced when replacing
the camshaft housing. Inspect tappet clearence
(Refer to 9 - ENGINE/CYLINDER HEAD/CAM-
SHAFT(S) - STANDARD PROCEDURE).
(2) Align inlet and exhaust camshafts at axial
bearing (Refer to 9 - ENGINE/CYLINDER HEAD/
CAMSHAFT(S) - STANDARD PROCEDURE).NOTE: Pay attention to markings on camshaft bear-
ing caps.
CAUTION: Do not rotate engine counter clockwise.
(3) Position the piston of cylinder #1 to ignition
TDC.
NOTE: Pay attention to markings on camshaft bear-
ing caps and follow the tightening procedure below.
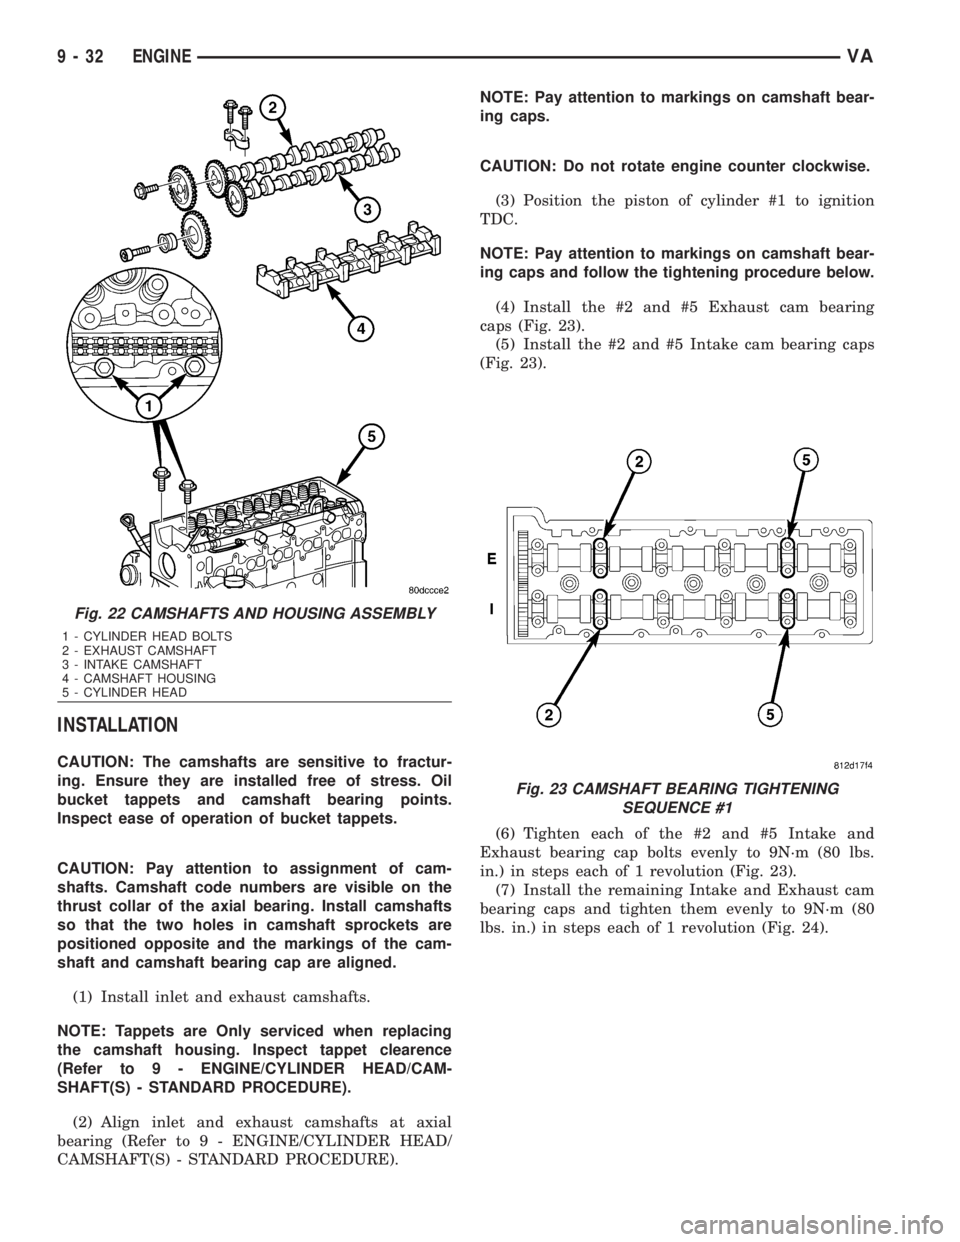
(4) Install the #2 and #5 Exhaust cam bearing
caps (Fig. 23).
(5) Install the #2 and #5 Intake cam bearing caps
(Fig. 23).
(6) Tighten each of the #2 and #5 Intake and
Exhaust bearing cap bolts evenly to 9N´m (80 lbs.
in.) in steps each of 1 revolution (Fig. 23).
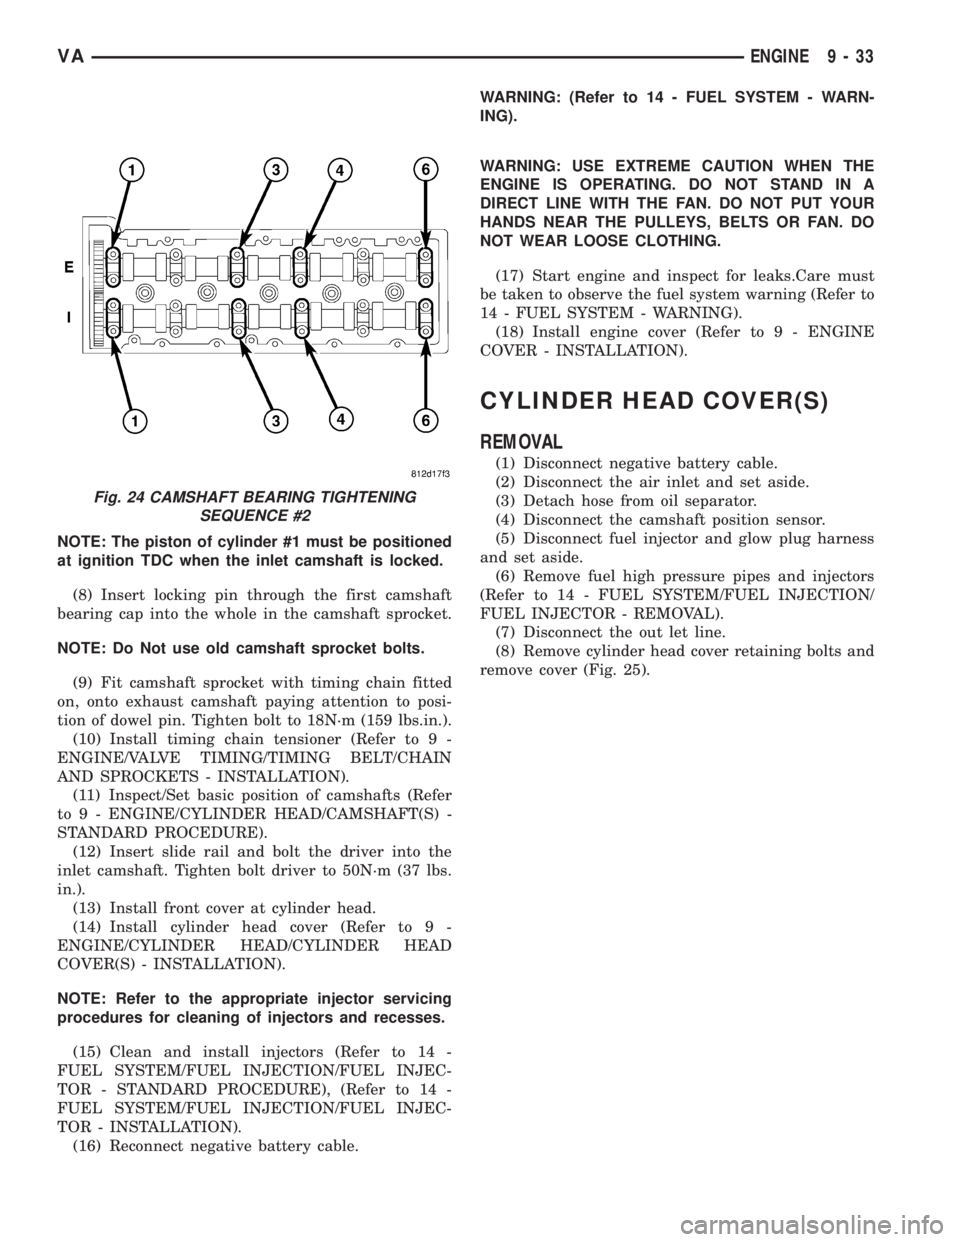
(7) Install the remaining Intake and Exhaust cam
bearing caps and tighten them evenly to 9N´m (80
lbs. in.) in steps each of 1 revolution (Fig. 24).
Fig. 22 CAMSHAFTS AND HOUSING ASSEMBLY
1 - CYLINDER HEAD BOLTS
2 - EXHAUST CAMSHAFT
3 - INTAKE CAMSHAFT
4 - CAMSHAFT HOUSING
5 - CYLINDER HEAD
Fig. 23 CAMSHAFT BEARING TIGHTENING
SEQUENCE #1
9 - 32 ENGINEVA
Page 1608 of 2305
NOTE: The piston of cylinder #1 must be positioned
at ignition TDC when the inlet camshaft is locked.
(8) Insert locking pin through the first camshaft
bearing cap into the whole in the camshaft sprocket.
NOTE: Do Not use old camshaft sprocket bolts.
(9) Fit camshaft sprocket with timing chain fitted
on, onto exhaust camshaft paying attention to posi-
tion of dowel pin. Tighten bolt to 18N´m (159 lbs.in.).
(10) Install timing chain tensioner (Refer to 9 -
ENGINE/VALVE TIMING/TIMING BELT/CHAIN
AND SPROCKETS - INSTALLATION).
(11) Inspect/Set basic position of camshafts (Refer
to 9 - ENGINE/CYLINDER HEAD/CAMSHAFT(S) -
STANDARD PROCEDURE).
(12) Insert slide rail and bolt the driver into the
inlet camshaft. Tighten bolt driver to 50N´m (37 lbs.
in.).
(13) Install front cover at cylinder head.
(14) Install cylinder head cover (Refer to 9 -
ENGINE/CYLINDER HEAD/CYLINDER HEAD
COVER(S) - INSTALLATION).
NOTE: Refer to the appropriate injector servicing
procedures for cleaning of injectors and recesses.
(15) Clean and install injectors (Refer to 14 -
FUEL SYSTEM/FUEL INJECTION/FUEL INJEC-
TOR - STANDARD PROCEDURE), (Refer to 14 -
FUEL SYSTEM/FUEL INJECTION/FUEL INJEC-
TOR - INSTALLATION).
(16) Reconnect negative battery cable.WARNING: (Refer to 14 - FUEL SYSTEM - WARN-
ING).
WARNING: USE EXTREME CAUTION WHEN THE
ENGINE IS OPERATING. DO NOT STAND IN A
DIRECT LINE WITH THE FAN. DO NOT PUT YOUR
HANDS NEAR THE PULLEYS, BELTS OR FAN. DO
NOT WEAR LOOSE CLOTHING.
(17) Start engine and inspect for leaks.Care must
be taken to observe the fuel system warning (Refer to
14 - FUEL SYSTEM - WARNING).
(18) Install engine cover (Refer to 9 - ENGINE
COVER - INSTALLATION).
CYLINDER HEAD COVER(S)
REMOVAL
(1) Disconnect negative battery cable.
(2) Disconnect the air inlet and set aside.
(3) Detach hose from oil separator.
(4) Disconnect the camshaft position sensor.
(5) Disconnect fuel injector and glow plug harness
and set aside.
(6) Remove fuel high pressure pipes and injectors
(Refer to 14 - FUEL SYSTEM/FUEL INJECTION/
FUEL INJECTOR - REMOVAL).
(7) Disconnect the out let line.
(8) Remove cylinder head cover retaining bolts and
remove cover (Fig. 25).
Fig. 24 CAMSHAFT BEARING TIGHTENING
SEQUENCE #2
VAENGINE 9 - 33
Page 1612 of 2305
NOTE: Using valve service tools #9307, screw
retaining fork into threaded edge of cylinder head
and position thrust piece vertically at the top of
each exhaust valve spring retainer. Use the cam
bearing cap threaded holes to position service tool
for installation of intake valve spring retainers.
NOTE: Ensure that the valve keepers are seated
properly.
(9) Compress valve and install valve collates (Fig.
26).
CAUTION: Make sure the crankshaft lock is in posi-
tion and properly secured for each cylinder being
serviced. Failure to do so may result in damage to
the vehicle or personal injury.
(10) Repeat procedure for each cylinder as neces-
sary.
(11) Remove special tooling from cylinder head.
(12) Position piston of #1 cylinder to ignition TDC.
(13) Install camshafts and check basic position
(Refer to 9 - ENGINE/CYLINDER HEAD/CAM-
SHAFT(S) - INSTALLATION).
(14) Install top guide rail (Refer to 9 - ENGINE/
CYLINDER HEAD - INSTALLATION).
(15) Install front cover at cylinder head (Refer to 9
- ENGINE/CYLINDER HEAD - INSTALLATION).
(16) Install timing chain tensioner with new gas-
ket (Refer to 9 - ENGINE/VALVE TIMING/TIMING
BELT/CHAIN AND SPROCKETS - INSTALLATION)
(17) Install cylinder head cover (Refer to 9 -
ENGINE/CYLINDER HEAD/CYLINDER HEAD
COVER(S) - INSTALLATION).
WARNING: (Refer to 14 - FUEL SYSTEM - WARN-
ING).
(18) Install injectors (Refer to 14 - FUEL SYS-
TEM/FUEL INJECTION/FUEL INJECTOR -
INSTALLATION).
(19) Reconnect negative battery cable.
(20) Start the engine, allow to warm, turn engine
off and inspect for leaks. Care must be taken to
observe the fuel system warning (Refer to 14 - FUEL
SYSTEM - WARNING)
(21) Install engine cover (Refer to 9 - ENGINE
COVER - INSTALLATION).
INSTALLATION - VALVES
WARNING: Valves must be kept in their original
positions in cylinder head. Failure to do so will
result in engine damage.NOTE: Inspect all valves, springs and retainers for
wear or damage. Replace as necessary.
(1) Install valves in their original position in the
cylinder head.
(2) Install lower valve spring retainer.
(3) Install valve stem seal.
(4) Install valve spring.
(5) Install valve spring retainer.
NOTE: Using tool, screw retaining fork into
threaded edge of cylinder head and position thrust
piece vertically at the top of each valve spring
retainer.
NOTE: Ensure that the valve keepers are seated
properly.
(6) Using a suitable valve spring compressor, com-
press valve spring and install valve keepers.
(7) Repeat steps 3 through 7 for each valve as nec-
essary.
(8) Remove valve assembly from cylinder head.
(9) Install cylinder head on engine block (Refer to
9 - ENGINE/CYLINDER HEAD - INSTALLATION).
(10) Install glow plugs (Refer to 8 - ELECTRICAL/
IGNITION CONTROL/GLOW PLUG - INSTALLA-
TION).
(11) Connect negative battery cable.
WARNING: US EXTREME CAUTION WHEN THE
ENGINE IS IN OPERATION. DO NOT STAND IN A
DIRECT LINE WITH THE FAN. DO NOT PUT YOUR
HANDS NEAR THE PULLEYS, BELTS OR FAN. DO
NOT WEAR LOOSE CLOTHING.
(12) Start engine and check for leaks. Care must
be taken to observe the fuel system warning (Refer to
14 - FUEL SYSTEM - WARNING)
(13) Install engine cover (Refer to 9 - ENGINE
COVER - INSTALLATION).
ENGINE BLOCK
STANDARD PROCEDURE
STANDARD PROCEDURE - REPLACING ENGINE
CORE AND OIL GALLERY PLUGS
Using a blunt tool such as a drift and a hammer,
strike the bottom edge of the cup plug. With the cup
plug rotated, grasp firmly with pliers or other suit-
able tool and remove plug (Fig. 30).
VAENGINE 9 - 37
Page 1645 of 2305
(8) Install the exhaust hanger fasteners at the
muffler.
(9) Tighten the exhaust hanger bracket to engine
block.
(10) Install the turbocharger support bracket.
(11) Lower the vehicle.
(12) Install the air cleaner duct to the turbo-
charger (Fig. 71).
(13) Install the exhaust heat shield.
(14) Connect the negative battery cable.
TIMING CHAIN COVER
REMOVAL
WARNING: DO NOT OPEN COOLING SYSTEM
UNLESS TEMPERATURE IS BELOW 90ÉC (194ÉF).
OPEN CAP SLOWLY TO RELEASE PRESSURE.
STORE COOLANT IN APPROVED CONTAINER
ONLY. RISK OF INJURY TO SKIN AND EYES FROM
SCALDING COOLANT. WEAR PROTECTIVE
GLOVES, CLOTHING AND EYE WEAR.
(1) Disconnect negative battery cable.
NOTE: Rotate engine on crankshaft. DO NOT crank
the engine at the bolt of the camshaft sprocket.
NOTE: DO NOT crank engine back.
(2) Position piston of cylinder 1 to ignition TDC.
Markings on the camshaft bearing cap must be
aligned.
(3) Drain coolant (Refer to 7 - COOLING/ENGINE/
COOLANT - STANDARD PROCEDURE).
(4) Install retaining lock for crankshaft/starter
ring gear (Refer to 9 - ENGINE/ENGINE BLOCK/
FLEX PLATE - INSTALLATION).
(5) Drain engine oil.
(6) Remove the oil filter to allow the oil to flow off
into the oil pan.
(7) Remove the radiator assembly (Refer to 7 -
COOLING/ENGINE/RADIATOR - REMOVAL).
(8) Remove engine cover (Refer to 9 - ENGINE -
REMOVAL).
(9) Remove front cover at cylinder head (Refer to 9
- ENGINE/CYLINDER HEAD - REMOVAL).
(10) Remove accessory drive belt.
(11) Remove the high pressure fuel pump (Refer to
14 - FUEL SYSTEM/FUEL DELIVERY/FUEL PUMP
- REMOVAL).
(12) Remove water pump (Refer to 7 - COOLING/
ENGINE/WATER PUMP - REMOVAL).
(13) Remove accessory drive belt pulley and vibra-
tion damper (Refer to 9 - ENGINE/ENGINE BLOCK/
VIBRATION DAMPER - REMOVAL).
(14) Remove the power steering pump.NOTE: NO NOT open the air conditioning system.
(15) Unplug AC compressor electrical connector
and unbolt AC compressor. Relocate in lower engine
compartmentwith outopening the system.
(16) Remove the generator with wiring attached
and relocate somewhere in the engine compartment.
(17) Install engine support fixture.
(18) Remove the oil pan.
(19) Detach the coolant hose to oil-water heat
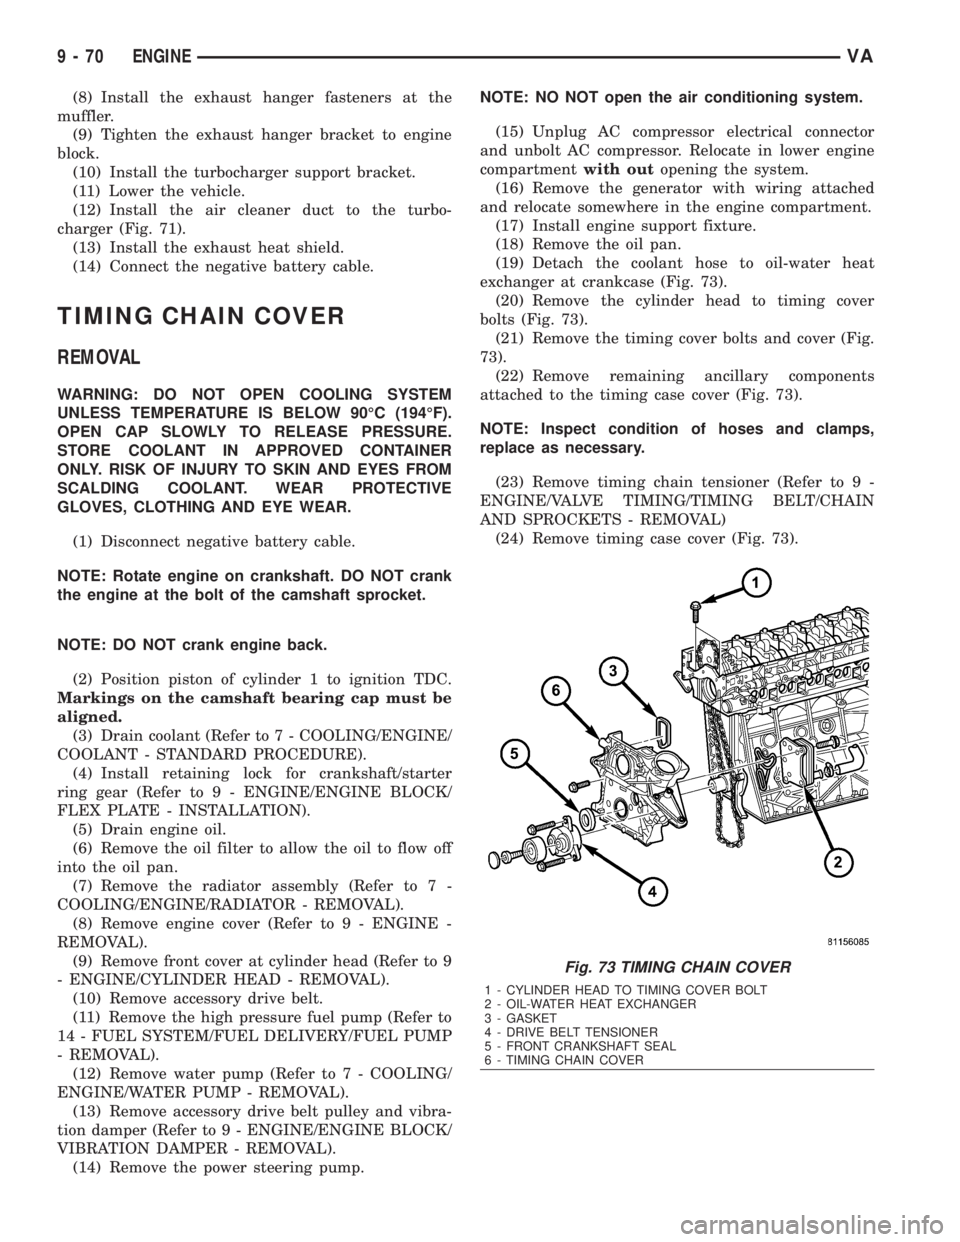
exchanger at crankcase (Fig. 73).
(20) Remove the cylinder head to timing cover
bolts (Fig. 73).
(21) Remove the timing cover bolts and cover (Fig.
73).
(22) Remove remaining ancillary components
attached to the timing case cover (Fig. 73).
NOTE: Inspect condition of hoses and clamps,
replace as necessary.
(23) Remove timing chain tensioner (Refer to 9 -
ENGINE/VALVE TIMING/TIMING BELT/CHAIN
AND SPROCKETS - REMOVAL)
(24) Remove timing case cover (Fig. 73).
Fig. 73 TIMING CHAIN COVER
1 - CYLINDER HEAD TO TIMING COVER BOLT
2 - OIL-WATER HEAT EXCHANGER
3 - GASKET
4 - DRIVE BELT TENSIONER
5 - FRONT CRANKSHAFT SEAL
6 - TIMING CHAIN COVER
9 - 70 ENGINEVA