Page 712 of 2305
COMMON METRIC EQUIVALENTS
1 inch = 25 Millimeters 1 Cubic Inch = 16 Cubic Centimeters
1 Foot = 0.3 Meter 1 Cubic Foot = 0.03 Cubic Meter
1 Yard = 0.9 Meter 1 Cubic Yard = 0.8 Cubic Meter
1 Mile = 1.6 Kilometers
Refer to the Metric Conversion Chart to convert
torque values listed in metric Newton-meters (N´m).
Also, use the chart to convert between millimeters
(mm) and inches (in.) (Fig. 4).
VAINTRODUCTION 7
Page 714 of 2305
TORQUE REFERENCES
DESCRIPTION
Individual Torque Charts appear within many of
the Groups. Refer to the Standard Torque Specifica-
tions Chart for torque references not listed in the
individual torque charts (Fig. 5).
VAINTRODUCTION 9
Page 715 of 2305
Fig. 5 TORQUE SPECIFICATIONS
10 INTRODUCTIONVA
Page 726 of 2305

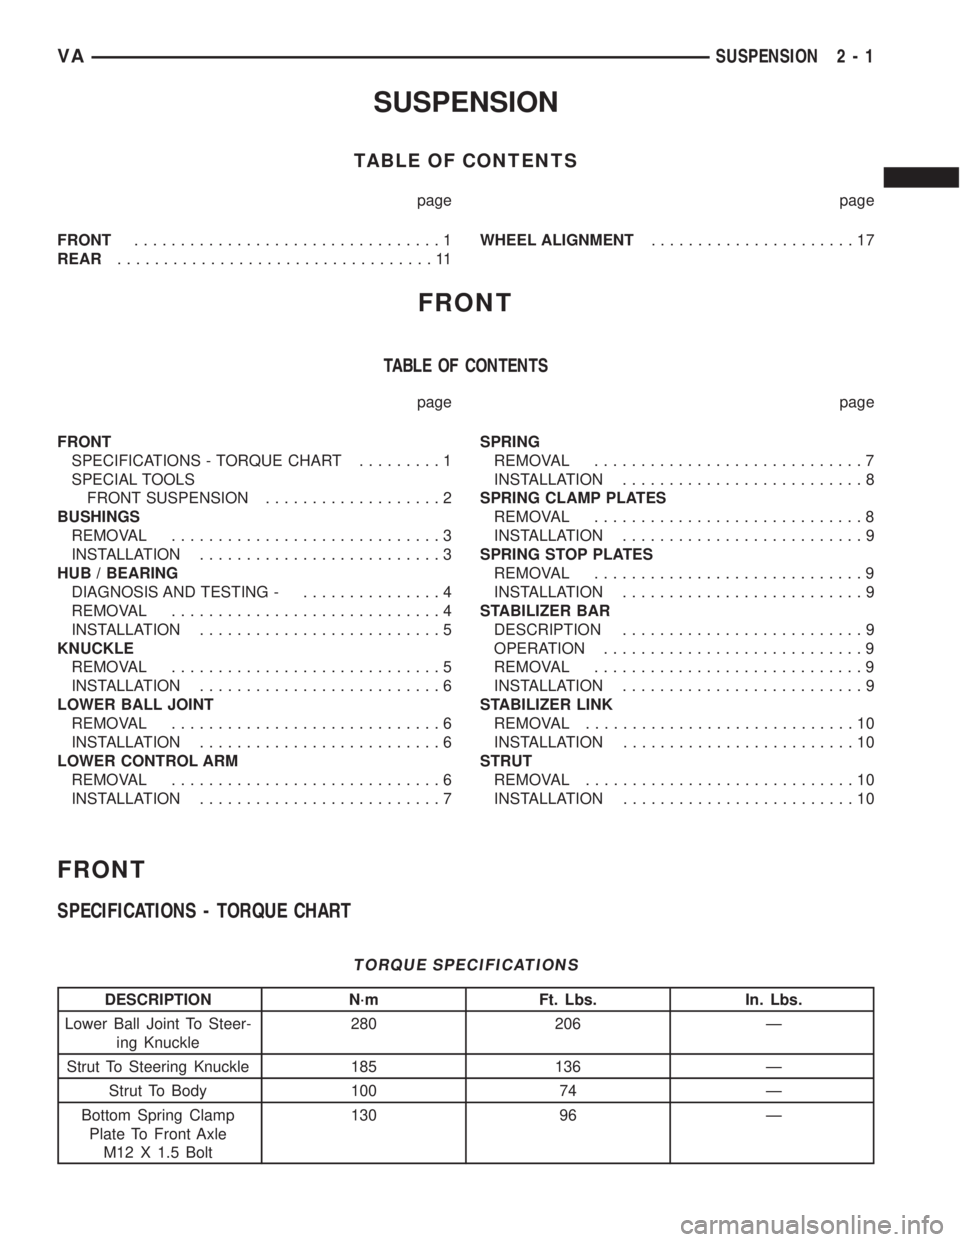
SUSPENSION
TABLE OF CONTENTS
page page
FRONT.................................1
REAR..................................11WHEEL ALIGNMENT......................17
FRONT
TABLE OF CONTENTS
page page
FRONT
SPECIFICATIONS - TORQUE CHART.........1
SPECIAL TOOLS
FRONT SUSPENSION...................2
BUSHINGS
REMOVAL.............................3
INSTALLATION..........................3
HUB / BEARING
DIAGNOSIS AND TESTING -...............4
REMOVAL.............................4
INSTALLATION..........................5
KNUCKLE
REMOVAL.............................5
INSTALLATION..........................6
LOWER BALL JOINT
REMOVAL.............................6
INSTALLATION..........................6
LOWER CONTROL ARM
REMOVAL.............................6
INSTALLATION..........................7SPRING
REMOVAL.............................7
INSTALLATION..........................8
SPRING CLAMP PLATES
REMOVAL.............................8
INSTALLATION..........................9
SPRING STOP PLATES
REMOVAL.............................9
INSTALLATION..........................9
STABILIZER BAR
DESCRIPTION..........................9
OPERATION............................9
REMOVAL.............................9
INSTALLATION..........................9
STABILIZER LINK
REMOVAL.............................10
INSTALLATION.........................10
STRUT
REMOVAL.............................10
INSTALLATION.........................10
FRONT
SPECIFICATIONS - TORQUE CHART
TORQUE SPECIFICATIONS
DESCRIPTION N´m Ft. Lbs. In. Lbs.
Lower Ball Joint To Steer-
ing Knuckle280 206 Ð
Strut To Steering Knuckle 185 136 Ð
Strut To Body 100 74 Ð
Bottom Spring Clamp
Plate To Front Axle
M12 X 1.5 Bolt130 96 Ð
VASUSPENSION 2 - 1
Page 736 of 2305

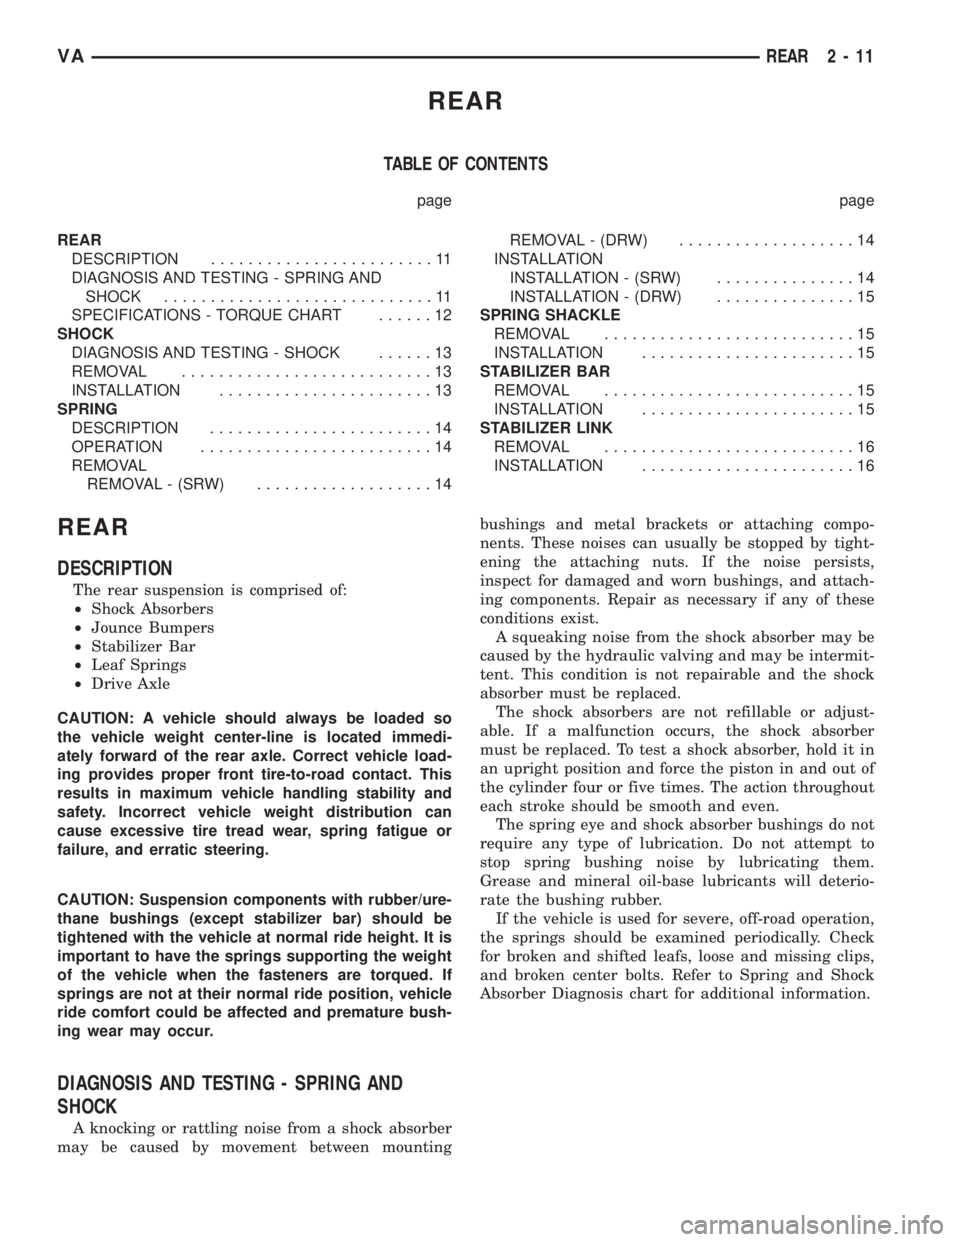
REAR
TABLE OF CONTENTS
page page
REAR
DESCRIPTION........................11
DIAGNOSIS AND TESTING - SPRING AND
SHOCK.............................11
SPECIFICATIONS - TORQUE CHART......12
SHOCK
DIAGNOSIS AND TESTING - SHOCK......13
REMOVAL...........................13
INSTALLATION.......................13
SPRING
DESCRIPTION........................14
OPERATION.........................14
REMOVAL
REMOVAL - (SRW)...................14REMOVAL - (DRW)...................14
INSTALLATION
INSTALLATION - (SRW)...............14
INSTALLATION - (DRW)...............15
SPRING SHACKLE
REMOVAL...........................15
INSTALLATION.......................15
STABILIZER BAR
REMOVAL...........................15
INSTALLATION.......................15
STABILIZER LINK
REMOVAL...........................16
INSTALLATION.......................16
REAR
DESCRIPTION
The rear suspension is comprised of:
²Shock Absorbers
²Jounce Bumpers
²Stabilizer Bar
²Leaf Springs
²Drive Axle
CAUTION: A vehicle should always be loaded so
the vehicle weight center-line is located immedi-
ately forward of the rear axle. Correct vehicle load-
ing provides proper front tire-to-road contact. This
results in maximum vehicle handling stability and
safety. Incorrect vehicle weight distribution can
cause excessive tire tread wear, spring fatigue or
failure, and erratic steering.
CAUTION: Suspension components with rubber/ure-
thane bushings (except stabilizer bar) should be
tightened with the vehicle at normal ride height. It is
important to have the springs supporting the weight
of the vehicle when the fasteners are torqued. If
springs are not at their normal ride position, vehicle
ride comfort could be affected and premature bush-
ing wear may occur.
DIAGNOSIS AND TESTING - SPRING AND
SHOCK
A knocking or rattling noise from a shock absorber
may be caused by movement between mountingbushings and metal brackets or attaching compo-
nents. These noises can usually be stopped by tight-
ening the attaching nuts. If the noise persists,
inspect for damaged and worn bushings, and attach-
ing components. Repair as necessary if any of these
conditions exist.
A squeaking noise from the shock absorber may be
caused by the hydraulic valving and may be intermit-
tent. This condition is not repairable and the shock
absorber must be replaced.
The shock absorbers are not refillable or adjust-
able. If a malfunction occurs, the shock absorber
must be replaced. To test a shock absorber, hold it in
an upright position and force the piston in and out of
the cylinder four or five times. The action throughout
each stroke should be smooth and even.
The spring eye and shock absorber bushings do not
require any type of lubrication. Do not attempt to
stop spring bushing noise by lubricating them.
Grease and mineral oil-base lubricants will deterio-
rate the bushing rubber.
If the vehicle is used for severe, off-road operation,
the springs should be examined periodically. Check
for broken and shifted leafs, loose and missing clips,
and broken center bolts. Refer to Spring and Shock
Absorber Diagnosis chart for additional information.
VAREAR 2 - 11
Page 737 of 2305

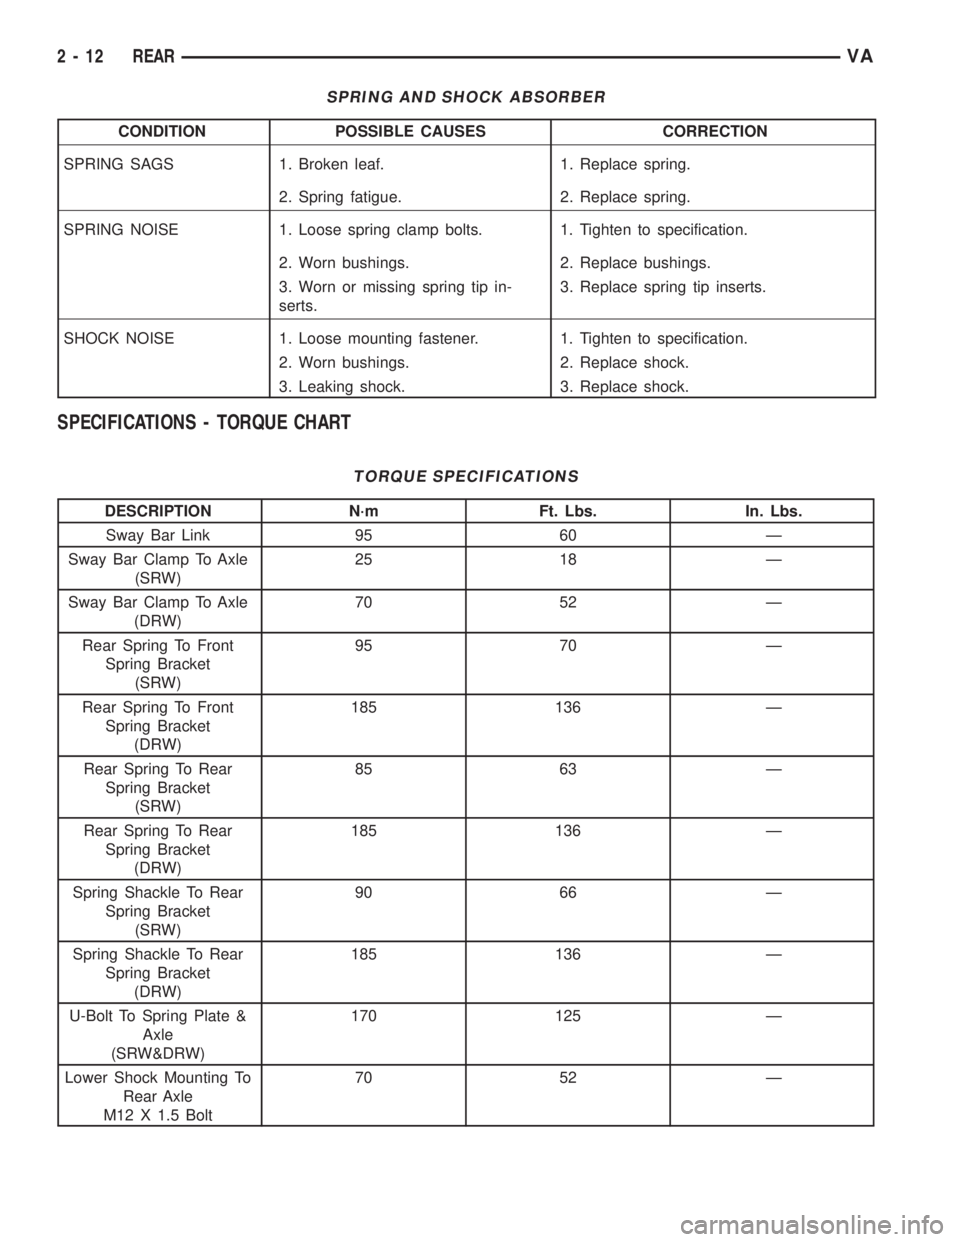
SPRING AND SHOCK ABSORBER
CONDITION POSSIBLE CAUSES CORRECTION
SPRING SAGS 1. Broken leaf. 1. Replace spring.
2. Spring fatigue. 2. Replace spring.
SPRING NOISE 1. Loose spring clamp bolts. 1. Tighten to specification.
2. Worn bushings. 2. Replace bushings.
3. Worn or missing spring tip in-
serts.3. Replace spring tip inserts.
SHOCK NOISE 1. Loose mounting fastener. 1. Tighten to specification.
2. Worn bushings. 2. Replace shock.
3. Leaking shock. 3. Replace shock.
SPECIFICATIONS - TORQUE CHART
TORQUE SPECIFICATIONS
DESCRIPTION N´m Ft. Lbs. In. Lbs.
Sway Bar Link 95 60 Ð
Sway Bar Clamp To Axle
(SRW)25 18 Ð
Sway Bar Clamp To Axle
(DRW)70 52 Ð
Rear Spring To Front
Spring Bracket
(SRW)95 70 Ð
Rear Spring To Front
Spring Bracket
(DRW)185 136 Ð
Rear Spring To Rear
Spring Bracket
(SRW)85 63 Ð
Rear Spring To Rear
Spring Bracket
(DRW)185 136 Ð
Spring Shackle To Rear
Spring Bracket
(SRW)90 66 Ð
Spring Shackle To Rear
Spring Bracket
(DRW)185 136 Ð
U-Bolt To Spring Plate &
Axle
(SRW&DRW)170 125 Ð
Lower Shock Mounting To
Rear Axle
M12 X 1.5 Bolt70 52 Ð
2 - 12 REARVA
Page 742 of 2305

WHEEL ALIGNMENT
TABLE OF CONTENTS
page page
WHEEL ALIGNMENT
DESCRIPTION........................17
DIAGNOSIS AND TESTING - PRE-ALIGNMENT
INSPECTION.........................17STANDARD PROCEDURE - TOE
ADJUSTMENT........................18
SPECIFICATIONS.....................19
WHEEL ALIGNMENT
DESCRIPTION
NOTE: Camber and Caster are not adjustable on
this vehicle. (TOE ONLY).
NOTE: Suspension components with rubber/ure-
thane bushings should be tightened with the vehi-
cle at normal ride height. It is important to have the
springs supporting the weight of the vehicle when
the fasteners are torqued. If springs are not at their
normal ride position, vehicle ride comfort could be
affected and premature bushing wear may occur.
Wheel alignment involves the correct positioning of
the wheels in relation to the vehicle. The positioning
is accomplished through suspension and steering
linkage adjustments. An alignment is considered
essential for efficient steering, good directional stabil-
ity and to minimize tire wear. The most important
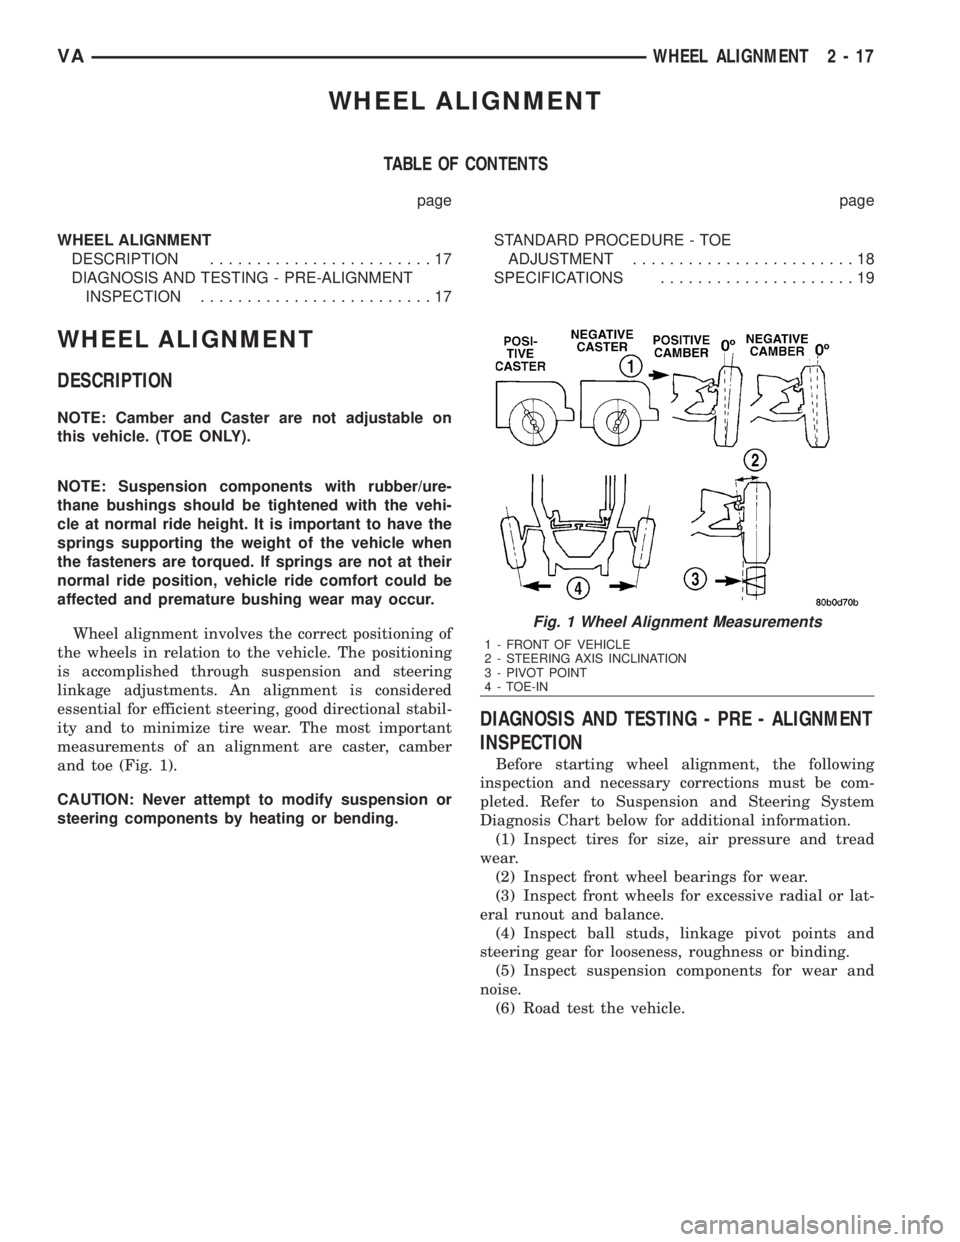
measurements of an alignment are caster, camber
and toe (Fig. 1).
CAUTION: Never attempt to modify suspension or
steering components by heating or bending.
DIAGNOSIS AND TESTING - PRE - ALIGNMENT
INSPECTION
Before starting wheel alignment, the following
inspection and necessary corrections must be com-
pleted. Refer to Suspension and Steering System
Diagnosis Chart below for additional information.
(1) Inspect tires for size, air pressure and tread
wear.
(2) Inspect front wheel bearings for wear.
(3) Inspect front wheels for excessive radial or lat-
eral runout and balance.
(4) Inspect ball studs, linkage pivot points and
steering gear for looseness, roughness or binding.
(5) Inspect suspension components for wear and
noise.
(6) Road test the vehicle.
Fig. 1 Wheel Alignment Measurements
1 - FRONT OF VEHICLE
2 - STEERING AXIS INCLINATION
3 - PIVOT POINT
4 - TOE-IN
VAWHEEL ALIGNMENT 2 - 17
Page 744 of 2305
(4) Tighten the tie rod jam nut to 50 N´m (37 ft.
lbs.).
(5) Verify the specifications
(6) Turn off engine.
SPECIFICATIONS
FRONT SPECIFICATIONS
DESCRIPTION FRONT SPECIFICATION
Toe-In 0É ( 0.16É)
Camber 0É ( 0.75É)
Camber
Left to Right Difference
Max1.33É
Caster 0É ( 0.5É)
Steering Knuckle Inclina-
tion0É ( 0.5É)
Steering Knuckle Inclina-
tion
Left to Right Difference
Max1É
REAR SPECIFICATIONS
DESCRIPTION REAR SPECIFICATION
Toe-In
Max0É ( 0.25É)
Camber
Max0É (-0.66É/+0.33É)
Inclination of Rear
Wheels (Individual Wheel
Toe)= Maximum Inclina-
tion of Rear Axle
Max0É ( 0.25É)
TORQUE SPECIFICATIONS
DESCRIPTION N´m Ft. Lbs. In. Lbs.
Outer Tie Rod End Jam
Nut50 37 -
VAWHEEL ALIGNMENT 2 - 19