Page 2741 of 3229
21
Quick start
R
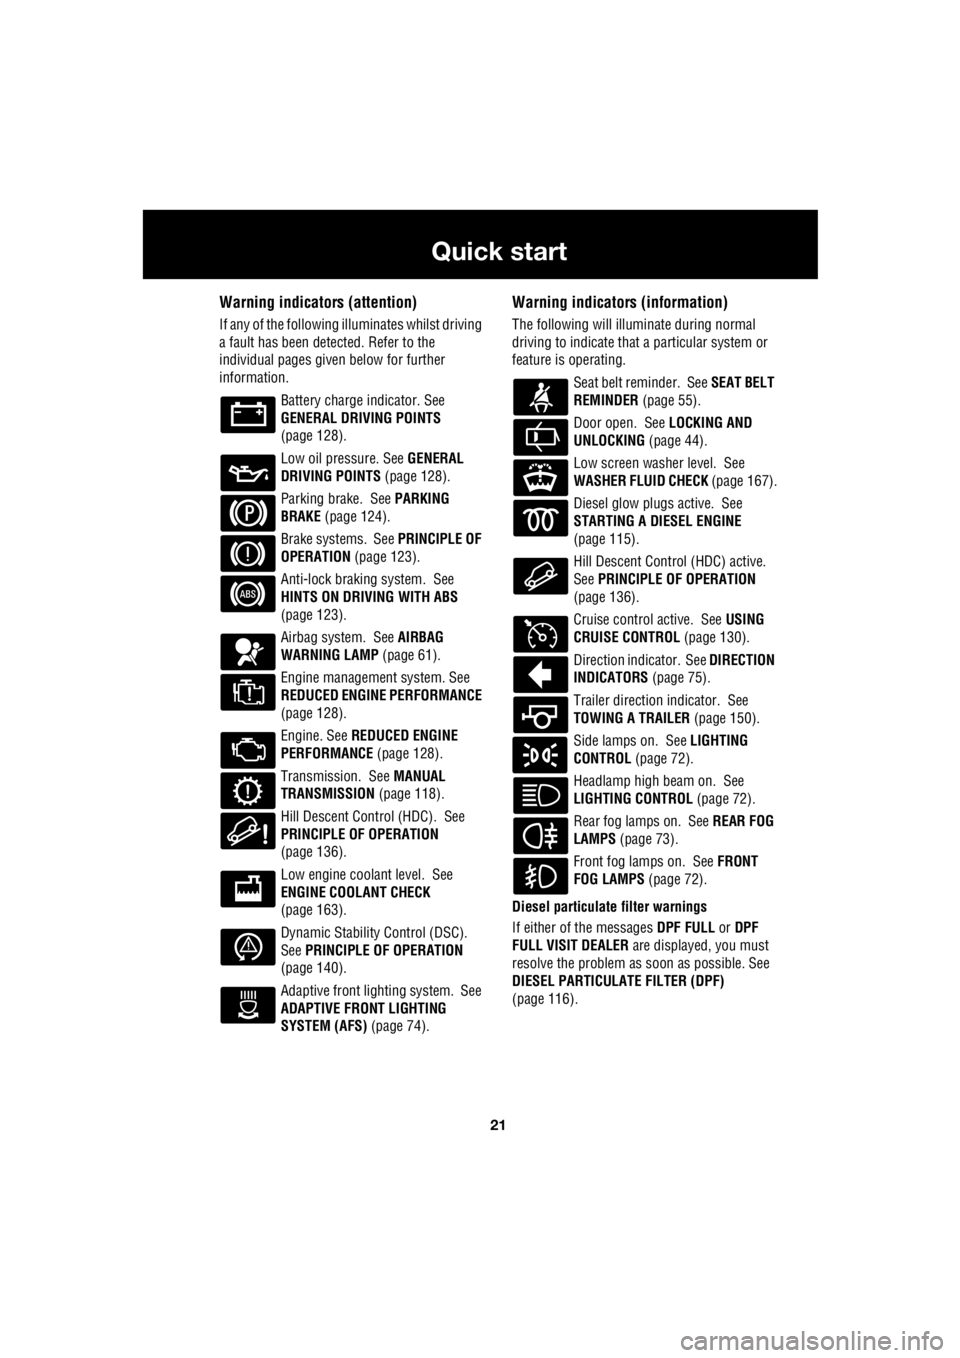
Warning indicators (attention)
If any of the following illuminates whilst driving
a fault has been detected. Refer to the
individual pages give n below for further
information.
Battery charge indicator. See
GENERAL DRIVING POINTS
(page 128).
Low oil pressure. See GENERAL
DRIVING POINTS (page 128).
Parking brake. See PARKING
BRAKE (page 124).
Brake systems. See PRINCIPLE OF
OPERATION (page 123).
Anti-lock braking system. See
HINTS ON DRIVING WITH ABS
(page 123).
Airbag system. See AIRBAG
WARNING LAMP (page 61).
Engine management system. See
REDUCED ENGINE PERFORMANCE
(page 128).
Engine. See REDUCED ENGINE
PERFORMANCE (page 128).
Transmission. See MANUAL
TRANSMISSION (page 118).
Hill Descent Control (HDC). See
PRINCIPLE OF OPERATION
(page 136).
Low engine coolant level. See
ENGINE COOLANT CHECK
(page 163).
Dynamic Stability Control (DSC).
See PRINCIPLE OF OPERATION
(page 140).
Adaptive front lighting system. See
ADAPTIVE FRONT LIGHTING
SYSTEM (AFS) (page 74).
Warning indicators (information)
The following will illuminate during normal
driving to indicate that a particular system or
feature is operating.
Seat belt reminder. See SEAT BELT
REMINDER (page 55).
Door open. See LOCKING AND
UNLOCKING (page 44).
Low screen washer level. See
WASHER FLUID CHECK (page 167).
Diesel glow plugs active. See
STARTING A DIESEL ENGINE
(page 115).
Hill Descent Control (HDC) active.
See PRINCIPLE OF OPERATION
(page 136).
Cruise control active. See USING
CRUISE CONTROL (page 130).
Direction indicator. See DIRECTION
INDICATORS (page 75).
Trailer direction indicator. See
TOWING A TRAILER (page 150).
Side lamps on. See LIGHTING
CONTROL (page 72).
Headlamp high beam on. See
LIGHTING CONTROL (page 72).
Rear fog lamps on. See REAR FOG
LAMPS (page 73).
Front fog lamps on. See FRONT
FOG LAMPS (page 72).
Diesel particulate filter warnings
If either of the messages DPF FULL or DPF
FULL VISIT DEALER are displayed, you must
resolve the problem as soon as possible. See
DIESEL PARTICULATE FILTER (DPF)
(page 116).
Page 2742 of 3229
22
Quick start
L
Wipers and washers
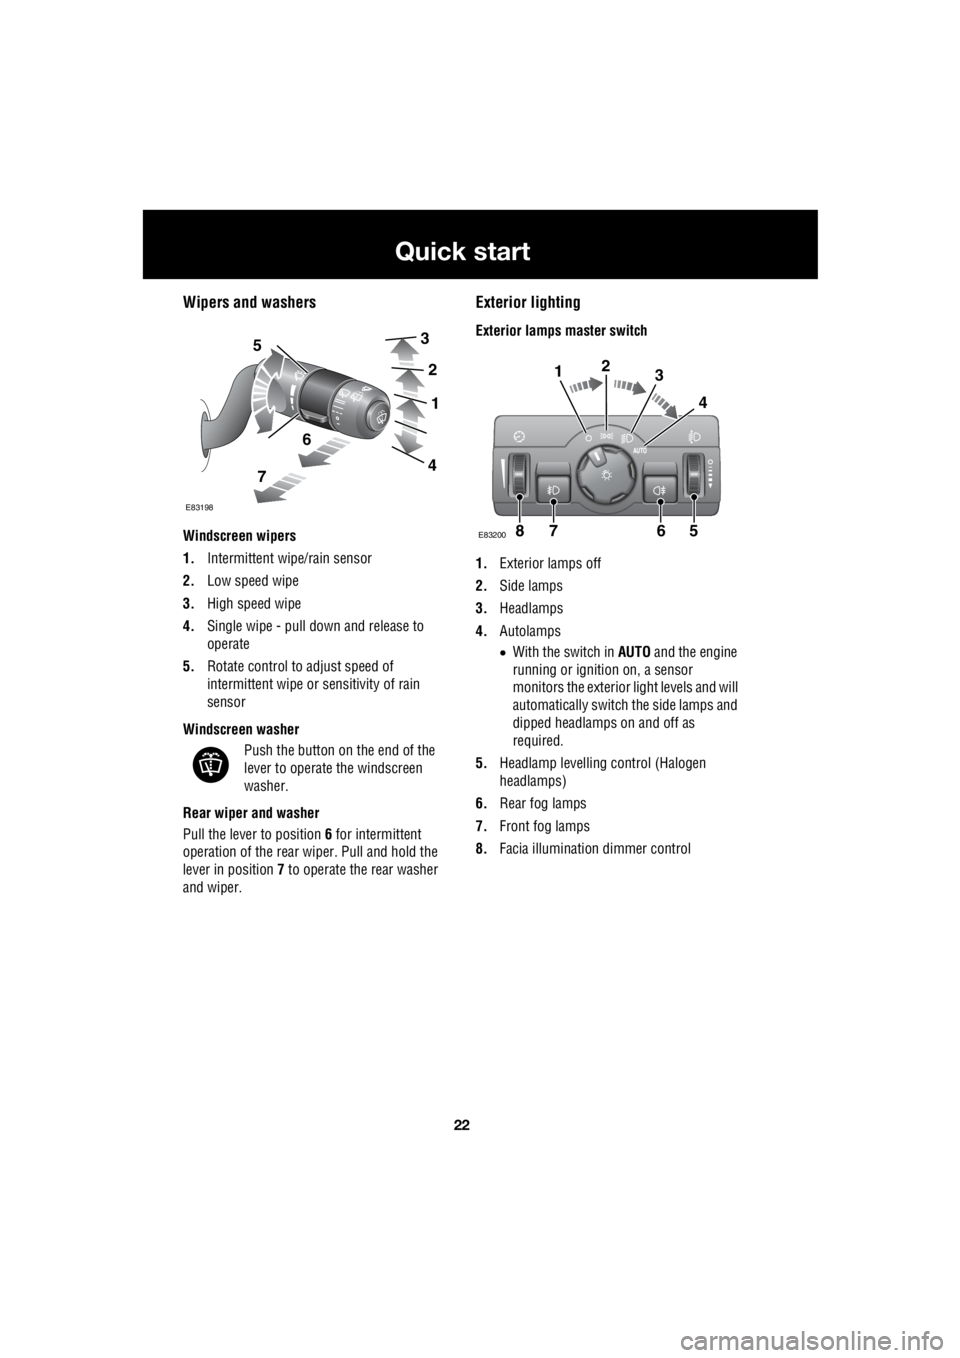
Windscreen wipers
1. Intermittent wipe/rain sensor
2. Low speed wipe
3. High speed wipe
4. Single wipe - pull down and release to
operate
5. Rotate control to adjust speed of
intermittent wipe or sensitivity of rain
sensor
Windscreen washer Push the button on the end of the
lever to operate the windscreen
washer.
Rear wiper and washer
Pull the lever to position 6 for intermittent
operation of the rear wiper. Pull and hold the
lever in position 7 to operate the rear washer
and wiper.
Exterior lighting
Exterior lamps master switch
1. Exterior lamps off
2. Side lamps
3. Headlamps
4. Autolamps
• With the switch in AUTO and the engine
running or ignition on, a sensor
monitors the exterior light levels and will
automatically switch the side lamps and
dipped headlamps on and off as
required.
5. Headlamp levelli ng control (Halogen
headlamps)
6. Rear fog lamps
7. Front fog lamps
8. Facia illumination dimmer control 5
6
7
3
2
1
4
E83198
7865
123
4
E83200
Page 2743 of 3229
23
Quick start
R
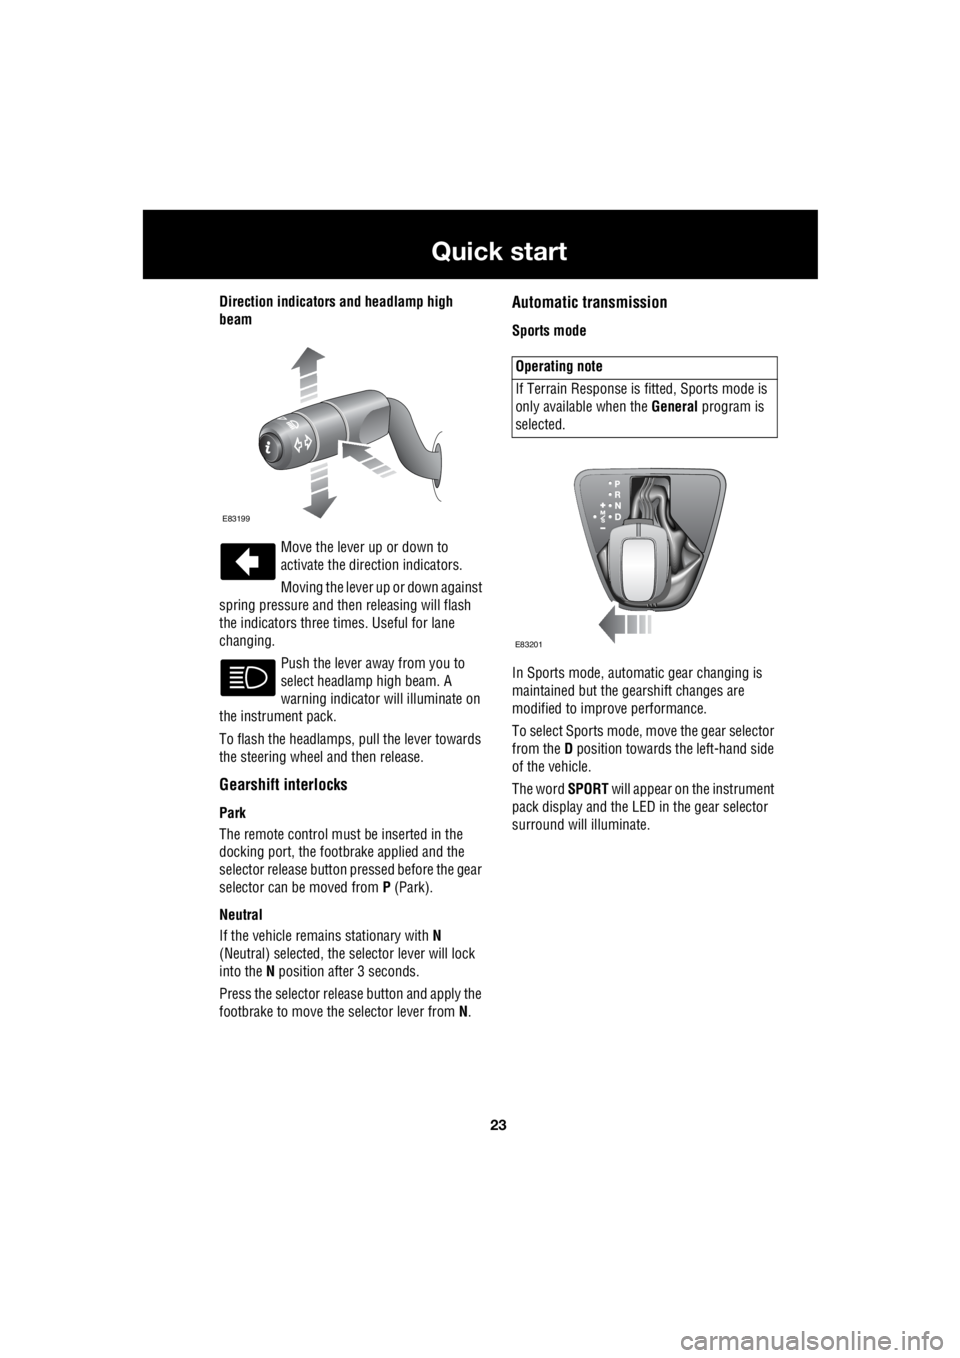
Direction indicators and headlamp high
beam
Move the lever up or down to
activate the direction indicators.
Moving the lever up or down against
spring pressure and then releasing will flash
the indicators three times. Useful for lane
changing.
Push the lever away from you to
select headlamp high beam. A
warning indicator will illuminate on
the instrument pack.
To flash the headlamps, pull the lever towards
the steering wheel and then release.
Gearshift interlocks
Park
The remote control must be inserted in the
docking port, the footbrake applied and the
selector release button pr essed before the gear
selector can be moved from P (Park).
Neutral
If the vehicle remains stationary with N
(Neutral) selected, the selector lever will lock
into the N position after 3 seconds.
Press the selector rele ase button and apply the
footbrake to move the selector lever from N.
Automatic transmission
Sports mode
In Sports mode, automatic gear changing is
maintained but the gearshift changes are
modified to improve performance.
To select Sports mode, move the gear selector
from the D position towards the left-hand side
of the vehicle.
The word SPORT will appear on the instrument
pack display and the LED in the gear selector
surround will illuminate.
E83199
Operating note
If Terrain Response is fi tted, Sports mode is
only available when the General program is
selected.
E83201
Page 2792 of 3229
Lighting
72
L
LightingLIGHTING CONTROL
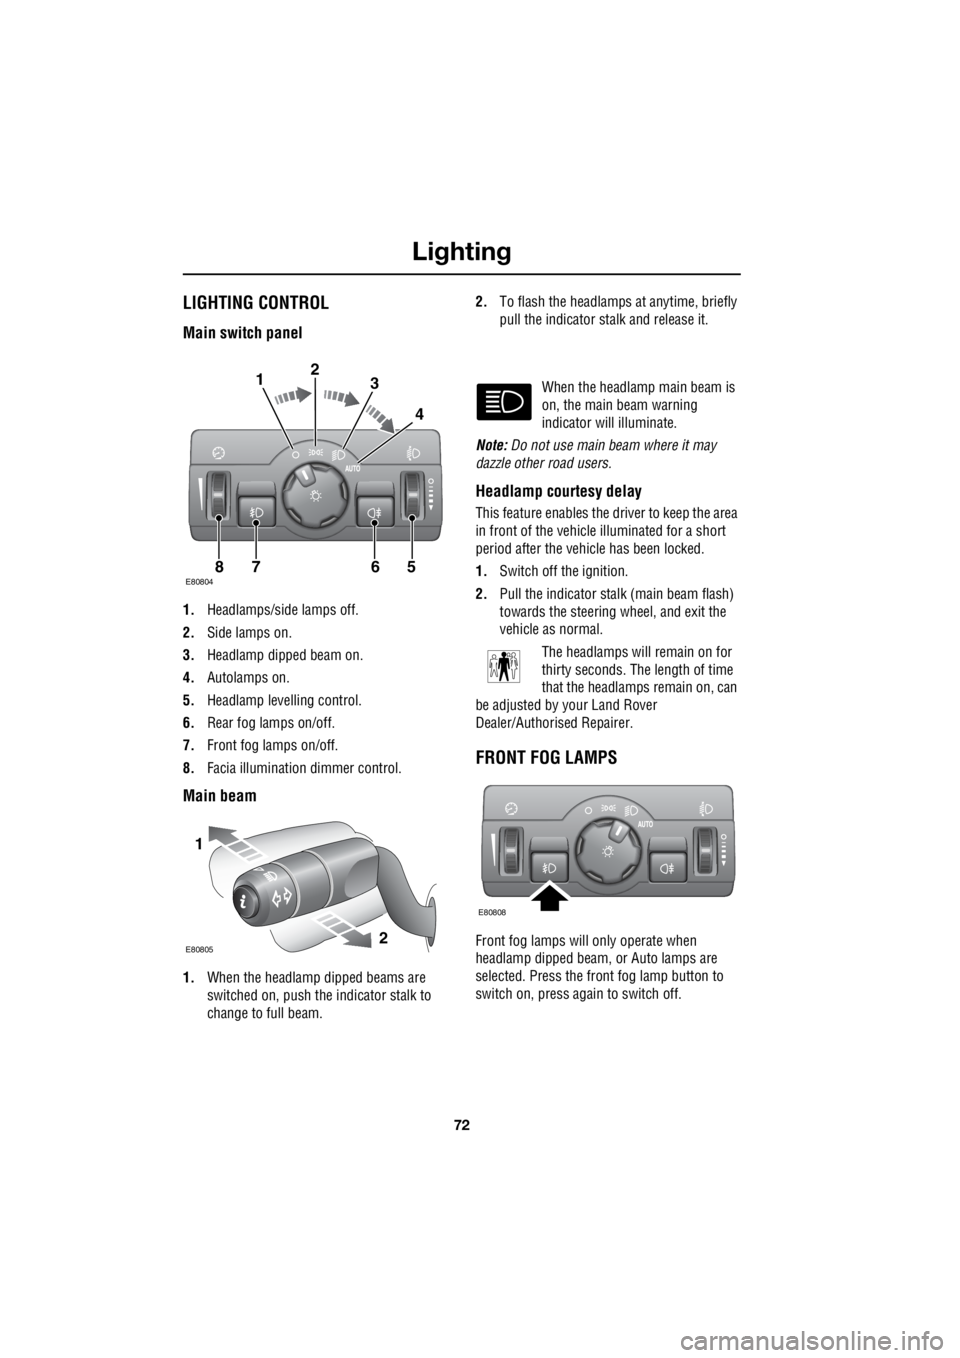
Main switch panel
1. Headlamps/side lamps off.
2. Side lamps on.
3. Headlamp dipped beam on.
4. Autolamps on.
5. Headlamp levelling control.
6. Rear fog lamps on/off.
7. Front fog lamps on/off.
8. Facia illumination dimmer control.
Main beam
1.When the headlamp dipped beams are
switched on, push the indicator stalk to
change to full beam. 2.
To flash the headlamps at anytime, briefly
pull the indicator stalk and release it.
When the headlamp main beam is
on, the main beam warning
indicator will illuminate.
Note: Do not use main beam where it may
dazzle other road users.
Headlamp courtesy delay
This feature enables the driver to keep the area
in front of the vehicle illuminated for a short
period after the vehicle has been locked.
1. Switch off the ignition.
2. Pull the indicator stalk (main beam flash)
towards the steering wheel, and exit the
vehicle as normal.
The headlamps will remain on for
thirty seconds. The length of time
that the headlamps remain on, can
be adjusted by your Land Rover
Dealer/Authorised Repairer.
FRONT FOG LAMPS
Front fog lamps will only operate when
headlamp dipped beam, or Auto lamps are
selected. Press the front fog lamp button to
switch on, press again to switch off.
E808047865
123
4
1
2E80805
E80808
Page 2793 of 3229
73
Lighting
R
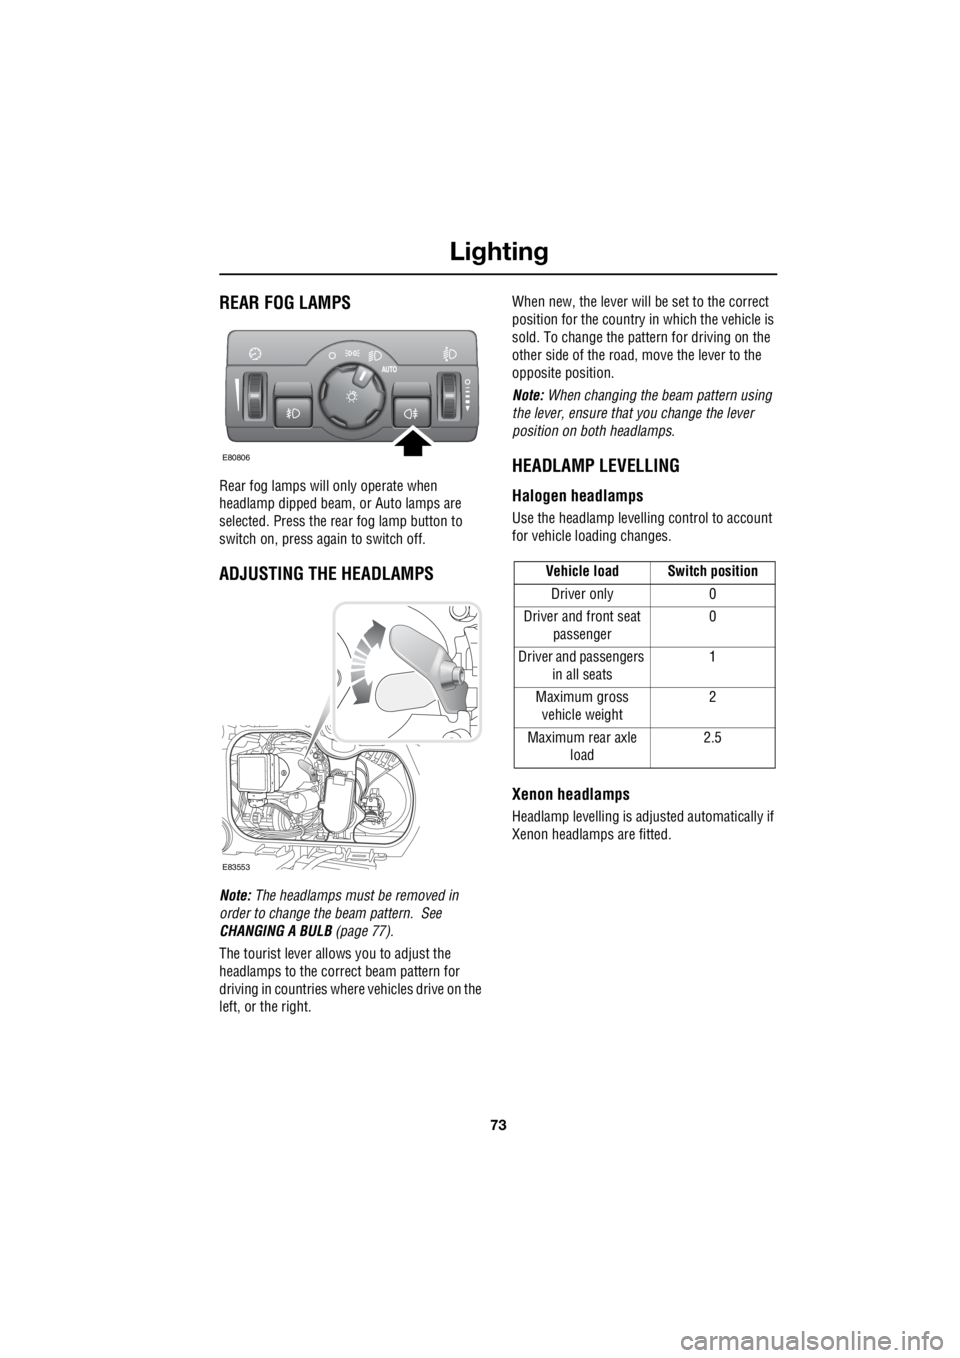
REAR FOG LAMPS
Rear fog lamps will only operate when
headlamp dipped beam, or Auto lamps are
selected. Press the rear fog lamp button to
switch on, press again to switch off.
ADJUSTING THE HEADLAMPS
Note: The headlamps must be removed in
order to change the beam pattern. See
CHANGING A BULB (page 77).
The tourist lever allows you to adjust the
headlamps to the correct beam pattern for
driving in countries where vehicles drive on the
left, or the right. When new, the lever will be set to the correct
position for the country in which the vehicle is
sold. To change the pattern for driving on the
other side of the road, move the lever to the
opposite position.
Note: When changing the beam pattern using
the lever, ensure that you change the lever
position on both headlamps.
HEADLAMP LEVELLING
Halogen headlamps
Use the headlamp levell ing control to account
for vehicle loading changes.
Xenon headlamps
Headlamp levelling is adju sted automatically if
Xenon headlamps are fitted.
E80806
E83553
Vehicle load Switch position
Driver only 0
Driver and front seat passenger 0
Driver and passengers in all seats 1
Maximum gross vehicle weight 2
Maximum rear axle load 2.5
Page 2794 of 3229
Lighting
74
L
HAZARD WARNING FLASHERS
Press the switch to turn the hazard warning
lamps on. When the hazard warning lamps are
operating, the indicator warning lamps will
flash in time with the hazard warning lamps.
Note: Hazard warning lamps can be used when
the ignition is on or off.
ADAPTIVE FRONT LIGHTING SYSTEM
(AFS)
1. Vehicle without AFS.
2. Vehicle with AFS.
When cornering using dipped beam, AFS will
adjust the headlamp beams to provide
improved illumination in the direction of travel.
AFS is deactivated when :-
• reverse gear is selected.
• the vehicle is stationary.
• daylight running lamps are on.
E80807
1
2
E80823
Page 2795 of 3229
75
Lighting
R
If a system fault is detected the
headlamps will attempt to move to
the central positio n, and remain
stationary. The AFS wa rning indicator will
illuminate to indicate th at a fault is present.
If the warning indicato r illuminates, contact
your Land Rover Dealer/A uthorised Repairer as
soon as possible.
DIRECTION INDICATORS
The direction indicators are operated using the
indicator stalk. Move the stalk up or down, to
indicate turning right or left.
The indicators will operate three times if the
stalk is briefly pushed up or down.
E80822
Page 2798 of 3229
Lighting
78
L
Removing the headlamp unit
In order to change a headlamp unit bulb, you
must first remove the headlamp unit.
To remove the headlamp unit :-
1. Undo and remove the two retaining bolts.
2. Pull up the locking lever to release the
headlamp unit.
3. Pull the headlamp unit forward sufficiently
to allow access to the rear of the unit.
4. Disconnect the electrical plug from the
back of the headlamp by pressing in the
locking tab and pulling the connector out.
1
3
4
1
E80991
2
1
CAUTION
Do not place the la mp unit face down
on hard or abrasive surfaces. Doing so
may scratch the surface of the lens.