2006 LAND ROVER FRELANDER 2 audio
[x] Cancel search: audioPage 2725 of 3229

Contents
5
R
ENGINE COOLANT CHECK ............................ 163
BRAKE AND CLUTCH FLUID CHECK ............. 165
POWER STEERING FLUID CHECK ................ 166
WASHER FLUID CHECK ................................ 167
TECHNICAL SPECIFICATIONS ...................... 169
Vehicle battery
BATTERY WARNING SYMBOLS ................... 171
BATTERY CARE ............................................ 171
USING BOOSTER CABLES ............................ 173
CHARGING THE VE HICLE BATTERY ............. 174
CHANGING THE VE HICLE BATTERY ............. 174
Wheels and tyres
GENERAL INFORMATION ............................. 176
TYRE CARE ................................................... 177
USING WINTER TYRES................................. 183
CHANGING A ROAD WHEEL ......................... 183
TYRE REPAIR KIT ......................................... 187
USING SNOW CHAINS.................................. 192
TYRE GLOSSARY.......................................... 193
TECHNICAL SPECIFICATIONS ...................... 194
Fuses
FUSE BOX LOCATIONS ................................. 195
CHANGING A FUSE ....................................... 195
FUSE SPECIFICATION CHART....................... 196
Emergency equipment
HAZARD WARNING FLASHERS .................... 204
WARNING TRIANGLE ................................... 204
Status after a collision
DRIVING AFTER A COLLISION...................... 205
INSPECTING SAFETY SYSTEM COMPONENTS ...
206
Vehicle recovery
TOWING POINTS .......................................... 207
LASHING POINTS ......................................... 208
TRANSPORTING THE VEHICLE..................... 208
TOWING THE VEHICLE ON FOUR WHEELS .. 208
Vehicle identification
VEHICLE IDENTIFICATION PLATE................. 210
VEHICLE IDENTIFI CATION NUMBER (VIN) ... 210
VEHICLE BUILD DATE PLATE ....................... 210
Technical specifications
ENGINE SPECIFICATIONS ............................ 211
WEIGHTS...................................................... 212
DIMENSIONS................................................ 213
Type approval
Declarations of conformity ........................... 215
Audio introduction
RADIO RECEPTION....................................... 218
Audio unit overview
AUDIO UNIT OVERVIEW............................... 219
Audio unit operation
ON OR OFF CONTROL .................................. 223
VOLUME CONTROL ...................................... 223
AUDIO CONTROL ......................................... 223
WAVEBAND BUTTON ................................... 224
AUTOSTORE CONTROL ................................ 225
STATION PRESET BUTTONS ........................ 226
TRAFFIC INFORMATION CONTROL .............. 226
Audio unit menus
RADIO DATA SYSTEM (RDS) ....................... 228
REGIONAL MODE (REG) .............................. 228
ENHANCED OTHER NETWORK (RDS-EON).. 229
ALTERNATIVE FREQUENCIES ...................... 229
NEWS BROADCASTS ................................... 230
PRIORITY PROGRAMME TYPE (PTY) .......... 231
RESETTING THE AUDIO UNIT ...................... 233
Digital audio broadcasting
GENERAL INFORMATION ............................. 234
AUDIO CONTROLS ....................................... 235
DISPLAY OPTIONS ....................................... 236
CHANNEL AUTOMATIC TUNING................... 236
CHANNEL OPTIONS ..................................... 236
PRESET BUTTONS ....................................... 238
SETTINGS..................................................... 240
Compact disc player
LOADING COMPACT DISCS ......................... 245
EJECTING COMPACT DISCS ........................ 246
EJECTING MULTIPLE CO MPACT DISCS....... 246
COMPACT DISC SELECTION ........................ 246
COMPACT DISC PLAYBACK ......................... 246
Page 2738 of 3229

18
Quick start
L
1. Exterior lamps master switch
2. Direction indicators/headlam ps/trip computer switch
3. Cruise control switches
4. Instrument pack
5. Audio/telephone switches
6. Washer/wiper switch
7. Start stop engine button
8. Master unlock switch
9. Hazard warning switch
10. Master lock switch
11. Audio unit
12. Heater/air conditioning controls
13. Dynamic Stability Control (DSC) switch
14. Gear selector
15. Touch screen
16. Parking brake
17. Terrain Response control switch
18. Hill Descent Control (HDC) switch
19. Starter control unit
20. Steering column adjustment lever
21. Horn switches
22. Facia illumination dimmer control
Page 2747 of 3229
27
Quick start
R
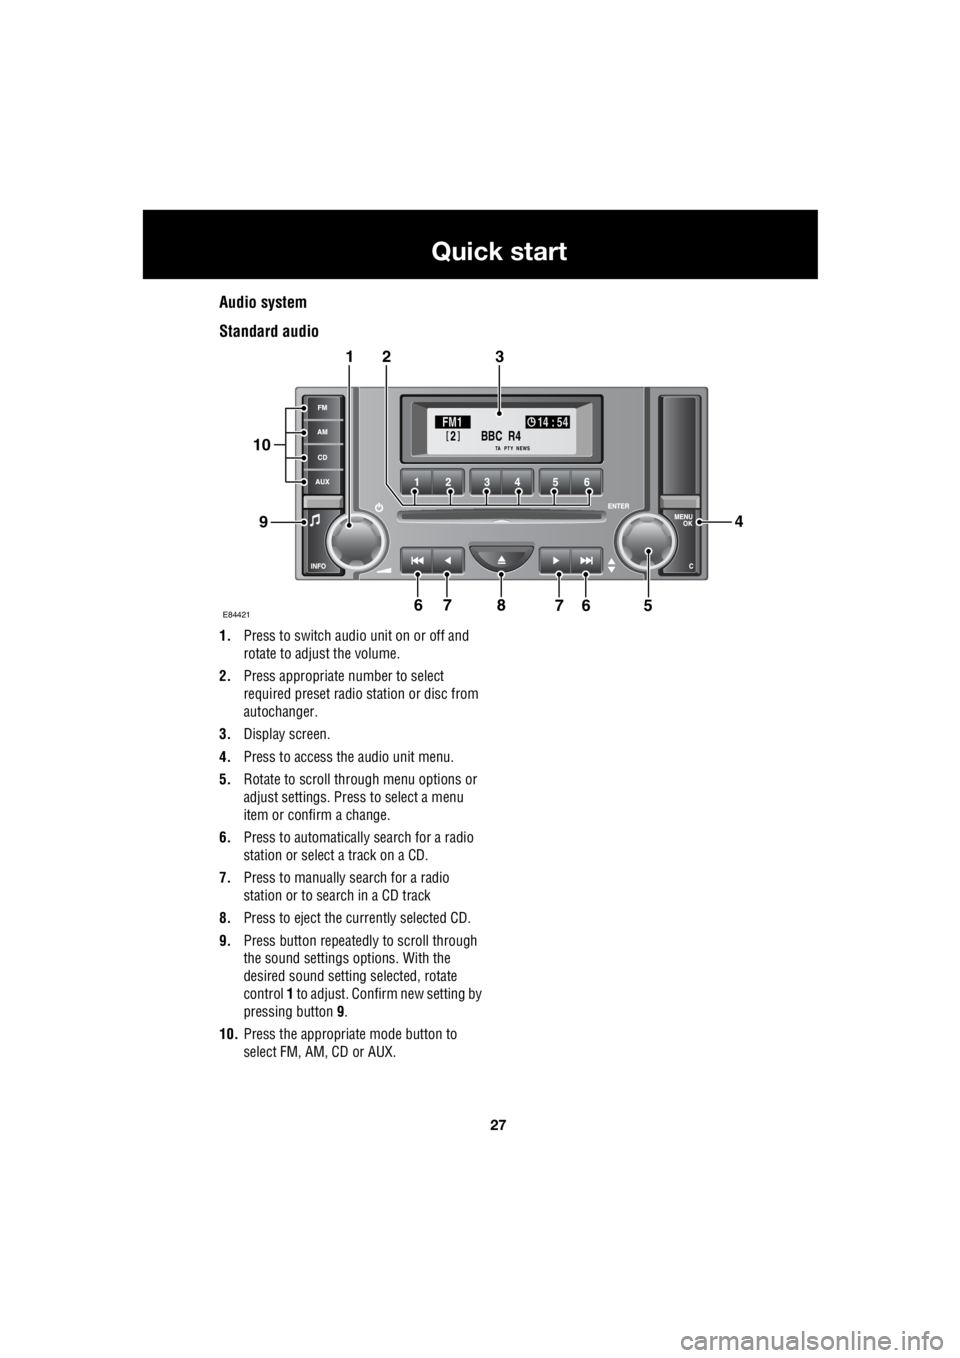
Audio system
Standard audio
1. Press to switch audio unit on or off and
rotate to adjust the volume.
2. Press appropriate number to select
required preset radio station or disc from
autochanger.
3. Display screen.
4. Press to access the audio unit menu.
5. Rotate to scroll through menu options or
adjust settings. Press to select a menu
item or confirm a change.
6. Press to automatically search for a radio
station or select a track on a CD.
7. Press to manually search for a radio
station or to search in a CD track
8. Press to eject the currently selected CD.
9. Press button repeatedly to scroll through
the sound settings options. With the
desired sound setting selected, rotate
control 1 to adjust. Confirm new setting by
pressing button 9.
10. Press the appropriate mode button to
select FM, AM, CD or AUX.
BBC R4
2FM1 14 : 54
TA NEWSPTY
E844217
321
94
56768
10
Page 2748 of 3229
28
Quick start
L
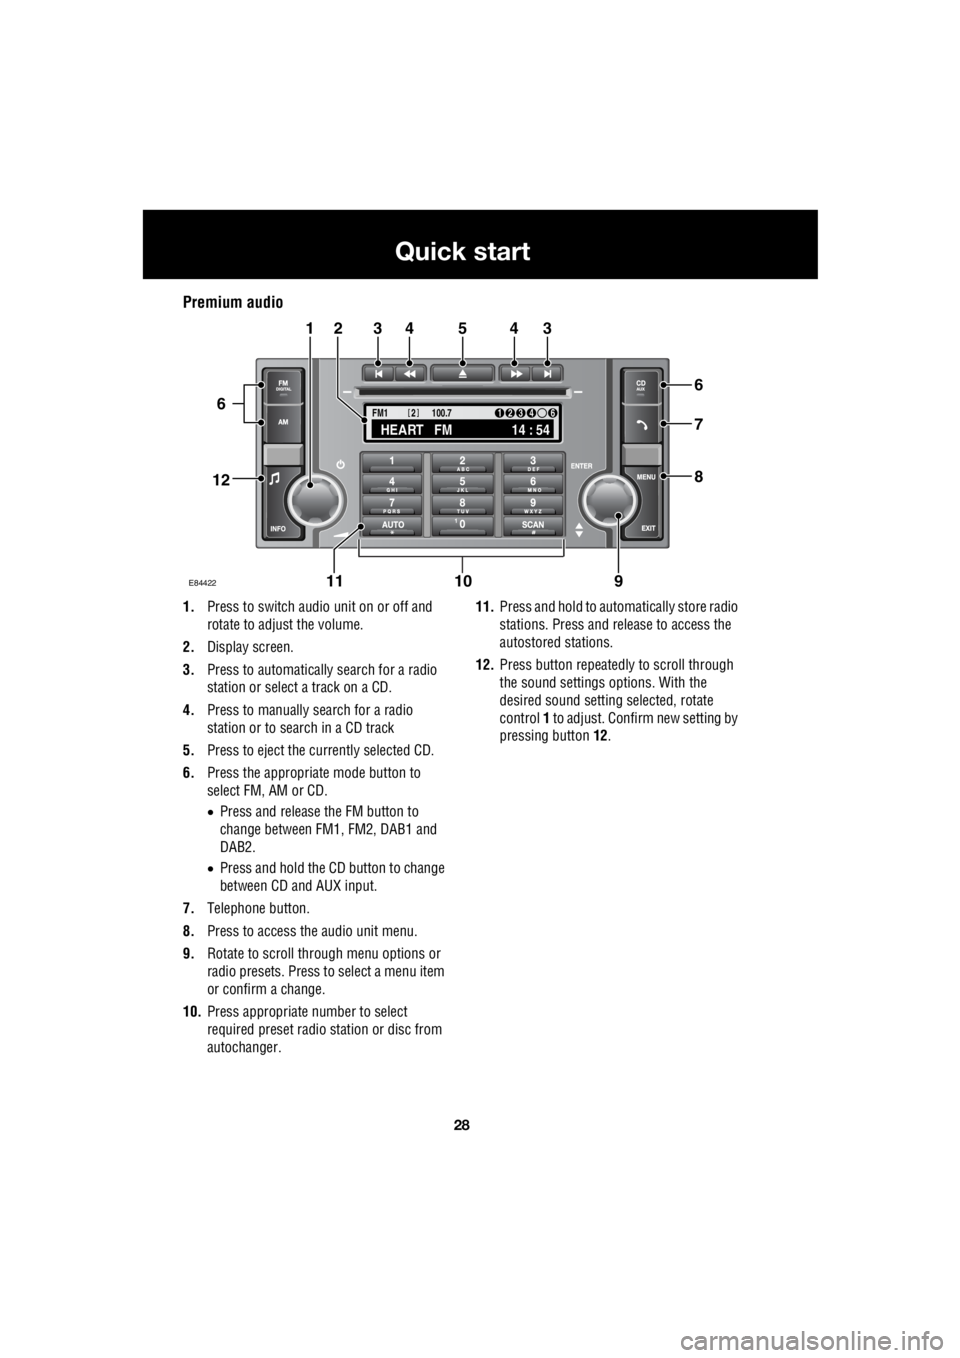
Premium audio
1. Press to switch audio unit on or off and
rotate to adjust the volume.
2. Display screen.
3. Press to automatically search for a radio
station or select a track on a CD.
4. Press to manually search for a radio
station or to search in a CD track
5. Press to eject the currently selected CD.
6. Press the appropriate mode button to
select FM, AM or CD.
• Press and release the FM button to
change between FM1, FM2, DAB1 and
DAB2.
• Press and hold the CD button to change
between CD and AUX input.
7. Telephone button.
8. Press to access the audio unit menu.
9. Rotate to scroll through menu options or
radio presets. Press to select a menu item
or confirm a change.
10. Press appropriate number to select
required preset radio station or disc from
autochanger. 11.
Press and hold to automatically store radio
stations. Press and release to access the
autostored stations.
12. Press button repeatedly to scroll through
the sound settings options. With the
desired sound setti ng selected, rotate
control 1 to adjust. Confir m new setting by
pressing button 12.
TA
NEWSPTY100.7
FM1
14 : 54
HEART FM
1234 6
2
E84422
34543
6
7
8
21
91011
12
6
Page 2749 of 3229
29
Quick start
R
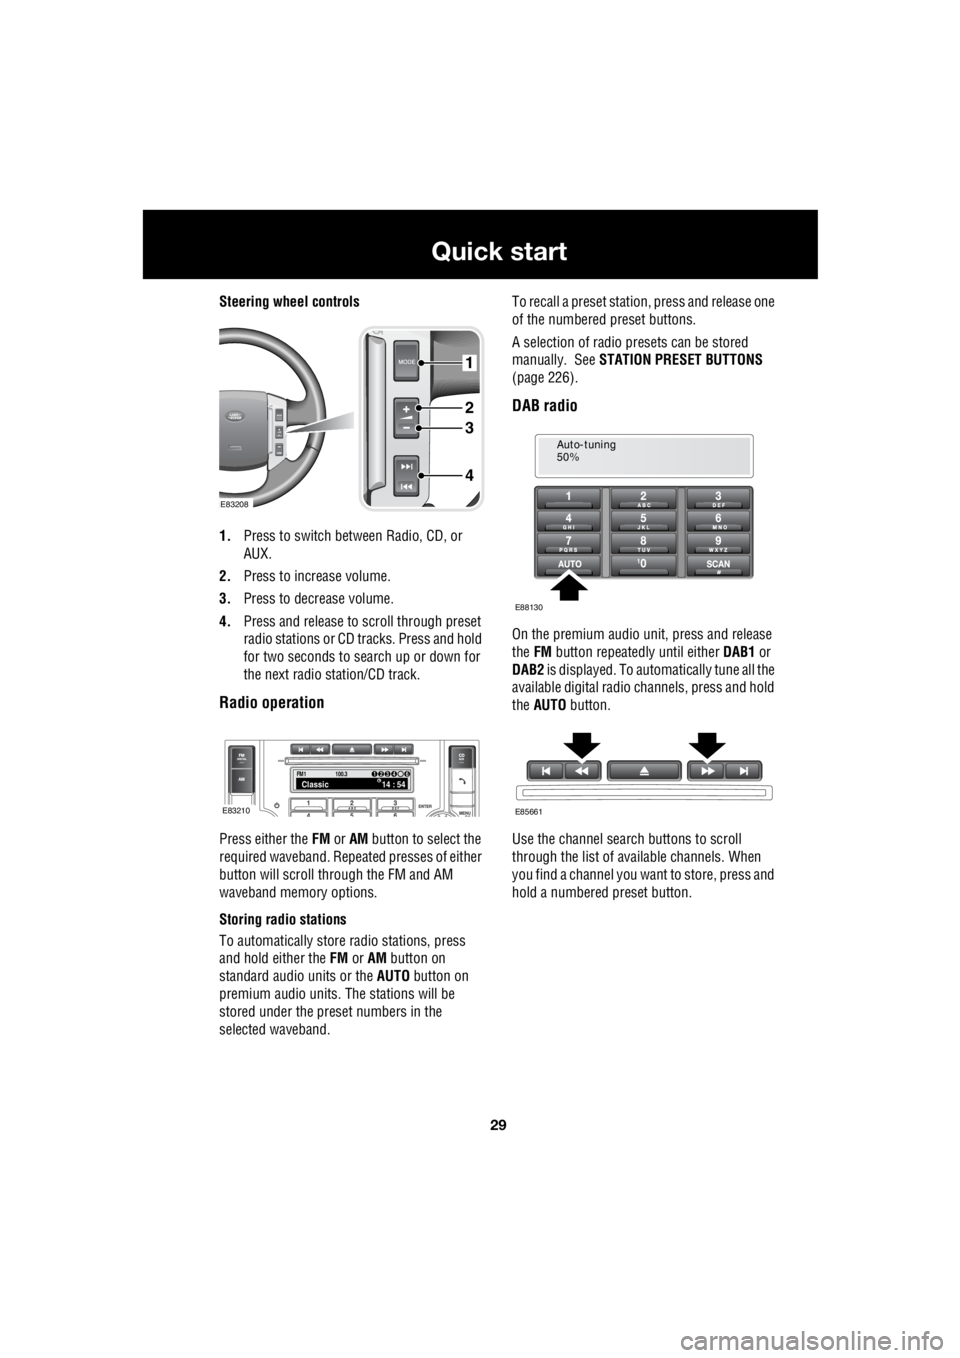
Steering wheel controls
1. Press to switch between Radio, CD, or
AUX.
2. Press to increase volume.
3. Press to decrease volume.
4. Press and release to scroll through preset
radio stations or CD tracks. Press and hold
for two seconds to search up or down for
the next radio station/CD track.
Radio operation
Press either the FM or AM button to select the
required waveband. Repeat ed presses of either
button will scroll through the FM and AM
waveband memory options.
Storing radio stations
To automatically store radio stations, press
and hold either the FM or AM button on
standard audio units or the AUTO button on
premium audio units. The stations will be
stored under the preset numbers in the
selected waveband. To recall a preset stati
on, press and release one
of the numbered preset buttons.
A selection of radio pr esets can be stored
manually. See STATION PRESET BUTTONS
(page 226).
DAB radio
On the premium audio unit, press and release
the FM button repeatedly until either DAB1 or
DAB2 is displayed. To auto matically tune all the
available digital radio channels, press and hold
the AUTO button.
Use the channel search buttons to scroll
through the list of available channels. When
you find a channel you want to store, press and
hold a numbered preset button.
1
2
3
4
E83208
FM114 : 54Classic1234 6
100.3
E83210
Auto-tuning
50%
E88130
E85661
Page 2750 of 3229
30
Quick start
L
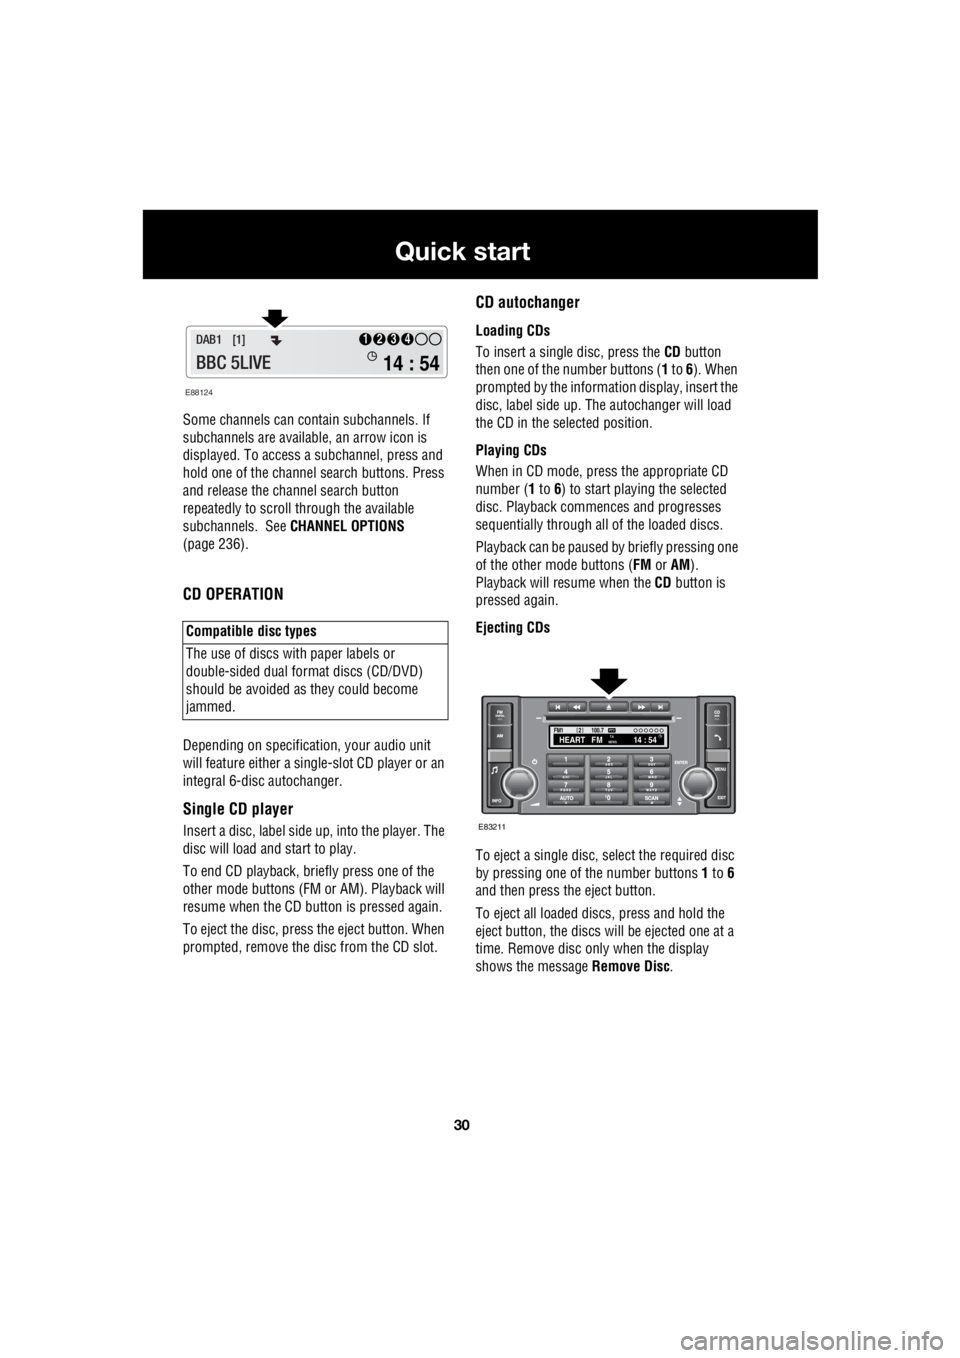
Some channels can co ntain subchannels. If
subchannels are availabl e, an arrow icon is
displayed. To access a subchannel, press and
hold one of the channel search buttons. Press
and release the channel search button
repeatedly to scroll through the available
subchannels. See CHANNEL OPTIONS
(page 236).
CD OPERATION
Depending on specification, your audio unit
will feature either a single- slot CD player or an
integral 6-disc autochanger.
Single CD player
Insert a disc, label side up, into the player. The
disc will load and start to play.
To end CD play back, briefly press one of the
other mode buttons (FM or AM). Playback will
resume when the CD button is pressed again.
To eject the disc, press the eject button. When
prompted, remove the disc from the CD slot.
CD autochanger
Loading CDs
To insert a single disc, press the CD button
then one of the number buttons ( 1 to 6). When
prompted by the information display, insert the
disc, label side up. The autochanger will load
the CD in the selected position.
Playing CDs
When in CD mode, press the appropriate CD
number ( 1 to 6) to start playing the selected
disc. Playback commences and progresses
sequentially through all of the loaded discs.
Playback can be paused by briefly pressing one
of the other mode buttons ( FM or AM).
Playback will re sume when the CD button is
pressed again.
Ejecting CDs
To eject a single disc, select the required disc
by pressing one of the number buttons 1 to 6
and then press the eject button.
To eject all loaded discs, press and hold the
eject button, the discs will be ejected one at a
time. Remove disc only when the display
shows the message Remove Disc.
Compatible disc types
The use of discs with paper labels or
double-sided dual format discs (CD/DVD)
should be avoided as they could become
jammed.
E88124
14 : 54
1234DAB1 [1]
BBC 5LIVE
100.7
2FM114 : 54TA
NEWSHEART FMPTY
E83211
Page 2751 of 3229
31
Quick start
R
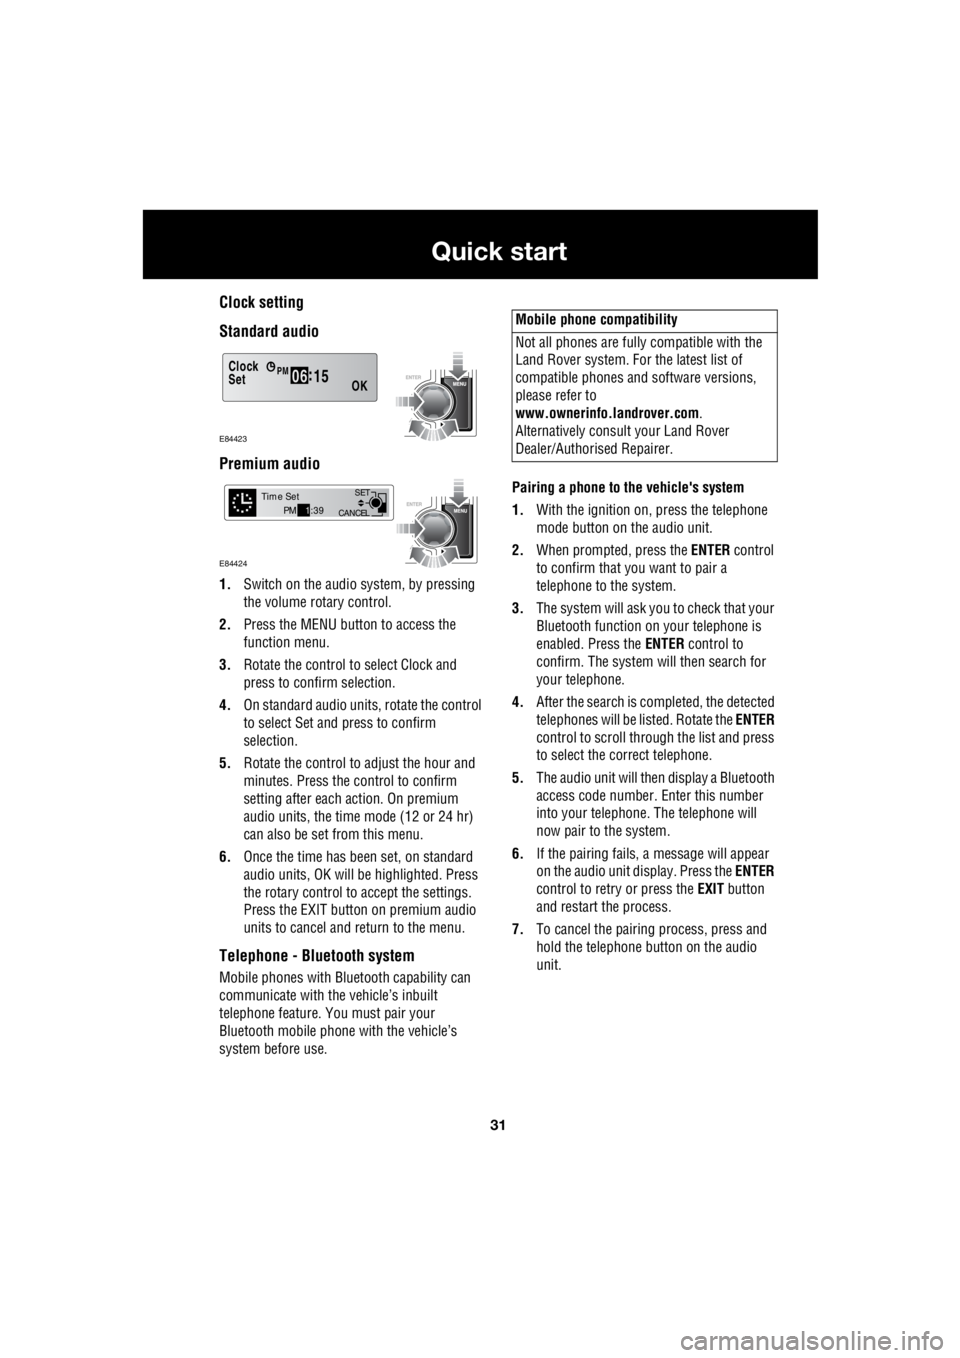
Clock setting
Standard audio
Premium audio
1. Switch on the audio system, by pressing
the volume rotary control.
2. Press the MENU button to access the
function menu.
3. Rotate the control to select Clock and
press to confirm selection.
4. On standard audio units, rotate the control
to select Set and press to confirm
selection.
5. Rotate the control to adjust the hour and
minutes. Press the c ontrol to confirm
setting after each action. On premium
audio units, the time mode (12 or 24 hr)
can also be set from this menu.
6. Once the time has been set, on standard
audio units, OK will be highlighted. Press
the rotary control to accept the settings.
Press the EXIT button on premium audio
units to cancel and return to the menu.
Telephone - Bluetooth system
Mobile phones with Blue tooth capability can
communicate with the vehicle’s inbuilt
telephone feature. You must pair your
Bluetooth mobile phone with the vehicle’s
system before use. Pairing a phone to the vehicle's system
1. With the ignition on, press the telephone
mode button on the audio unit.
2. When prompted, press the ENTER control
to confirm that you want to pair a
telephone to the system.
3. The system will ask you to check that your
Bluetooth function on your telephone is
enabled. Press the ENTER control to
confirm. The system will then search for
your telephone.
4. After the search is completed, the detected
telephones will be listed. Rotate the ENTER
control to scroll through the list and press
to select the correct telephone.
5. The audio unit will then display a Bluetooth
access code number. Enter this number
into your telephone. The telephone will
now pair to the system.
6. If the pairing fails, a message will appear
on the audio unit display. Press the ENTER
control to retry or press the EXIT button
and restart the process.
7. To cancel the pairing process, press and
hold the telephone button on the audio
unit.
Clock
OK06 :
15SetPM
E84423
CANCEL SET
Time SetPM
1:39
E84424
Mobile phone compatibility
Not all phones are fully compatible with the
Land Rover system. For the latest list of
compatible phones and software versions,
please refer to
www.ownerinfo.landrover.com .
Alternatively consult your Land Rover
Dealer/Authorised Repairer.
Page 2752 of 3229
32
Quick start
L
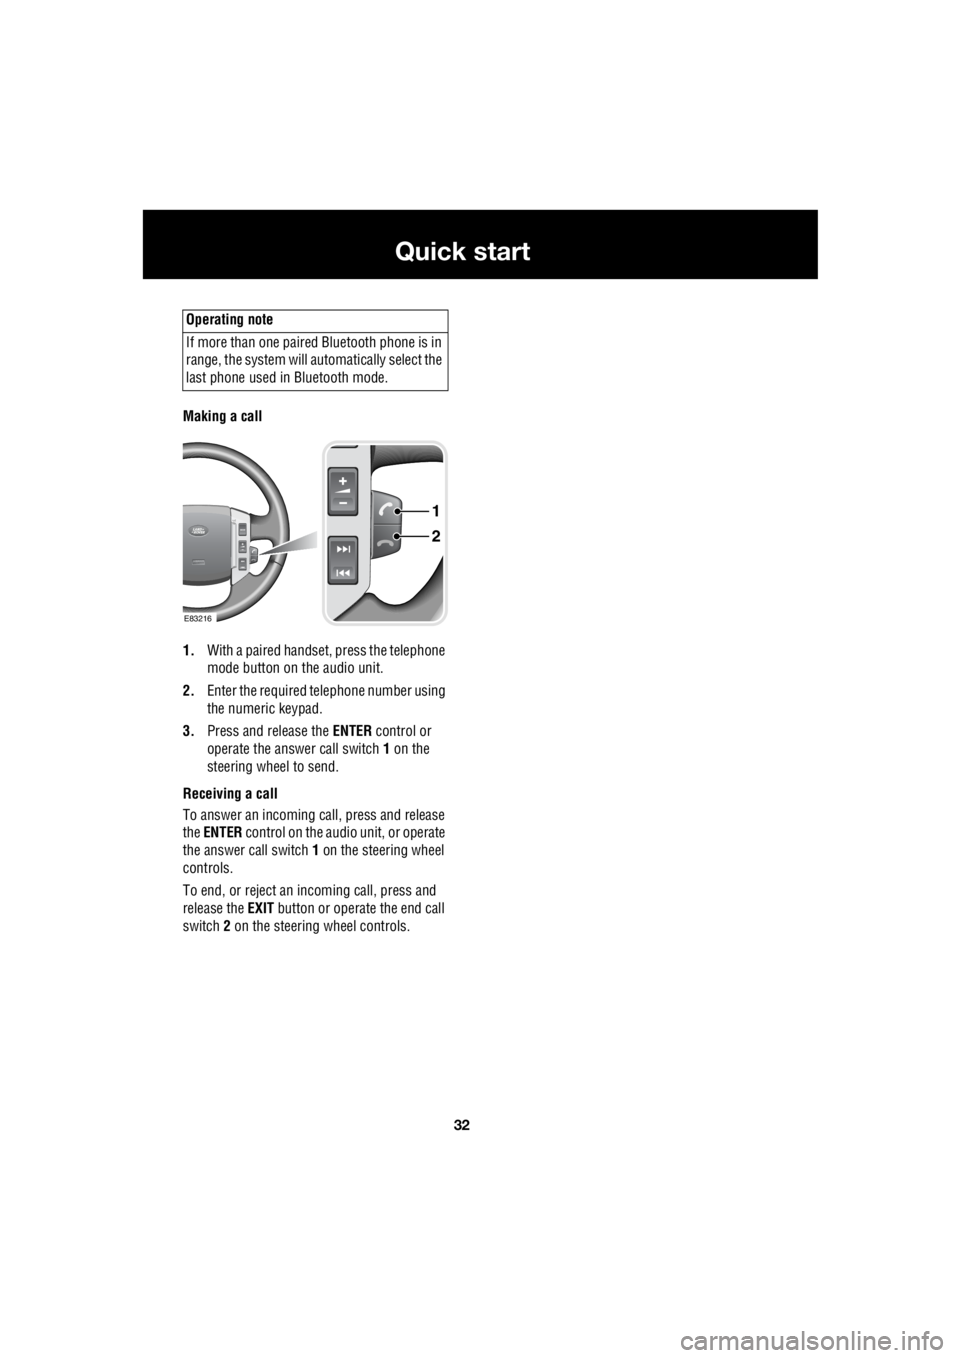
Making a call
1. With a paired handset, press the telephone
mode button on the audio unit.
2. Enter the required te lephone number using
the numeric keypad.
3. Press and release the ENTER control or
operate the answer call switch 1 on the
steering wheel to send.
Receiving a call
To answer an incoming call, press and release
the ENTER control on the audio unit, or operate
the answer call switch 1 on the steering wheel
controls.
To end, or reject an incoming call, press and
release the EXIT button or operate the end call
switch 2 on the steering wheel controls.
Operating note
If more than one paired Bluetooth phone is in
range, the system will automatically select the
last phone used in Bluetooth mode.
1
2
E83216