Page 203 of 3229

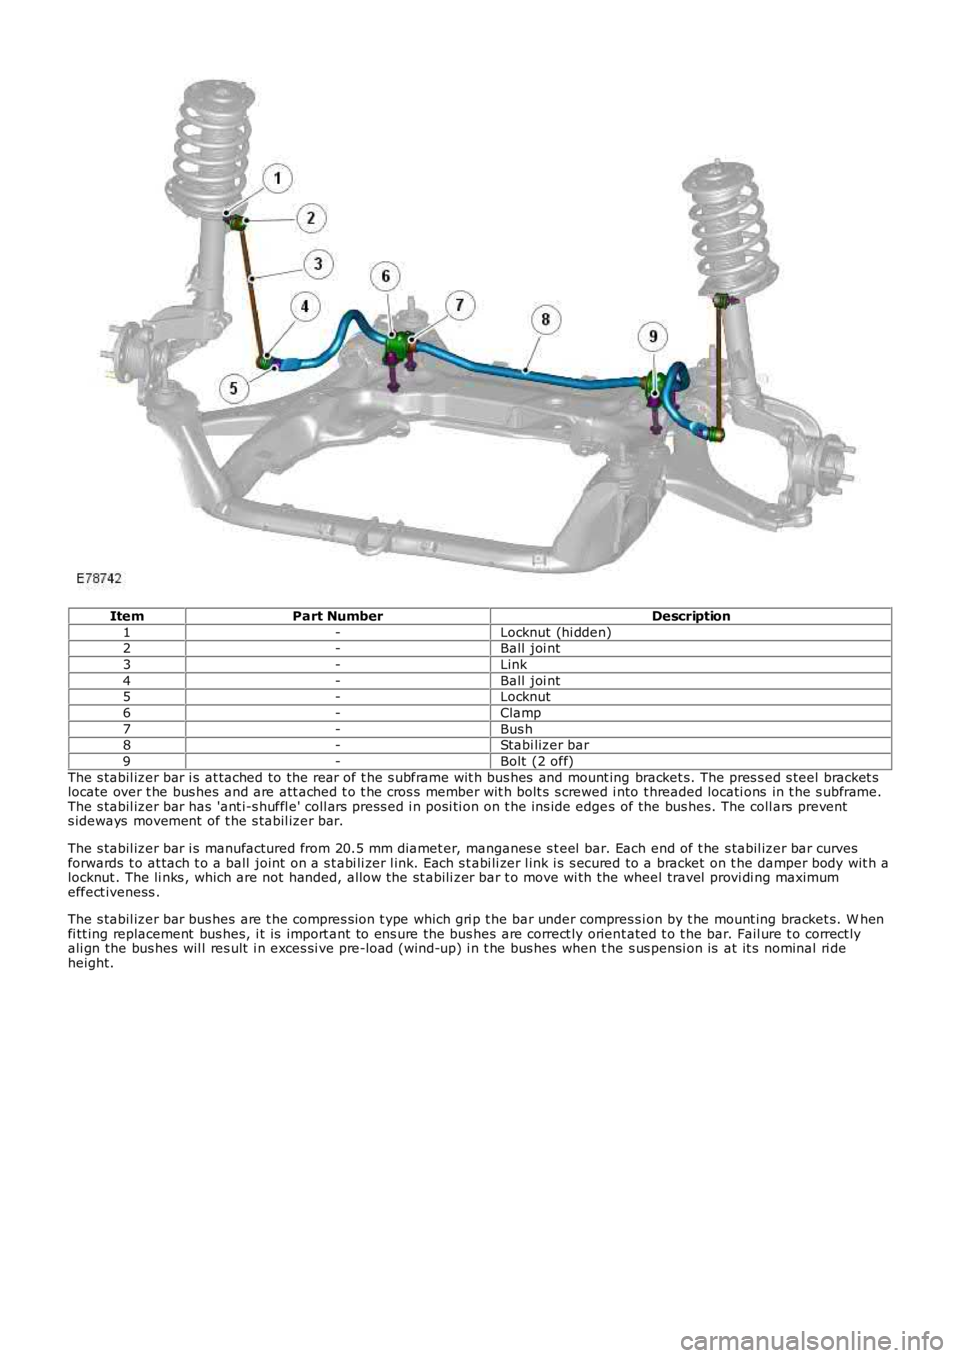
ItemPart NumberDescription
1-Locknut (hi dden)2-Ball joi nt
3-Link
4-Ball joi nt5-Locknut
6-Clamp
7-Bus h8-Stabi lizer bar
9-Bolt (2 off)
The s tabil izer bar i s at tached to the rear of t he s ubframe wit h bus hes and mount ing bracket s. The pres s ed s teel bracket slocate over t he bus hes and are att ached t o t he cros s member wit h bolt s s crewed i nto t hreaded locati ons in t he s ubframe.The s tabil izer bar has 'ant i-s huffl e' coll ars press ed i n posi ti on on t he ins ide edges of the bus hes. The coll ars prevents ideways movement of t he s tabil izer bar.
The s tabil izer bar i s manufactured from 20.5 mm diamet er, manganes e s t eel bar. Each end of t he s tabil izer bar curvesforwards t o at tach t o a ball joint on a s t abi li zer l ink. Each s t abi li zer l ink i s s ecured to a bracket on t he damper body wit h alocknut . The li nks , which are not handed, allow the st abili zer bar t o move wi th the wheel travel provi di ng maximumeffect iveness .
The s tabil izer bar bus hes are t he compres s ion t ype which gri p t he bar under compres si on by t he mount ing bracket s. W henfi tt ing replacement bus hes, i t is import ant to ens ure the bus hes are correct ly orient ated t o t he bar. Fail ure t o correct lyali gn the bus hes wil l res ult i n exces si ve pre-load (wind-up) i n t he bus hes when t he s us pensi on is at it s nominal ri deheight.
Page 205 of 3229
Publi s hed: 11-May-2011
Front Suspension - Front Wheel Bearing
Removal and Inst all ati on
Special T ool(s)
204-348/3Remover/Ins t al ler, W heel Hub/W heel Bearing
204-348-01Adapter for 204-348
204-528/1Remover/Ins t al ler, Bus hing
204-536/2Remover/Ins t al ler, Bus hing
205-802/5Remover, W heel Hub/Beari ng
Removal
• NOTE: The wheel bearing i s s uppli ed as part of t he dri ve fl ange as s embly.
1. W ARNING: Make sure t o s upport the vehicle wit h axles tands .
Rais e and s upport t he vehi cl e.
1.
Remove t he wheel knuckl e.
Refer t o: W heel Knuckle (204-01 Front Sus pens ion, Removal andInst all at ion).
2.
Page 206 of 3229
Pos it ion t he wheel knuckl e as sembl y in a pres sand s upport on s pecial t ool .
Speci al Tool (s ): 205-802/5Us ing t he s peci al t ool, pres s t he dri ve fl angeas sembl y out of the wheel knuckle.
Speci al Tool (s ): 204-536/2
3.
Installation
1. CAUTION: Make s ure that a new drive flangeas sembl y is ins tal led.
Pos it ion t he new dri ve fl ange ass embly in t hes peci al t ools .
Speci al Tool (s ): 204-348/3, 204-348-01Us ing t he s peci al t ool, pres s t he dri ve fl angeas sembl y int o t he wheel knuckl e.
Speci al Tool (s ): 204-528/1
1.
Inst all t he wheel knuckl e.
Refer t o: W heel Knuckle (204-01 Front Sus pens ion, Removal andInst all at ion).
2.
Page 207 of 3229
Publi s hed: 11-May-2011
Front Suspension - Lower Arm
Removal and Inst all ati on
Special T ool(s)
204-619G-Clamp
205-857Remover, Halfs haft
211-316Separat or, Ball Joi nt
Removal
Remove t he plenum chamber panel.
Refer t o: Plenum Chamber (412-01 Cl imat e Control, Removal andInst all at ion).
1.
Releas e t he hood support s t rut s and s ecure the hood i nan upri ght pos it ion.2.
3. W ARNING: Make sure t o s upport the vehicle wit h axles tands .
Rais e and s upport t he vehi cl e.
3.
Remove t he wheel and t ire.
Refer t o: W heel and Ti re (204-04 W heel s and Tires, Removal andInst all at ion).
4.
Page 208 of 3229
5. NOTE: Thi s s tep requires the ai d of anot hert echnician.
Compres s t he s pri ng and damper as s embly.
Speci al Tool (s ): 204-619
5.
Remove and dis card t he front halfs haft bol t.6.
Part ial ly release the front halfs haft from t he wheelknuckle.
Speci al Tool (s ): 205-857
7.
8. CAUTION: Do not all ow halfs hafts to hanguns upport ed at one end or joi nt damage will occur.
Part ial ly release the front halfs haft from t he wheelknuckle.
8.
Page 210 of 3229

Stage 1:Stage 2:
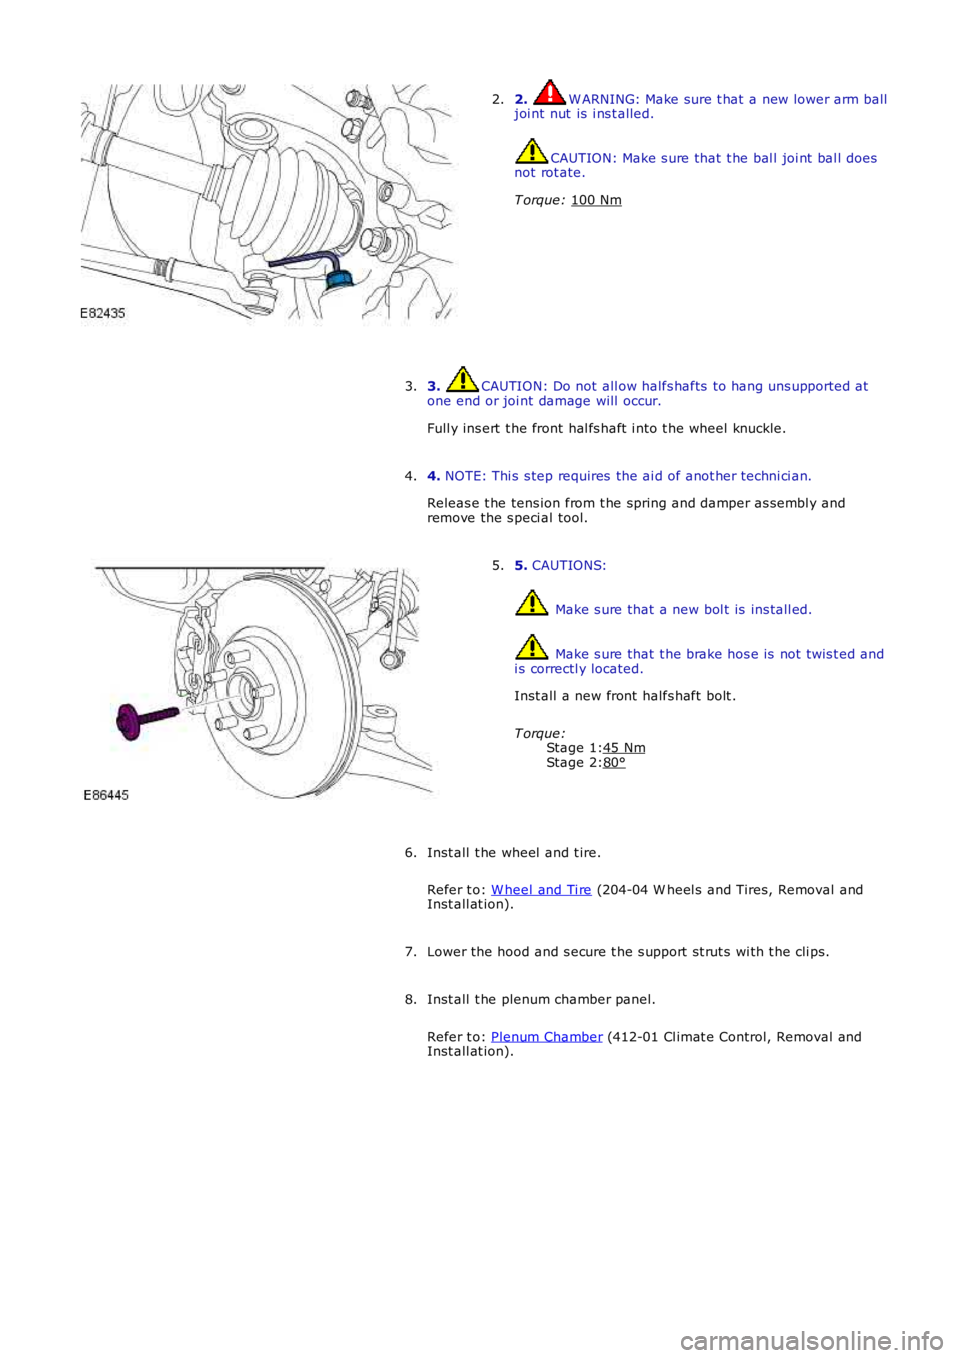
2. W ARNING: Make sure t hat a new lower arm balljoi nt nut is i ns t alled.
CAUTION: Make s ure that t he bal l joi nt bal l doesnot rot ate.
T orque: 100 Nm
2.
3. CAUTION: Do not all ow halfs hafts to hang uns upported atone end or joi nt damage will occur.
Full y ins ert t he front hal fs haft i nto t he wheel knuckle.
3.
4. NOTE: Thi s s tep requires the ai d of anot her techni ci an.
Releas e t he tens ion from t he spring and damper as sembl y andremove the s peci al tool.
4.
5. CAUTIONS:
Make s ure that a new bol t is ins tall ed.
Make s ure that t he brake hos e is not t wis t ed andi s correctl y located.
Inst all a new front halfs haft bolt .
T orque:45 Nm80°
5.
Inst all t he wheel and t ire.
Refer t o: W heel and Ti re (204-04 W heel s and Tires, Removal andInst all at ion).
6.
Lower the hood and s ecure t he s upport st rut s wi th t he cli ps.7.
Inst all t he plenum chamber panel.
Refer t o: Plenum Chamber (412-01 Cl imat e Control, Removal andInst all at ion).
8.
Page 211 of 3229

Publi s hed: 11-May-2011
Front Suspension - Front Stabilizer Bar
Removal and Inst all ati on
Removal CAUTION: Nut s and bol ts mus t be ti ght ened wit h t he weight of t he vehi cl e on t he s us p
ensi on.
• NOTE: Only us e cl ean water as a l ubricant for t he bushi ng, i f required.
• NOTE: Removal s t eps in t his procedure may cont ain i nst all ati on det ail s.
1. W ARNING: Make sure t o s upport the vehicle wit h axle
s tands .
Rais e and s upport t he vehi cl e.
1.
Remove t he front wheel s and ti res .
Refer t o: W heel and Ti re (204-04 W heel s and Tires, Removal and
Inst all at ion).
2.
Remove t he dri ves haft .
Refer t o: Dri ves haft - Vehicles W it hout : Dies el Part icul ate Fi lt er (DPF) (205-01 Driveshaft, Removal and Ins tal lati on).
3.
Remove t he cat alyti c convert ers .
Refer t o: Cat alyt ic Converter (309-00A Exhaus t Syst em - I6 3.2L
Petrol, Removal and Ins tall ati on).
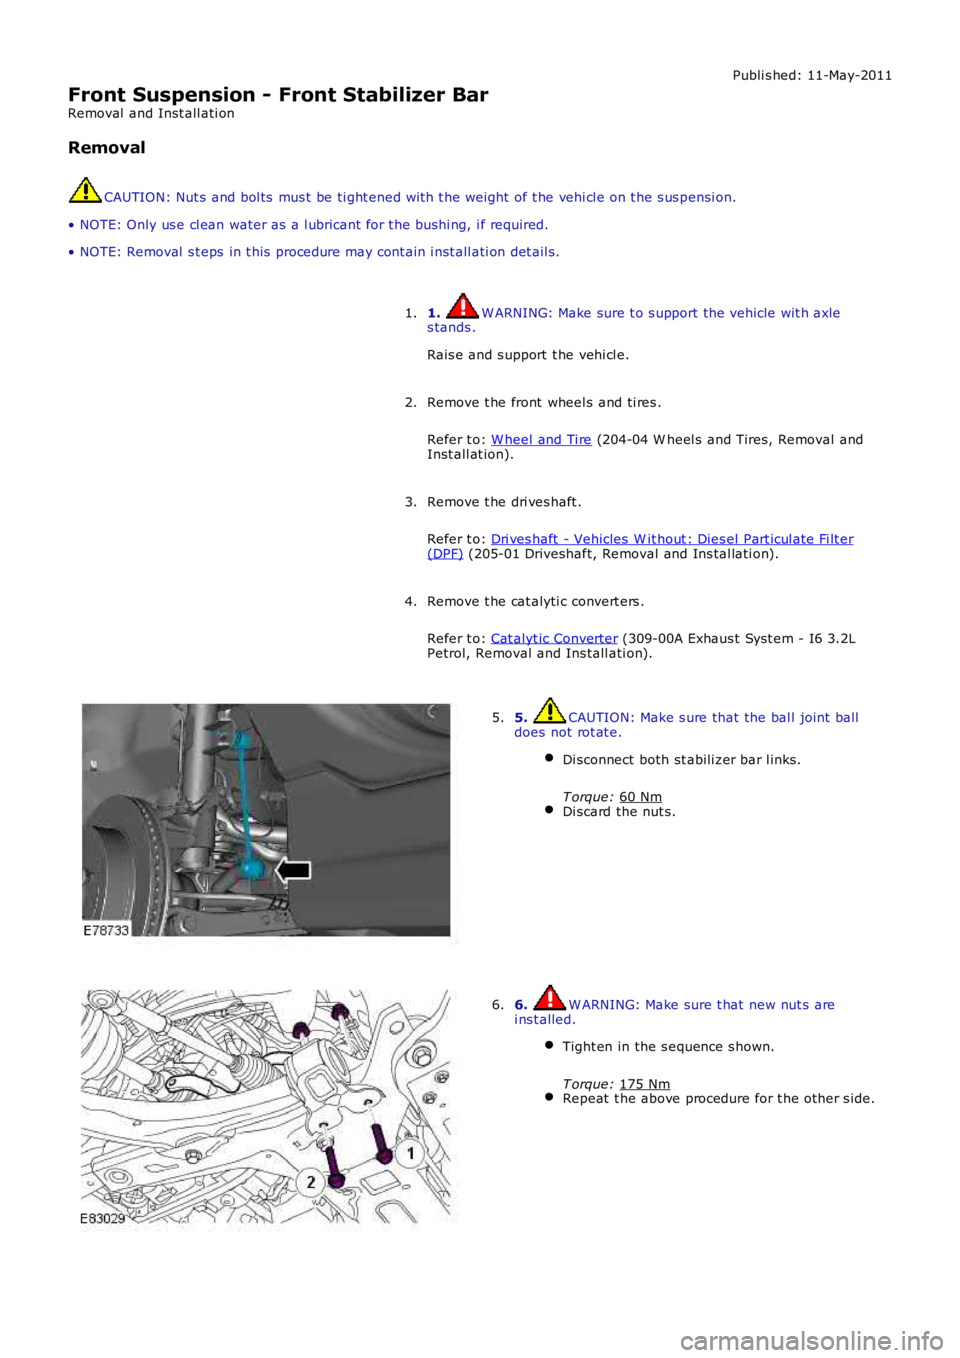
4. 5. CAUTION: Make s ure that the bal l joint ball
does not rot at e.
Di sconnect both st abili zer bar l inks.
T orque: 60 Nm Di scard the nut s.5.
6. W ARNING: Make sure t hat new nut s are
i ns t alled.
Tight en in the s equence s hown.
T orque: 175 Nm Repeat t he above procedure for t he other s ide.6.
Page 213 of 3229
Publi s hed: 11-May-2011
Front Suspension - Front Stabilizer Bar Bushing
Removal and Inst all ati on
Removal
1. W ARNING: Make sure t o s upport the vehicle wit h axles tands .
Rais e and s upport t he vehi cl e.
1.
Remove t he front wheel s and ti res .
Refer t o: W heel and Ti re (204-04 W heel s and Tires, Removal andInst all at ion).
2.
Remove t he engi ne undershi eld.
Refer t o: Engi ne Unders hi eld (501-02 Front End Body Panel s ,Removal and Ins tall ati on).
3.
4. CAUTION: Make s ure that the bal l joint balldoes not rot at e.
Di sconnect both front s t abi li zer bar li nks fromt he s tabil izer bar.Di scard the nut s.
4.