2006 LAND ROVER FRELANDER 2 transmission fluid
[x] Cancel search: transmission fluidPage 1296 of 3229
Publi s hed: 11-May-2011
Automatic Transmission/Transaxle - Diagnostics
Diagnosi s and Tes ti ng
Principles of Operation
For a detail ed descripti on of the Aut omati c t ransmis s ion/t rans axl e:REFER to: Trans mi ss i on Descri pti on (307-01 Aut omat ic Trans mi ss ion/Transaxle, Des cript ion and O perati on).
Fluid Level and Condition Check
CAUTION: The vehicle s hould not be driven if t he fluid level i s low as int ernal failure can resul t.
• NOTE: The t rans mis s ion fluid temperat ure mus t be bet ween 50°C (122°F) and 60°C (140°F) whil s t checki ng level. Shouldt he temperat ure ri se above t his figure, abort t he check and al low t he t rans mis s ion flui d to cool .
This vehicle is not equi pped wit h a flui d level indicator. An incorrect l evel may affect the t rans mi ss i on operati on and couldres ult i n t rans mis s ion damage. To correct ly check and add flui d t o the trans mi s si on:REFER to: (307-01 Automat icTrans mis s ion/Transaxle)
Transmis s ion Flui d Level Check - I6 3.2L Petrol (General Procedures ),Transmis s ion Flui d Level Check - TD4 2.2L Di es el (General Procedures ).
Fluid Condi ti on Check
Us e t he fol lowing procedure to check the flui d condi ti on, whi ch is a good i ndicat or of the i nternal condi ti on of thet ransmis s ion:
1. Check t he fluid level .1.
2. Observe the col our and t he odour of t he fl uid. The col our under normal circums t ances s houl d be reddi sh, notbrown or black.
If in doubt, compare t he fluid wit h t hat from a new, s ealed cont ainer.
2.
3. All ow t he fl ui d t o dri p onto a faci al t is s ue and examine t he s tai n.3.
4. If evidence of sol id materi al is found, t he transmis s ion fluid pan should be removed for furt her ins pecti on.4.
Inspection and Verification
CAUTION: Di agnos is by s ubs ti tut ion from a donor vehicle is NO T acceptabl e. Subs ti tut ion of cont rol modules doesnot guarant ee confirmat ion of a faul t, and may als o caus e addit ional fault s i n t he vehi cl e being t est ed and/or t he donorvehi cl e.
1. Verify t he cus t omer concern.1.
2. Vis ually ins pect for obvious s igns of mechani cal , el ect ri cal or hydrauli c fault s .2.
Visual Inspection
MechanicalElectricalHydraulicDamaged s hift mechanis m/li nkagesDamaged automat ic t rans mi ss ion cas ingCheck the t rans mi ss ion sel ect or lever cable forcorrect adjus t ment
Bl own fus e(s)Damaged, loos e or corrodedconnect orsW iring harnes s
Fluid level t oohigh/l owPoor condit ion offl uidFluid leak
3. If an obvious cause for an obs erved or report ed concern is found, correct t he caus e (if pos s ible) beforeproceeding t o t he next s t ep.3.
4. Us e the approved di agnos ti c s ys t em or a s can t ool t o ret rieve any diagnos t ic t rouble codes (DTCs ) before movingont o t he DTC index.
Make s ure t hat all DTCs are cl eared fol lowing recti fi cat ion.
4.
DTC Index
• NOTE: If the control modul e/t rans mis s ion i s s uspect and the vehicle remai ns under manufacturer warrant y, refer t o t heW arranty Pol icy and Procedures manual (s ect ion B1.2), or determine i f any pri or approval programme is in operat ion, pri ort o the ins tall ati on of a new module/transmis s ion.
• NOTE: Generic scan t ool s may not read the codes li st ed, or may read only fi ve digit codes . Mat ch the five di git s from t hes can tool to the firs t fi ve di git s of the seven digi t code l is ted to ident ify t he faul t (t he las t t wo digi ts gi ve addi ti onalinformat ion read by the manufact urer approved diagnos t ic s ys tem).
• NOTE: W hen performing el ect ri cal volt age or resi s tance tes t s, al ways us e a digit al mult imet er (DMM) accurate to threedeci mal places , and wi th an up-to-date cali brat ion cert ificate. W hen t es ti ng res is t ance, always take t he res i st ance of t heDMM leads int o account.
• NOTE: Check and recti fy bas ic faul ts before beginni ng diagnos t ic rout ines i nvol vi ng pinpoint t es t s.
Page 1298 of 3229
Publi s hed: 11-May-2011
Automatic Transmission/Transaxle - Transmission Fluid Level CheckI6 3.2L
Petrol
General Procedures W ARNING: Observe due care when drai ning, as the flui d can be very hot .
Ens ure t hat the aut omat ic trans mi s si on is in 'P' and t he handbrake is
ful ly appli ed.
1.
Remove t he air cleaner hous ing.
Refer t o: Air Cleaner (303-12B Intake Ai r Dis tribut ion and Fil tering -
TD4 2.2L Dies el, Removal and Inst all ati on).
2.
Clean t he area around the trans mi s si on fl uid fil ler plug.
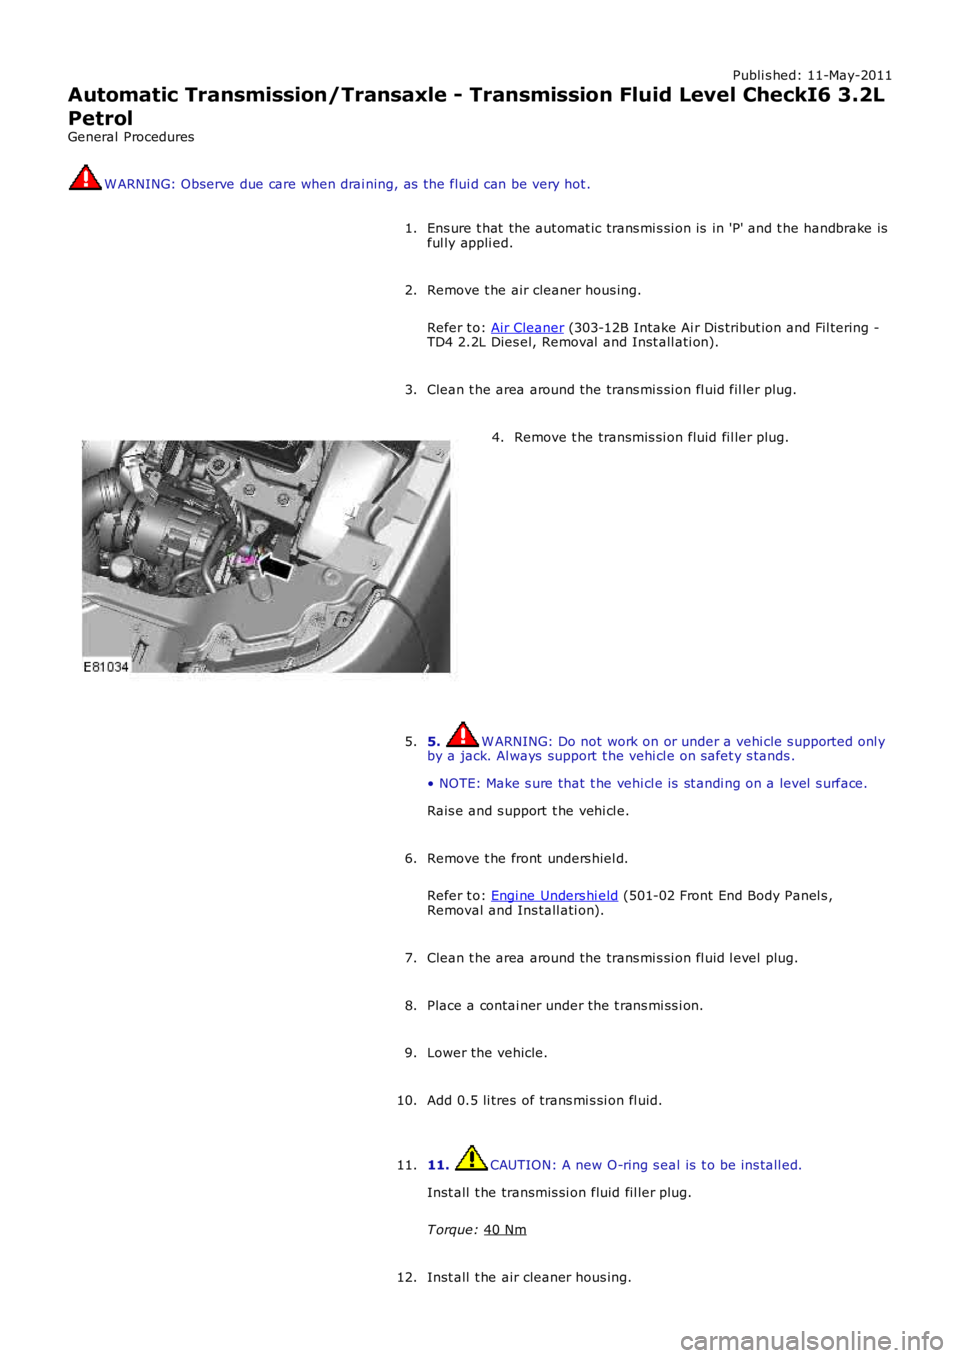
3. Remove t he transmis si on fluid fil ler plug.
4.
5. W ARNING: Do not work on or under a vehi cle s upported onl y
by a jack. Al ways support t he vehi cl e on s afet y s tands .
• NOTE: Make s ure that t he vehi cl e is st andi ng on a level s urface.
Rais e and s upport t he vehi cl e.
5.
Remove t he front unders hiel d.
Refer t o: Engi ne Unders hi eld (501-02 Front End Body Panel s ,
Removal and Ins tall ati on).
6.
Clean t he area around the trans mi s si on fl uid l evel plug.
7.
Place a contai ner under the t rans mi ss i on.
8.
Lower the vehicle.
9.
Add 0.5 li tres of trans mi s si on fl uid.
10.
11. CAUTION: A new O-ring s eal is t o be ins tall ed.
Inst all t he transmis si on fluid fil ler plug.
T orque: 40 Nm 11.
Inst all t he air cleaner hous ing.
12.
Page 1300 of 3229
Publi s hed: 11-May-2011
Automatic Transmission/Transaxle - Transmission Fluid Drain and RefillI6
3.2L Petrol
General Procedures W ARNING: Observe due care when drai ning, as the flui d can be very hot .
Ens ure t hat the aut omat ic trans mi s si on is in 'P' and t he handbrake is
ful ly appli ed.
1.
Remove t he air cleaner hous ing.
Refer t o: Air Cleaner (303-12B Intake Ai r Dis tribut ion and Fil tering -
TD4 2.2L Dies el, Removal and Inst all ati on).
2.
Clean t he area around the trans mi s si on fl uid fil ler plug.
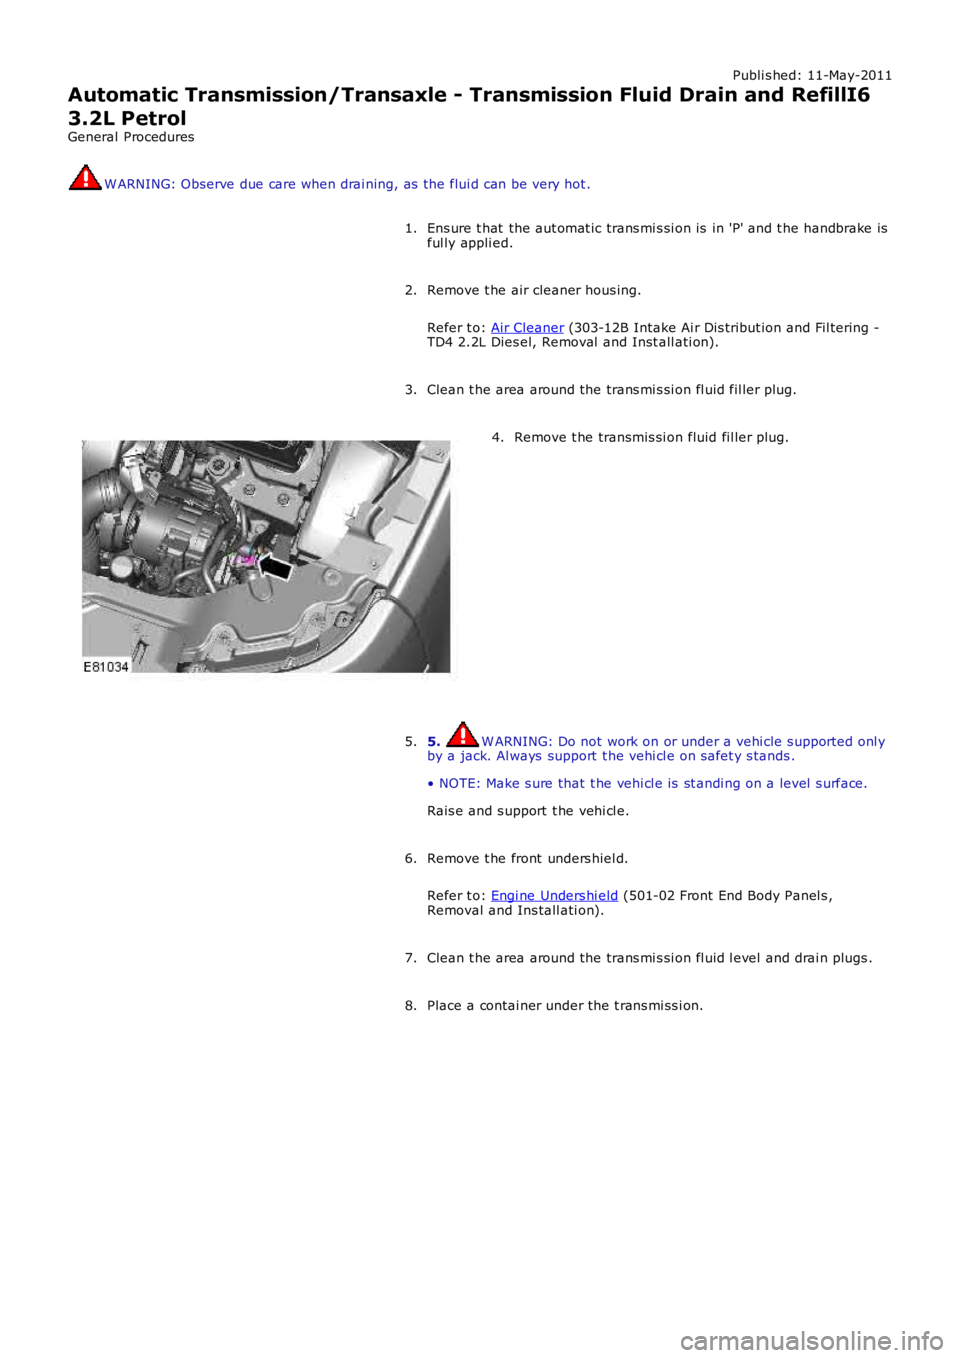
3. Remove t he transmis si on fluid fil ler plug.
4.
5. W ARNING: Do not work on or under a vehi cle s upported onl y
by a jack. Al ways support t he vehi cl e on s afet y s tands .
• NOTE: Make s ure that t he vehi cl e is st andi ng on a level s urface.
Rais e and s upport t he vehi cl e.
5.
Remove t he front unders hiel d.
Refer t o: Engi ne Unders hi eld (501-02 Front End Body Panel s ,
Removal and Ins tall ati on).
6.
Clean t he area around the trans mi s si on fl uid l evel and drai n plugs .
7.
Place a contai ner under the t rans mi ss i on.
8.
Page 1303 of 3229
Publi s hed: 11-May-2011
Automatic Transmission/Transaxle - Transmission Fluid Level CheckTD4
2.2L Diesel
General Procedures W ARNING: Observe due care when drai ning, as the flui d can be very hot .
Ens ure t hat the aut omat ic trans mi s si on is in 'P' and t he handbrake is
ful ly appli ed.
1.
Clean t he area around the trans mi s si on fl uid fil ler plug.
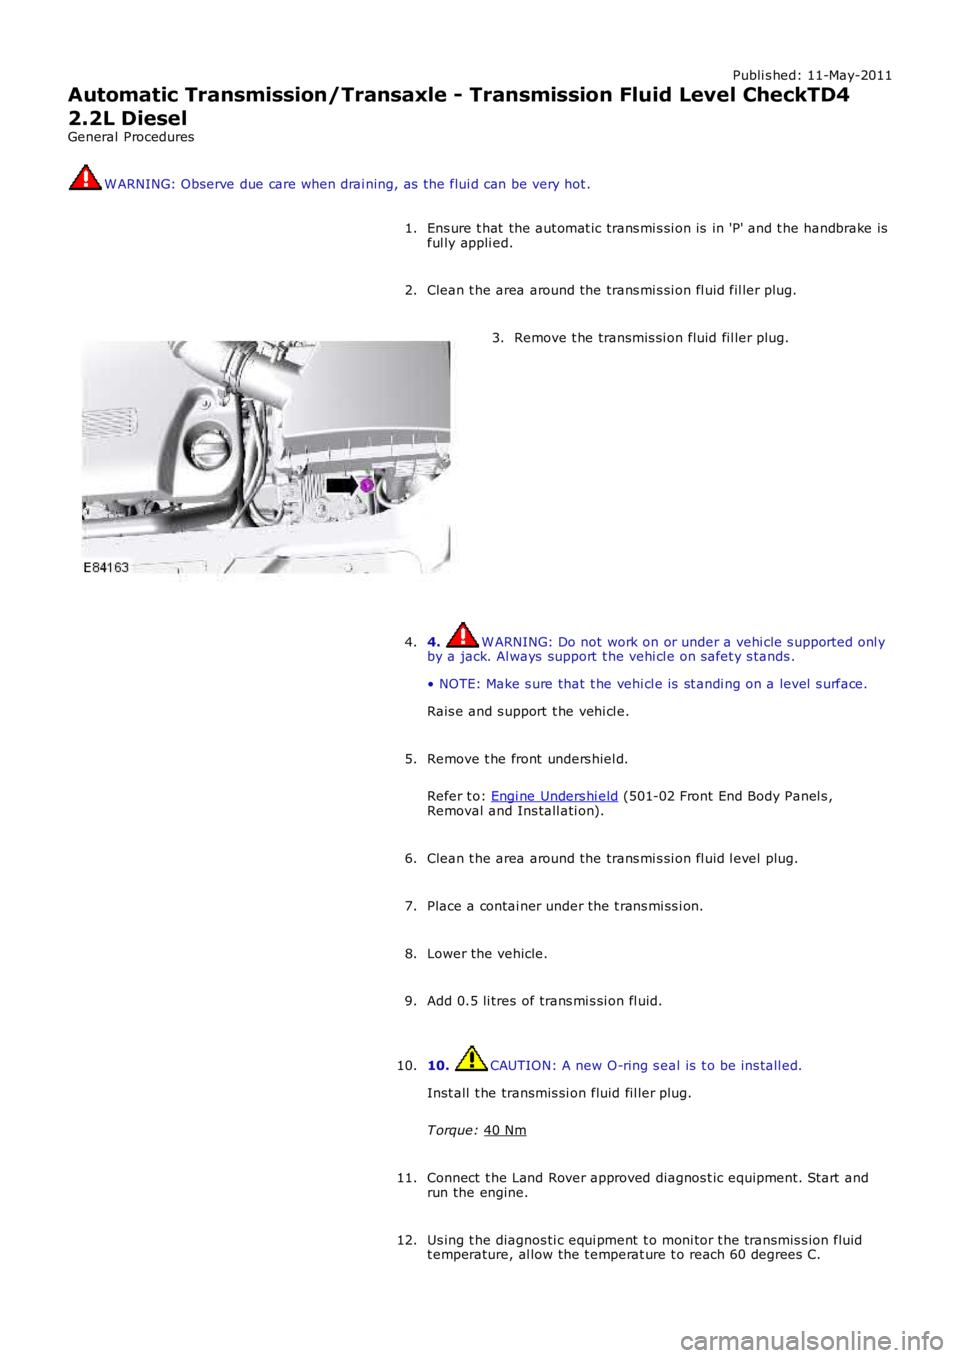
2. Remove t he transmis si on fluid fil ler plug.
3.
4. W ARNING: Do not work on or under a vehi cle s upported onl y
by a jack. Al ways support t he vehi cl e on s afet y s tands .
• NOTE: Make s ure that t he vehi cl e is st andi ng on a level s urface.
Rais e and s upport t he vehi cl e.
4.
Remove t he front unders hiel d.
Refer t o: Engi ne Unders hi eld (501-02 Front End Body Panel s ,
Removal and Ins tall ati on).
5.
Clean t he area around the trans mi s si on fl uid l evel plug.
6.
Place a contai ner under the t rans mi ss i on.
7.
Lower the vehicle.
8.
Add 0.5 li tres of trans mi s si on fl uid.
9.
10. CAUTION: A new O-ring s eal is t o be ins tall ed.
Inst all t he transmis si on fluid fil ler plug.
T orque: 40 Nm 10.
Connect t he Land Rover approved diagnos t ic equipment. St art and
run the engine.
11.
Us ing t he diagnos ti c equi pment t o moni tor t he transmis s ion fluid
t emperature, al low the t emperat ure t o reach 60 degrees C.
12.
Page 1305 of 3229
Publi s hed: 11-May-2011
Automatic Transmission/Transaxle - Transmission Fluid Drain and RefillTD4
2.2L Diesel
General Procedures W ARNING: Observe due care when drai ning, as the flui d can be very hot .
Ens ure t hat the aut omat ic trans mi s si on is in 'P' and t he handbrake is
ful ly appli ed.
1.
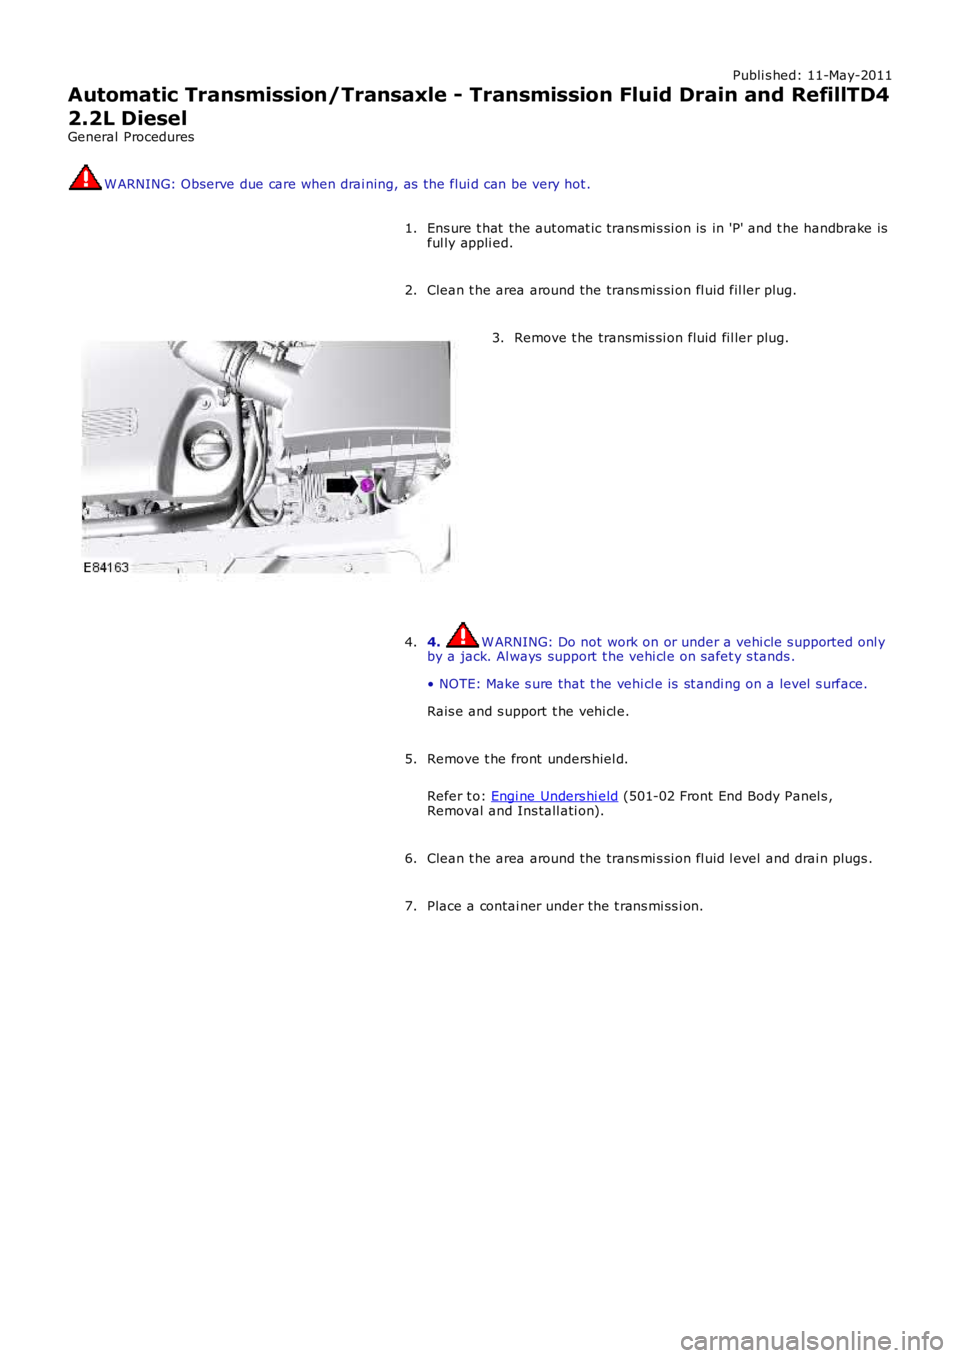
Clean t he area around the trans mi s si on fl uid fil ler plug.
2. Remove t he transmis si on fluid fil ler plug.
3.
4. W ARNING: Do not work on or under a vehi cle s upported onl y
by a jack. Al ways support t he vehi cl e on s afet y s tands .
• NOTE: Make s ure that t he vehi cl e is st andi ng on a level s urface.
Rais e and s upport t he vehi cl e.
4.
Remove t he front unders hiel d.
Refer t o: Engi ne Unders hi eld (501-02 Front End Body Panel s ,
Removal and Ins tall ati on).
5.
Clean t he area around the trans mi s si on fl uid l evel and drai n plugs .
6.
Place a contai ner under the t rans mi ss i on.
7.
Page 1319 of 3229
Publi s hed: 11-May-2011
Automatic Transmission/Transaxle - Transmission Fluid Pan, Gasket and
Filter
Removal and Inst all ati on
Removal
Remove t he cover and dis connect the bat tery ground cabl e.
Refer t o: Specificati ons (414-00 Bat tery and Charging Sys tem -General Informat ion, Specificati ons).
1.
2. W ARNING: Make sure t o s upport the vehicle wit h axles tands .
Rais e and s upport t he vehi cl e.
2.
Drai n t he t ransmis s ion fluid.
Refer t o: Transmis s ion Flui d Drai n and Refi ll - I6 3.2L Pet rol (307-01Automat ic Transmis si on/Trans axl e, General Procedures ).
3.
Remove t he front subframe as s embly.
Refer t o: Front Subframe (502-00 Uni -Body, Subframe and Mount ingSyst em, Removal and Ins tall ati on).
4.
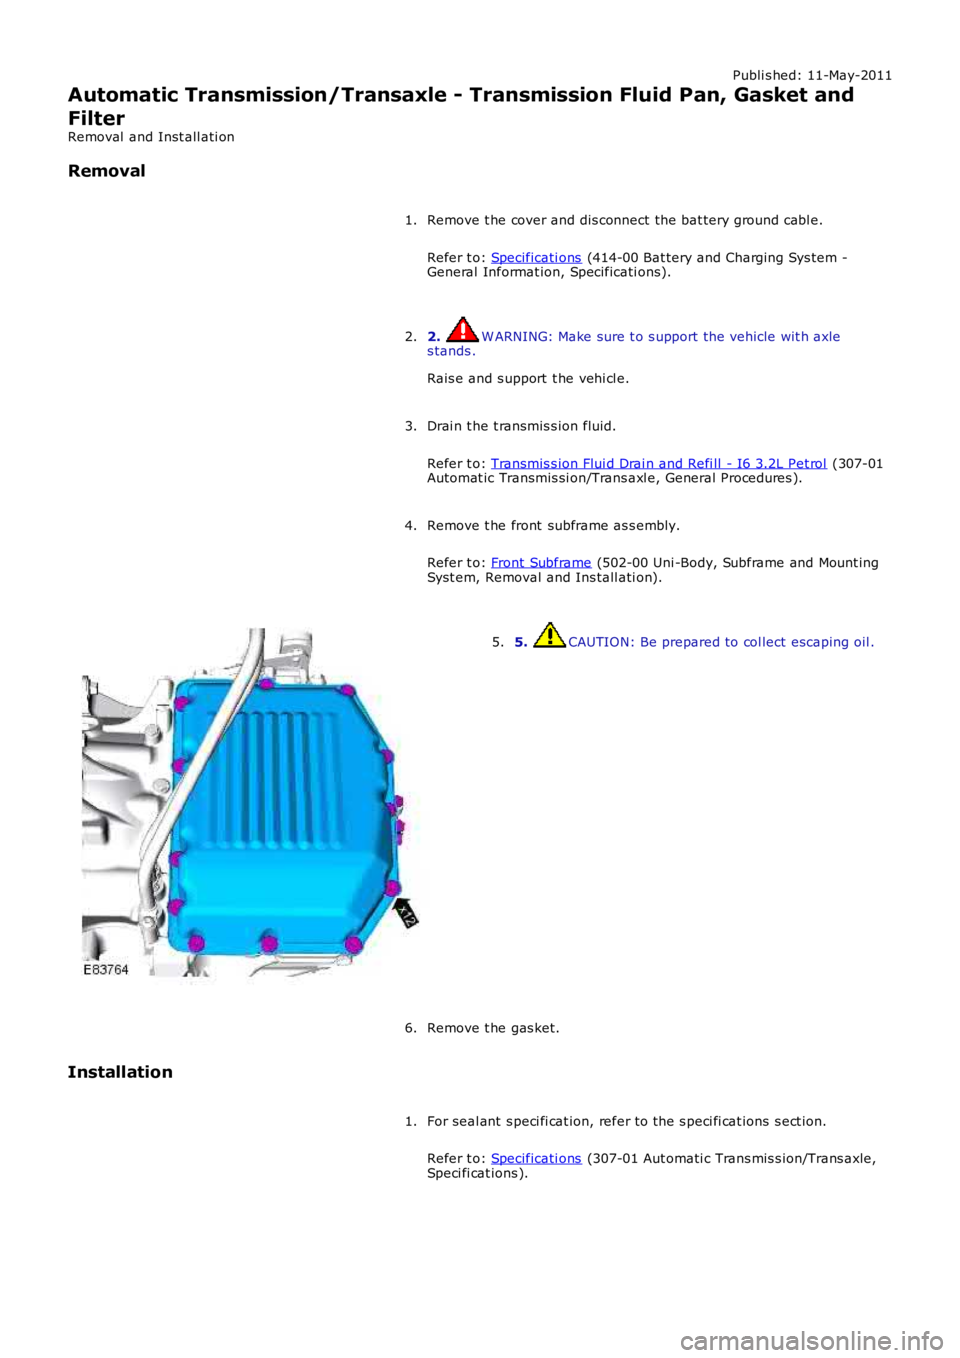
5. CAUTION: Be prepared to col lect escaping oil .5.
Remove t he gas ket.6.
Installation
For seal ant s peci fi cat ion, refer to t he s peci fi cat ions s ect ion.
Refer t o: Specificati ons (307-01 Aut omati c Trans mis s ion/Trans axle,Speci fi cat ions ).
1.
Page 1321 of 3229
Publi s hed: 11-May-2011
Automatic Transmission/Transaxle - Transmission Fluid Pan
Removal and Inst all ati on
Removal
1. W ARNING: Make sure t o s upport the vehicle wit h axles tands .
Rais e and s upport t he vehi cl e.
1.
Drai n t he t ransmis s ion fluid.
Refer t o: Transmis s ion Flui d Drai n and Refi ll - I6 3.2L Pet rol (307-01Automat ic Transmis si on/Trans axl e, General Procedures ).
2.
Remove t he front subframe as s embly.
Refer t o: Front Subframe (502-00 Uni -Body, Subframe and Mount ingSyst em, Removal and Ins tall ati on).
3.
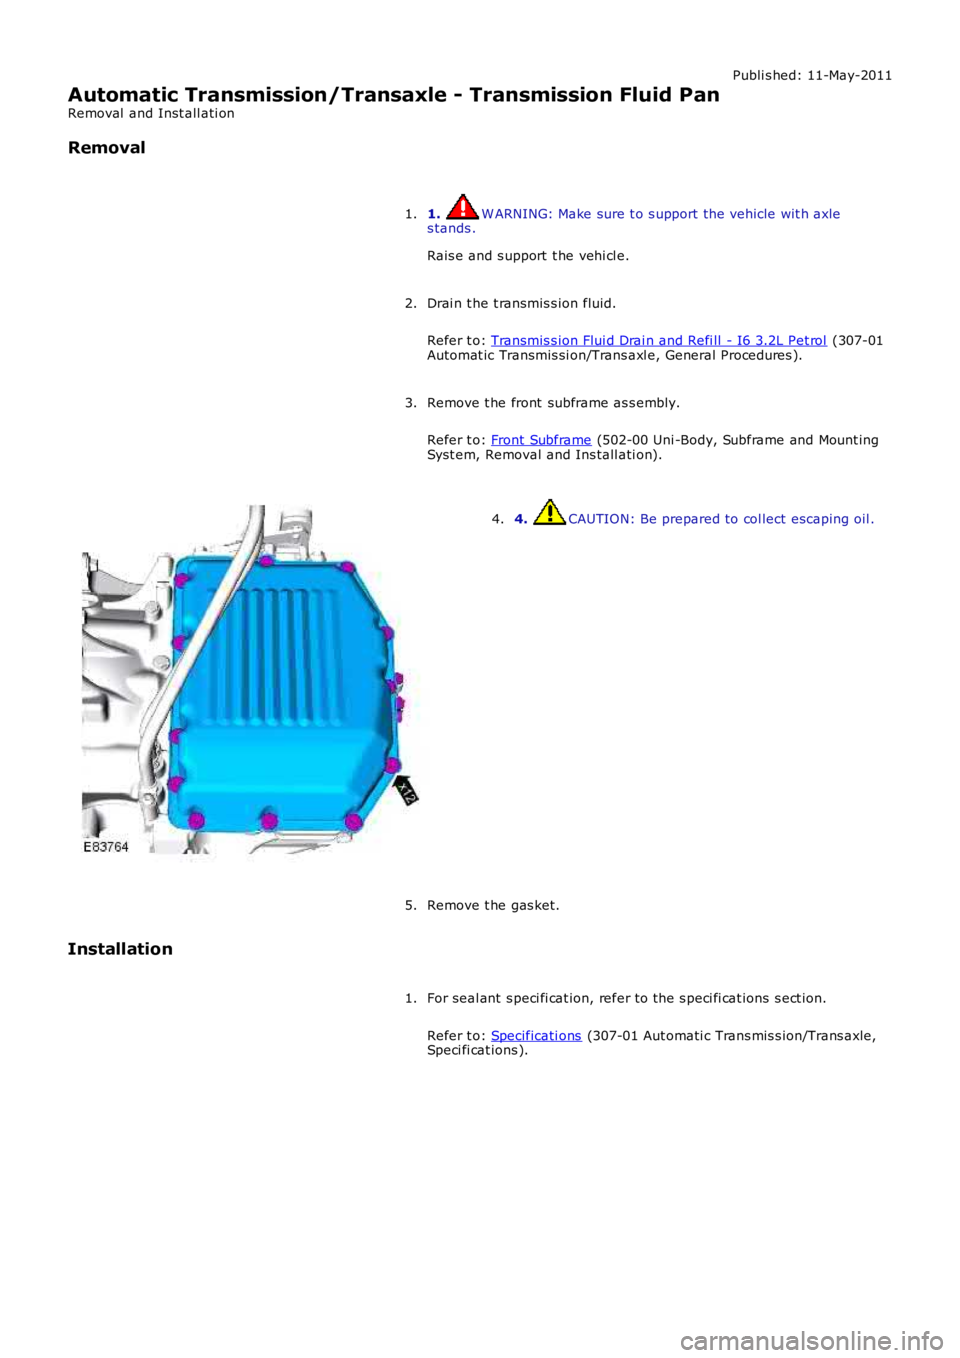
4. CAUTION: Be prepared to col lect escaping oil .4.
Remove t he gas ket.5.
Installation
For seal ant s peci fi cat ion, refer to t he s peci fi cat ions s ect ion.
Refer t o: Specificati ons (307-01 Aut omati c Trans mis s ion/Trans axle,Speci fi cat ions ).
1.
Page 1326 of 3229
Publi s hed: 11-May-2011
Automatic Transmission/Transaxle - TransmissionI6 3.2L Petrol
Removal
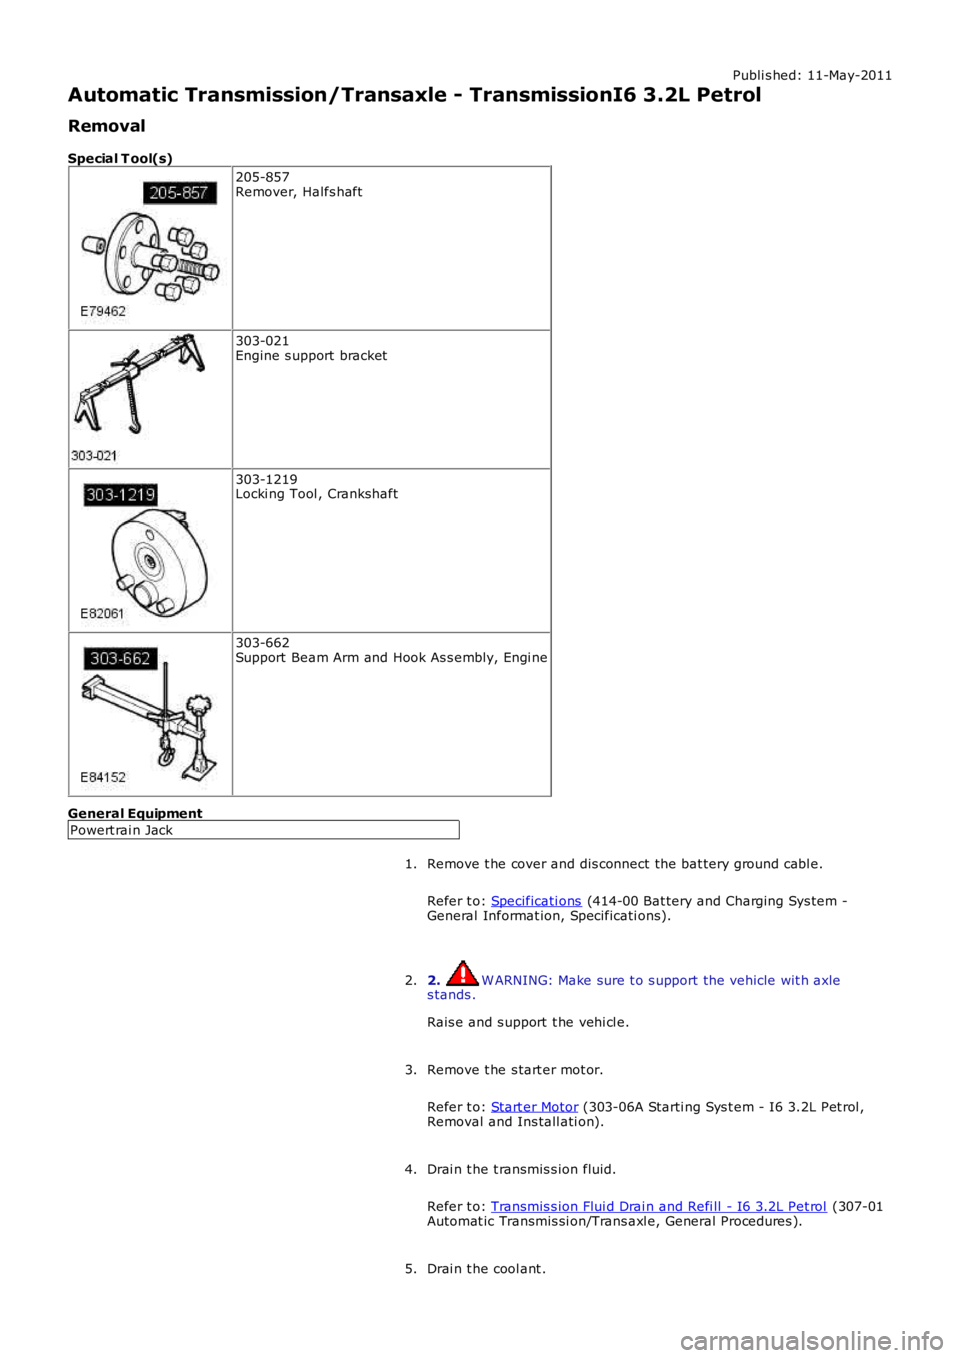
Special T ool(s) 205-857
Remover, Halfs haft 303-021
Engine s upport bracket 303-1219
Locki ng Tool , Crankshaft 303-662
Support Beam Arm and Hook As s embly, Engi ne
General Equipment Powert rai n Jack
Remove t he cover and dis connect the bat tery ground cabl e.
Refer t o: Specificati ons (414-00 Bat tery and Charging Sys tem -
General Informat ion, Specificati ons).
1.
2. W ARNING: Make sure t o s upport the vehicle wit h axle
s tands .
Rais e and s upport t he vehi cl e.
2.
Remove t he s tart er mot or.
Refer t o: Start er Motor (303-06A Starti ng Sys t em - I6 3.2L Pet rol ,
Removal and Ins tall ati on).
3.
Drai n t he t ransmis s ion fluid.
Refer t o: Transmis s ion Flui d Drai n and Refi ll - I6 3.2L Pet rol (307-01
Automat ic Transmis si on/Trans axl e, General Procedures ).
4.
Drai n t he cool ant .
5.