2006 LAND ROVER FRELANDER 2 bonnet
[x] Cancel search: bonnetPage 1990 of 3229
Secure t he 3 ground cables t o t he vehi cl e body.
T orque: 10 Nm 25.
Secure t he harness to the vehicle body.
26.
Connect t he the bonnet lock electrical connect or
27.
Inst all t he RH s econdary bul khead mount ing bracket.
T orque: 10 Nm 28.
Inst all t he inner plenum plat e and s ecure t he electrical connect or to
t he plat e.
29.
Connect t he heat ed s creen RH el ect ri cal connector.
30.
Inst all t he auxi liary cool ant pump and connect the feed hos e.
T orque: 10 Nm 31.
Inst all t he FFB heat er coolant feed and ret urn pipes .
32.
Connect t he FFB heat er coolant feed and ret urn hos es to the pi pes .
33.
Connect t he A/C pres sure s wit ch and t he BBUS electrical connect ors .
Als o secure t he harnes s t o t he vehi cl e body.
34.
Secure t he engi ne compartment harnes s t o t he vehi cl e bulkhead.
35.
Secure t he harness tray to the LHS of t he vehicle bul khead.
36.
Connect t he LH heated s creen el ect ri cal connector and s ecure t he
harnes s t o the vehicl e body.
37.
Feed the harnes s i nto the LH wheel arch and s ecure t he grommet.
38.
Inst all t he ABS modulat or bracket.
T orque: 25 Nm 39.
Inst all t he LH s ide repeat er lamp and s ecure t he cli ps to the vehicle
body.
40.
Connect t he rear was her pi pe.
41.
Connect t he ABS s ens or electrical connect or and s ecure the harnes s
t o t he vehi cl e body.
42.
Connect t he two electrical connect ors t o t he CJB.
43.
Connect t he main engi ne compartment harnes s t o t he ins trument
panel harnes s and clos e t he cover.
44.
Connect t he main engi ne compartment harnes s t o t he headl amp
l evell ing ECU.
45.
Connect t he 3 floor harness el ect ri cal connect ions.
46.
Page 2009 of 3229
Secure t he 3 eart h point s and s ecure t he harness cl ips t o t he vehi cl e
body.
T orque: 10 Nm 8.
Secure t he batt ery l ead to the bat tery terminal clamp.
T orque: 25 Nm 9.
Inst all t he fus e box cover.
10.
Inst all t he harness cover to the s us pens ion turret.
11.
Feed harness under t he air cleaner duct and s ecure the duct t o the
grommet.
12.
Secure headl amp and bumper harness cl ips .
13.
Connect t he height sens or elect rical connect or and s ecure t he
harnes s wit h t he cli ps .
14.
Inst all headl amp mount ing plat e.
T orque: 10 Nm 15.
Connect t he s ide repeat er el ect ri cal connector.
16.
Connect t he heat ed was her jet electrical connect ion and s ecure t he
harnes s t o the vehicl e body.
17.
Connect t he ABS s ens or and s ecure t he harness to t he vehicle body.
18.
Secure t he was her pipe to the harnes s and s ecure t he harness to the
body.
19.
Connect t he cras h s ens or electrical connect ors .
20.
Connect t he the bonnet lock electrical connect or
21.
Secure t he harness to the body and t hen secure the bonnet releas e
cabl e t o t he harness .
22.
Secure t he was her pipe to the was her bot tl e.
23.
Inst all t he washer bott le and connect t he elect rical connecti ons .
T orque: 10 Nm 24.
Secure t he 3 ground cables t o t he vehi cl e body.
T orque: 10 Nm 25.
Secure t he harness to the vehicle body.
26.
Connect t he cool ant l evel s ensor electrical connect or.
27.
Page 2724 of 3229

Contents
4
L
Climate control
AIR VENTS ................................................... 101
MANUAL CLIMATE CONTROL ...................... 102
AUTOMATIC CLIMATE CONTROL ................. 103
HEATED WINDOWS AND MIRRORS ............ 104
AUXILIARY HEATER ..................................... 104
ELECTRIC SUNROOF .................................... 105
Convenience features
SUN VISORS ................................................ 107
CLOCK .......................................................... 107
CIGAR LIGHTER ........................................... 109
ASHTRAY ..................................................... 109
AUXILIARY POWER SOCKETS ..................... 110
CUP HOLDERS ............................................. 111
STORAGE COMPARTMENTS ........................ 112
Starting the engine
GENERAL INFORMATION ............................. 113
STARTING A PETROL ENGINE ..................... 114
STARTING A DIESEL ENGINE ....................... 115
DIESEL PARTICULATE FILTER (DPF) ........... 116
Transmission
MANUAL TRANSMISSION ............................ 118
AUTOMATIC TRANSMISSION ...................... 118
TECHNICAL SPECIFICATIONS ...................... 122
Brakes
PRINCIPLE OF OPERATION .......................... 123
HINTS ON DRIVING WITH ABS .................... 123
PARKING BRAKE .......................................... 124
Parking aid
PRINCIPLE OF OPERATION .......................... 126
USING THE PARKING AID ............................ 127
Driving hints
GENERAL DRIVING POINTS ......................... 128
REDUCED ENGINE PERFORMANCE ............. 128
RUNNING-IN ................................................ 128
ECONOMICAL DRIVING ................................ 129
Cruise control
PRINCIPLE OF OPERATION .......................... 130
USING CRUISE CONTROL ............................ 130
Terrain response
PRINCIPLE OF OPERATION .......................... 132
USING TERRAIN RESPONSE ........................ 132
Hill descent control (HDC)
PRINCIPLE OF OPERATION .......................... 136
USING HDC ................................................... 137
Traction control
USING TRACTION CONTROL ........................ 139
Stability control
PRINCIPLE OF OPERATION .......................... 140
USING STABILITY CONTROL ........................ 141
Fuel and refuelling
SAFETY PRECAUTIONS................................. 142
FUEL QUALITY .............................................. 142
RUNNING OUT OF FUEL................................ 144
FUEL CUT-OFF............................................... 144
FUEL FILLER FLAP ........................................ 144
REFUELLING ................................................. 145
TECHNICAL SPECIFICATIONS ....................... 146
Load carrying
GENERAL INFORMATION.............................. 147
LUGGAGE ANCHOR POINTS ......................... 148
LUGGAGE COVERS ....................................... 149
Towing
TOWING A TRAILER...................................... 150
LEVELLING.................................................... 151
ESSENTIAL TOWING CHECKS ...................... 151
RECOMMENDED TOWING WEIGHTS ............ 152
TOW BAR ...................................................... 153
Vehicle care
CLEANING THE ALLOY WHEELS................... 154
CLEANING THE EXTERIOR ............................ 154
CLEANING THE INTERIOR ............................ 155
REPAIRING MINOR PAINT DAMAGE ............ 156
Maintenance
GENERAL INFORMATION.............................. 157
OPENING AND CLOSING THE BONNET......... 160
ENGINE COMPARTMENT OVERVIEW ........... 161
ENGINE OIL CHECK....................................... 162
Page 2729 of 3229
9
Quick start
R
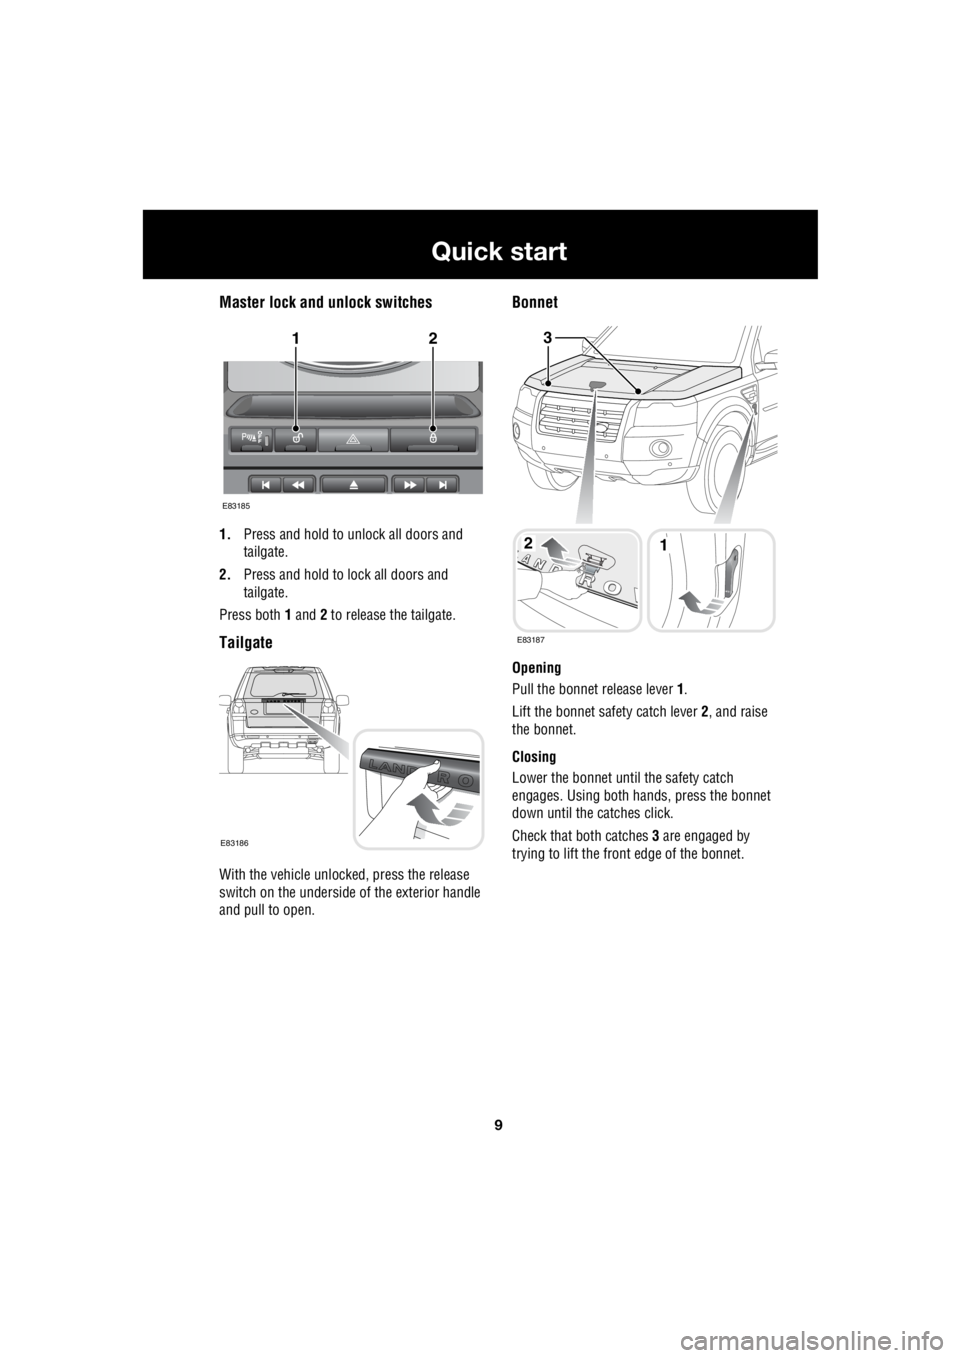
Master lock and unlock switches
1. Press and hold to unlock all doors and
tailgate.
2. Press and hold to lock all doors and
tailgate.
Press both 1 and 2 to release the tailgate.
Tailgate
With the vehicle unlocked, press the release
switch on the underside of the exterior handle
and pull to open.
Bonnet
Opening
Pull the bonnet release lever 1.
Lift the bonnet safety catch lever 2, and raise
the bonnet.
Closing
Lower the bonnet until the safety catch
engages. Using both hands, press the bonnet
down until the catches click.
Check that both catches 3 are engaged by
trying to lift the front edge of the bonnet.
12
E83185
E83186
12
3
E83187
Page 2756 of 3229
Introduction
36
L
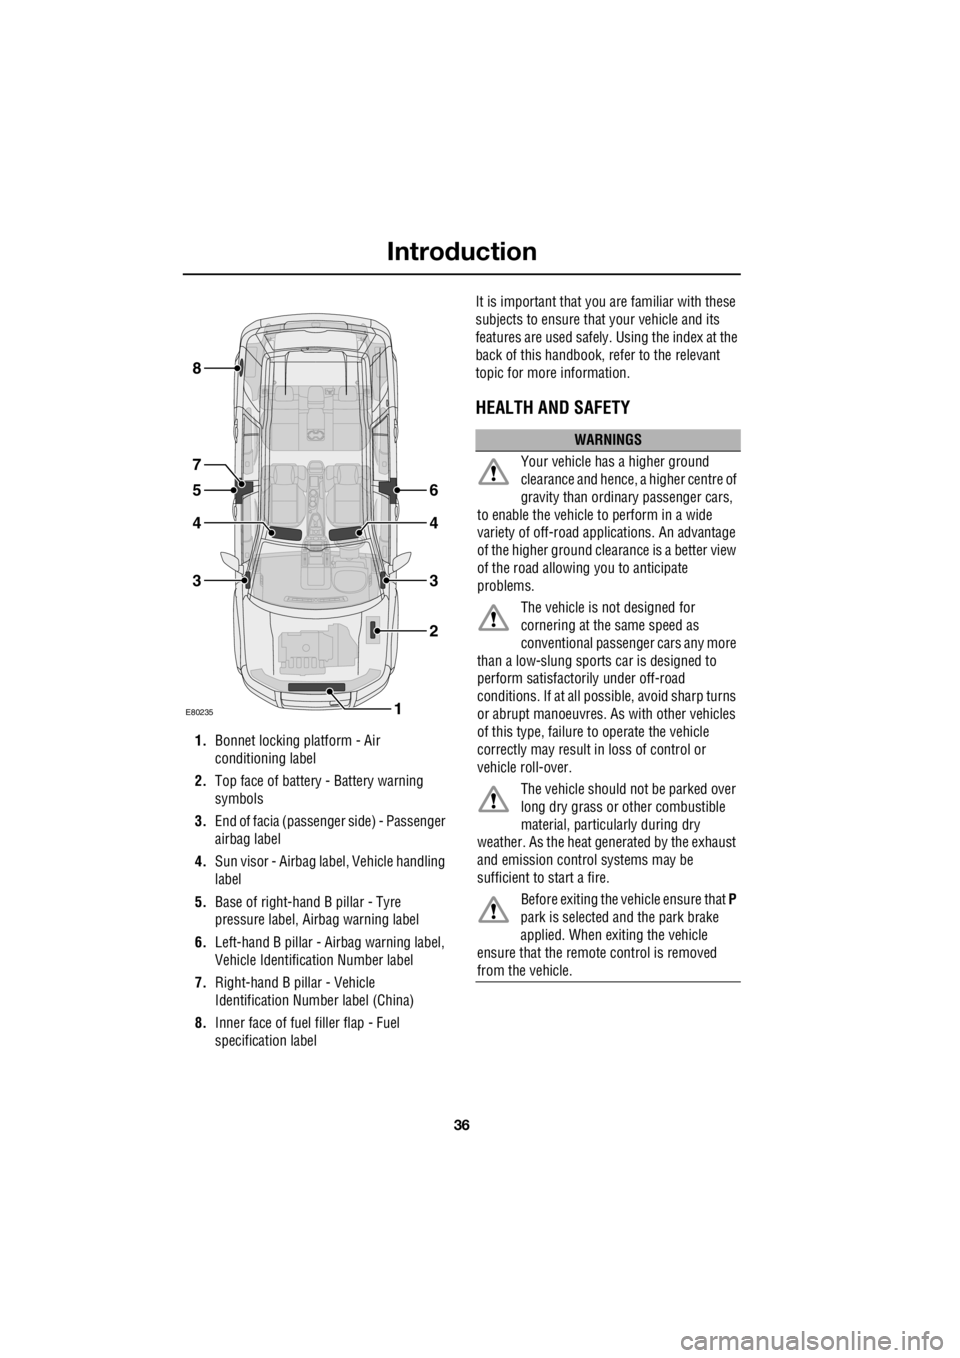
1. Bonnet locking platform - Air
conditioning label
2. Top face of battery - Battery warning
symbols
3. End of facia (passenger side) - Passenger
airbag label
4. Sun visor - Airbag label, Vehicle handling
label
5. Base of right-hand B pillar - Tyre
pressure label, Ai rbag warning label
6. Left-hand B pillar - Airbag warning label,
Vehicle Identification Number label
7. Right-hand B pillar - Vehicle
Identification Number label (China)
8. Inner face of fuel filler flap - Fuel
specification label It is important that you are familiar with these
subjects to ensure that your vehicle and its
features are used safely. Using the index at the
back of this handbook, re fer to the relevant
topic for more information.
HEALTH AND SAFETY
E80235
6
4
3
2
1
5
4
3
8
7
WARNINGS
Your vehicle has a higher ground
clearance and hence, a higher centre of
gravity than ordina ry passenger cars,
to enable the vehicle to perform in a wide
variety of off-road app lications. An advantage
of the higher ground clea rance is a better view
of the road allowing you to anticipate
problems.
The vehicle is not designed for
cornering at the same speed as
conventional passenge r cars any more
than a low-slung sports car is designed to
perform satisfactori ly under off-road
conditions. If at all possible, avoid sharp turns
or abrupt manoeuvres. As with other vehicles
of this type, failure to operate the vehicle
correctly may result in loss of control or
vehicle roll-over.
The vehicle should no t be parked over
long dry grass or other combustible
material, particul arly during dry
weather. As the heat ge nerated by the exhaust
and emission control systems may be
sufficient to start a fire.
Before exiting the vehicle ensure that P
park is selected and the park brake
applied. When exiting the vehicle
ensure that the remote control is removed
from the vehicle.
Page 2764 of 3229
Locks
44
L
LocksLOCKING AND UNLOCKING
Drive-away locking
The vehicle can be configured by a
Land Rover Dealer/Authorised
Repairer to lock automatically
when in motion. Contact your
Dealer/Authorised Re pairer for further
information.
Locking and unlocking from inside the
vehicle
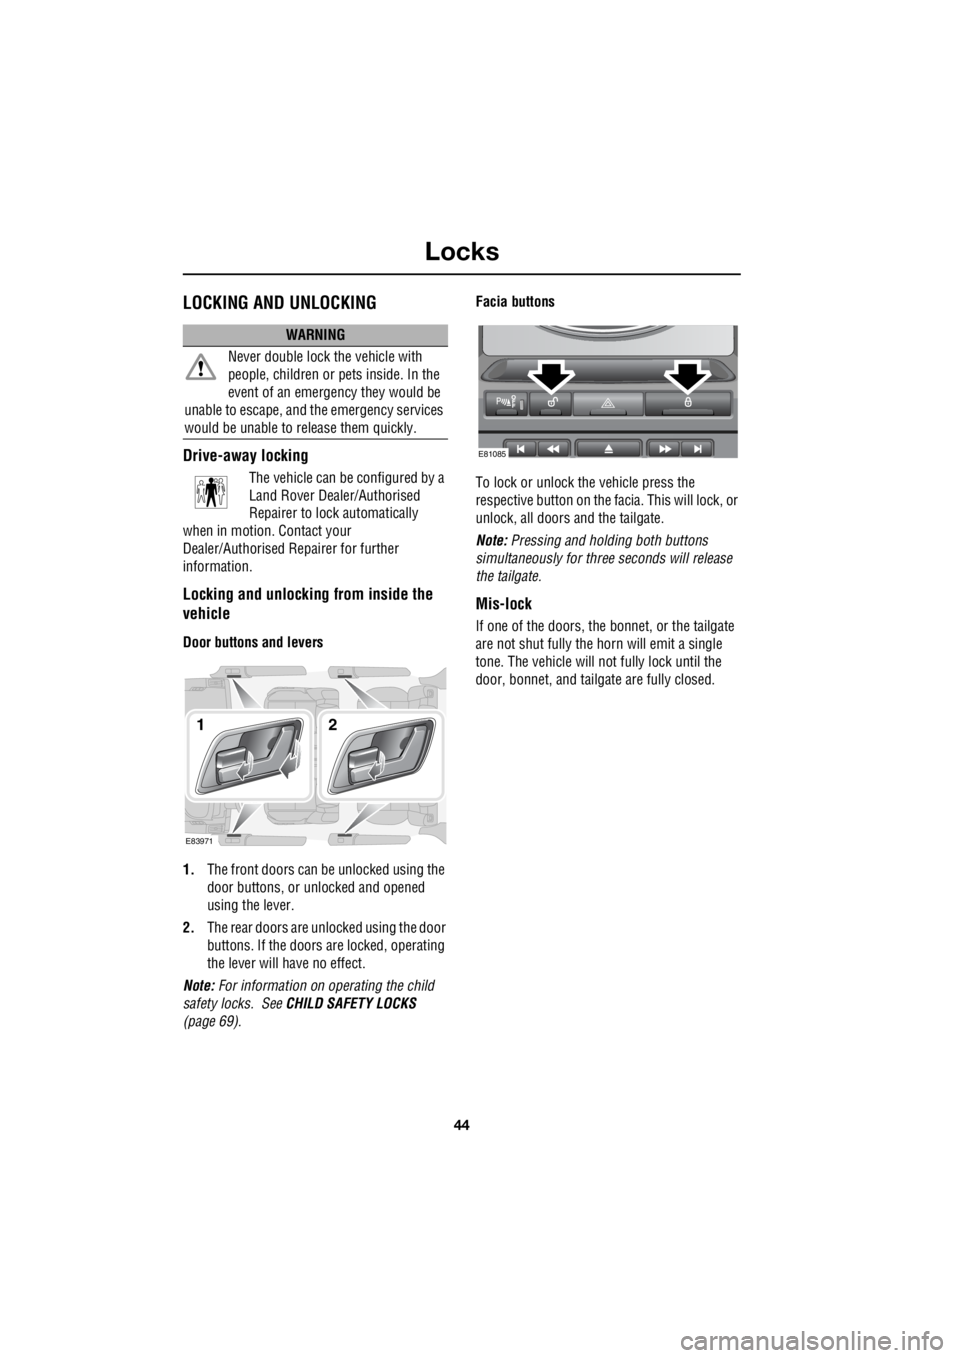
Door buttons and levers
1. The front doors can be unlocked using the
door buttons, or unlocked and opened
using the lever.
2. The rear doors are unlocked using the door
buttons. If the doors are locked, operating
the lever will have no effect.
Note: For information on operating the child
safety locks. See CHILD SAFETY LOCKS
(page 69). Facia buttons
To lock or unlock the vehicle press the
respective button on the fa cia. This will lock, or
unlock, all doors and the tailgate.
Note: Pressing and holding both buttons
simultaneously for thre e seconds will release
the tailgate.
Mis-lock
If one of the doors, the bon net, or the tailgate
are not shut fully the horn will emit a single
tone. The vehicle will not fully lock until the
door, bonnet, and tailga te are fully closed.
WARNING
Never double lock the vehicle with
people, children or pe ts inside. In the
event of an emergency they would be
unable to escape, and th e emergency services
would be unable to release them quickly.
E83971
12
E81085
Page 2765 of 3229
45
Alarm
R
AlarmARMING THE ALARM
The engine is automatically
immobilised when the remote
control is removed from the starter
control unit. The alarm system is automatically
armed when the remote lock button is pressed.
The hazard lamps will flash to indicate that the
alarm is armed.
Full alarm
To set full alarm protection ensure that all the
windows and the sunroof are closed. Then
press the lock button twice within three
seconds. The hazard warn ing lights will flash
twice to confirm the alarm state.
Once fully armed the alarm will sound if :-
• the bonnet, tailgate, or a door are opened.
• movement is detected within the vehicle
interior.
• a window, front or rear windscreen, or
sunroof glass are broken.
• the vehicle is raised or tilted.
• the vehicle battery is disconnected.
• an attempt is made to disconnect the alarm
siren.
Note: If the alarm is armed and a window or the
sunroof are left open the alarm will sound due
to movement of air currents.
Partial alarm
To set partial alarm protection, briefly press the
lock button once. The hazard warning lights
will flash once to confirm the alarm state.
Once partially armed the alarm will sound if :-
• the bonnet, tailgate, or a door are opened.
• the vehicle battery is disconnected.
• an attempt is made to disconnect the alarm
siren. Note:
This setting should be used in
circumstances such as travelling on a ferry,
when pets are to be left in the vehicle, when a
window must be left open etc
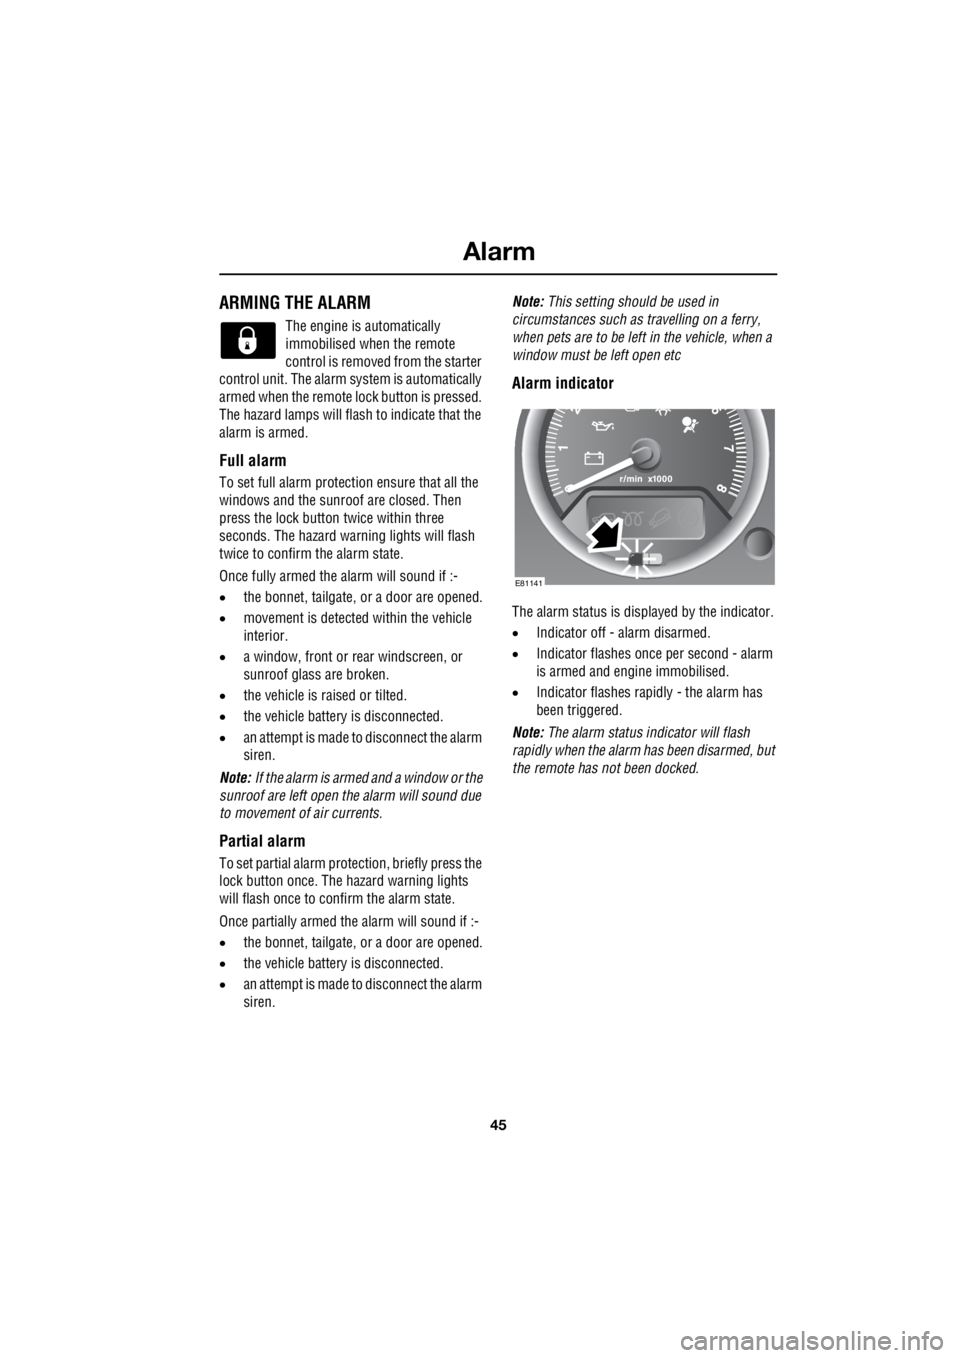
Alarm indicator
The alarm status is disp layed by the indicator.
• Indicator off - alarm disarmed.
• Indicator flashes once per second - alarm
is armed and engine immobilised.
• Indicator flashes rapidly - the alarm has
been triggered.
Note: The alarm status in dicator will flash
rapidly when the alarm has been disarmed, but
the remote has not been docked.
E81141
Page 2809 of 3229
89
Wipers and washers
R
REAR WINDOW WIPER AND
WASHERS
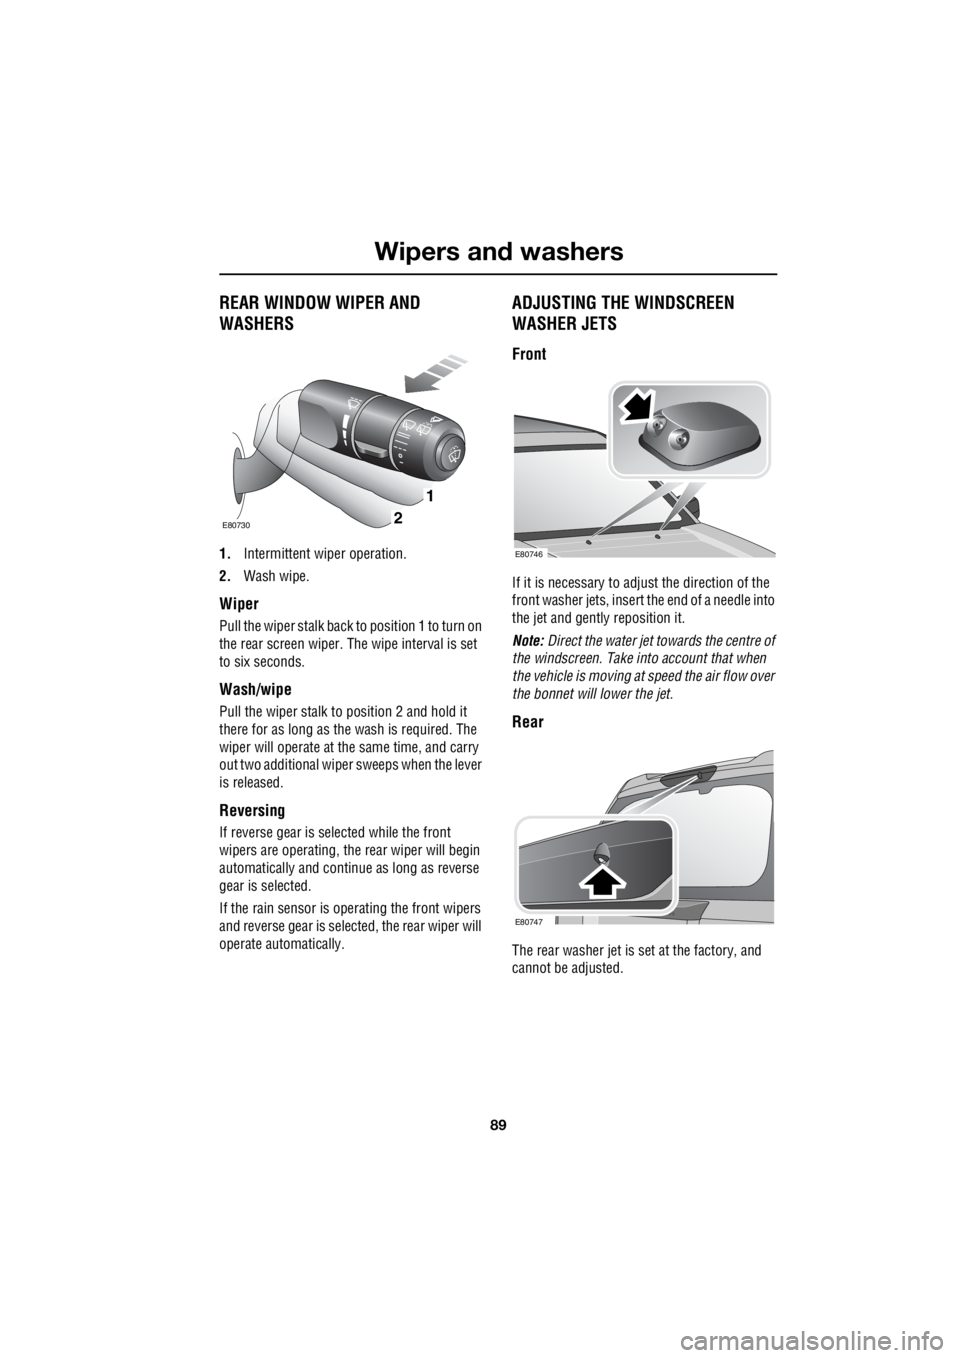
1. Intermittent wiper operation.
2. Wash wipe.
Wiper
Pull the wiper stalk back to position 1 to turn on
the rear screen wiper. The wipe interval is set
to six seconds.
Wash/wipe
Pull the wiper stalk to position 2 and hold it
there for as long as the wash is required. The
wiper will operate at the same time, and carry
out two additional wiper sweeps when the lever
is released.
Reversing
If reverse gear is selected while the front
wipers are operating, the rear wiper will begin
automatically and conti nue as long as reverse
gear is selected.
If the rain sensor is ope rating the front wipers
and reverse gear is sele cted, the rear wiper will
operate automatically.
ADJUSTING THE WINDSCREEN
WASHER JETS
Front
If it is necessary to adjust the direction of the
front washer jets, insert the end of a needle into
the jet and gently reposition it.
Note: Direct the water jet towards the centre of
the windscreen. Take into account that when
the vehicle is moving at speed the air flow over
the bonnet will lower the jet.
Rear
The rear washer jet is set at the factory, and
cannot be adjusted.
1
2E80730
E80746
E80747