2006 LAND ROVER FRELANDER 2 roof
[x] Cancel search: roofPage 2607 of 3229
Publ is hed: 11-May-2011
Side Panel Sheet Metal Repairs - A-Pillar Outer Panel
Removal and Installation
Removal
CAUTION: The A-Pillar outer panel must be MIG slot brazed to the reinforcement, which is DP600, (Dual Phase steel).
MIG plug we lds / spot we lds, must not be used.
• NOTE: The A-Pillar outer panel is serviced as a separate weld-on panel. The fender mounting bracket is serviced
separately.
• NOTE: There are NVH elements attached inside this panel; they are not serviced on the new panel. If damaged, new
element(s) will be required.
1. The A-Pillar out er panel is replaced in conjunct ion wit h:
Front bumper cover
Hood
Front fender
Front door
Instrument panel
Windshield glass
Headliner
2. Fo r a d d i t i o na l i nf o rma t i o n re l a t i ng t o t hi s re p a i r p ro ce d ure
please see the following:
Fo r a d d i t i o na l i nf o rma t i o n, re f e r t o : Body and Frame
(501-26
Body Repairs - Vehicle Specific Information and Tolerance
Checks, Description and Operation) /
St a nd a rd W o rks ho p P ra ct i ce s
(100-00 Ge ne ra l I nf o rma t i o n,
Description and Operation).
3. Remove the hood.
4. Remove the front fender.
5. Remove the front door.
Fo r a d d i t i o na l i nf o rma t i o n, re f e r t o : Front Door
(501-03 Body
Closures, Removal and Installation).
6. Remove the headliner.
Fo r a d d i t i o na l i nf o rma t i o n, re f e r t o : Headliner - Vehicles
Without: Tilting Roof Opening Panel (501-05 Int eri or Tri m and
Ornamentation, Removal and Installation) /
Headliner - Vehicles With: Tilting Roof Opening Panel
(501-05
Int erior Trim and Ornamentat ion, Removal and Installat ion).
7. Re move t he i ns t rume nt pa ne l .
Fo r a d d i t i o na l i nf o rma t i o n, re f e r t o : Instrument Panel - TD4
2.2L Di es el (501-12 Ins t rument Panel and Cons ole, Removal
and Installation).
8. Remove the windshield glass.
Fo r a d d i t i o na l i nf o rma t i o n, re f e r t o : Windshield Glass
(501-11
Glass, Frames and Mechanisms, Removal and Installation).
9. Remove t he upper and l ower door hi nges from t he pi l lar, 4 x
bolts.
10. Re mo ve t he ro cke r p a ne l i nne r t ri m.
11. Re mo ve t he s i d e a i r curt a i n mo d ul e .
Fo r a d d i t i o na l i nf o rma t i o n, re f e r t o : Si d e A i r Curt a i n Mo d ul e
(501-20B Suppl ement al Res t rai nt Sys t em, Removal and
Installation).
12. Remove the front wheel and tire.
Fo r a d d i t i o na l i nf o rma t i o n, re f e r t o : Wheel and Tire
(204-04
Wheels and Tires, Removal and Installation).
13. Remove the rocker panel outer moulding.
14. Release and lay aside the front carpet section.
15. Re mo ve t he re a r ca rp e t s e ct i o n.
16. Remove the roof moulding, front and rear sections.
17. Release and lay aside the wiring harness along the A-Pillar
i nne r a nd i nne r ro cke r p a ne l .
18. Release and lay aside the insulating material at the inner
bulkhead.
Page 2613 of 3229
Publ is hed: 11-May-2011
Side Panel Sheet Metal Repairs - A-Pillar Reinforcement
Removal and Installation
Removal
• CAUTIONS:
The A-Pillar reinforcement is DP600, (Dual Phase steel) and must be MIG plug welded to the inner. Spot we lds must
not be used.
Ensure that all welded joints are suitably sealed and waterproofed, particularly in the areas where the original panel
adhesive / sealer cannot be replicated. W here necessary, seal the joints prior to the fitment of outer panels.
• NOTE: The A-Pillar reinforcement is unpicked from the side panel reinforcement 'ring-frame', it is not serviced separately.
• NOTE: There are NVH elements attached inside this panel, they are not serviced on the new panel. If damaged, new
element/s will be required.
1. The A-Pillar reinforcement is replaced in conjunction with:
Front bumper cover
Front fender
Front door
Instrument panel
Windshield glass
A-Pillar outer panel
2. Fo r a d d i t i o na l i nf o rma t i o n re l a t i ng t o t hi s re p a i r p ro ce d ure
please see the following:
Fo r a d d i t i o na l i nf o rma t i o n, re f e r t o : Body and Frame
(501-26
Body Repairs - Vehicle Specific Information and Tolerance
Checks, Description and Operation) /
St a nd a rd W o rks ho p P ra ct i ce s
(100-00 Ge ne ra l I nf o rma t i o n,
Description and Operation).
3. Remove the A-Pillar outer panel.
Fo r a d d i t i o na l i nf o rma t i o n, re f e r t o : A -P i l l a r O ut e r P a ne l
(501-29 Side Panel Sheet Metal Repairs, Removal and
Installation).
Page 2617 of 3229
Publ is hed: 11-May-2011
Side Panel Sheet Metal Repairs - B-Pillar Outer Panel
Removal and Installation
Removal
CAUTION: The B-Pillar outer panel must be MIG slot brazed to the B-Pillar reinforcement, which is BH300, (Bake
Hardened steel) and the rocker panel inner reinforcement, which is DP600, (Dual Phase steel). MIG plug we lds / spot
we lds, must not be used.
• NOTE: The B-Pillar outer panel is serviced as a separate weld-on panel.
• NOTE: There is an NVH element attached inside this panel, it is not serviced on the new panel. If damaged, a new
element will be required.
• NOTE: If the B-Pillar outer is replaced without the B-Pillar reinforcement, the upper section butt joint can be made lower
down the pillar if required.
1. The B-Pillar out er panel is replaced in conjunct ion wit h:
Front door
Rear door
Headliner
2. Fo r a d d i t i o na l i nf o rma t i o n re l a t i ng t o t hi s re p a i r p ro ce d ure
please see the following:
Fo r a d d i t i o na l i nf o rma t i o n, re f e r t o : Body and Frame
(501-26
Body Repairs - Vehicle Specific Information and Tolerance
Checks, Description and Operation) /
St a nd a rd W o rks ho p P ra ct i ce s
(100-00 Ge ne ra l I nf o rma t i o n,
Description and Operation).
3. Remove the front door.
Fo r a d d i t i o na l i nf o rma t i o n, re f e r t o : Front Door
(501-03 Body
Closures, Removal and Installation).
4. Remove the rear door.
Fo r a d d i t i o na l i nf o rma t i o n, re f e r t o : Rear Door
(501-03 Body
Closures, Removal and Installation).
5. Remove t he upper and l ower door hi nges from t he B-Pi l lar, 4 x
bolts.
6. Remove the front door striker from the B-Pillar.
7. Remove the front seat.
Fo r a d d i t i o na l i nf o rma t i o n, re f e r t o : Front Seat
(501-10
Seating, Removal and Installation).
8. Remove the rear seat cushion.
Fo r a d d i t i o na l i nf o rma t i o n, re f e r t o : Rear Seat Cushion
(501-10
Seating, Removal and Installation).
9. Remove the front safety belt retractor.
Fo r a d d i t i o na l i nf o rma t i o n, re f e r t o : Front Safety Belt Retractor
(501-20A Safe t y Bel t Sys t em, Removal and Ins t al l at i on).
10. Remove t he headli ner.
Fo r a d d i t i o na l i nf o rma t i o n, re f e r t o : Headliner - Vehicles
Without: Tilting Roof Opening Panel (501-05 Int eri or Tri m and
Ornamentation, Removal and Installation) /
Headliner - Vehicles With: Tilting Roof Opening Panel
(501-05
Int erior Trim and Ornamentat ion, Removal and Installat ion).
11. Remove the RH & LH rocker panel inner trims.
12. Remove the B-Pillar side impact sensor.
Fo r a d d i t i o na l i nf o rma t i o n, re f e r t o : B-Pillar Side Impact Sensor
(501-20B Suppl ement al Res t rai nt Sys t em, Removal and
Installation).
13. Re mo ve t he s i d e a i r curt a i n mo d ul e .
Fo r a d d i t i o na l i nf o rma t i o n, re f e r t o : Si d e A i r Curt a i n Mo d ul e
(501-20B Suppl ement al Res t rai nt Sys t em, Removal and
Installation).
14. Remove the roof moulding, front and rear sections.
15. Remove the rocker panel outer moulding.
16. Release and lay aside the front carpet section.
17. Re mo ve t he re a r ca rp e t s e ct i o n.
18. Release and lay aside the wiring harness along the B-Pillar
i nne r a nd i nne r ro cke r p a ne l .
Page 2622 of 3229

Publ is hed: 11-May-2011
Side Panel Sheet Metal Repairs - B-Pillar Reinforcement
Removal and Installation
Removal
• CAUTIONS:
The B-Pillar reinforcement is BH300, (Bake Hardened steel). It must be MIG plug welded to the B-Pillar inner, the
ro cke r p a ne l i nne r re i nf o rce me nt a nd t he ca nt ra i l re i nf o rce me nt . Spot we lds must not be use d.
Ensure that all welded joints are suitably sealed and waterproofed, particularly in the areas where the original panel
adhesive / sealer cannot be replicated. W here necessary, seal the joints prior to the fitment of outer panels.
• NOTE: The B-Pillar reinforcement is unpicked from the side panel reinforcement, 'ring-frame', it is not serviced
separately.
• NOTE: There is a NVH element located between the B-Pillar reinforcement and the B-Pillar inner.
1. The B-Pillar reinforcement is replaced in conjunction with:
Front door
Rear door
Headli ni ng
B-Pillar outer panel
2. Fo r a d d i t i o na l i nf o rma t i o n re l a t i ng t o t hi s re p a i r p ro ce d ure
please see the following:
Fo r a d d i t i o na l i nf o rma t i o n, re f e r t o : Body and Frame
(501-26
Body Repairs - Vehicle Specific Information and Tolerance
Checks, Description and Operation) /
St a nd a rd W o rks ho p P ra ct i ce s
(100-00 Ge ne ra l I nf o rma t i o n,
Description and Operation).
3. Remove the B-Pillar outer panel.
Fo r a d d i t i o na l i nf o rma t i o n, re f e r t o : B -P i l l a r O ut e r P a ne l
(501-29 Side Panel Sheet Metal Repairs, Removal and
Installation).
4. NOTE: It will be necessary to use a HSS spot weld drill bit
on the A-Pillar upper / cantrail and rocker panel areas.
• NOTE: Holes should be drilled through the B-Pillar
reinforcement and the B-Pillar inner panel at the door
apertures. This enables MIG plug welds to be installed through
the inner panel.
Mill out the spot welds.
5. Separate the joints and remove the old panel, also releasing
the NVH element.
Page 2627 of 3229
Publ is hed: 11-May-2011
Side Panel Sheet Metal Repairs - Rocker Panel Inner Reinforcement
Removal and Installation
Removal
• CAUTIONS:
The rocker panel inner reinforcement is DP600, (Dual Phase steel) and must be MIG plug welded to the inner. Spot
we lds must not be used.
Ensure that all welded joints are suitably sealed and waterproofed, particularly in the areas where the original panel
adhesive / sealer cannot be replicated. W here necessary, seal the joints prior to the fitment of outer panels.
• NOTE: The rocker panel inner reinforcement is unpicked from the side panel reinforcement 'ring-frame', it is not serviced
separately.
1. T he ro cke r p a ne l i nne r re i nf o rce me nt i s re p l a ce d i n co nj unct i o n
with:
Front bumper cover
Front fender
Front door
Rear door
Rocker panel
2. Fo r a d d i t i o na l i nf o rma t i o n re l a t i ng t o t hi s re p a i r p ro ce d ure
please see the following:
Fo r a d d i t i o na l i nf o rma t i o n, re f e r t o : Body and Frame
(501-26
Body Repairs - Vehicle Specific Information and Tolerance
Checks, Description and Operation) /
St a nd a rd W o rks ho p P ra ct i ce s
(100-00 Ge ne ra l I nf o rma t i o n,
Description and Operation).
3. Remove the rocker panel.
Fo r a d d i t i o na l i nf o rma t i o n, re f e r t o : Rocker Panel
(501-29 Si de
Panel Sheet Metal Repairs, Removal and Installation).
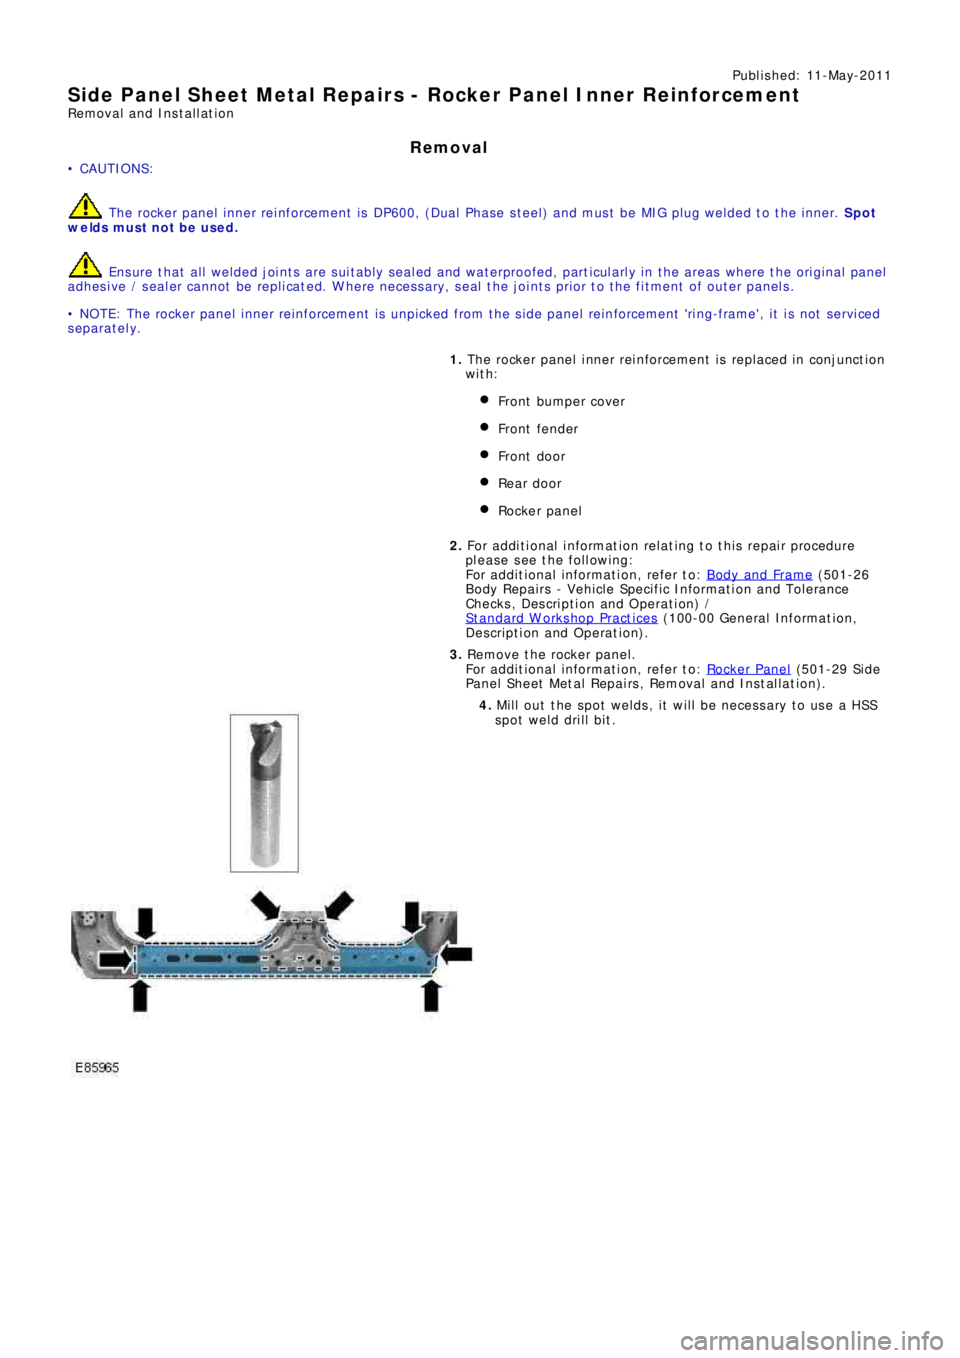
4. Mill out the spot welds, it will be necessary to use a HSS
spot weld drill bit.
Page 2636 of 3229
Publ is hed: 11-May-2011
Rear End Sheet Metal Repairs - Quarter Panel
Removal and Installation
Removal
CAUTION: The quarter panel must be MIG slot brazed to the rocker panel inner reinforcement, which is DP600, (Dual
Phase steel). MIG plug we lds / spot w elds must not be use d in this are a.
• NOTE: The quarter panel is serviced as a separate weld-on panel.
• NOTE: There are NVH elements inside this panel, they are not serviced on the new panel. If damaged, a new element
will be required.
1. The quarter panel is replaced in conjunction with:
Rear bumper cover
Rear door
Quarter glass
Headliner
2. Fo r a d d i t i o na l i nf o rma t i o n re l a t i ng t o t hi s re p a i r p ro ce d ure
please see the following:
Fo r a d d i t i o na l i nf o rma t i o n, re f e r t o : Body and Frame
(501-26
Body Repairs - Vehicle Specific Information and Tolerance
Checks, Description and Operation) /
St a nd a rd W o rks ho p P ra ct i ce s
(100-00 Ge ne ra l I nf o rma t i o n,
Description and Operation).
3. Re move t he re a r bumpe r co ve r.
Fo r a d d i t i o na l i nf o rma t i o n, re f e r t o : Rear Bumper
(501-19
Bumpe rs , Re mo va l a nd Ins t a l l a t i on).
4. Remove the rear door.
Fo r a d d i t i o na l i nf o rma t i o n, re f e r t o : Rear Door
(501-03 Body
Closures, Removal and Installation).
5. Remove the headliner.
Fo r a d d i t i o na l i nf o rma t i o n, re f e r t o : Headliner - Vehicles
Without: Tilting Roof Opening Panel (501-05 Int eri or Tri m and
Ornamentation, Removal and Installation) /
Headliner - Vehicles With: Tilting Roof Opening Panel
(501-05
Int erior Trim and Ornamentat ion, Removal and Installat ion).
6. Re mo ve t he re a r d o o r s t ri ke r f ro m t he C-P i l l a r.
7. Remove the roof moulding, front and rear sections.
8. Re mo ve t he s i d e a i r curt a i n mo d ul e .
Fo r a d d i t i o na l i nf o rma t i o n, re f e r t o : Si d e A i r Curt a i n Mo d ul e
(501-20B Suppl ement al Res t rai nt Sys t em, Removal and
Installation).
9. Remove the rear quarter glass.
Fo r a d d i t i o na l i nf o rma t i o n, re f e r t o : Rear Quarter Window
Gl a s s (501-11 Glass, Frames and Mechanisms, Removal and
Installation).
10. Remove the front seat.
Fo r a d d i t i o na l i nf o rma t i o n, re f e r t o : Front Seat
(501-10
Seating, Removal and Installation).
11. Remove the floor console.
Fo r a d d i t i o na l i nf o rma t i o n, re f e r t o : Floor Console
(501-12
Instrument Panel and Console, Removal and Installation).
12. Remove the RH & LH rocker panel inner trims.
13. Remove the rear seat cushion.
Fo r a d d i t i o na l i nf o rma t i o n, re f e r t o : Rear Seat Cushion
(501-10
Seating, Removal and Installation).
14. Re mo ve t he re a r ca rp e t s e ct i o n.
15. Remove the rear safety belt retractor.
Fo r a d d i t i o na l i nf o rma t i o n, re f e r t o : Rear Safety Belt Retractor
(501-20A Safe t y Bel t Sys t em, Removal and Ins t al l at i on).
16. Remove the liftgate aperture weatherseal.
17. Remove the forced air extraction grille.
18. Remove the rear wheel and tire.
Fo r a d d i t i o na l i nf o rma t i o n, re f e r t o : Wheel and Tire
(204-04
Wheels and Tires, Removal and Installation).
19. Remove the rocker panel outer moulding.
20. Release and lay aside the wiring harness along the inner
Page 2685 of 3229
Publ is hed: 11-May-2011
Rear End Sheet Metal Repairs - Inner Quarter Panel and Wheelhouse
Removal and Installation
Removal
• NOTE: The inner quarter panel and wheelhouse is an assembly of the inner quarter panel, rear wheelhouse inner, rear
wheelhous e out er and t he rear lamp mount ing panel.
• NOTE: The service panel is not fully welded.
• NOTE: The panel is sectioned to avoid disturbing the roof panel.
1. The inner quarter panel and wheelhouse is replaced in
conjunct ion wit h:
Rear bumper cover
Rear bumper
Quarter panel
Rear door
Quarter glass
Rear subframe and suspension assembly
2. Fo r a d d i t i o na l i nf o rma t i o n re l a t i ng t o t hi s re p a i r p ro ce d ure
please see the following:
Fo r a d d i t i o na l i nf o rma t i o n, re f e r t o : Body and Frame
(501-26
Body Repairs - Vehicle Specific Information and Tolerance
Checks, Description and Operation) /
St a nd a rd W o rks ho p P ra ct i ce s
(100-00 Ge ne ra l I nf o rma t i o n,
Description and Operation).
3. Remove the quarter panel.
Fo r a d d i t i o na l i nf o rma t i o n, re f e r t o : Quarter Panel
(501-30
Rear End Sheet Metal Repairs, Removal and Installation).
4. Remove the rear subframe / suspension as an assembly.
5. Remove the brake pipe.
6. RH Only: Release and lay aside the fuel vent hose.
7. Remove the rear seat backrest.
Fo r a d d i t i o na l i nf o rma t i o n, re f e r t o : Front Seat Backres t Heat er
Ma t (501-10 Seating, Removal and Installation).
8. Release and lay aside the wiring harness.
Page 2724 of 3229
Contents
4
L
Climate control
AIR VENTS ................................................... 101
MANUAL CLIMATE CONTROL ...................... 102
AUTOMATIC CLIMATE CONTROL ................. 103
HEATED WINDOWS AND MIRRORS ............ 104
AUXILIARY HEATER ..................................... 104
ELECTRIC SUNROOF .................................... 105
Convenience features
SUN VISORS ................................................ 107
CLOCK .......................................................... 107
CIGAR LIGHTER ........................................... 109
ASHTRAY ..................................................... 109
AUXILIARY POWER SOCKETS ..................... 110
CUP HOLDERS ............................................. 111
STORAGE COMPARTMENTS ........................ 112
Starting the engine
GENERAL INFORMATION ............................. 113
STARTING A PETROL ENGINE ..................... 114
STARTING A DIESEL ENGINE ....................... 115
DIESEL PARTICULATE FILTER (DPF) ........... 116
Transmission
MANUAL TRANSMISSION ............................ 118
AUTOMATIC TRANSMISSION ...................... 118
TECHNICAL SPECIFICATIONS ...................... 122
Brakes
PRINCIPLE OF OPERATION .......................... 123
HINTS ON DRIVING WITH ABS .................... 123
PARKING BRAKE .......................................... 124
Parking aid
PRINCIPLE OF OPERATION .......................... 126
USING THE PARKING AID ............................ 127
Driving hints
GENERAL DRIVING POINTS ......................... 128
REDUCED ENGINE PERFORMANCE ............. 128
RUNNING-IN ................................................ 128
ECONOMICAL DRIVING ................................ 129
Cruise control
PRINCIPLE OF OPERATION .......................... 130
USING CRUISE CONTROL ............................ 130
Terrain response
PRINCIPLE OF OPERATION .......................... 132
USING TERRAIN RESPONSE ........................ 132
Hill descent control (HDC)
PRINCIPLE OF OPERATION .......................... 136
USING HDC ................................................... 137
Traction control
USING TRACTION CONTROL ........................ 139
Stability control
PRINCIPLE OF OPERATION .......................... 140
USING STABILITY CONTROL ........................ 141
Fuel and refuelling
SAFETY PRECAUTIONS................................. 142
FUEL QUALITY .............................................. 142
RUNNING OUT OF FUEL................................ 144
FUEL CUT-OFF............................................... 144
FUEL FILLER FLAP ........................................ 144
REFUELLING ................................................. 145
TECHNICAL SPECIFICATIONS ....................... 146
Load carrying
GENERAL INFORMATION.............................. 147
LUGGAGE ANCHOR POINTS ......................... 148
LUGGAGE COVERS ....................................... 149
Towing
TOWING A TRAILER...................................... 150
LEVELLING.................................................... 151
ESSENTIAL TOWING CHECKS ...................... 151
RECOMMENDED TOWING WEIGHTS ............ 152
TOW BAR ...................................................... 153
Vehicle care
CLEANING THE ALLOY WHEELS................... 154
CLEANING THE EXTERIOR ............................ 154
CLEANING THE INTERIOR ............................ 155
REPAIRING MINOR PAINT DAMAGE ............ 156
Maintenance
GENERAL INFORMATION.............................. 157
OPENING AND CLOSING THE BONNET......... 160
ENGINE COMPARTMENT OVERVIEW ........... 161
ENGINE OIL CHECK....................................... 162