Page 568 of 3229
t he s ame number of t urns as when removed.
Inst all t he ti e-rod end.
2. W ARNING: Make sure t hat a new t ie-rod end nut is
i ns t alled.
• CAUTIONS: Make s ure that t he mat ing faces are clean and free of foreign
mat eri al . Make s ure that t he ball joi nt bal l does not rot ate.
Connect t he ti e-rod end ball joi nt.
T orque: 70 Nm 2.
3. CAUTION: Make s ure that the mati ng faces are cl ean and
free of foreign mat eri al.
Tight en the ti e-rod locki ng nut.
T orque: 55 Nm 3.
Inst all t he front wheel .
Refer t o: W heel and Ti re (204-04 W heel s and Tires, Removal and
Inst all at ion).
4.
Us ing onl y four wheel al ignment equi pment approved by Land Rover,
check and adjus t t he wheel al ignment.
5.
Page 702 of 3229
Publi s hed: 11-May-2011
Engine - I6 3.2L Petrol - Engine Mount RH
Removal and Inst all ati on
Special T ool(s)
303-1254Support , Engine
Removal
• NOTE: Removal s t eps in t his procedure may cont ain i nst all ati on det ail s.
1. W ARNING: Make sure t o s upport the vehicle wit h axles tands .
Rais e and s upport t he vehi cl e.
1.
Remove t he engi ne undershi eld.
Refer t o: Engi ne Unders hi eld (501-02 Front End Body Panel s ,Removal and Ins tall ati on).
2.
Remove t he RH front wheel and t ire.
Refer t o: W heel and Ti re (204-04 W heel s and Tires, Removal andInst all at ion).
3.
Remove t he fender spl as h shi el d extens ion panel.4.
Page 717 of 3229
Publi s hed: 11-May-2011
Engine - I6 3.2L Petrol - Engine Front Seal
Removal and Inst all ati on
Removal
1. W ARNING: Do not work on or under a vehi cle s upported onl yby a jack. Al ways support t he vehi cl e on s afet y s tands .
Rais e and s upport t he vehi cl e.
1.
Remove t he front wheel .
Refer t o: W heel and Ti re (204-04 W heel s and Tires, Removal andInst all at ion).
2.
Remove t he fender spl as h shi el d extens ion panel.3.
Remove t he cranks haft front oil s eal.4.
Installation
1. CAUTION: The oil s eal must be ins tal led dry.
Inst all t he cranks haft front oil s eal.
1.
Inst all t he fender spl as h shi el d extens ion panel.2.
Inst all t he front wheel .
Refer t o: W heel and Ti re (204-04 W heel s and Tires, Removal andInst all at ion).
3.
Check and top-up the engine oi l.4.
Page 807 of 3229
Publi s hed: 11-May-2011
Engine - TD4 2.2L Diesel - Camshaft Timing
General Procedures
Special T ool(s)
303-1270Ti ming Pi n, Cranks haft
303-1277Ti ming Pi n, Cams haft
Remove t he cover and dis connect the bat tery ground cabl e.
Refer t o: Specificati ons (414-00 Bat tery and Charging Sys tem -General Informat ion, Specificati ons).
1.
2. W ARNING: Make sure t o s upport the vehicle wit h axles tands .
Rais e and s upport t he vehi cl e.
2.
Remove t he RH front wheel and t ire.
Refer t o: W heel and Ti re (204-04 W heel s and Tires, Removal andInst all at ion).
3.
Remove t he s tart er mot or.
Refer t o: Start er Motor (303-06B Starti ng Sys t em - TD4 2.2L Dies el,Removal and Ins tall ati on).
4.
5.
Page 823 of 3229
Publi s hed: 11-May-2011
Engine - TD4 2.2L Diesel - Crankshaft Pulley
Removal and Inst all ati on
Special T ool(s)
303-1270Ti ming Pi n, Cranks haft
303-1272Locki ng Tool , Flywheel
303-1277Ti ming Pi n, Cams haft
Removal
• NOTE: Removal s t eps in t his procedure may cont ain i nst all ati on det ail s.
Remove t he cover and dis connect the bat tery ground cabl e.
Refer t o: Specificati ons (414-00 Bat tery and Charging Sys tem -General Informat ion, Specificati ons).
1.
2. W ARNING: Make sure t o s upport the vehicle wit h axles tands .
Rais e and s upport t he vehi cl e.
2.
Remove t he s tart er mot or.
Refer t o: Start er Motor (303-06B Starti ng Sys t em - TD4 2.2L Dies el,Removal and Ins tall ati on).
3.
Remove t he acces sory dri ve bel t.
Refer t o: Acces sory Dri ve Belt (303-05B Acces sory Drive - TD4 2.2LDi es el, Removal and Ins tal lat ion).
4.
Remove t he front wheel .
Refer t o: W heel and Ti re (204-04 W heel s and Tires, Removal andInst all at ion).
5.
Page 888 of 3229

Publi s hed: 11-May-2011
Engine - TD4 2.2L Diesel - Balance Shaft Assembly
Removal and Inst all ati on
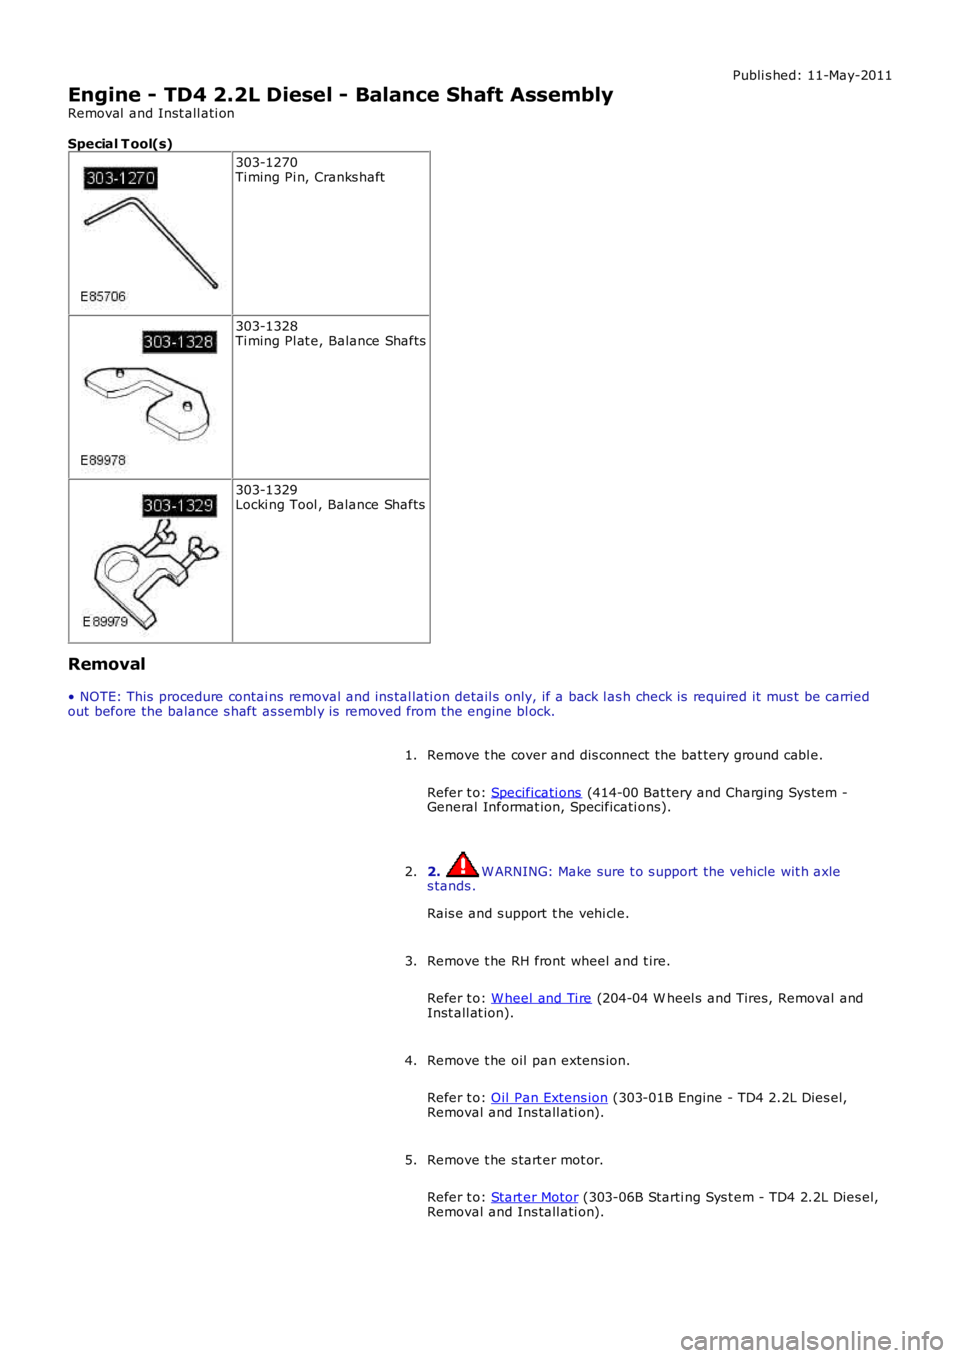
Special T ool(s)
303-1270Ti ming Pi n, Cranks haft
303-1328Ti ming Pl at e, Balance Shafts
303-1329Locki ng Tool , Balance Shafts
Removal
• NOTE: This procedure contai ns removal and ins tal lati on detail s only, if a back l ash check is required it mus t be carriedout before the balance s haft as sembl y is removed from the engine bl ock.
Remove t he cover and dis connect the bat tery ground cabl e.
Refer t o: Specificati ons (414-00 Bat tery and Charging Sys tem -General Informat ion, Specificati ons).
1.
2. W ARNING: Make sure t o s upport the vehicle wit h axles tands .
Rais e and s upport t he vehi cl e.
2.
Remove t he RH front wheel and t ire.
Refer t o: W heel and Ti re (204-04 W heel s and Tires, Removal andInst all at ion).
3.
Remove t he oil pan extens ion.
Refer t o: Oil Pan Extens ion (303-01B Engine - TD4 2.2L Dies el,Removal and Ins tall ati on).
4.
Remove t he s tart er mot or.
Refer t o: Start er Motor (303-06B Starti ng Sys t em - TD4 2.2L Dies el,Removal and Ins tall ati on).
5.
Page 892 of 3229

Stage 1:
Stage 2:
Stage 1:
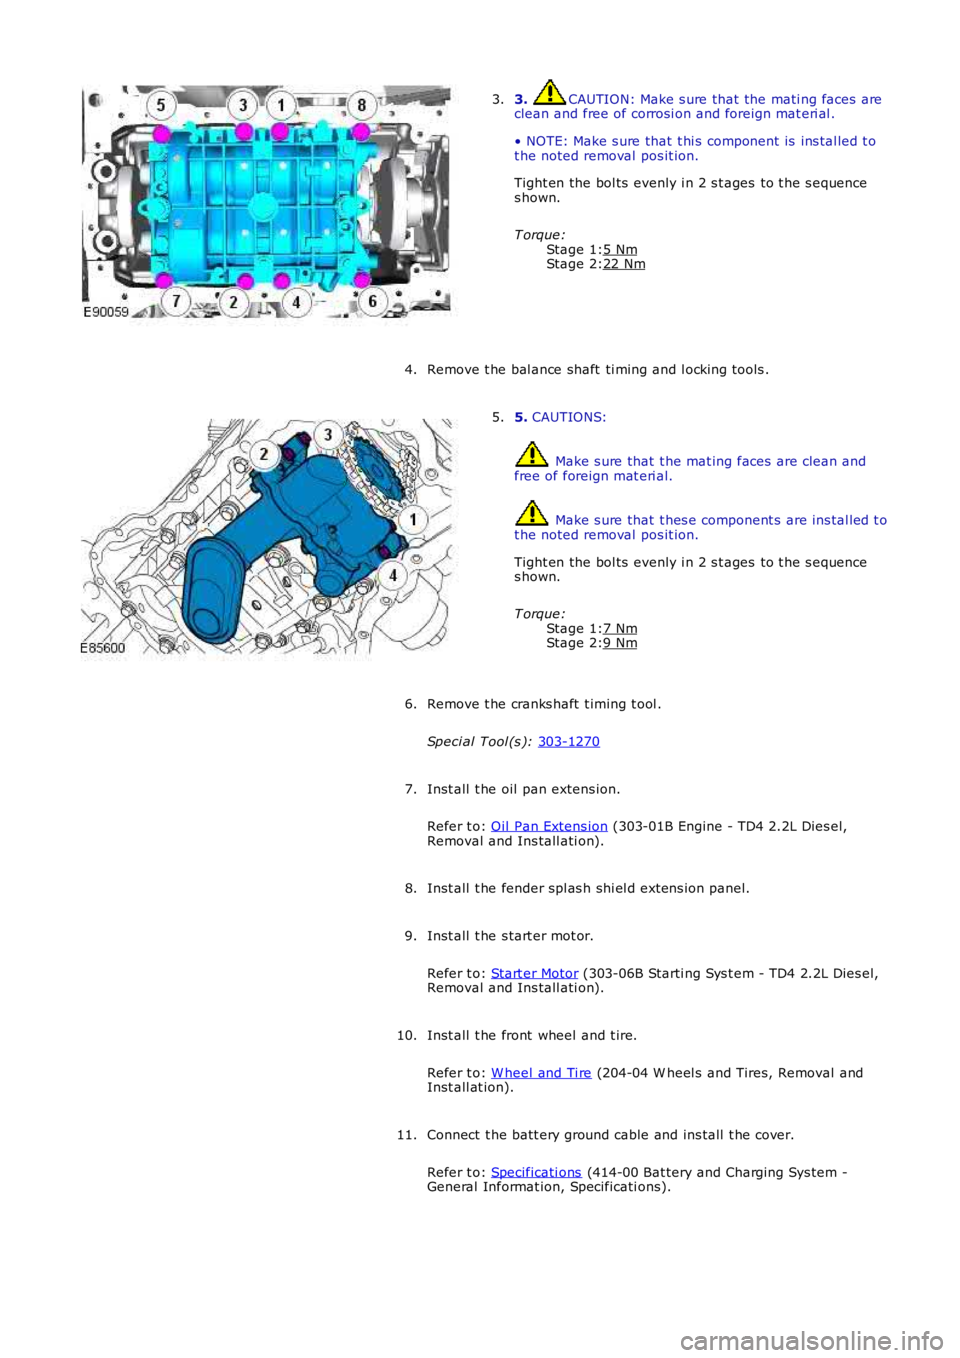
Stage 2: 3. CAUTION: Make s ure that the mati ng faces are
clean and free of corrosi on and foreign mat eri al .
• NOTE: Make s ure that t hi s component is ins tal led t o
t he noted removal pos it ion.
Tight en the bol ts evenly i n 2 s t ages to t he s equence
s hown.
T orque: 5 Nm 22 Nm3.
Remove t he bal ance shaft ti ming and l ocking tools .
4. 5.
CAUTIONS: Make s ure that t he mat ing faces are clean and
free of foreign mat eri al. Make s ure that t hes e component s are ins tal led t o
t he noted removal pos it ion.
Tight en the bol ts evenly i n 2 s t ages to t he s equence
s hown.
T orque: 7 Nm 9 Nm5.
Remove t he cranks haft t iming t ool .
Speci al Tool (s ): 303-1270 6.
Inst all t he oil pan extens ion.
Refer t o: Oil Pan Extens ion (303-01B Engine - TD4 2.2L Dies el,
Removal and Ins tall ati on).
7.
Inst all t he fender spl as h shi el d extens ion panel.
8.
Inst all t he s tart er mot or.
Refer t o: Start er Motor (303-06B Starti ng Sys t em - TD4 2.2L Dies el,
Removal and Ins tall ati on).
9.
Inst all t he front wheel and t ire.
Refer t o: W heel and Ti re (204-04 W heel s and Tires, Removal and
Inst all at ion).
10.
Connect t he batt ery ground cable and ins tall t he cover.
Refer t o: Specificati ons (414-00 Bat tery and Charging Sys tem -
General Informat ion, Specificati ons).
11.
Page 951 of 3229
Publi s hed: 11-May-2011
Engine Cooling - TD4 2.2L Diesel - Cooling System Draining, Filling and
Bleeding
General Procedures
Pos it ion t he vehi cl e on a lift .1.
Set the heat er controls t o maxi mum.2.
3. W ARNING: Si nce injury s uch as scaldi ng coul dbe caused by es caping s team or coolant , do not removet he fi ll er cap from the coolant expans ion tank whil e t hes yst em is hot.
Remove t he cool ant expans i on tank cap.
3.
Di sconnect t he bat t ery ground cable.
Refer t o: Specificati ons (414-00 Bat tery and Charging Sys tem -General Informat ion, Specificati ons).
4.
Remove t he RH front wheel.
Refer t o: W heel and Ti re (204-04 W heel s and Tires, Removal andInst all at ion).
5.
Remove t he engi ne undershi eld.
Refer t o: Engi ne Unders hi eld (501-02 Front End Body Panel s ,Removal and Ins tall ati on).
6.
Pos it ion a contai ner t o coll ect t he fl uid.7.
At tach a hos e t o t he radiat or drain tap. Open the tap.8.