Page 268 of 425
Axle drving assembly
Removal of semiaxle
1. Remove the wheel.
2. Disconnect the manual brake pull-wire from the
carriage; loose the small bracket.
3. Remove the brake caliper; remove the brake disc .
4. Remove the rear halfaxle assembly from the rear
axle housing
a. Use the bolt to connect the special tools to the semiaxle flange
surface.
b. Use the hammer of special tools to remove the rear axle.
brake caliper assembly
brake disc
circlip
oil seal base
bearing
oil seal
oil seal pressing block
parking brake assembly
rear axle
N
m: Specified torque
Used component which can not be used any more.
pull-wire assembly
5. Remove the circlip from the halfaxle assembly.
Use the circlip pliers to remove the circlip.
Page 271 of 425
Reducer
Replace the oil seal on the car
1. Disconnect the reducer from the drive shaft.
a. Make the assembly mark on two flanges.
b. Remove four bolts and nuts.
2. Remove the flange and dustproof cover assembly
3. Remove the oil seal
Use the special tools to remove the oil seal.
bearing spacer
adjusting washer
rear bearing
drive bevel gear
adjusting ring
side bearingdriven bevel gear
differential housing
locking plate
plain washer
flange
dustproof cover
oil seal
oil baffle disc
front bearingbearing glandstop plate
lock washer with
double ears
N m: Specified torque
Used component which can not be used any more.
assembly mark
Page 277 of 425
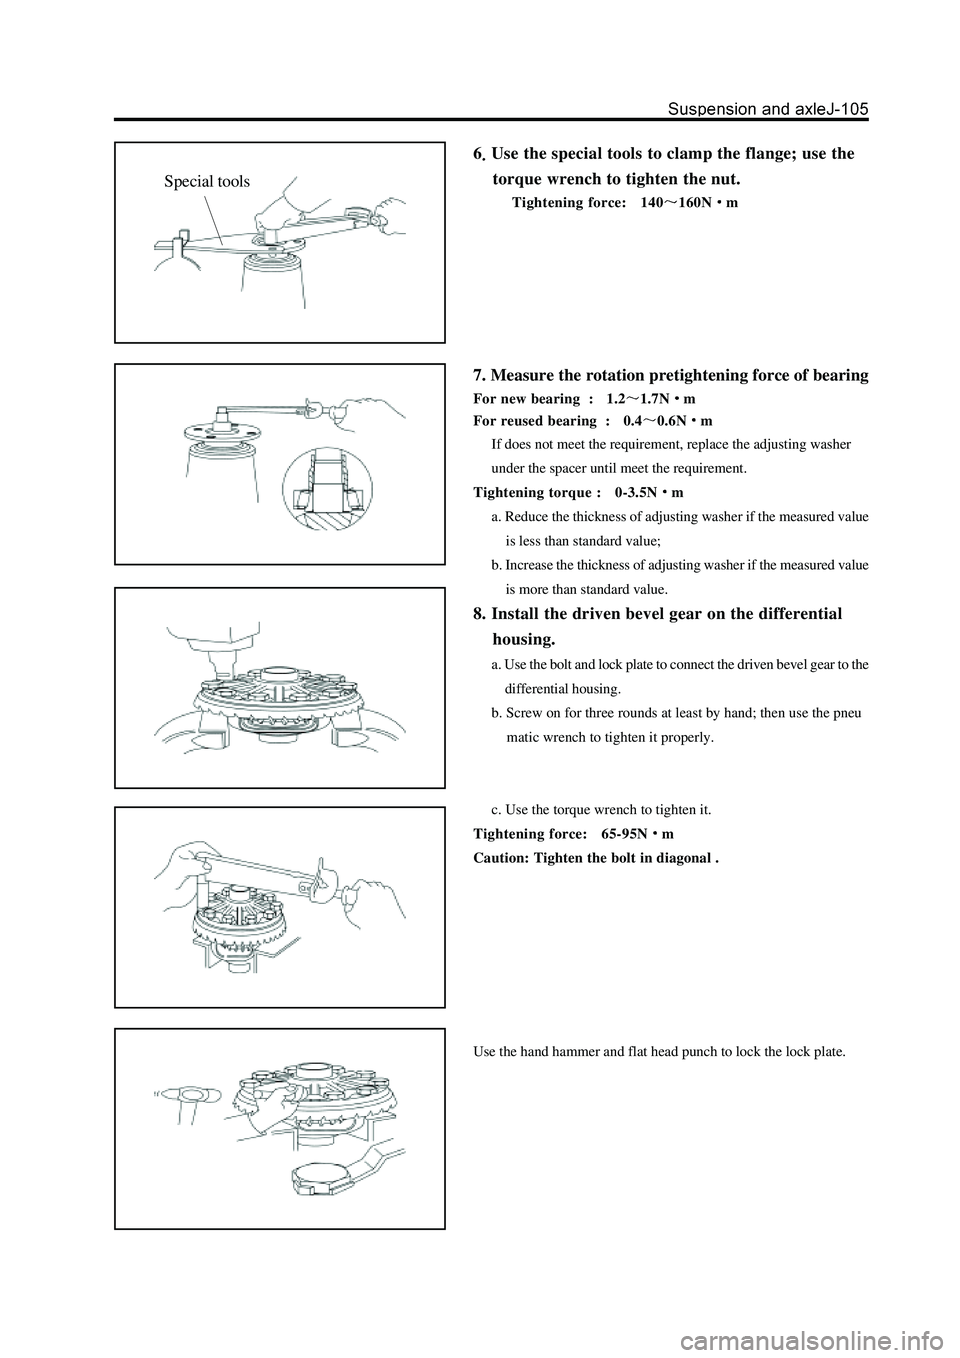
6Use the special tools to clamp the flange; use the
torque wrench to tighten the nut.
Tightening force: 140160Nm
7. Measure the rotation pretightening force of bearing
For new bearing : 1.21.7Nm
For reused bearing : 0.4
0.6Nm
If does not meet the requirement, replace the adjusting washer
under the spacer until meet the requirement.
Tightening torque : 0-3.5N
m
a. Reduce the thickness of adjusting washer if the measured value
is less than standard value;
b. Increase the thickness of adjusting washer if the measured value
is more than standard value.
8. Install the driven bevel gear on the differential
housing.
a. Use the bolt and lock plate to connect the driven bevel gear to the
differential housing.
b. Screw on for three rounds at least by hand; then use the pneu
matic wrench to tighten it properly.
c. Use the torque wrench to tighten it.
Tightening force: 65-95N
m
Caution: Tighten the bolt in diagonal .
Use the hand hammer and flat head punch to lock the lock plate.
Special tools
Page 278 of 425
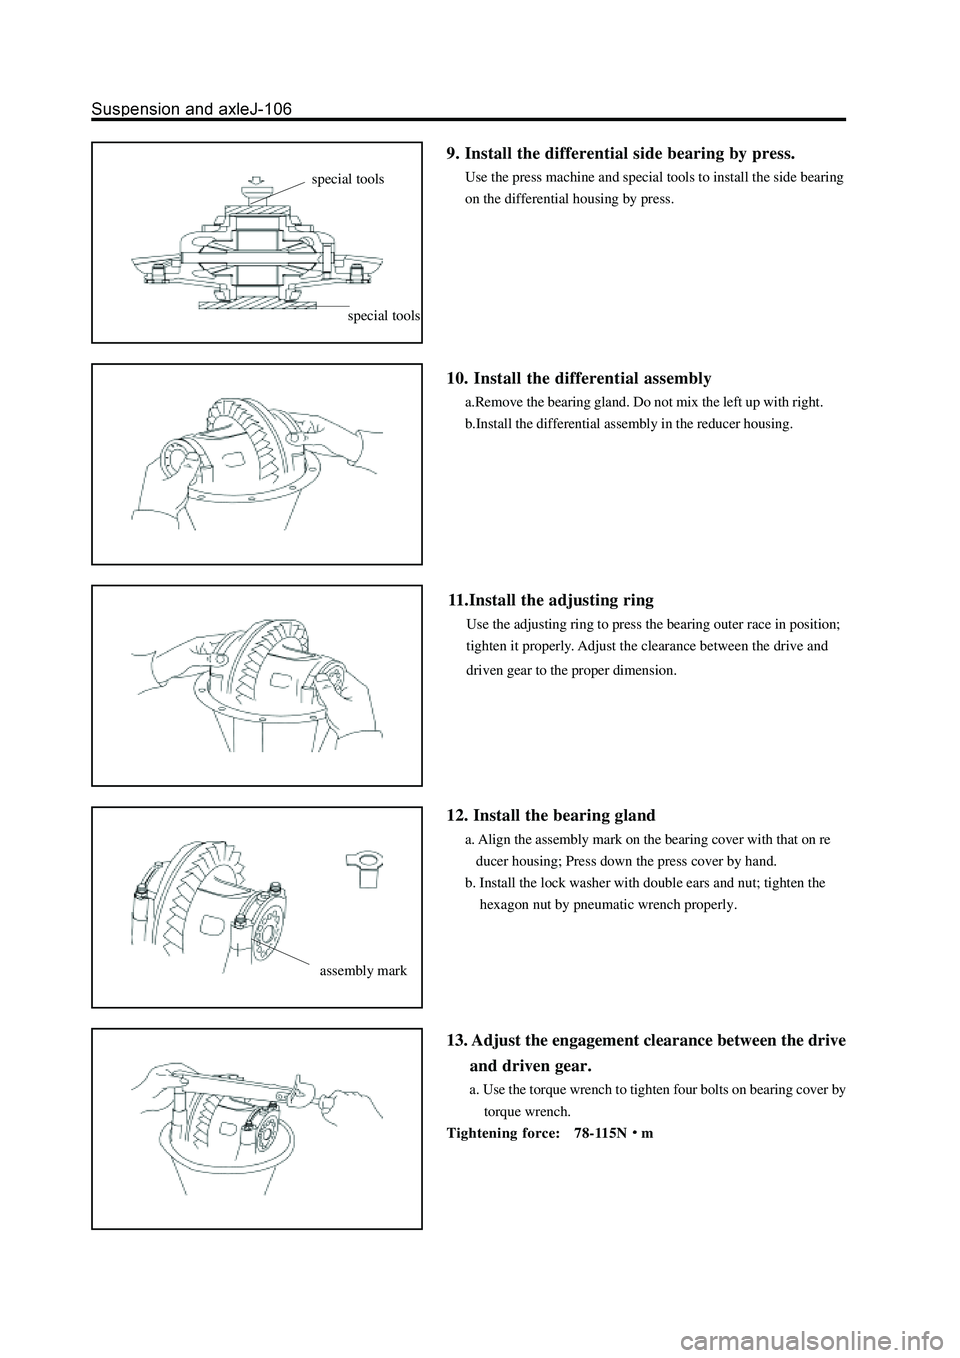
9. Install the differential side bearing by press.
Use the press machine and special tools to install the side bearing
on the differential housing by press.
10. Install the differential assembly
a.Remove the bearing gland. Do not mix the left up with right.
b.Install the differential assembly in the reducer housing.
11.Install the adjusting ring
Use the adjusting ring to press the bearing outer race in position;
tighten it properly. Adjust the clearance between the drive and
driven gear to the proper dimension.
12. Install the bearing gland
a. Align the assembly mark on the bearing cover with that on re
ducer housing; Press down the press cover by hand.
b. Install the lock washer with double ears and nut; tighten the
hexagon nut by pneumatic wrench properly.
13. Adjust the engagement clearance between the drive
and driven gear.
a. Use the torque wrench to tighten four bolts on bearing cover by
torque wrench.
Tightening force: 78-115N
m
special tools
special tools
assembly mark
Page 280 of 425
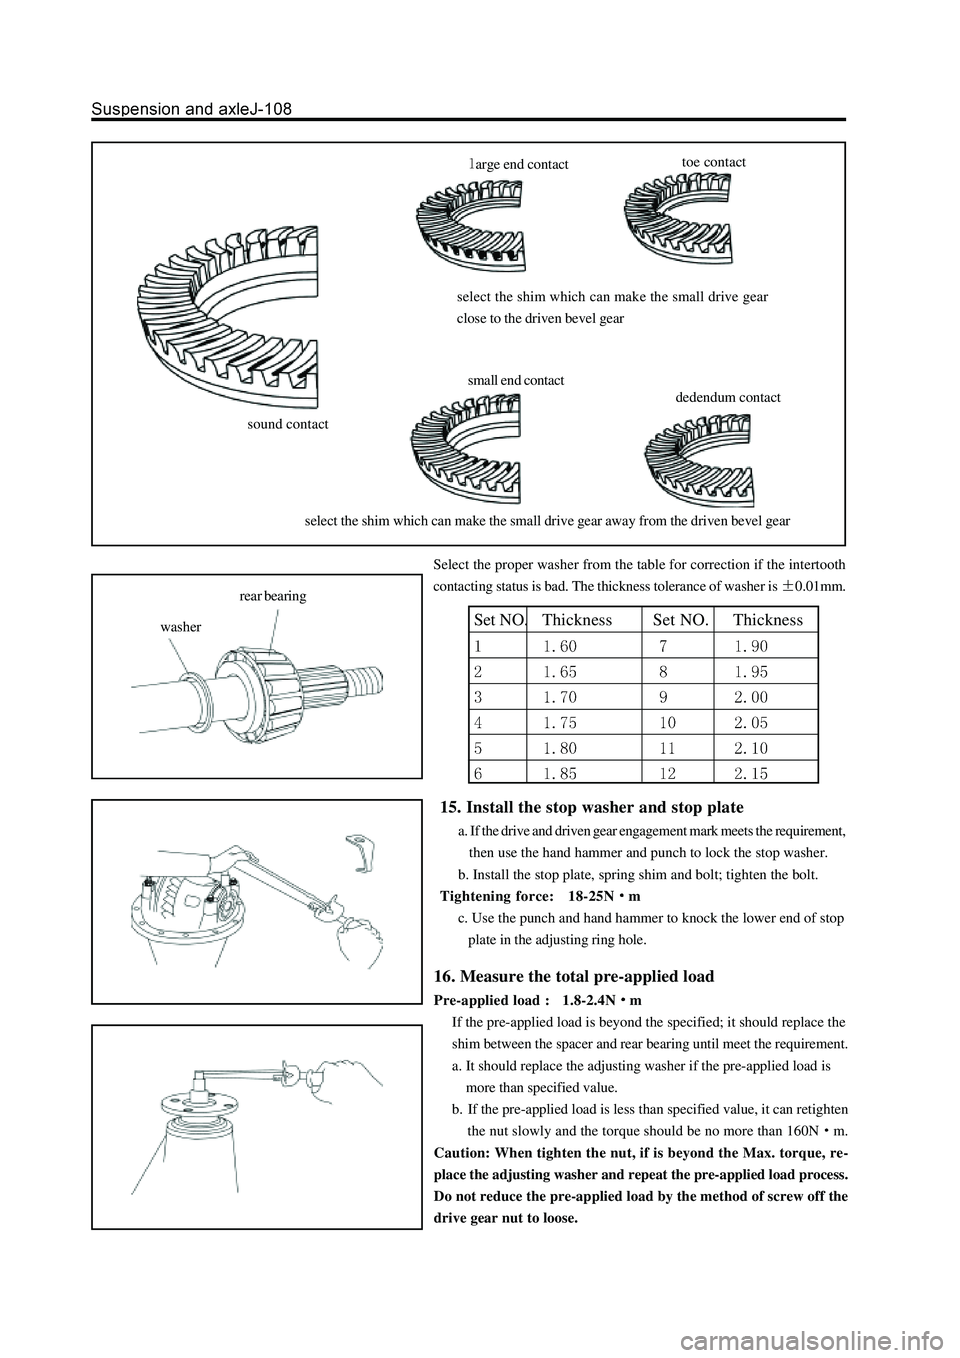
sound contacttoe contact
dedendum contact
arge end contact
small end contact select the shim which can make the small drive gear
close to the driven bevel gear
select the shim which can make the small drive gear away from the driven bevel gear
Select the proper washer from the table for correction if the intertooth
contacting status is bad. The thickness tolerance of washer is
0.01mm.
15. Install the stop washer and stop plate
a. If the drive and driven gear engagement mark meets the requirement,
then use the hand hammer and punch to lock the stop washer.
b. Install the stop plate, spring shim and bolt; tighten the bolt.
Tightening force: 18-25N
m
c. Use the punch and hand hammer to knock the lower end of stop
plate in the adjusting ring hole.
Set NO. Thickness Set NO. Thickness
16. Measure the total pre-applied load
Pre-applied load : 1.8-2.4Nm
If the pre-applied load is beyond the specified; it should replace the
shim between the spacer and rear bearing until meet the requirement.
a. It should replace the adjusting washer if the pre-applied load is
more than specified value.
b. If the pre-applied load is less than specified value, it can retighten
the nut slowly and the torque should be no more than 160N
m.
Caution: When tighten the nut, if is beyond the Max. torque, re-
place the adjusting washer and repeat the pre-applied load process.
Do not reduce the pre-applied load by the method of screw off the
drive gear nut to loose.
washerrear bearing
Page 281 of 425
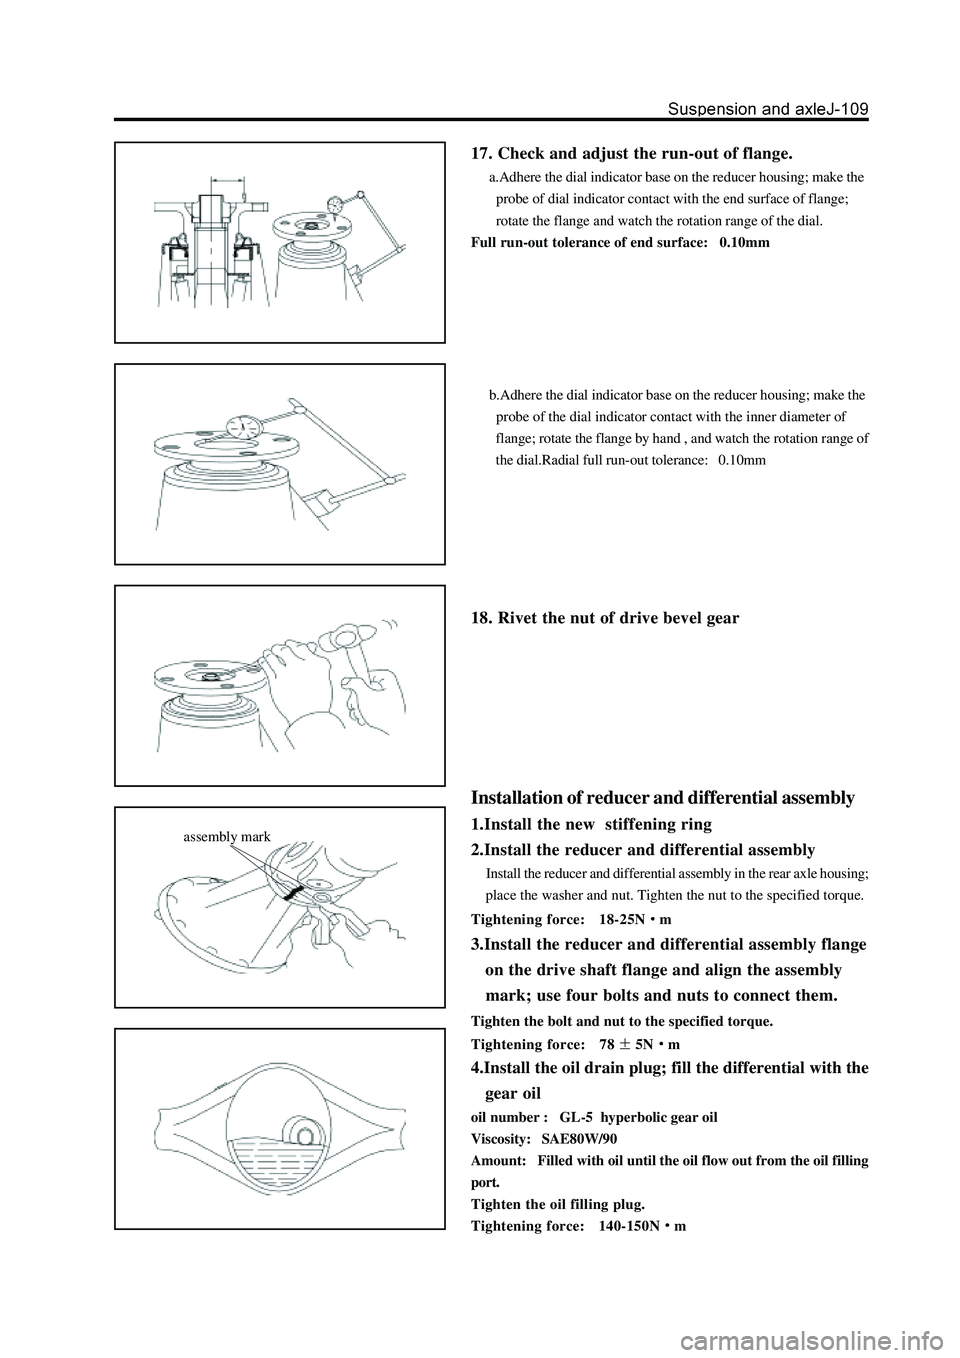
17. Check and adjust the run-out of flange.
a.Adhere the dial indicator base on the reducer housing; make the
probe of dial indicator contact with the end surface of flange;
rotate the flange and watch the rotation range of the dial.
Full run-out tolerance of end surface: 0.10mm
b.Adhere the dial indicator base on the reducer housing; make the
probe of the dial indicator contact with the inner diameter of
flange; rotate the flange by hand , and watch the rotation range of
the dial.Radial full run-out tolerance: 0.10mm
18. Rivet the nut of drive bevel gear
Installation of reducer and differential assembly
1.Install the new stiffening ring
2.Install the reducer and differential assembly
Install the reducer and differential assembly in the rear axle housing;
place the washer and nut. Tighten the nut to the specified torque.
Tightening force: 18-25N
m
3.Install the reducer and differential assembly flange
on the drive shaft flange and align the assembly
mark; use four bolts and nuts to connect them.
Tighten the bolt and nut to the specified torque.
Tightening force: 78
5Nm
4.Install the oil drain plug; fill the differential with the
gear oil
oil number : GL-5 hyperbolic gear oil
Viscosity: SAE80W/90
Amount: Filled with oil until the oil flow out from the oil filling
port.
Tighten the oil filling plug.
Tightening force: 140-150N
m
assembly mark
Page 284 of 425
Rear suspension
N m: specified torque
bush clip
bush
rear stabilizer barrear connecting rod of stabilizer bar assembly
plain washer
short longitudinal
pull-rod fixed bolt
rubber padshort longitudinal
pull-rod fixed bolt
long longitudinal
pull-rod assembly
long longitudinal
pull-rod fixed bolt
long longitudinal
pull-rodassembly
short longitudinal
pull-rod assembly
rear axle
assembly
coil spring
upper support pad
of coil spring
short longitudinal pull-rod assembly
long longitudinal
pull-rod assembly
rear vibration damper
cross pull-rod assembly
cross pull-rod
connecting bolt
Page 285 of 425
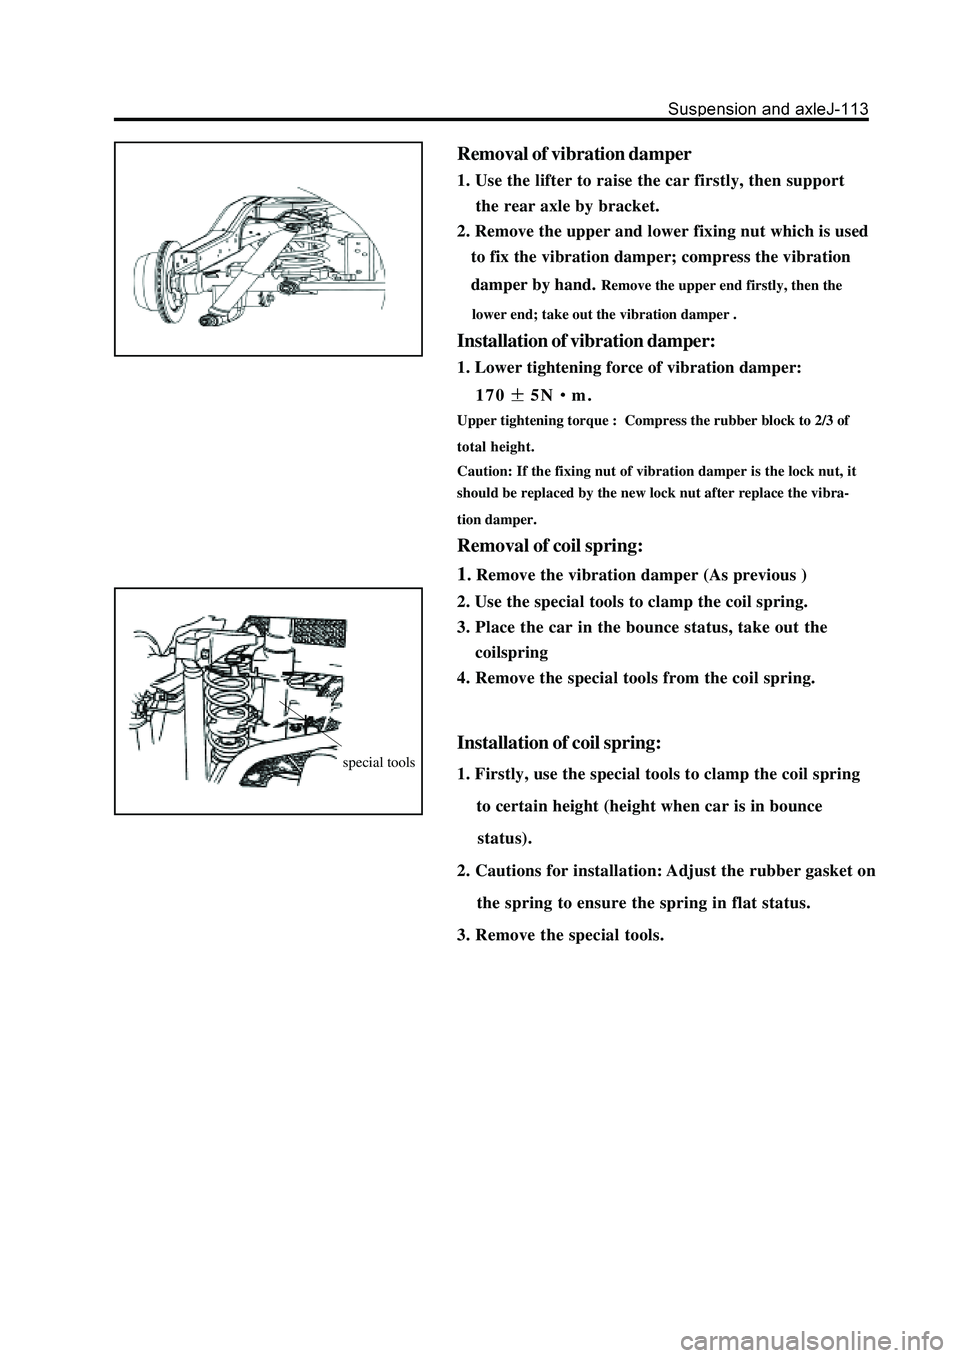
Removal of vibration damper
1. Use the lifter to raise the car firstly, then support
the rear axle by bracket.
2. Remove the upper and lower fixing nut which is used
to fix the vibration damper; compress the vibration
damper by hand.
Remove the upper end firstly, then the
lower end; take out the vibration damper .
Installation of vibration damper:
1. Lower tightening force of vibration damper:
170
5Nm.
Upper tightening torque : Compress the rubber block to 2/3 of
total height.
Caution: If the fixing nut of vibration damper is the lock nut, it
should be replaced by the new lock nut after replace the vibra-
tion damper.
Removal of coil spring:
1
. Remove the vibration damper (As previous )
2. Use the special tools to clamp the coil spring.
3. Place the car in the bounce status, take out the
coilspring
4. Remove the special tools from the coil spring.
Installation of coil spring:
1. Firstly, use the special tools to clamp the coil spring
to certain height (height when car is in bounce
status).
2. Cautions for installation: Adjust the rubber gasket on
the spring to ensure the spring in flat status.
3. Remove the special tools.special tools