Page 1266 of 5267
3.EXHAUST LEAK
Start the engine.
Inspect the exhaust for leaks between the engine and the 2/1 O2 Sensor.
Inspect the exhaust for leaks between the engine and the 2/2 O2 Sensor.
Are there any exhaust leaks?
Ye s>>
Repair or replace the leaking exhaust parts as necessary.
Perform the POWERTRAIN VERIFICATION TEST. (Refer to 9 - ENGINE - STANDARD PROCEDURE)
No>>
Go To 4
4.ENGINE MECHANICAL
Check the exhaust for excessive smoke caused by an internal problem in the engine.
Is an engine mechanical condition present?
Ye s>>
Repair the engine mechanical condition as necessary.
Perform the POWERTRAIN VERIFICATION TEST. (Refer to 9 - ENGINE - STANDARD PROCEDURE)
No>>
Go To 5
5.AGING O2 SENSOR
A new rear O2 Sensor along with an aging front O2 Sensor may cause the DTC to set.
Review the vehicles repair history.
Has the rear O2 Sensor been replaced without replacing the front O2 Sensor?
Ye s>>
Replace the 2/1 O2 Sensor as necessary.
Perform the POWERTRAIN VERIFICATION TEST. (Refer to 9 - ENGINE - STANDARD PROCEDURE)
No>>
Go To 6
6.CATALYTIC CONVERTER
If there are no possible cause remaining, view repair.
Repair
Replace the Catalytic Converter.
Perform the POWERTRAIN VERIFICATION TEST. (Refer to 9 - ENGINE - STANDARD PROCEDURE)
Page 1287 of 5267
P0460-FUEL LEVEL SENDING UNIT NO CHANGE OVER MILES
For a complete wiring diagramRefer to Section 8W.
When Monitored:
Engine running and fuel level either below 15% or above 85% of capacity.
Set Condition:
The PCM sees low fuel, less than 15%, for more than 120 miles or fuel level does not change by at least 4%
for more than 250 miles.
Possible Causes
PHYSICALLY DAMAGED/DEFORMED/OBSTRUCTED FUEL TANK
FUEL LEVEL SENSOR
Always perform the Pre-Diagnostic Troubleshooting procedure before proceeding. (Refer to 9 - ENGINE -
DIAGNOSIS AND TESTING)
1.CHECKING FOR A DAMAGED/DEFORMED/OBSTRUCTED FUEL TANK
Turn the ignition off.
WARNING: WARNING: The fuel system is under a constant pressure, even with the engine off. Before test-
ing or servicing any fuel system hose, fitting or line, the fuel system pressure must be released.
Inspect the outside of the fuel tank for defects.
Remove the fuel tank.
Remove the fuel pump module from the fuel tank.
Inspect the inside of the fuel tank for any obstructions or deformities.
Is the fuel tank free from defects?
Ye s>>
Go To 2
No>>
Repair or replace the fuel tank as necessary.
Perform POWERTRAIN VERIFICATION TEST. (Refer to 9 - ENGINE - STANDARD PROCEDURE)
2.FUEL LEVEL SENSOR
If there are no possible causes remaining, view repair.
Repair
Replace the Fuel Level Sensor.
Perform POWERTRAIN VERIFICATION TEST. (Refer to 9 - ENGINE - STANDARD PROCEDURE)
Page 1289 of 5267
When Monitored:
Ignition on and battery voltage above 10.4 volts.
Set Condition:
The fuel level sensor signal voltage goes below 0.4 of a volt for more than 90seconds. One Trip Fault. Three
good trips to turn off the MIL.
Possible Causes
(N4) FUEL LEVEL SIGNAL CIRCUIT SHORTED TO GROUND
(N4) FUEL LEVEL SIGNAL CIRCUIT SHORTED TO THE (K900) SENSOR GROUND CIRCUIT
FUEL LEVEL SENSOR
INSTRUMENT CLUSTER
Always perform the Pre-Diagnostic Troubleshooting procedure before proceeding. (Refer to 9 - ENGINE -
SCHEMATICS AND DIAGRAMS).
Diagnostic Test
1.FUEL LEVEL SENSOR VOLTAGE BELOW 0.4 OF A VOLT
NOTE: Diagnose any Bus Message failures before continuing.
Ignition on, engine not running.
With the scan tool, read the Fuel Level Sensor voltage.
Is the Fuel Level Sensor voltage below 0.4 of a volt?
Ye s>>
Go To 2
No>>
Refer to the INTERMITTENT CONDITION Diagnostic Procedure.
Perform the POWERTRAIN VERIFICATION TEST. (Refer to 9 - ENGINE - STANDARD PROCEDURE)
2.FUEL LEVEL SENSOR
Turn the ignition off.
Disconnect the Fuel Pump Module harness connector.
Ignition on, engine not running.
With the scan tool, read the Fuel Level Sensor voltage.
Did the Fuel Level Sensor voltage change from below 0.4 of a volt to above 4.0volts?
Ye s>>
Replace the Fuel Level Sensor.
Perform the POWERTRAIN VERIFICATION TEST. (Refer to 9 - ENGINE - STANDARD PROCEDURE)
No>>
Go To 3
Page 1290 of 5267
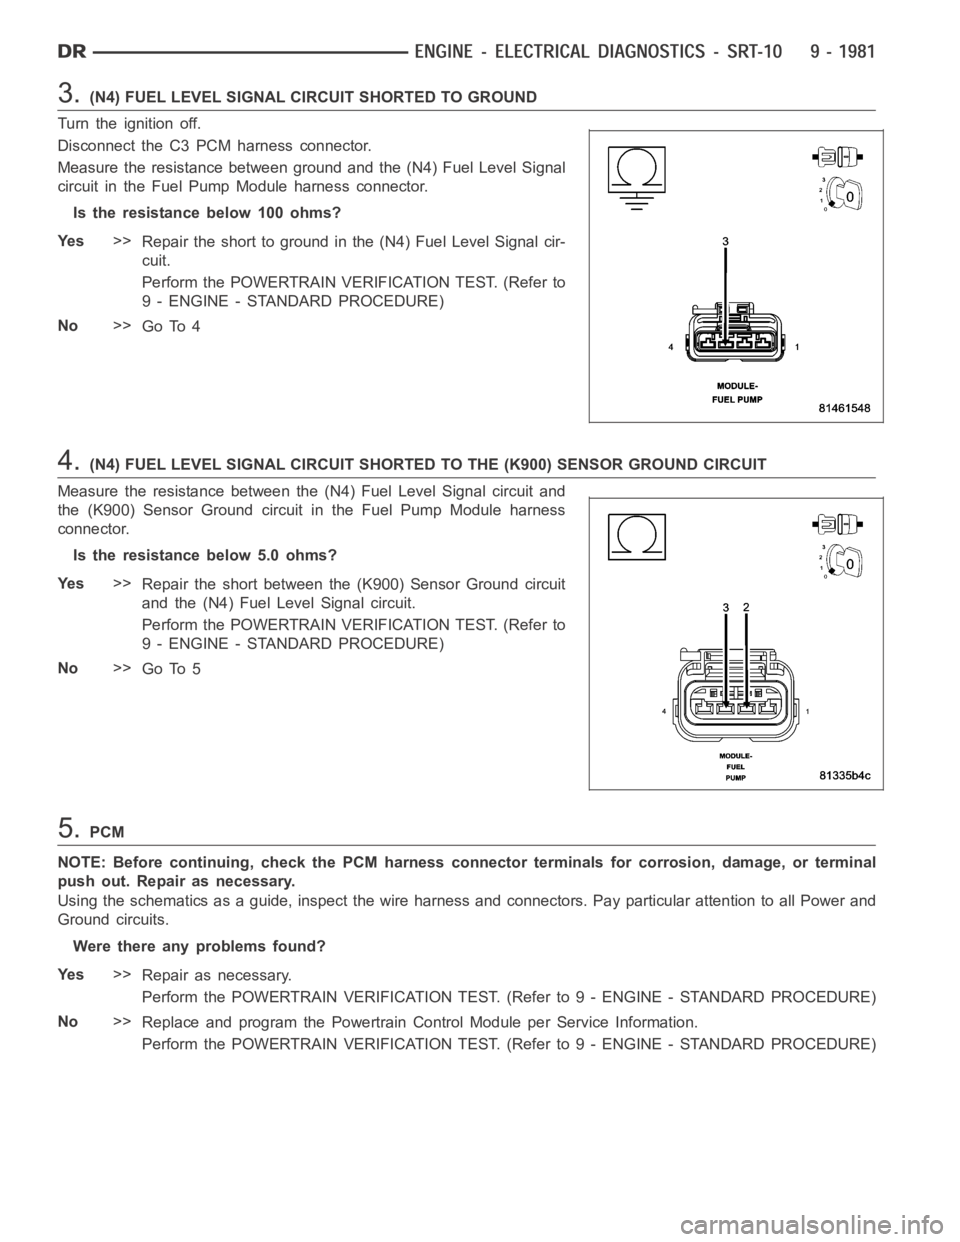
3.(N4) FUEL LEVEL SIGNAL CIRCUIT SHORTED TO GROUND
Turn the ignition off.
Disconnect the C3 PCM harness connector.
Measure the resistance between ground and the (N4) Fuel Level Signal
circuit in the Fuel Pump Module harness connector.
Istheresistancebelow100ohms?
Ye s>>
Repair the short to ground in the (N4) Fuel Level Signal cir-
cuit.
Perform the POWERTRAIN VERIFICATION TEST. (Refer to
9 - ENGINE - STANDARD PROCEDURE)
No>>
Go To 4
4.(N4) FUEL LEVEL SIGNAL CIRCUIT SHORTED TO THE (K900) SENSOR GROUND CIRCUIT
Measure the resistance between the (N4) Fuel Level Signal circuit and
the (K900) Sensor Ground circuit in the Fuel Pump Module harness
connector.
Is the resistance below 5.0 ohms?
Ye s>>
Repair the short between the (K900) Sensor Ground circuit
and the (N4) Fuel Level Signal circuit.
Perform the POWERTRAIN VERIFICATION TEST. (Refer to
9 - ENGINE - STANDARD PROCEDURE)
No>>
Go To 5
5.PCM
NOTE: Before continuing, check the PCM harness connector terminals for corrosion, damage, or terminal
push out. Repair as necessary.
Using the schematics as a guide, inspect the wire harness and connectors. Pay particular attention to all Power and
Ground circuits.
Were there any problems found?
Ye s>>
Repair as necessary.
Perform the POWERTRAIN VERIFICATION TEST. (Refer to 9 - ENGINE - STANDARD PROCEDURE)
No>>
Replace and program the Powertrain Control Module per Service Information.
Perform the POWERTRAIN VERIFICATION TEST. (Refer to 9 - ENGINE - STANDARD PROCEDURE)
Page 1291 of 5267
P0463-FUEL LEVEL SENSOR 1 CIRCUIT HIGH
For a complete wiring diagramRefer to Section 8W.
Page 1292 of 5267
When Monitored:
Ignition on and battery voltage above 10.4 volts.
Set Condition:
The fuel level sensor signal voltage at the PCM goes above 4.9 volts for morethan 90 seconds. One Trip
Fault. Three good trips to turn off the MIL.
Possible Causes
(N4) FUEL LEVEL SIGNAL CIRCUIT SHORTED TO BATTERY VOLTAGE
(N4) FUEL LEVEL SIGNAL CIRCUIT OPEN
(K900) SENSOR GROUND CIRCUIT OPEN
FUEL LEVEL SENSOR
PCM
Always perform the Pre-Diagnostic Troubleshooting procedure before proceeding. (Refer to 9 - ENGINE -
DIAGNOSIS AND TESTING).
Diagnostic Test
1.FUEL LEVEL SENSOR VOLTS ABOVE 4.9 VOLTS
NOTE: Diagnose any Bus Message failures before continuing.
Ignition on, engine not running.
With a scan tool, read the Fuel Level Sensor voltage.
Is the Fuel Level Sensor voltage above 4.9 volts?
Ye s>>
Go To 2
No>>
Refer to the INTERMITTENT CONDITION Diagnostic Procedure.
Perform the POWERTRAIN VERIFICATION TEST. (Refer to 9 - ENGINE - STANDARD PROCEDURE)
2.FUEL LEVEL SENSOR
Turn the ignition off.
Disconnect the Fuel Pump Module electrical harness connector.
Ignition on, engine not running.
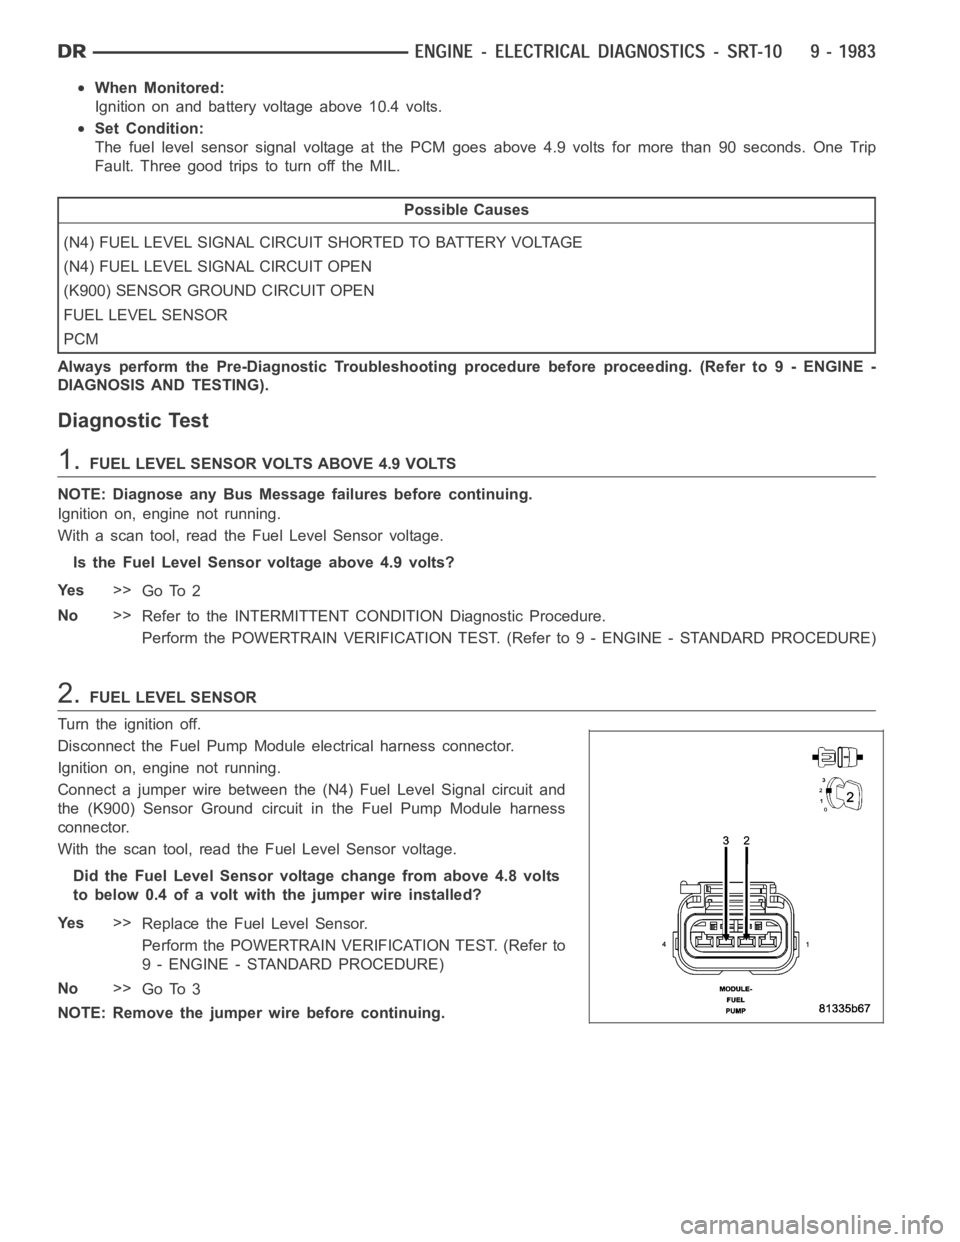
Connect a jumper wire between the (N4) Fuel Level Signal circuit and
the (K900) Sensor Ground circuit in the Fuel Pump Module harness
connector.
With the scan tool, read the Fuel Level Sensor voltage.
Did the Fuel Level Sensor voltage change from above 4.8 volts
to below 0.4 of a volt with the jumper wire installed?
Ye s>>
Replace the Fuel Level Sensor.
Perform the POWERTRAIN VERIFICATION TEST. (Refer to
9 - ENGINE - STANDARD PROCEDURE)
No>>
Go To 3
NOTE: Remove the jumper wire before continuing.
Page 1294 of 5267
5.(K900) SENSOR GROUND CIRCUIT OPEN
Measure the resistance of the (K900) Sensor Ground circuit from the
Fuel Pump Module harness connector to the PCM harness connector.
Is the resistance below 5.0 ohms?
Ye s>>
Go To 6
No>>
Repair the open in the (K900) Sensor Ground circuit.
Perform the POWERTRAIN VERIFICATION TEST. (Refer to
9 - ENGINE - STANDARD PROCEDURE)
6.PCM
NOTE: Before continuing, check the PCM harness connector terminals for corrosion, damage, or terminal
push out. Repair as necessary.
Using the schematics as a guide, inspect the wire harness and connectors. Pay particular attention to all Power and
Ground circuits.
Were there any problems found?
Ye s>>
Repair as necessary.
Perform the POWERTRAIN VERIFICATION TEST. (Refer to 9 - ENGINE - STANDARD PROCEDURE)
No>>
Replace and program the Powertrain Control Module per Service Information.
Perform the POWERTRAIN VERIFICATION TEST. (Refer to 9 - ENGINE - STANDARD PROCEDURE)
Page 1296 of 5267
When Monitored:
Engine Temperature greater than 104 Deg F, MAP vacuum approximately 15
to 16inches of mercury and
Engine RPM between 1400 and 3000 rpm.
Set Condition:
No Vehicle Speed Signal for more than 15 seconds on two consecutive trips.
Possible Causes
(B22) VEHICLE SPEED SIGNAL CIRCUIT SHORTED TO VOLTAGE
(B22) VEHICLE SPEED SIGNAL CIRCUIT OPEN BETWEEN CAB AND PCM
(B22) VEHICLE SPEED SIGNAL CIRCUIT SHORTED TO GROUND
PCM
Always perform the Pre-Diagnostic Troubleshooting procedure before proceeding. (Refer to 9 - ENGINE -
DIAGNOSIS AND TESTING)
1.GOOD TRIP EQUAL TO ZERO
Ignition on, engine not running.
NOTE: With the scan tool check for any related DTCs that may be present in theABS/RWAL Module or TCM,
diagnose any ABS/RWAL Module DTC’s before continuing.
With the scan tool, read DTCs and record the related Freeze Frame data.
Is the Good Trip Counter displayed and equal to zero?
Ye s>>
Go To 2
No>>
Refer to the INTERMITTENT CONDTION Diagnostic Procedure.
Perform POWERTRAIN VERIFICATION TEST. (Refer to 9 - ENGINE - STANDARD PROCEDURE)
2.(B22) VEHICLE SPEED SENSOR SIGNAL CIRCUIT SHORT TO VOLTAGE
Turn the ignition off.
Disconnect the PCM harness connectors.
Disconnect the CAB Module harness connector.
Ignition on, engine not running.
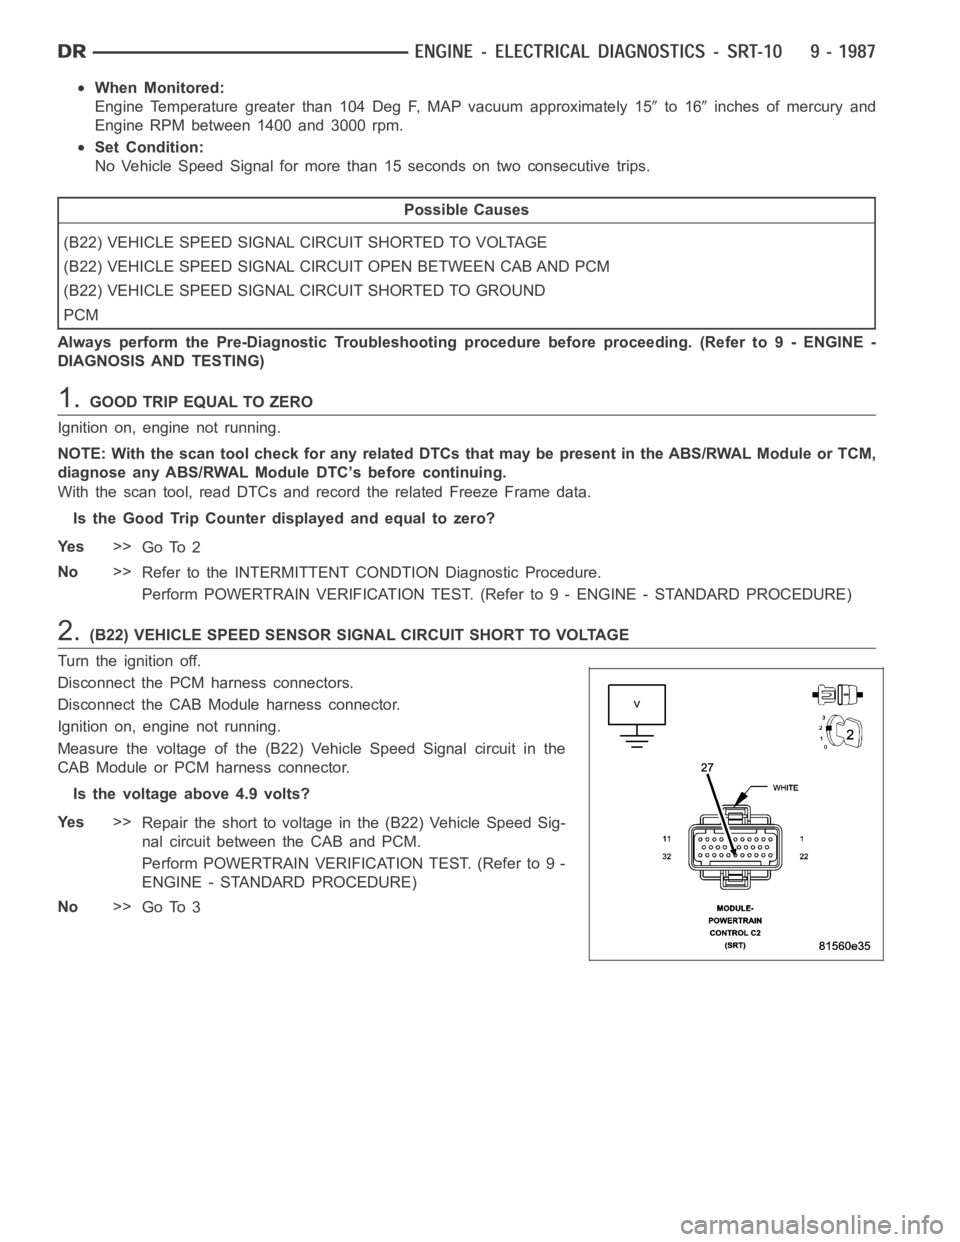
Measure the voltage of the (B22) Vehicle Speed Signal circuit in the
CAB Module or PCM harness connector.
Is the voltage above 4.9 volts?
Ye s>>
Repair the short to voltage in the (B22) Vehicle Speed Sig-
nal circuit between the CAB and PCM.
Perform POWERTRAIN VERIFICATION TEST. (Refer to 9 -
ENGINE - STANDARD PROCEDURE)
No>>
Go To 3