2006 DODGE RAM SRT-10 ignition
[x] Cancel search: ignitionPage 3745 of 5267
Theory of Operation
The transmission throttle valve cable has been replace by the transmission throttle valve actuator (TTVA). The TTVA
consists of an electric DC motor, two potentiometers, and a gear drive system. The TTVA is mechanically connected
to the transmission throttle valve in the valve body by the “D” shaped opening in the bottom of the TTVA shaft.
The Transmission Throttle Valve Actuator (TTVA) does not require any mechanical adjustments. All changes in throt-
tle valve position are controlled by the Engine Control Module (ECM).
The TTVA does require an initialization period after the actuator has beenremoved or replaced. After the actuator
has been removed or replaced, move the ignition to the ON position for thirty (30) seconds. This will allow the ECM
sufficient time to perform the internal calibration procedures to learn the TTVA’s current “zero” position.
When Monitored:
Continuously with the ignition on.
Set Condition:
The current detected on the TTVA circuit is greater than a threshold for a calibrated amount of time or the
feedback to the controller does not match the intended state.
Possible Causes
(F856) 5 VOLT SUPPLY CIRCUIT OPEN
(K314) TTVA MOTOR (+) CIRCUIT OPEN
(K315) TTVA MOTOR (-) CIRCUIT OPEN
(K314) TTVA MOTOR (+) CIRCUIT SHORT TO GROUND
(K315) TTVA MOTOR (-) CIRCUIT SHORT TO GROUND
(K314) TTVA MOTOR (+) CIRCUIT SHORT TO VOLTAGE
(K315) TTVA MOTOR (-) CIRCUIT SHORT TO VOLTAGE
(K314) TTVA MOTOR (+) CIRCUIT SHORT TO ANOTHER CIRCUIT
(K315) TTVA MOTOR (-) CIRCUIT SHORT TO ANOTHER CIRCUIT
INTERNAL TRANSMISSION
TRANSMISSION THROTTLE VALVE ACTUATOR
ENGINE CONTROL MODULE
Always perform the Pre-Diagnostic Troubleshooting procedure before proceeding. (Refer to 21 - TRANSMIS-
SION/TRANSAXLE/AUTOMATIC - 48RE - STANDARD PROCEDURE)
Diagnostic Test
1.CHECK IF THE DTC IS CURRENT
Ignition on, engine not running.
With the scan tool, read Engine DTCs.
Record the Freeze Frame data for the reported DTC.
With the scan tool, erase DTCs.
Turn the ignition off to the lock position.
Using the Freeze Frame data recorded earlier, try to duplicate the conditions in which the DTC originally set.
NOTE: It may be necessary to road test the vehicle to duplicate the originalset conditions.
With the scan tool, read Engine DTCs.
Did the DTC reset?
Ye s>>
Go To 2
No>>
Go To 12
Page 3746 of 5267
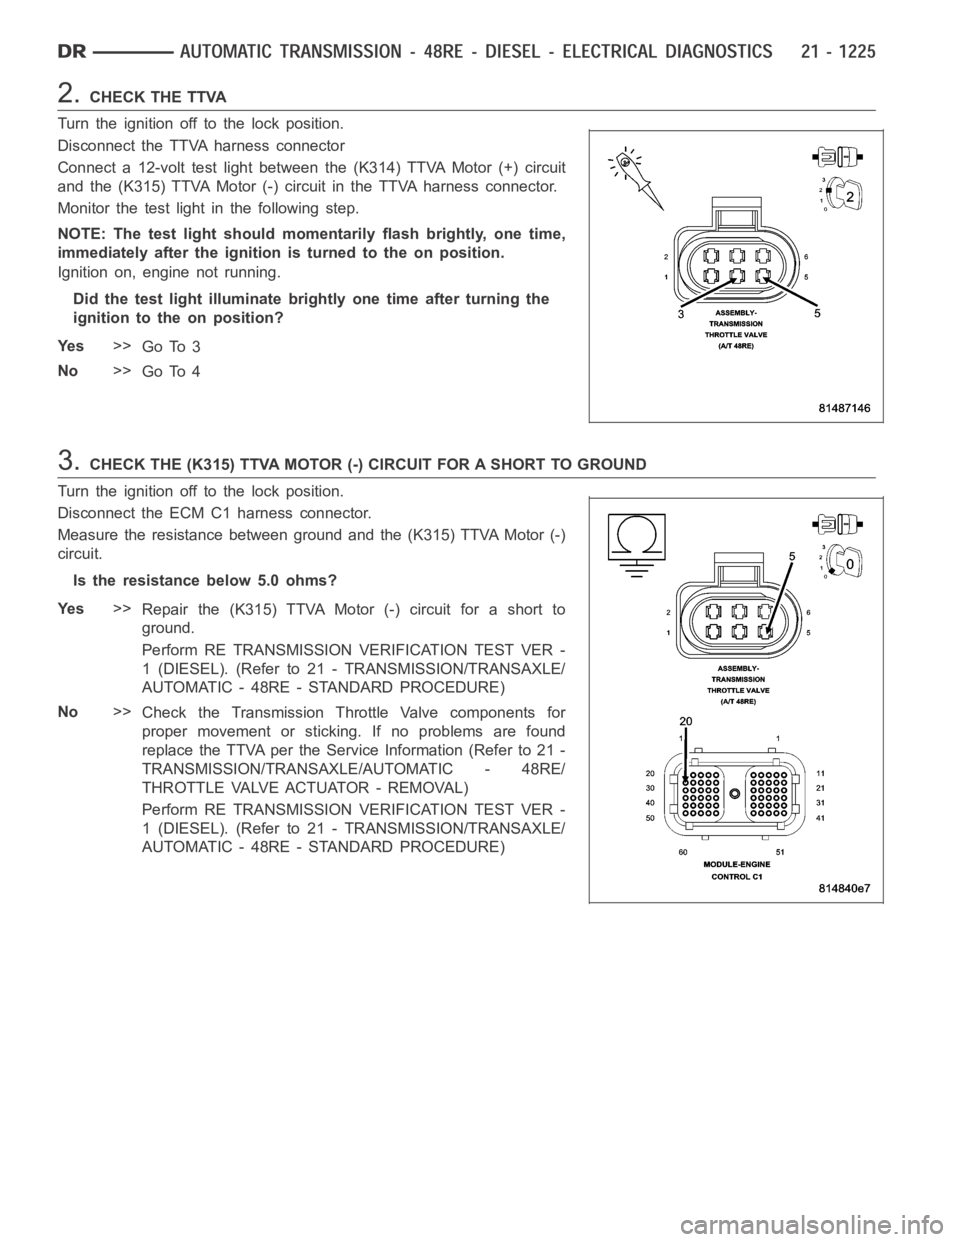
2.CHECK THE TTVA
Turn the ignition off to the lock position.
Disconnect the TTVA harness connector
Connect a 12-volt test light between the (K314) TTVA Motor (+) circuit
and the (K315) TTVA Motor (-) circuit in the TTVA harness connector.
Monitor the test light in the following step.
NOTE: The test light should momentarily flash brightly, one time,
immediately after the ignition is turned to the on position.
Ignition on, engine not running.
Did the test light illuminate brightly one time after turning the
ignition to the on position?
Ye s>>
Go To 3
No>>
Go To 4
3.CHECK THE (K315) TTVA MOTOR (-) CIRCUIT FOR A SHORT TO GROUND
Turn the ignition off to the lock position.
Disconnect the ECM C1 harness connector.
Measure the resistance between ground and the (K315) TTVA Motor (-)
circuit.
Is the resistance below 5.0 ohms?
Ye s>>
Repair the (K315) TTVA Motor (-) circuit for a short to
ground.
Perform RE TRANSMISSION VERIFICATION TEST VER -
1 (DIESEL). (Refer to 21 - TRANSMISSION/TRANSAXLE/
AUTOMATIC - 48RE - STANDARD PROCEDURE)
No>>
Check the Transmission Throttle Valve components for
proper movement or sticking. If no problems are found
replace the TTVA per the Service Information (Refer to 21 -
TRANSMISSION/TRANSAXLE/AUTOMATIC - 48RE/
THROTTLE VALVE ACTUATOR - REMOVAL)
Perform RE TRANSMISSION VERIFICATION TEST VER -
1 (DIESEL). (Refer to 21 - TRANSMISSION/TRANSAXLE/
AUTOMATIC - 48RE - STANDARD PROCEDURE)
Page 3747 of 5267
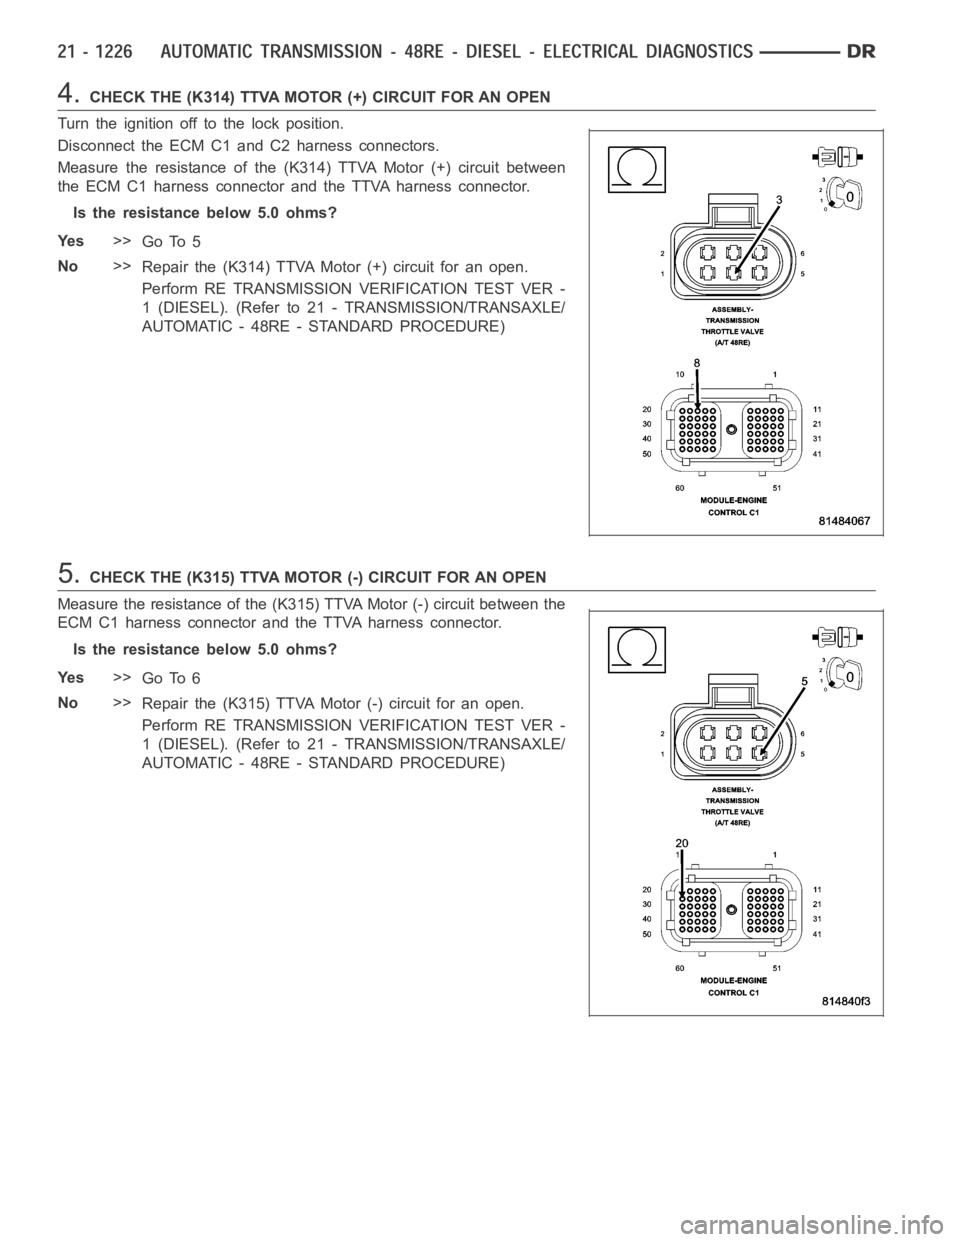
4.CHECK THE (K314) TTVA MOTOR (+) CIRCUIT FOR AN OPEN
Turn the ignition off to the lock position.
Disconnect the ECM C1 and C2 harness connectors.
Measure the resistance of the (K314) TTVA Motor (+) circuit between
the ECM C1 harness connector and the TTVA harness connector.
Is the resistance below 5.0 ohms?
Ye s>>
Go To 5
No>>
Repair the (K314) TTVA Motor (+) circuit for an open.
Perform RE TRANSMISSION VERIFICATION TEST VER -
1 (DIESEL). (Refer to 21 - TRANSMISSION/TRANSAXLE/
AUTOMATIC - 48RE - STANDARD PROCEDURE)
5.CHECK THE (K315) TTVA MOTOR (-) CIRCUIT FOR AN OPEN
Measure the resistance of the (K315) TTVA Motor (-) circuit between the
ECM C1 harness connector and the TTVA harness connector.
Is the resistance below 5.0 ohms?
Ye s>>
Go To 6
No>>
Repair the (K315) TTVA Motor (-) circuit for an open.
Perform RE TRANSMISSION VERIFICATION TEST VER -
1 (DIESEL). (Refer to 21 - TRANSMISSION/TRANSAXLE/
AUTOMATIC - 48RE - STANDARD PROCEDURE)
Page 3748 of 5267
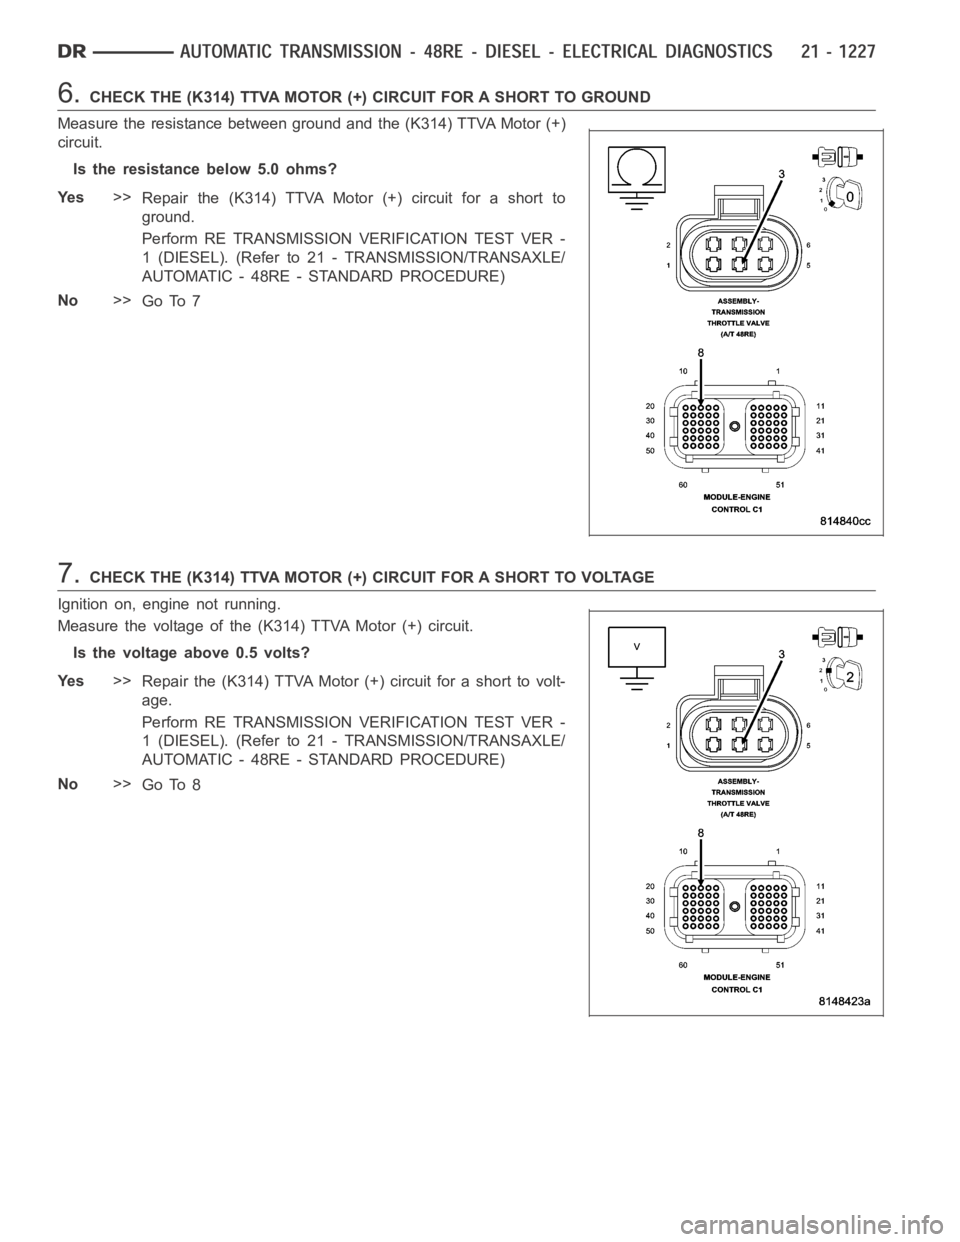
6.CHECK THE (K314) TTVA MOTOR (+) CIRCUIT FOR A SHORT TO GROUND
Measure the resistance between ground and the (K314) TTVA Motor (+)
circuit.
Is the resistance below 5.0 ohms?
Ye s>>
Repair the (K314) TTVA Motor (+) circuit for a short to
ground.
Perform RE TRANSMISSION VERIFICATION TEST VER -
1 (DIESEL). (Refer to 21 - TRANSMISSION/TRANSAXLE/
AUTOMATIC - 48RE - STANDARD PROCEDURE)
No>>
Go To 7
7.CHECK THE (K314) TTVA MOTOR (+) CIRCUIT FOR A SHORT TO VOLTAGE
Ignition on, engine not running.
Measure the voltage of the (K314) TTVA Motor (+) circuit.
Is the voltage above 0.5 volts?
Ye s>>
Repair the (K314) TTVA Motor (+) circuit for a short to volt-
age.
Perform RE TRANSMISSION VERIFICATION TEST VER -
1 (DIESEL). (Refer to 21 - TRANSMISSION/TRANSAXLE/
AUTOMATIC - 48RE - STANDARD PROCEDURE)
No>>
Go To 8
Page 3749 of 5267
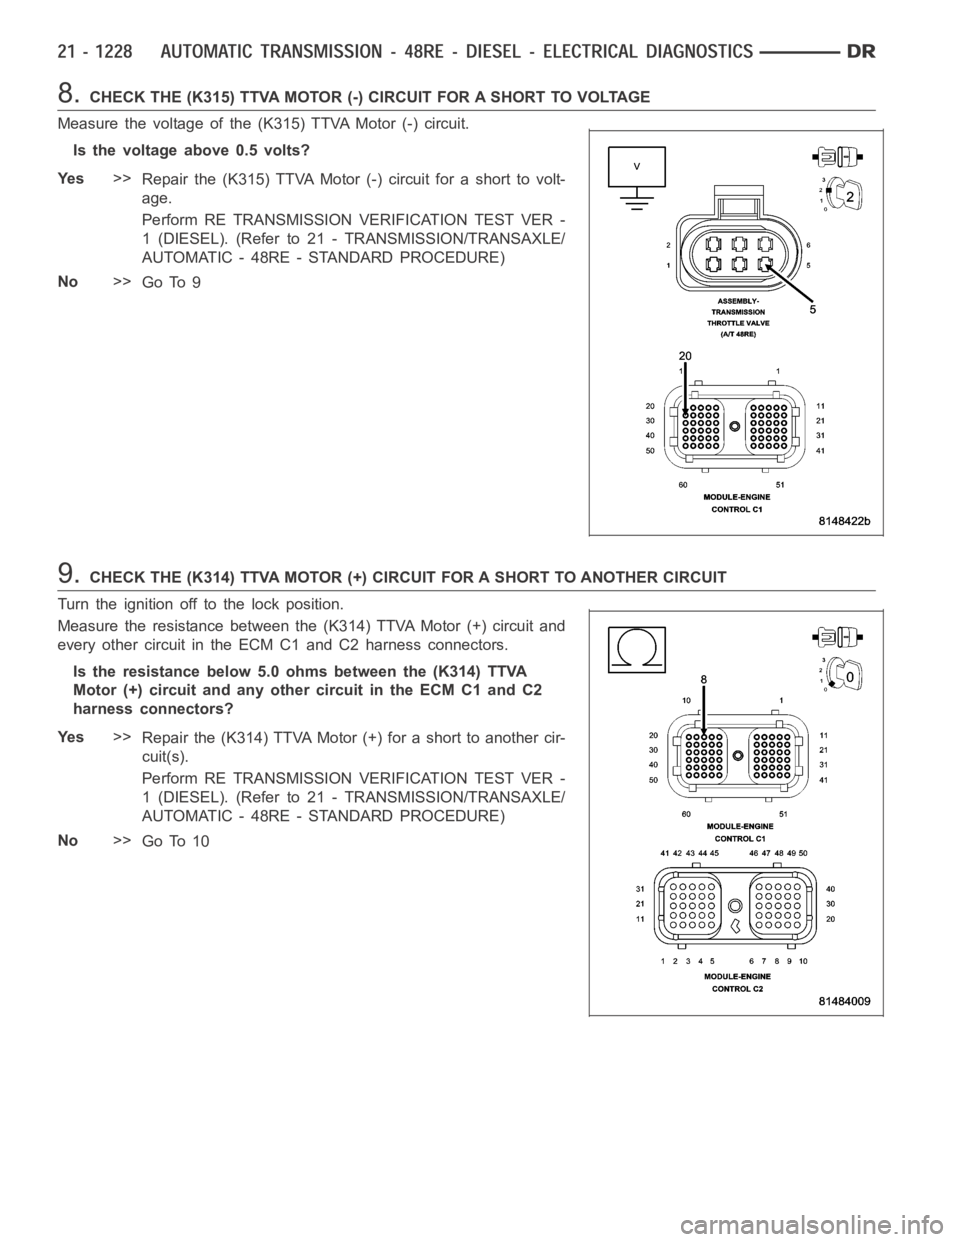
8.CHECK THE (K315) TTVA MOTOR (-) CIRCUIT FOR A SHORT TO VOLTAGE
Measure the voltage of the (K315) TTVA Motor (-) circuit.
Is the voltage above 0.5 volts?
Ye s>>
Repair the (K315) TTVA Motor (-) circuit for a short to volt-
age.
Perform RE TRANSMISSION VERIFICATION TEST VER -
1 (DIESEL). (Refer to 21 - TRANSMISSION/TRANSAXLE/
AUTOMATIC - 48RE - STANDARD PROCEDURE)
No>>
Go To 9
9.CHECK THE (K314) TTVA MOTOR (+) CIRCUIT FOR A SHORT TO ANOTHER CIRCUIT
Turn the ignition off to the lock position.
Measure the resistance between the (K314) TTVA Motor (+) circuit and
every other circuit in the ECM C1 and C2 harness connectors.
Is the resistance below 5.0 ohms between the (K314) TTVA
Motor (+) circuit and any other circuit in the ECM C1 and C2
harness connectors?
Ye s>>
Repair the (K314) TTVA Motor (+) for a short to another cir-
cuit(s).
Perform RE TRANSMISSION VERIFICATION TEST VER -
1 (DIESEL). (Refer to 21 - TRANSMISSION/TRANSAXLE/
AUTOMATIC - 48RE - STANDARD PROCEDURE)
No>>
Go To 10
Page 3750 of 5267
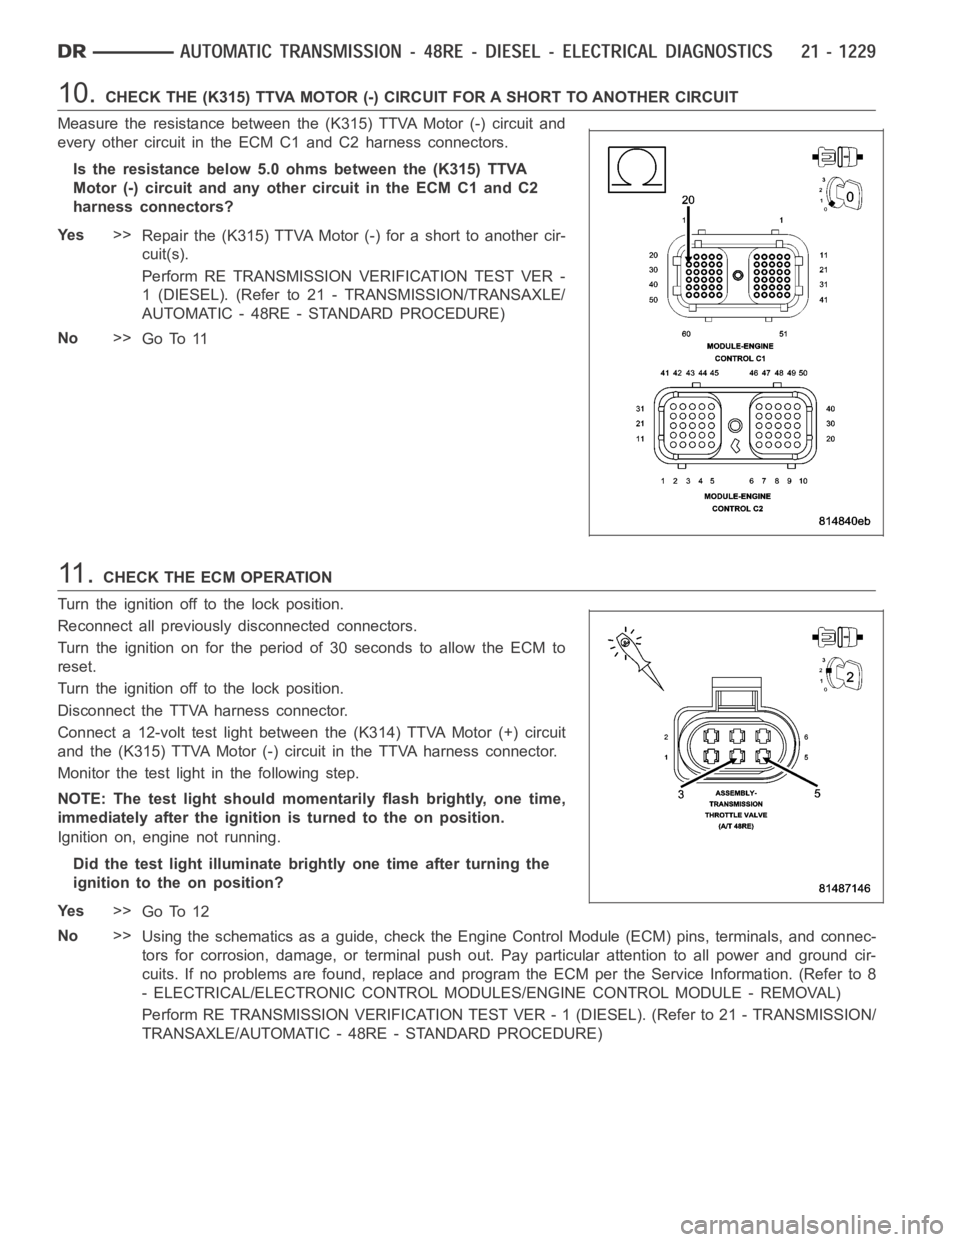
10.CHECK THE (K315) TTVA MOTOR (-) CIRCUIT FOR A SHORT TO ANOTHER CIRCUIT
Measure the resistance between the (K315) TTVA Motor (-) circuit and
every other circuit in the ECM C1 and C2 harness connectors.
Is the resistance below 5.0 ohms between the (K315) TTVA
Motor (-) circuit and any other circuit in the ECM C1 and C2
harness connectors?
Ye s>>
Repair the (K315) TTVA Motor (-) for a short to another cir-
cuit(s).
Perform RE TRANSMISSION VERIFICATION TEST VER -
1 (DIESEL). (Refer to 21 - TRANSMISSION/TRANSAXLE/
AUTOMATIC - 48RE - STANDARD PROCEDURE)
No>>
Go To 11
11 .CHECK THE ECM OPERATION
Turn the ignition off to the lock position.
Reconnect all previously disconnected connectors.
Turntheignitiononfortheperiodof30secondstoallowtheECMto
reset.
Turn the ignition off to the lock position.
Disconnect the TTVA harness connector.
Connect a 12-volt test light between the (K314) TTVA Motor (+) circuit
and the (K315) TTVA Motor (-) circuit in the TTVA harness connector.
Monitor the test light in the following step.
NOTE: The test light should momentarily flash brightly, one time,
immediately after the ignition is turned to the on position.
Ignition on, engine not running.
Did the test light illuminate brightly one time after turning the
ignition to the on position?
Ye s>>
Go To 12
No>>
Using the schematics as a guide, check the Engine Control Module (ECM) pins, terminals, and connec-
tors for corrosion, damage, or terminal push out. Pay particular attentiontoallpowerandgroundcir-
cuits. If no problems are found, replace and program the ECM per the ServiceInformation. (Refer to 8
- ELECTRICAL/ELECTRONIC CONTROL MODULES/ENGINE CONTROL MODULE - REMOVAL)
Perform RE TRANSMISSION VERIFICATION TEST VER - 1 (DIESEL). (Refer to 21 - TRANSMISSION/
TRANSAXLE/AUTOMATIC - 48RE - STANDARD PROCEDURE)
Page 3753 of 5267
Theory of Operation
The Governor Pressure Control System is used to regulate the governor pressure which controls the shifts for first,
second, and third gear. The Governor Pressure Control System test verifies that the requested pressure and the
actual pressure are within a predetermined tolerance.
When Monitored:
While driving and the commanded governor pressure is equal to the pressurerequired for third gear.
Set Condition:
If the governor pressure sensor output is less than 407 kPa (60 psi) or greater than 621 kPa (80 psi) when the
requested pressure is 407 - 621 kPa (60 - 80 psi) for 2.2 seconds. This DTC will set if there are two trips of
five consecutive bad 2.2 second tests with the transmission oil temperature between 23.5 - 88° C (74 - 190°
F).
Possible Causes
OTHER TRANSMISSION DTCS PRESENT
5-VOLT SUPPLY CIRCUIT OPEN - EXTERNAL
5-VOLT SUPPLY CIRCUIT OPEN - INTERNAL
GOVERNOR PRESSURE SENSOR
VA LV E B O D Y
INTERNAL TRANSMISSION
ENGINE CONTROL MODULE
TRANSMISSION - INTERNAL DAMAGE
Always perform the Pre-Diagnostic Troubleshooting procedure before proceeding. (Refer to 21 - TRANSMIS-
SION/TRANSAXLE/AUTOMATIC - 48RE - STANDARD PROCEDURE)
Diagnostic Test
1.CHECK IF OTHER TRANSMISSION DTCS ARE PRESENT
Ignition on, engine not running.
With the scan tool, read Engine DTCs.
Are any other transmission DTCs present?
Ye s>>
Refer to the Transmission category and perform the appropriate symptom(s).
No>>
Go To 2
2.CHECK IF THE GOVERNOR PRESSURE IS ABOVE 3 PSI IN DRIVE
CAUTION: Apply the parking brake.
Start the engine and allow the transmission to reach normal operating temperature above 43° C (110° F).
CAUTION: Apply the brakes.
With the engine at idle, place the gear selector in Drive.
With the scan tool, read the Governor Pressure.
Is the Governor Pressure above 21 kPa (3 psi)?
Ye s>>
Go To 3
No>>
Go To 4
Page 3754 of 5267
3.CHECK IF THE GOVERNOR PRESSURE IS BELOW 3 PSI
Turn the ignition off to the lock position.
Install a pressure gauge at the Governor Pressure test port. (Refer to 21 - TRANSMISSION/TRANSAXLE/AUTO-
MATIC - 48RE - DIAGNOSIS AND TESTING)
NOTE: Use the appropriate pressure gauge for the pressure range measured.
CAUTION: Apply the parking brake.
Start the engine and allow the transmission to reach normal operating temperature above 43° C (110° F).
CAUTION: Apply the brakes.
With the engine at idle, place the gear selector in Drive.
Read the governor pressure on the pressure gauge.
Is the governor pressure on the pressure gauge below 21 kPa (3 psi) with the engine at idle and the
gear selector in Drive?
Ye s>>
The Governor Pressure Solenoid is functioning properly. Go To 7
No>>
Go To 10
4.GOVERNOR PRESSURE BETWEEN 40-55 WITH RELAY REMOVED
Place the gear selector in Park.
Turn the ignition off to the lock position.
Disconnect the TIPM C1 connector.
Start the engine and allow the transmission to reach normal operating temperature above 43° C (110° F).
WARNING: Do not wear loose clothing or jewelry when working on or near a running engine. Failure to
follow these instructions can result in personal injury or death.
NOTE: Disconnecting the TIPM connector may set various DTCs. Disregard anyDTCthatmaysetdueto
disconnecting the connector.
CAUTION: Apply the brakes.
Place the gear selector in Drive and allow the engine to idle for 30 seconds.
With the scan tool, read the Actual Governor Pressure at idle.
Is the governor pressure on the scan tool between 276 - 379 kPa (40 - 55 psi)?
Ye s>>
Go To 5
No>>
Go To 6
5.GOVERNOR PRESSURE SOLENOID
Turn the ignition off to the lock position.
Replace the Governor Pressure Solenoid per the Service Information. (Refer to 21 - TRANSMISSION/TRANSAXLE/
AUTOMATIC - 48RE/GOVERNOR PRESSURE SENSOR - REMOVAL)
Start the engine and allow the transmission to reach normal operating temperature above 43° C (110° F).
With the scan tool, monitor the target governor pressure and actual governor pressure.
Drivethevehicleataconstantspeed40-48Km/h(25-30MPH).
NOTE: The Actual Governor Pressure should be within 21 kPa (3 psi) of the Target Governor Pressure
within 3 seconds.
Is the Actual Governor Pressure within 21 kPa (3 psi) of the Target GovernorPressure?
Ye s>>
Go To 13
No>>
Repair internal transmission leak. Inspect all components pertaining tothe Governor Pressure Sensor
and the Governor Pressure Solenoid. (Refer to 21 - TRANSMISSION/TRANSAXLE/AUTOMATIC -
48RE/GOVERNOR PRESSURE SENSOR - REMOVAL)
Perform RE TRANSMISSION VERIFICATION TEST VER - 1 (DIESEL). (Refer to 21 - TRANSMISSION/
TRANSAXLE/AUTOMATIC - 48RE - STANDARD PROCEDURE)