2006 DODGE RAM SRT-10 battery
[x] Cancel search: batteryPage 5148 of 5267
INSTALLATION
3.7L/4.7L/5.7L ENGINES
NOTE: If the A/C condenser is being replaced, add 30 milliliters (1 fluid ounce) of refrigerant oil to the refrig-
erant system. Use only refrigerant oil of the type recommended for the A/C compressor in the vehicle.
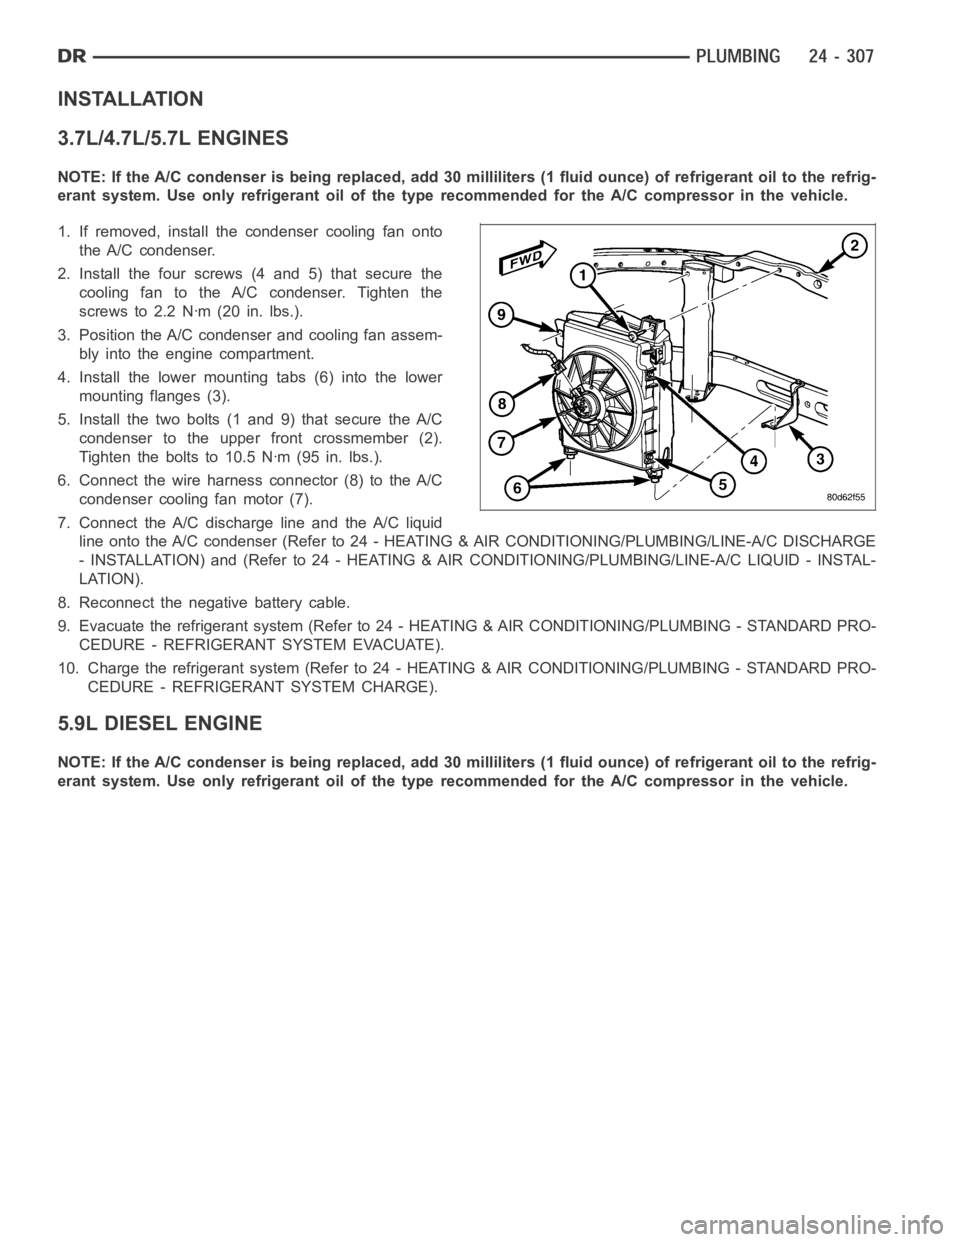
1. If removed, install the condenser cooling fan onto
the A/C condenser.
2. Install the four screws (4 and 5) that secure the
cooling fan to the A/C condenser. Tighten the
screws to 2.2 Nꞏm (20 in. lbs.).
3. Position the A/C condenser and cooling fan assem-
bly into the engine compartment.
4. Install the lower mounting tabs (6) into the lower
mounting flanges (3).
5. Install the two bolts (1 and 9) that secure the A/C
condenser to the upper front crossmember (2).
Tighten the bolts to 10.5 Nꞏm (95 in. lbs.).
6. Connect the wire harness connector (8) to the A/C
condenser cooling fan motor (7).
7. Connect the A/C discharge line and the A/C liquid
line onto the A/C condenser (Refer to 24 - HEATING & AIR CONDITIONING/PLUMBING/LINE-A/C DISCHARGE
- INSTALLATION) and (Refer to 24 - HEATING & AIR CONDITIONING/PLUMBING/LINE-A/C LIQUID - INSTAL-
LATION).
8. Reconnect the negative battery cable.
9. Evacuate the refrigerant system (Refer to 24 - HEATING & AIR CONDITIONING/PLUMBING - STANDARD PRO-
CEDURE - REFRIGERANT SYSTEM EVACUATE).
10. Charge the refrigerant system (Refer to 24 - HEATING & AIR CONDITIONING/PLUMBING - STANDARD PRO-
CEDURE - REFRIGERANT SYSTEM CHARGE).
5.9L DIESEL ENGINE
NOTE: If the A/C condenser is being replaced, add 30 milliliters (1 fluid ounce) of refrigerant oil to the refrig-
erant system. Use only refrigerant oil of the type recommended for the A/C compressor in the vehicle.
Page 5149 of 5267
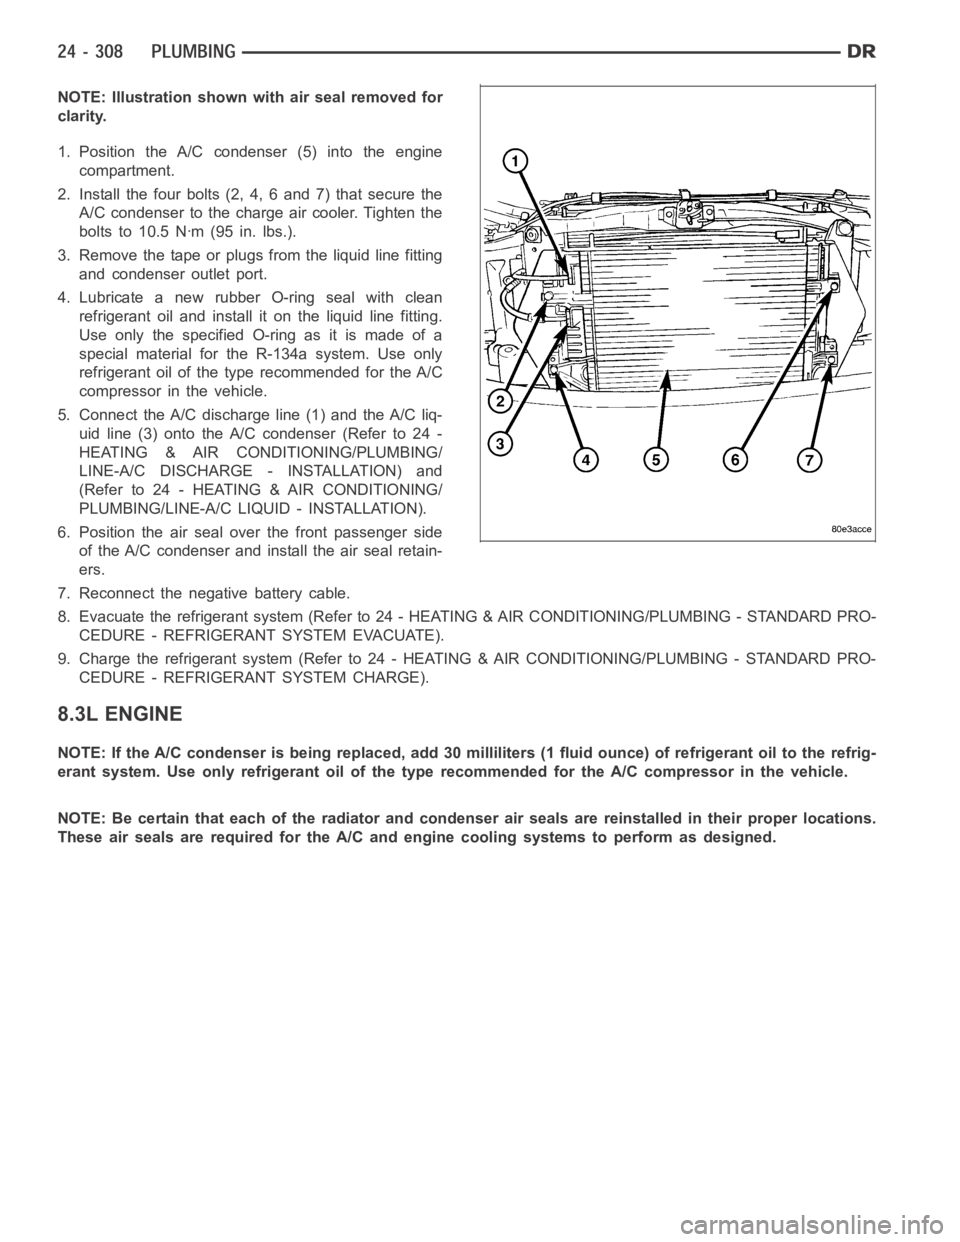
NOTE: Illustration shown with air seal removed for
clarity.
1. Position the A/C condenser (5) into the engine
compartment.
2. Install the four bolts (2, 4, 6 and 7) that secure the
A/C condenser to the charge air cooler. Tighten the
bolts to 10.5 Nꞏm (95 in. lbs.).
3. Remove the tape or plugs from the liquid line fitting
and condenser outlet port.
4. Lubricate a new rubber O-ring seal with clean
refrigerant oil and install it on the liquid line fitting.
UseonlythespecifiedO-ringasitismadeofa
special material for the R-134a system. Use only
refrigerant oil of the type recommended for the A/C
compressor in the vehicle.
5. Connect the A/C discharge line (1) and the A/C liq-
uid line (3) onto the A/C condenser (Refer to 24 -
HEATING & AIR CONDITIONING/PLUMBING/
LINE-A/C DISCHARGE - INSTALLATION) and
(Refer to 24 - HEATING & AIR CONDITIONING/
PLUMBING/LINE-A/C LIQUID - INSTALLATION).
6. Position the air seal over the front passenger side
of the A/C condenser and install the air seal retain-
ers.
7. Reconnect the negative battery cable.
8. Evacuate the refrigerant system (Refer to 24 - HEATING & AIR CONDITIONING/PLUMBING - STANDARD PRO-
CEDURE - REFRIGERANT SYSTEM EVACUATE).
9. Charge the refrigerant system (Refer to 24 - HEATING & AIR CONDITIONING/PLUMBING - STANDARD PRO-
CEDURE - REFRIGERANT SYSTEM CHARGE).
8.3L ENGINE
NOTE: If the A/C condenser is being replaced, add 30 milliliters (1 fluid ounce) of refrigerant oil to the refrig-
erant system. Use only refrigerant oil of the type recommended for the A/C compressor in the vehicle.
NOTE: Be certain that each of the radiator and condenser air seals are reinstalled in their proper locations.
These air seals are required for the A/C and engine cooling systems to perform as designed.
Page 5150 of 5267
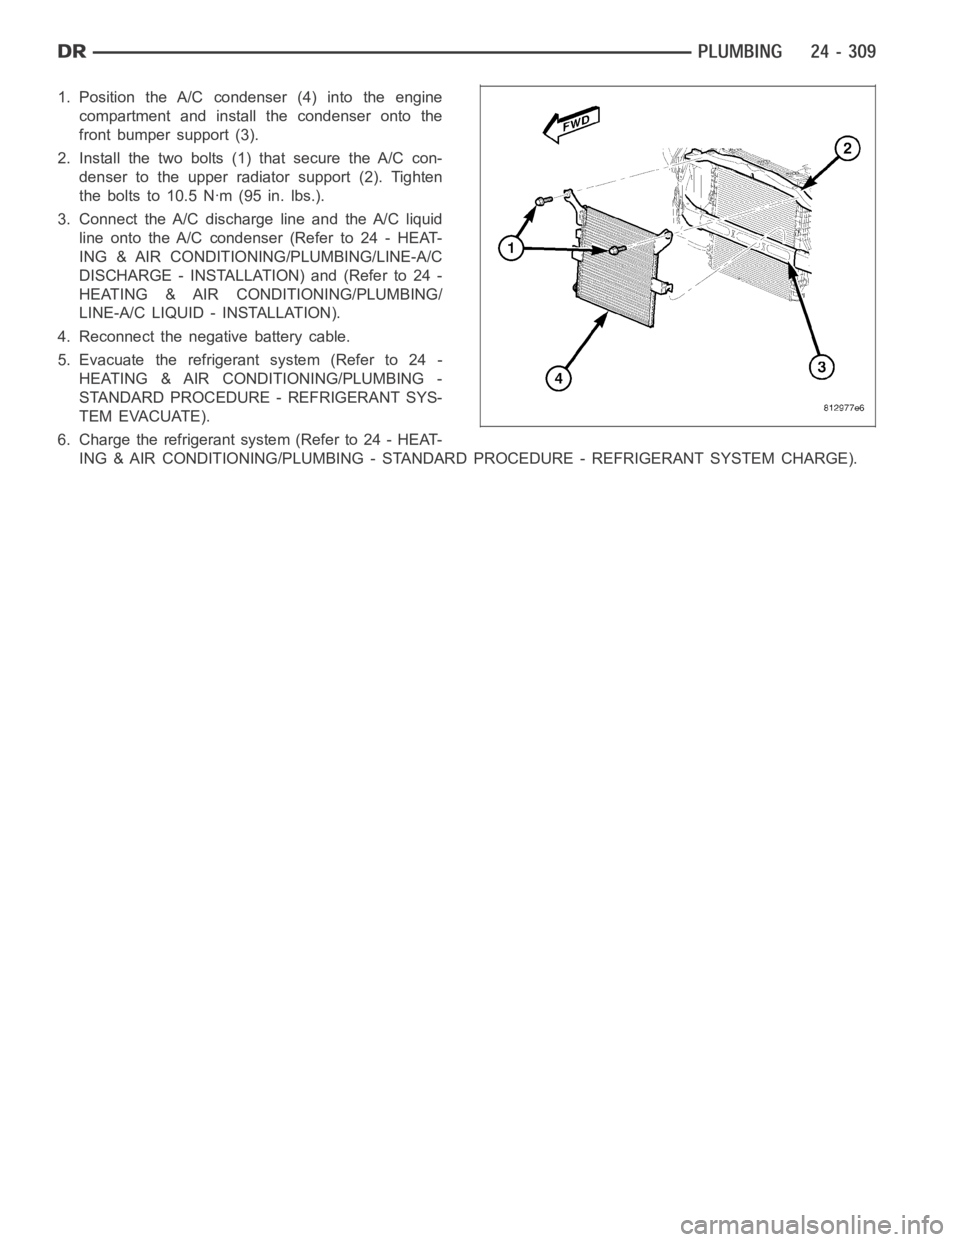
1. Position the A/C condenser (4) into the engine
compartment and install the condenser onto the
front bumper support (3).
2. Install the two bolts (1) that secure the A/C con-
denser to the upper radiator support (2). Tighten
the bolts to 10.5 Nꞏm (95 in. lbs.).
3. Connect the A/C discharge line and the A/C liquid
line onto the A/C condenser(Referto24-HEAT-
ING & AIR CONDITIONING/PLUMBING/LINE-A/C
DISCHARGE - INSTALLATION) and (Refer to 24 -
HEATING & AIR CONDITIONING/PLUMBING/
LINE-A/C LIQUID - INSTALLATION).
4. Reconnect the negative battery cable.
5. Evacuate the refrigerant system (Refer to 24 -
HEATING & AIR CONDITIONING/PLUMBING -
STANDARD PROCEDURE - REFRIGERANT SYS-
TEM EVACUATE).
6. Charge the refrigerant system (Refer to 24 - HEAT-
ING & AIR CONDITIONING/PLUMBING - STANDARD PROCEDURE - REFRIGERANT SYSTEM CHARGE).
Page 5151 of 5267
CORE-HEATER
DESCRIPTION
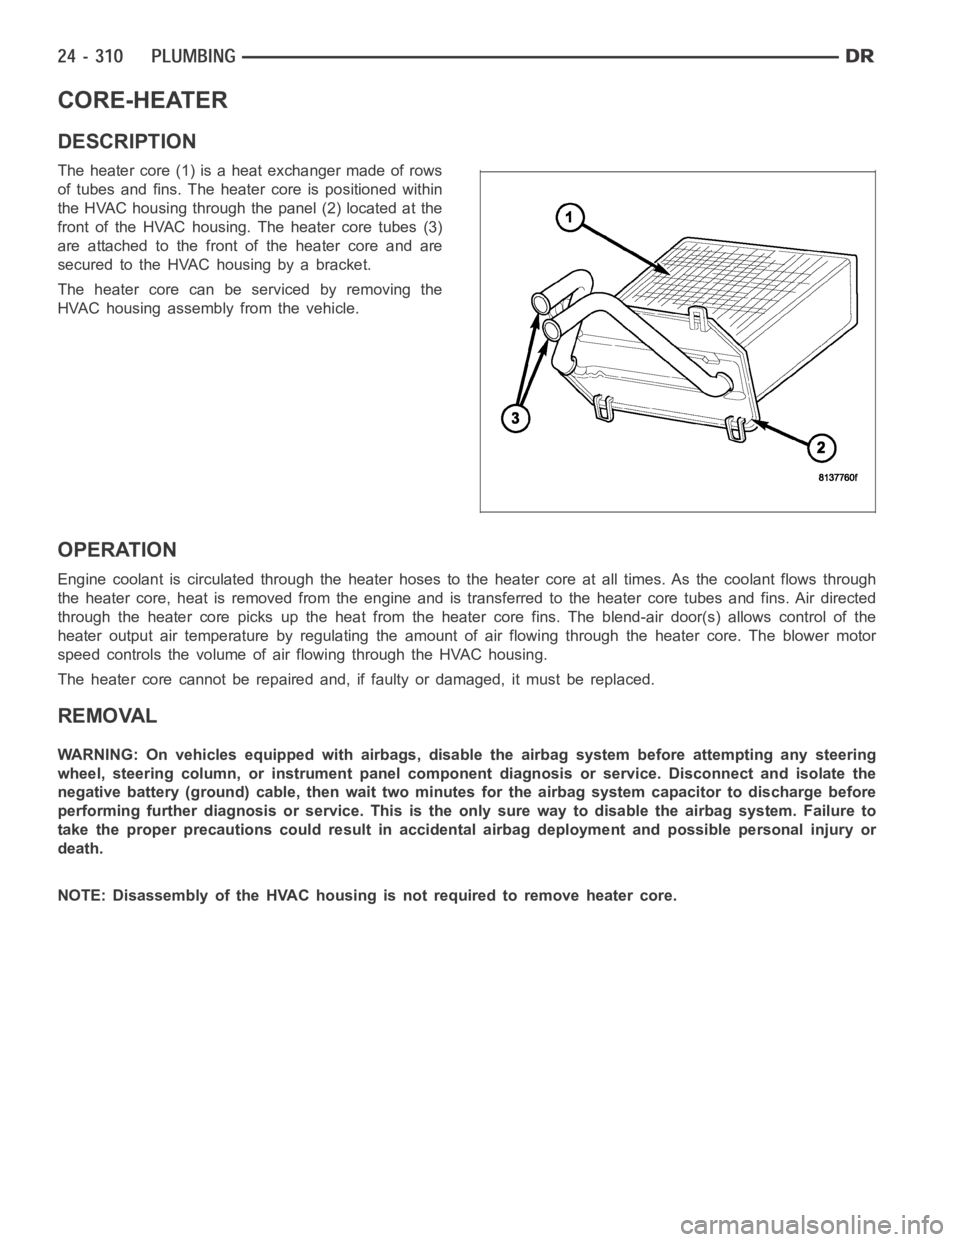
The heater core (1) is a heat exchanger made of rows
of tubes and fins. The heater core is positioned within
the HVAC housing through the panel (2) located at the
front of the HVAC housing. The heater core tubes (3)
are attached to the front of the heater core and are
secured to the HVAC housing by a bracket.
The heater core can be serviced by removing the
HVAC housing assembly from the vehicle.
OPERATION
Engine coolant is circulated through the heater hoses to the heater core atall times. As the coolant flows through
the heater core, heat is removed from the engine and is transferred to the heater core tubes and fins. Air directed
through the heater core picks up the heat from the heater core fins. The blend-air door(s) allows control of the
heater output air temperature by regulating the amount of air flowing through the heater core. The blower motor
speed controls the volume of air flowing through the HVAC housing.
The heater core cannot be repaired and, if faulty or damaged, it must be replaced.
REMOVAL
WARNING: On vehicles equipped with airbags, disable the airbag system before attempting any steering
wheel, steering column, or instrument panel component diagnosis or service. Disconnect and isolate the
negative battery (ground) cable, then wait two minutes for the airbag system capacitor to discharge before
performing further diagnosis or service. This is the only sure way to disable the airbag system. Failure to
take the proper precautions could result in accidental airbag deploymentand possible personal injury or
death.
NOTE: Disassembly of the HVAC housing is not required to remove heater core.
Page 5160 of 5267
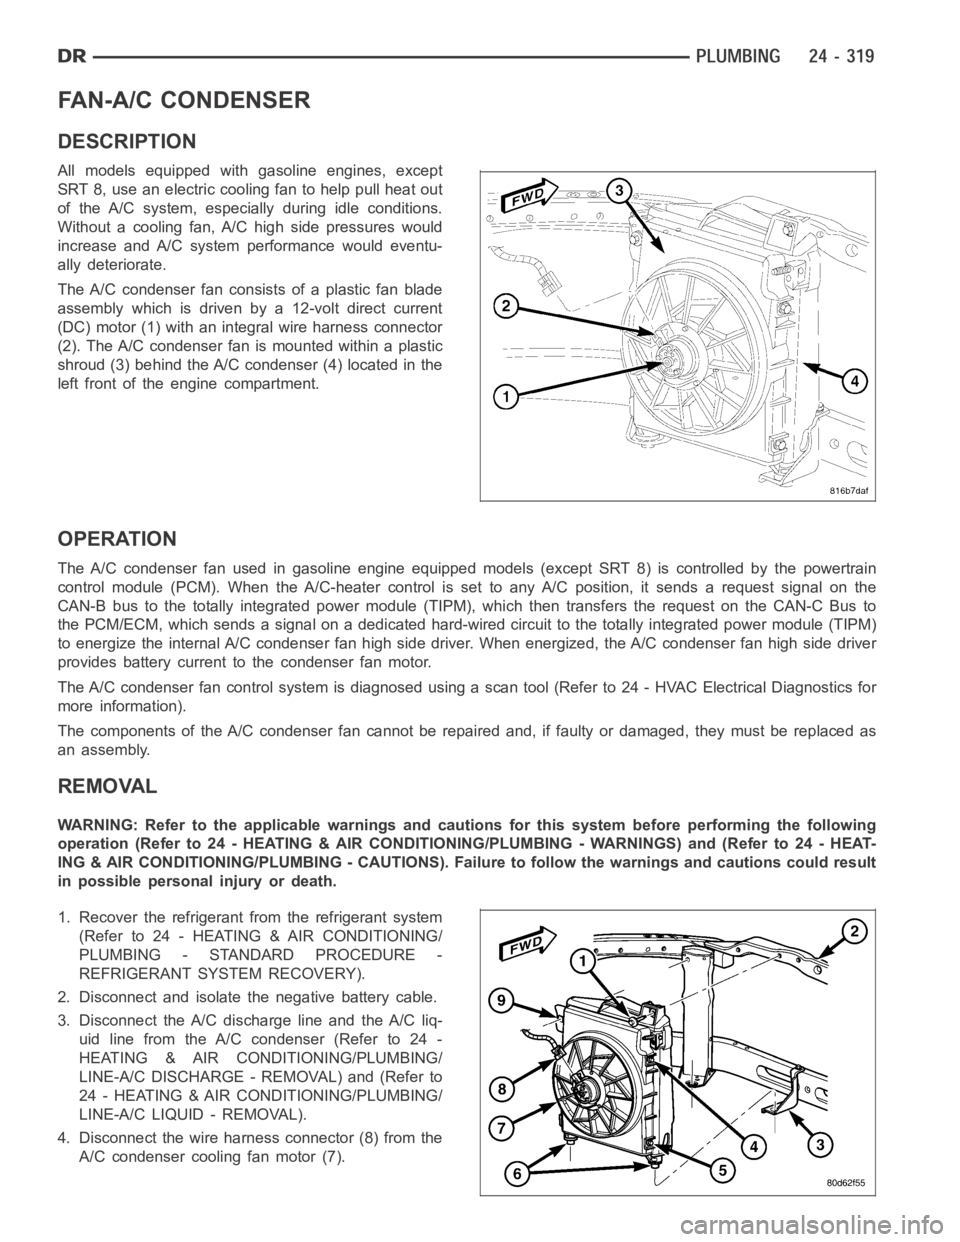
FAN-A/C CONDENSER
DESCRIPTION
All models equipped with gasoline engines, except
SRT 8, use an electric cooling fan to help pull heat out
of the A/C system, especially during idle conditions.
Without a cooling fan, A/C high side pressures would
increase and A/C system performance would eventu-
ally deteriorate.
The A/C condenser fan consists of a plastic fan blade
assembly which is driven by a 12-volt direct current
(DC) motor (1) with an integral wire harness connector
(2). The A/C condenser fan is mounted within a plastic
shroud (3) behind the A/C condenser (4) located in the
left front of the engine compartment.
OPERATION
The A/C condenser fan used in gasoline engine equipped models (except SRT 8) is controlled by the powertrain
control module (PCM). When the A/C-heater control is set to any A/C position, it sends a request signal on the
CAN-B bus to the totally integrated power module (TIPM), which then transfers the request on the CAN-C Bus to
the PCM/ECM, which sends a signal on a dedicated hard-wired circuit to the totally integrated power module (TIPM)
to energize the internal A/C condenser fan high side driver. When energized, the A/C condenser fan high side driver
provides battery current to the condenser fan motor.
The A/C condenser fan control system isdiagnosed using a scan tool (Refer to 24 - HVAC Electrical Diagnostics for
more information).
The components of the A/C condenser fan cannot be repaired and, if faulty ordamaged, they must be replaced as
an assembly.
REMOVAL
WARNING: Refer to the applicable warnings and cautions for this system before performing the following
operation (Refer to 24 - HEATING & AIR CONDITIONING/PLUMBING - WARNINGS) and (Refer to 24 - HEAT-
ING & AIR CONDITIONING/PLUMBING - CAUTIONS). Failure to follow the warnings and cautions could result
in possible personal injury or death.
1. Recover the refrigerant from the refrigerant system
(Refer to 24 - HEATING & AIR CONDITIONING/
PLUMBING - STANDARD PROCEDURE -
REFRIGERANT SYSTEM RECOVERY).
2. Disconnect and isolate the negative battery cable.
3. Disconnect the A/C discharge line and the A/C liq-
uidlinefromtheA/Ccondenser(Referto24-
HEATING & AIR CONDITIONING/PLUMBING/
LINE-A/C DISCHARGE - REMOVAL) and (Refer to
24 - HEATING & AIR CONDITIONING/PLUMBING/
LINE-A/C LIQUID - REMOVAL).
4. Disconnect the wire harness connector (8) from the
A/C condenser cooling fan motor (7).
Page 5161 of 5267
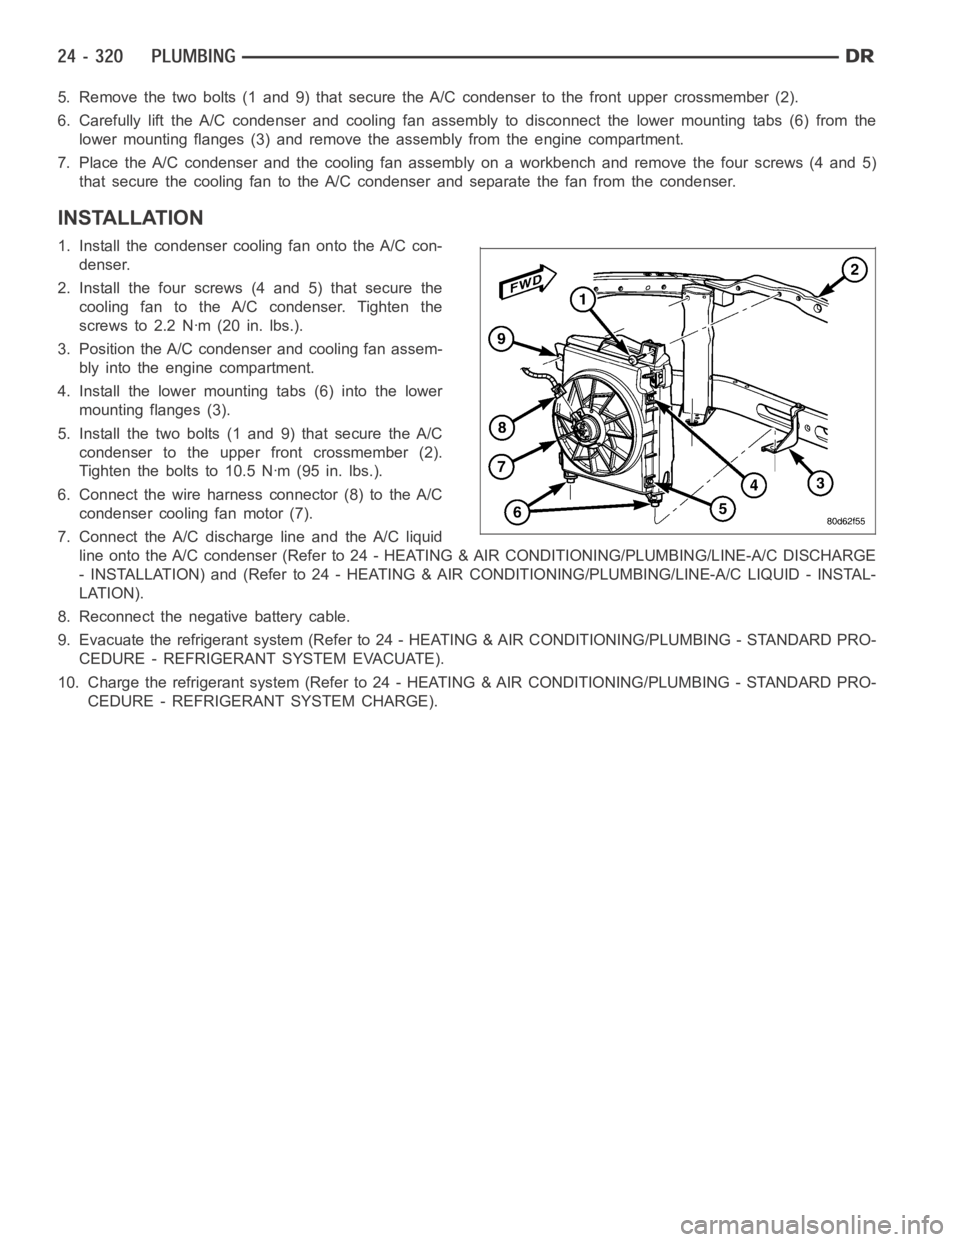
5. Remove the two bolts (1 and 9) that secure the A/C condenser to the front upper crossmember (2).
6. Carefully lift the A/C condenser and cooling fan assembly to disconnectthe lower mounting tabs (6) from the
lower mounting flanges (3) and remove the assembly from the engine compartment.
7. Place the A/C condenser and the cooling fan assembly on a workbench and remove the four screws (4 and 5)
that secure the cooling fan to the A/C condenser and separate the fan from the condenser.
INSTALLATION
1. Install the condenser cooling fan onto the A/C con-
denser.
2. Install the four screws (4 and 5) that secure the
cooling fan to the A/C condenser. Tighten the
screws to 2.2 Nꞏm (20 in. lbs.).
3. Position the A/C condenser and cooling fan assem-
bly into the engine compartment.
4. Install the lower mounting tabs (6) into the lower
mounting flanges (3).
5. Install the two bolts (1 and 9) that secure the A/C
condenser to the upper front crossmember (2).
Tighten the bolts to 10.5 Nꞏm (95 in. lbs.).
6. Connect the wire harness connector (8) to the A/C
condenser cooling fan motor (7).
7. Connect the A/C discharge line and the A/C liquid
line onto the A/C condenser (Refer to 24 - HEATING & AIR CONDITIONING/PLUMBING/LINE-A/C DISCHARGE
- INSTALLATION) and (Refer to 24 - HEATING & AIR CONDITIONING/PLUMBING/LINE-A/C LIQUID - INSTAL-
LATION).
8. Reconnect the negative battery cable.
9. Evacuate the refrigerant system (Refer to 24 - HEATING & AIR CONDITIONING/PLUMBING - STANDARD PRO-
CEDURE - REFRIGERANT SYSTEM EVACUATE).
10. Charge the refrigerant system (Refer to 24 - HEATING & AIR CONDITIONING/PLUMBING - STANDARD PRO-
CEDURE - REFRIGERANT SYSTEM CHARGE).
Page 5162 of 5267
LINE-A/C DISCHARGE
DESCRIPTION
The A/C discharge line is the refrigerant line that goes from the A/C compressor to the A/C condenser and has an
integral fitting for the A/C pressure transducer (Refer to 24 - HEATING & AIR CONDITIONING/CONTROLS/TRANS-
DUCER-A/C PRESSURE - DESCRIPTION).
The A/C discharge line for the 5.9L Diesel engine is serviced as an assemblywith the suction line.
The A/C discharge line for the 8.3L engine is secured to the top of fan shroudby two retainers.
CAUTION: Use only O-ring seals specified for the vehicle. Failure to use correct O-ring seal will cause the
refrigerant system connection to leak.
The A/C discharge line has no serviceable parts except the rubber O-ring seals. The O-ring seals used on the
connections are made from a special type of rubber not affected by R-134a refrigerant. The O-ring seals must be
replaced whenever the A/C discharge line is removed and installed.
If the A/C discharge line is found to be leaking or is damaged, it must be replaced.
REMOVAL
3.7L/4.7L ENGINES
WARNING: Refer to the applicable warnings and cautions for this system before performing the following
operation (Refer to 24 - HEATING & AIR CONDITIONING/PLUMBING - WARNINGS) and (Refer to 24 - HEAT-
ING & AIR CONDITIONING/PLUMBING - CAUTIONS). Failure to follow the warnings and cautions could result
in possible personal injury or death.
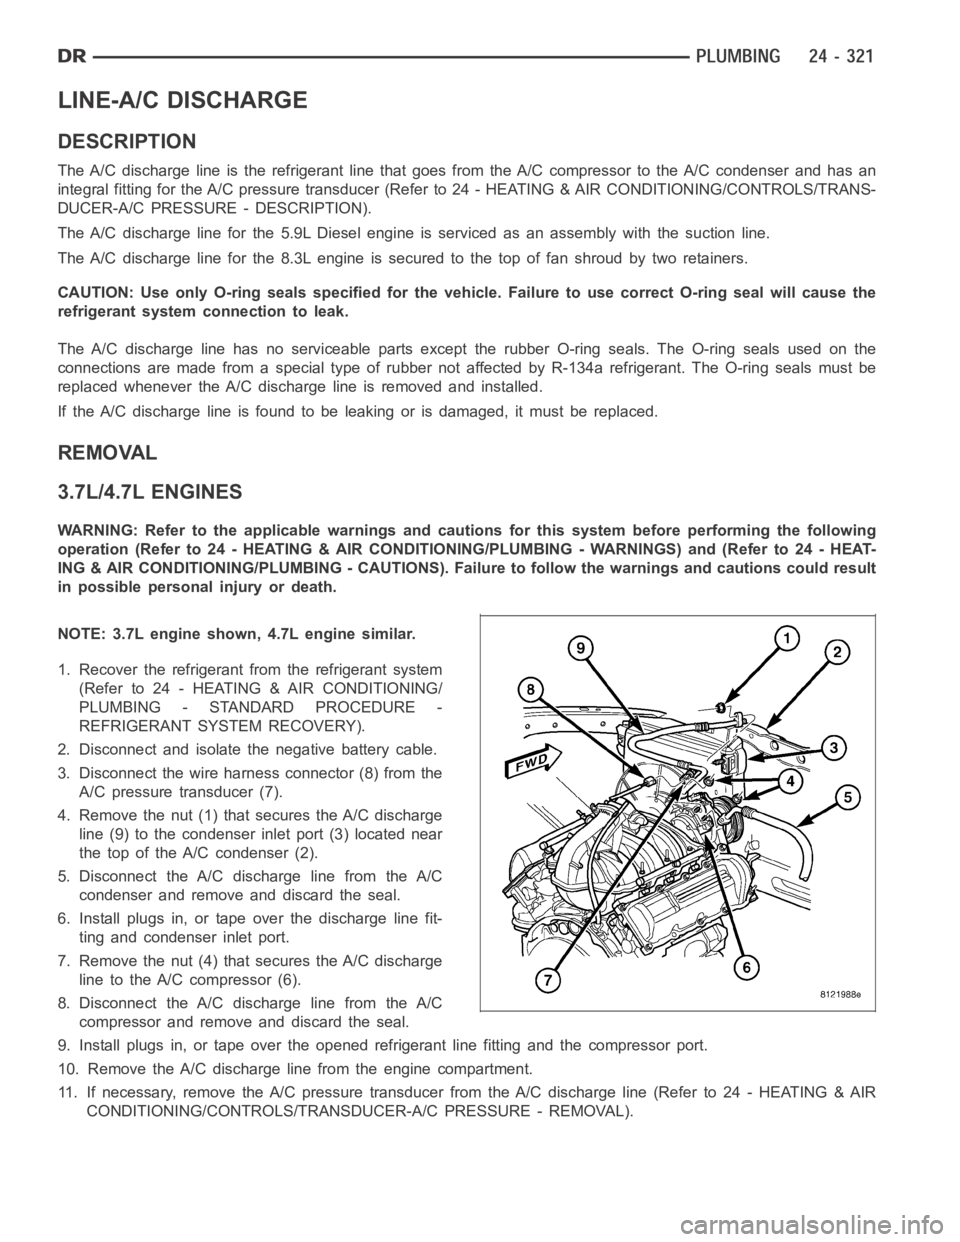
NOTE: 3.7L engine shown, 4.7L engine similar.
1. Recover the refrigerant from the refrigerant system
(Refer to 24 - HEATING & AIR CONDITIONING/
PLUMBING - STANDARD PROCEDURE -
REFRIGERANT SYSTEM RECOVERY).
2. Disconnect and isolate the negative battery cable.
3. Disconnect the wire harness connector (8) from the
A/C pressure transducer (7).
4. Remove the nut (1) that secures the A/C discharge
line (9) to the condenser inlet port (3) located near
the top of the A/C condenser (2).
5. Disconnect the A/C discharge line from the A/C
condenser and remove and discard the seal.
6. Install plugs in, or tape over the discharge line fit-
ting and condenser inlet port.
7. Remove the nut (4) that secures the A/C discharge
line to the A/C compressor (6).
8. Disconnect the A/C discharge line from the A/C
compressor and remove and discard the seal.
9. Install plugs in, or tape over the opened refrigerant line fitting and the compressor port.
10. Remove the A/C discharge line from the engine compartment.
11. If necessary, remove the A/C pressure transducer from the A/C dischargeline(Referto24-HEATING&AIR
CONDITIONING/CONTROLS/TRANSDUCER-A/C PRESSURE - REMOVAL).
Page 5163 of 5267
5.7L ENGINE
WARNING: Refer to the applicable warnings and cautions for this system before performing the following
operation (Refer to 24 - HEATING & AIR CONDITIONING/PLUMBING - WARNINGS) and (Refer to 24 - HEAT-
ING & AIR CONDITIONING/PLUMBING - CAUTIONS). Failure to follow the warnings and cautions could result
in possible personal injury or death.
1. Recover the refrigerant from the refrigerant system
(Refer to 24 - HEATING & AIR CONDITIONING/
PLUMBING - STANDARD PROCEDURE -
REFRIGERANT SYSTEM RECOVERY).
2. Disconnect and isolate the negative battery cable.
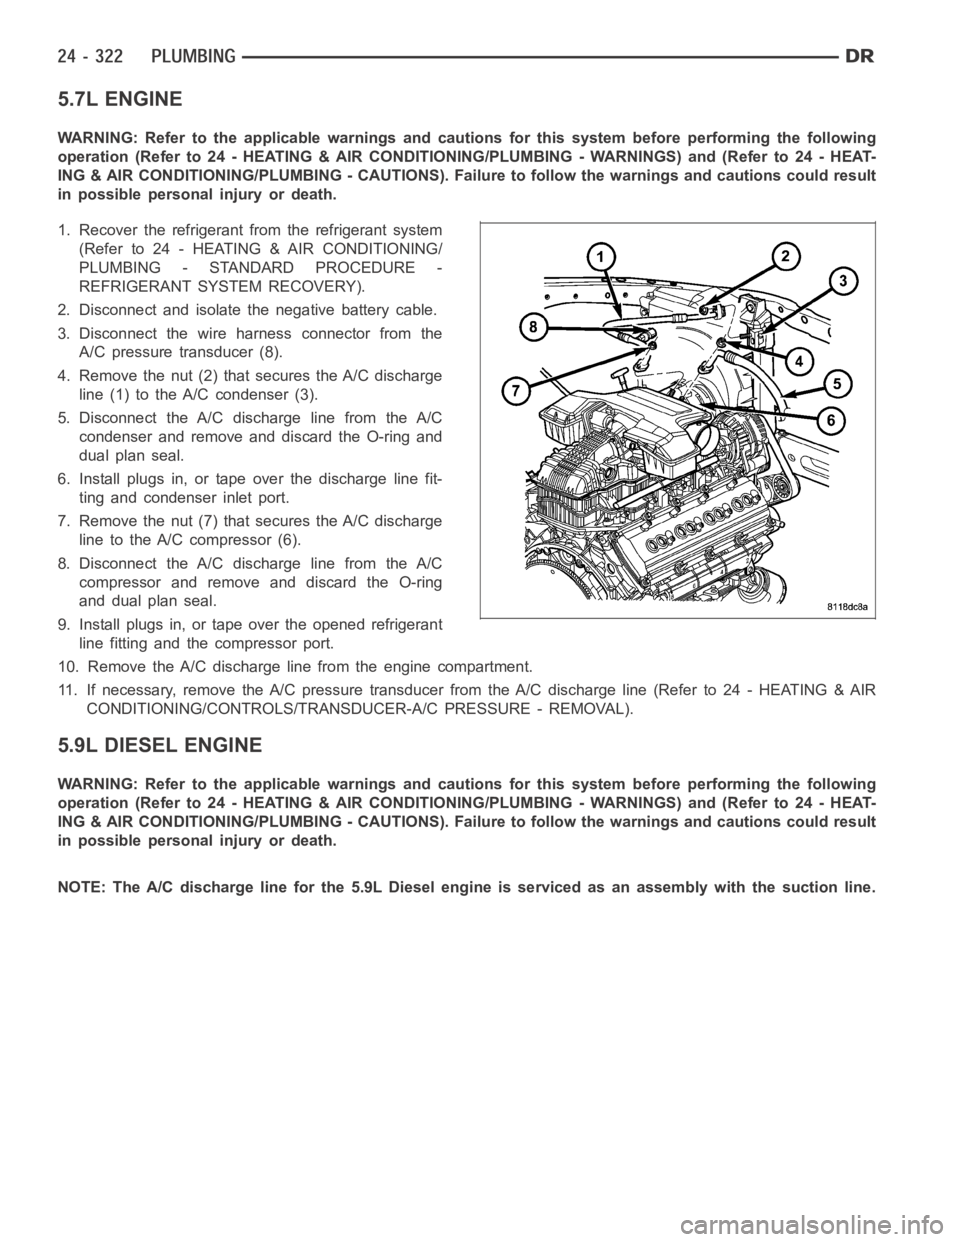
3. Disconnect the wire harness connector from the
A/C pressure transducer (8).
4. Remove the nut (2) that secures the A/C discharge
line (1) to the A/C condenser (3).
5. Disconnect the A/C discharge line from the A/C
condenser and remove and discard the O-ring and
dual plan seal.
6. Install plugs in, or tape over the discharge line fit-
ting and condenser inlet port.
7. Remove the nut (7) that secures the A/C discharge
line to the A/C compressor (6).
8. Disconnect the A/C discharge line from the A/C
compressor and remove and discard the O-ring
and dual plan seal.
9. Install plugs in, or tape over the opened refrigerant
line fitting and the compressor port.
10. Remove the A/C discharge line from the engine compartment.
11. If necessary, remove the A/C pressure transducer from the A/C dischargeline(Referto24-HEATING&AIR
CONDITIONING/CONTROLS/TRANSDUCER-A/C PRESSURE - REMOVAL).
5.9L DIESEL ENGINE
WARNING: Refer to the applicable warnings and cautions for this system before performing the following
operation (Refer to 24 - HEATING & AIR CONDITIONING/PLUMBING - WARNINGS) and (Refer to 24 - HEAT-
ING & AIR CONDITIONING/PLUMBING - CAUTIONS). Failure to follow the warnings and cautions could result
in possible personal injury or death.
NOTE: The A/C discharge line for the 5.9L Diesel engine is serviced as an assembly with the suction line.