Page 1703 of 2893
���� Front door
20-2920-29
Front and Rear Door Position
Adjustment
12 mm (0.47 in.)
0.5m(19in.)
300 mm (12 in.) B
C
A
D
8x1.25mm
29 N·m
(3.0 kgf")
���
���
�(�#�'�����������
���
�����������������"�����)���� Front door
20-2920-29
Front and Rear Door Position
Adjustment
12 mm (0.47 in.)
0.5m(19in.)
300 mm (12 in.) B
C
A
D
8x1.25mm
29 N·m
(3.0 kgf·m,
22 lbf·ft)
F
8x1.25mm
29 N·m
(3.0 kgf·m,
22 lbf·ft)
A
B C
7. Attach the plastic cover making sure it its sealed
around its outside perimeter to seal out water.
8. Reinstall the door panel: Front door (see page 20-9)
Rear door (see page 20-19)
9. Check for water leaks. Run water over the roof and on the sealing area as shown, and note these items:
Use a 12 mm (0.47 in.) diameter hose (A).
Adjust the rate of water flow as shown (B).
Do not use a nozzle.
Hold the hose about 300 mm (12 in.) away from the door (C). NOTE: Check for a flush fit with the body, then check for
equal gaps between the front, rear, and bottom door
edges and the body. Check that the door and the body
edges are parallel. If necessary, replace the mounting
bolts before adjusting the door position.
1. Place the vehicle on a firm, level surface when adjusting the doors.
2. Adjust at the hinges (A): Pad a floor jack (B) with shop towels (C), then usethe jack to support the door to prevent damage to
the door while adjusting it.
On the front door: Remove the front inner fender (see page 20-171). Loosen the hinge m ounting
bolts (D) slightly, and move the door backward or
forward, up or down as necessary to equalize the
gaps.
On the rear door: Loosen the hinge mounting bolts (E) slightly, and move the door backward or
forward, up or down as necessary to equalize the
gaps.
(cont’d)
08/08/21 15:00:01 61SNR030_200_0031
ProCarManuals.com
DYNOMITE -2009-
Page 1704 of 2893
���� Front door
20-2920-29
Front and Rear Door Position
Adjustment
12 mm (0.47 in.)
0.5m(19in.)
300 mm (12 in.) B
C
A
D
8x1.25mm
29 N·m
(3.0 kgf")
���
���
�(�#�'�����������
���
�����������������"�����)���� Front door
20-2920-29
Front and Rear Door Position
Adjustment
12 mm (0.47 in.)
0.5m(19in.)
300 mm (12 in.) B
C
A
D
8x1.25mm
29 N·m
(3.0 kgf·m,
22 lbf·ft)
F
8x1.25mm
29 N·m
(3.0 kgf·m,
22 lbf·ft)
A
B C
7. Attach the plastic cover making sure it its sealed
around its outside perimeter to seal out water.
8. Reinstall the door panel: Front door (see page 20-9)
Rear door (see page 20-19)
9. Check for water leaks. Run water over the roof and on the sealing area as shown, and note these items:
Use a 12 mm (0.47 in.) diameter hose (A).
Adjust the rate of water flow as shown (B).
Do not use a nozzle.
Hold the hose about 300 mm (12 in.) away from the door (C). NOTE: Check for a flush fit with the body, then check for
equal gaps between the front, rear, and bottom door
edges and the body. Check that the door and the body
edges are parallel. If necessary, replace the mounting
bolts before adjusting the door position.
1. Place the vehicle on a firm, level surface when adjusting the doors.
2. Adjust at the hinges (A): Pad a floor jack (B) with shop towels (C), then usethe jack to support the door to prevent damage to
the door while adjusting it.
On the front door: Remove the front inner fender (see page 20-171). Loosen the hinge m ounting
bolts (D) slightly, and move the door backward or
forward, up or down as necessary to equalize the
gaps.
On the rear door: Loosen the hinge mounting bolts (E) slightly, and move the door backward or
forward, up or down as necessary to equalize the
gaps.
(cont’d)
08/08/21 15:00:01 61SNR030_200_0031
ProCarManuals.com
DYNOMITE -2009-
Page 1706 of 2893
���
�(�#�'�����������
���
���������
�����
�"�����)����
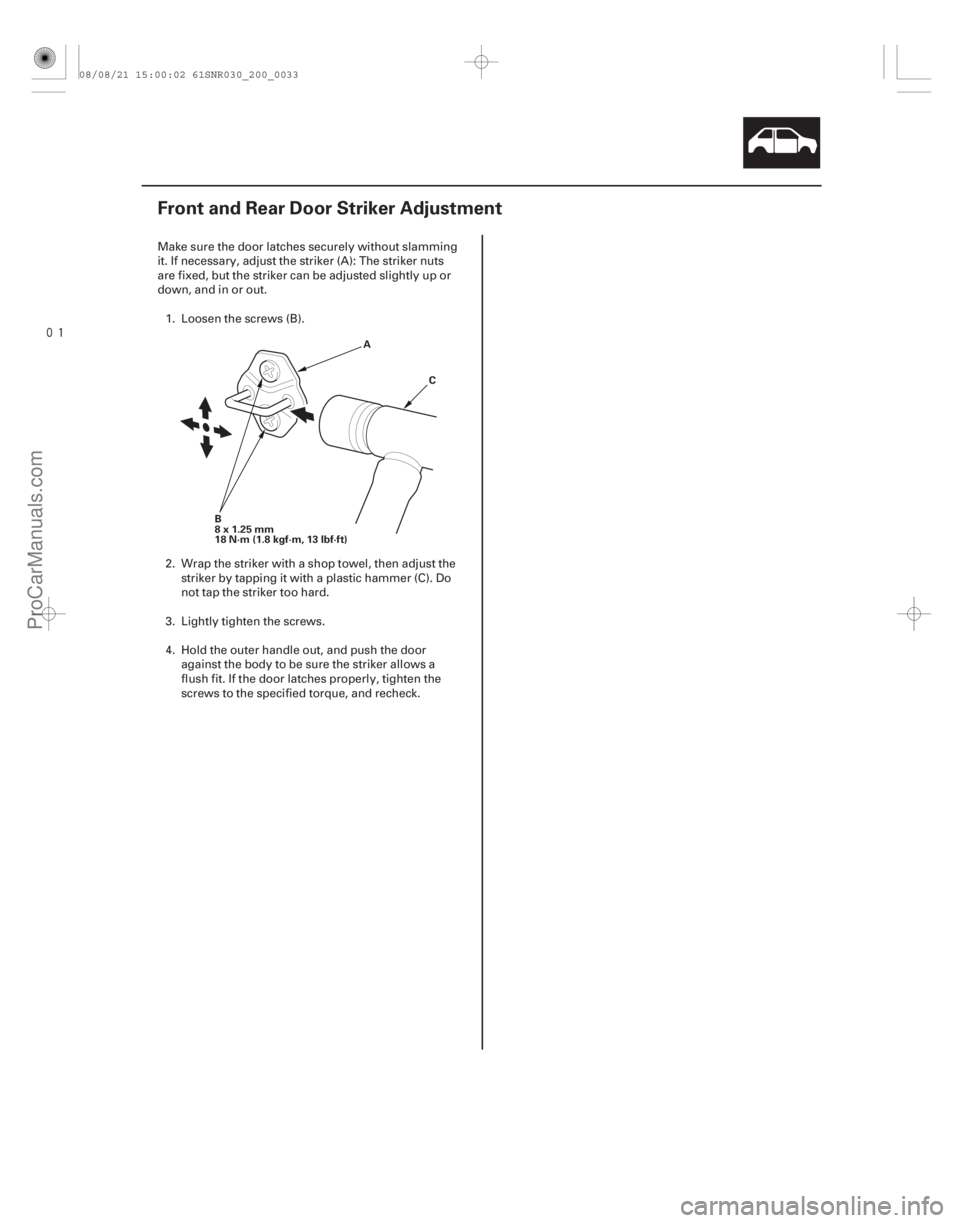
20-31
Front and Rear Door Striker Adjustment
B
8x1.25mm
18 N·m (1.8 kgf·m, 13 lbf·ft) A
C
Make sure the door latches securely without slamming
it. If necessary, adjust the striker (A): The striker nuts
are fixed, but the striker can be adjusted slightly up or
down, and in or out.1. Loosen the screws (B).
2. Wrap the striker with a shop towel, then adjust the striker by tapping it with a plastic hammer (C). Do
not tap the striker too hard.
3. Lightly tighten the screws.
4. Hold the outer handle out, and push the door against the body to be sure the striker allows a
flush fit. If the door latches properly, tighten the
screws to the specified torque, and recheck.
08/08/21 15:00:02 61SNR030_200_0033
ProCarManuals.com
DYNOMITE -2009-
Page 1709 of 2893
����
20-34 Mirrors
Mirror Holder Replacement
A
B C
A
B
C
D E
C
E
F A
B
C B
A B
C
A
C
CB A
A
B
C
NO GOOD
OK
NOTE: Put on gloves to protect yo")
���
��������
�(�#�'�������������������������������
� �����)����
20-34 Mirrors
Mirror Holder Replacement
A
B C
A
B
C
D E
C
E
F A
B
C B
A B
C
A
C
CB A
A
B
C
NO GOOD
OK
NOTE: Put on gloves to protect your hands.
1. Carefully push on the top edge of the mirror holder (A) by hand.
2. Put a shop towel in the opening between the lower edge of the mirror holder and the mirror housing
(B) to prevent scratches, and detach the bottom
clips (C) with a flat-tip screwdriver wrapped with
protective tape.
3. Carefully pull out the bottom edge of the mirror holder (A) to separate the adhesive (B), and then
release the side clips (C).
4. Separate the mirror holder from the actuator (D) by releasing the hooks (E). Disconnect the mirror
defogger connectors (F) from the heater pad
terminals. 5. Before reinstalling the mirror holder to the inner
holder (A) on the actuator, check the actuator rods
(B) and the actuator boots (C). Make sure the
actuator rods are securely mounted in the holes,
and that the boots properly cover each rod.
6. Reconnect the mirror defogger connectors.
7. Reattach the hooks of the mirror holder to the actuator, then position the mirror holder on the
actuator. Carefully push on the clip portions of the
mirror holder until the mirror holder locks into
place.
8. Check the actuator operation.
08/08/21 15:00:05 61SNR030_200_0036
ProCarManuals.com
DYNOMITE -2009-
Page 1710 of 2893
���
�����(�#�'�������������������������������
� �����)����
20-35
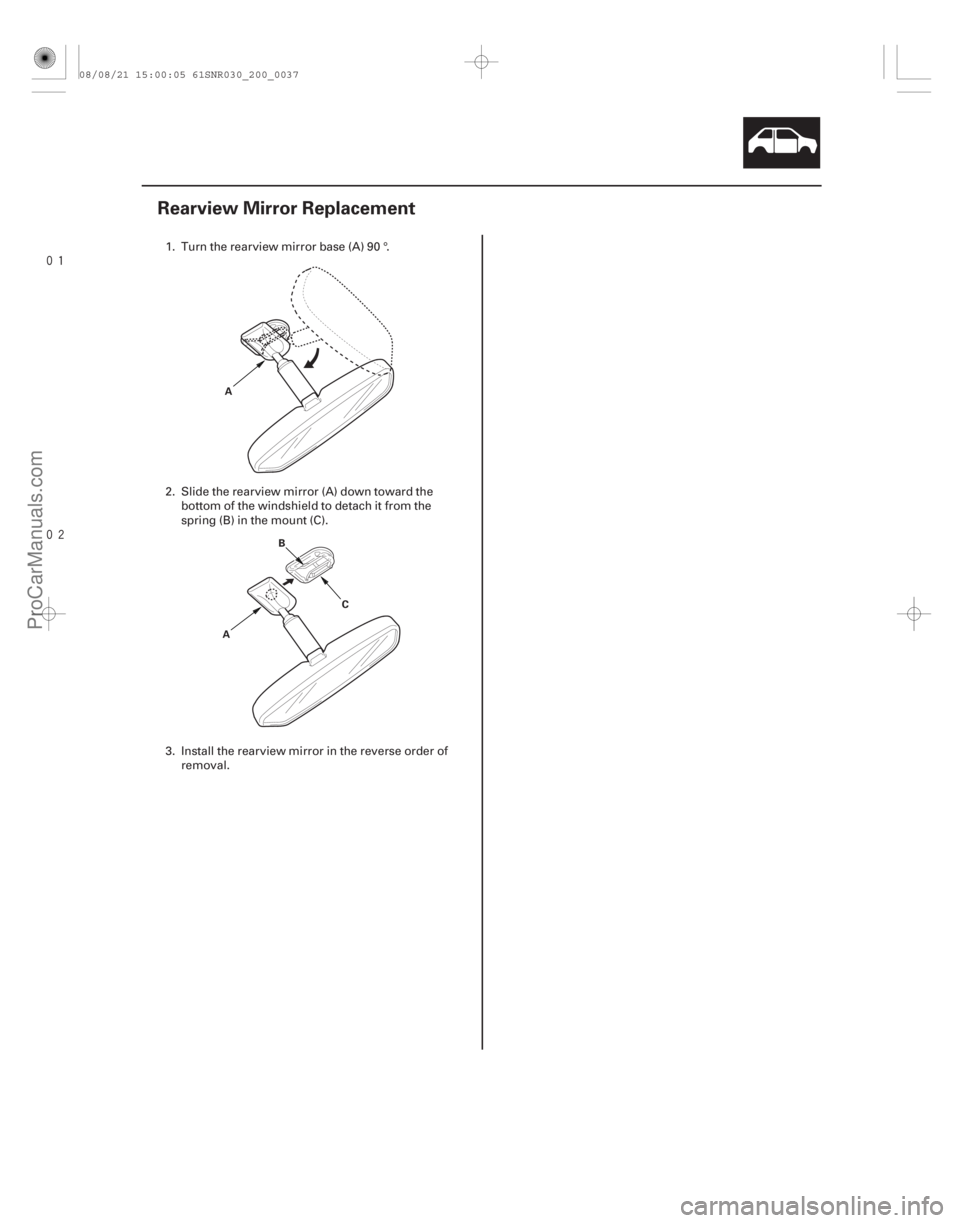
Rearview Mirror Replacement
A
A B
C
1. Turn the rearview mirror base (A) 90 °.
2. Slide the rearview mirror (A) down toward thebottom of the windshield to detach it from the
spring (B) in the mount (C).
3. Install the rearview mirror in the reverse order of removal.
08/08/21 15:00:05 61SNR030_200_0037
ProCarManuals.com
DYNOMITE -2009-
Page 1714 of 2893

Width 3.5 mm (0.14 in.)
Clips adhesive tape: Thickness 0.4 mm (0.016 in.)
Width 10 mm (0.39 in.)
20-39
Inside 11 mm
(0.43 in.)
B
D
12.3 mm")
����
Rubber dams adhesive tape:
Thickness 0.16 mm (0.006 in.)
Width 3.5 mm (0.14 in.)
Clips adhesive tape: Thickness 0.4 mm (0.016 in.)
Width 10 mm (0.39 in.)
20-39
Inside 11 mm
(0.43 in.)
B
D
12.3 mm
(0.48 in.) B
A
CE
E
E
AC B
D
12.3 mm
(0.48 in.)
12.8 mm
(0.5 in.) F
8. Scrape smooth the old adhesive, using a puttyknife or similar tool, until there is a thickness of
about 2 mm (0.08 in.) on the bonding surface
around the entire windshield opening flange:
Do not scrape down to the painted surface of the body; damaged paint will interfere with proper
bonding.
Remove the rubber dam and fasteners from the body.
Replace the dashboard seal with a new one.
9. Clean the body bonding surface with a shop towel dampened in isopropyl alcohol. After cleaning,
keep oil, grease and water from getting on the
clean surface.
10. If the old windshield will be reinstalled, scrape off the old adhesive, the fasteners, and the rubber dam
from the windshield with a putty knife. Clean the
bonding surfaces on the inside face and the edge of
the windshield with isopropyl alcohol. Make sure
the bonding surface is kept free of water, oil, and
grease. 11. Attach the upper rubber dam (A), the lower rubber
dam (B), and the clips (C) with adhesive tape to the
inside face of the windshield (D) as shown:
Be sure the rubber dam and the clips line up with the alignment marks (E).
Be sure the convex portion (F) of the left and the right clips faces the left side.
Be careful not to touch the windshield where adhesive will be applied.
(cont’d)
08/08/21 15:00:08 61SNR030_200_0041
ProCarManuals.com
DYNOMITE -2009-
Page 1717 of 2893

12 mm (0.47 in.)
7 mm (0.28 in.)
2 mm (0.08 in.)
Inside Overlap
1mm(0.04in.)
C
A
D
A
B
C C A
B
D
2 mm (0.08 in.)
Inside
B
C
A
20. Put the cartridge in")
�
��
20-42Glass
Windshield Replacement (cont’d)
12 mm (0.47 in.)
7 mm (0.28 in.)
2 mm (0.08 in.)
Inside Overlap
1mm(0.04in.)
C
A
D
A
B
C C A
B
D
2 mm (0.08 in.)
Inside
B
C
A
20. Put the cartridge in a caulking gun, and run a
continuous bead of adhesive (A) around the edge
of the windshield (B) between the dams (C) and the
molding (D) as shown. Apply the adhesive within
30 minutes after applying the glass primer. Make a
slightly thicker bead at each corner. 21. Pull out the glass side adhesive backing away from
the lower rubber dam.
22. Hold the windshield with suction cups over the opening, align it with the alignment marks made in
step 15, and set it down on the adhesive. Lightly
push on the windshield until its edges are fully
seated on the adhesive all the way around.
NOTE: Do not open or close any of the doors for
about an hour until the adhesive is dry.
23. Scrape or wipe the excess adhesive off with a putty knife or towel. To remove adhesive from a painted
surface or the windshield, wipe with a soft shop
towel dampened with isopropyl alcohol.
24. After the adhesive has dried, spray water over the windshield and check for leaks. Mark leaking area,
let the windshield dry, then seal with sealant. Let
the vehicle stand for at least 4 hours after
windshield installation. If the vehicle has to be used
within the first 4 hours, it must be driven slowly.
25. Reinstall all remaining removed parts. NOTE: Advise the customer not to do the following
things for 2 to 3 days: Slam the doors with all the windows rolled up.
Twist the body excessively (such as when going in and out of driveways at an angle or driving
over rough, uneven roads).
08/08/21 15:00:09 61SNR030_200_0044
ProCarManuals.com
DYNOMITE -2009-
Page 1721 of 2893

A
B B
A
B
12. Set the front corner glass (A) to the front corner
trim (B) quickly. Be careful not to touch the
adhesive. 13. Hold the fron")
��������
20-46Glass
Front Corner Glass Replacement (cont’d)
A
B B
A
B
12. Set the front corner glass (A) to the front corner
trim (B) quickly. Be careful not to touch the
adhesive. 13. Hold the front corner glass (A) with a suction cup
over the opening while holding the front corner
trim (B) by the other hand, align the clips, and set it
down on the adhesive. Lightly push on the front
corner glass until its edges are fully seated on the
adhesive all the way around.
NOTE: Make sure that there is no clearance between the sash and front lower sash.
Do not open or close any of the doors for about an hour until the adhesive is dry.
14. Scrape or wipe the excess adhesive off with a putty knife or towel. To remove adhesive from a painted
surface or the front corner glass, wipe with a soft
shop towel dampened with isopropyl alcohol.
15. After the adhesive has dried, spray water over the front corner glass and check for leaks. Mark the
leaking area, let the front corner glass dry, then
seal with sealant. Let the vehicle stand for at least
4 hours after front corner glass installation. If the
vehicle has to be used within the first 4 hours, it
must be driven slowly.
16. Reinstall all remaining removed parts. NOTE: Advise the customer not to do the following
things for 2 to 3 days: Slam the doors with all the windows rolled up.
Twist the body excessively (such as when going in and out of driveways at an angle or driving
over rough, uneven roads).
08/08/21 15:00:12 61SNR030_200_0048
ProCarManuals.com
DYNOMITE -2009-