Page 1723 of 2893

A
B
AB
A B
C A
B C
A
A AA
6. Remove the lower rubber dam (A) from the lower
edge of the rear window (B). If necessary, cu")
����
��������
Cutting positions
20-48 Glass
Rear Window Replacement (cont’d)
A
B
AB
A B
C A
B C
A
A AA
6. Remove the lower rubber dam (A) from the lower
edge of the rear window (B). If necessary, cut the
rubber dam with a utility knife.
7. With a helper on the outside, pull the piano wire (A) back and forth in a sawing motion. Hold the piano
wire as close to the rear window (B) as possible to
prevent damage to the body, and carefully cut
through adhesive (C) around the entire rear
window. 8. Carefully remove the rear window.
9. Scrape smooth the old adhesive, using a putty
knife or similar tool, until there is a thickness of
about 2 mm (0.08 in.) on the bonding surface
around the entire rear window opening flange:
Do not scrape down to the painted surface of the body; damaged paint will interfere with proper
bonding.
Remove the fasteners from the body.
10. Clean the body bonding surface with a shop towel dampened in isopropyl alcohol. After cleaning,
keep oil, grease, and water from getting on the
surface.
11. If the old rear window will be reinstalled, scrape off the old adhesive, the fasteners, and the rubber dam
from the rear window with a putty knife. Clean the
bonding surfaces on the inside face and the edge of
the rear window with isopropyl alcohol. Make sure
the bonding surface is kept free of water, oil, and
grease.
08/08/21 15:00:13 61SNR030_200_0050
ProCarManuals.com
DYNOMITE -2009-
Page 1727 of 2893

21. Hold the rear window with suction cups over the
opening, align it with the alignment marks you
made in step 15, and set it down on the adhesive.
Light")
20-52Glass
Rear Window Replacement (cont’d)
21. Hold the rear window with suction cups over the
opening, align it with the alignment marks you
made in step 15, and set it down on the adhesive.
Lightly push on the rear window until its edges are
fully seated on the adhesive all the way around.
NOTE: Do not open or close any of the doors for
about an hour until the adhesive is dry.
22. Scrape or wipe the excess adhesive off with a putty knife or towel. To remove adhesive from a painted
surface or the rear window, use a soft shop towel
dampened with isopropyl alcohol.
23. After the adhesive has dried, spray water over the rear window and check for leaks. Mark the leaking
area, let the rear window dry, then seal with sealant.
Let the vehicle stand for at least 4 hours after rear
window installation. If the vehicle has to be used
within the first 4 hours, it must be driven slowly.
24. Reinstall all remaining removed parts. NOTE: Advise the customer not to do the following
things for 2 to 3 days: Slam the doors with all the windows rolled up.
Twist the body excessively (such as when going in and out of driveways at an angle or driving
over rough, uneven roads).
08/08/21 15:00:15 61SNR030_200_0054
ProCarManuals.com
DYNOMITE -2009-
Page 1740 of 2893
����
�µ�µ �µ
Closing force: 200 290 N (20 30 kgf, 44 66 lbf)
20-64 Moonroof
Closing Force and Opening Drag Check
B
A
C A
B
1. Remove the headl")
���
����
�(�#�'���������������������������������������)����
�µ�µ �µ
Closing force: 200 290 N (20 30 kgf, 44 66 lbf)
20-64 Moonroof
Closing Force and Opening Drag Check
B
A
C A
B
1. Remove the headliner (see page 20-84).
2. Closing force check: With a shop towel (A) on the leading edge of theglass (B), attach a spring scale (C) as shown.
Have an assistant hold the switch to close the glass while you measure the force required to
stop it.
Read the force as soon as the glass stops moving, then immediately release the switch and spring
scale.
3. If the force in not within specification, remove the moonroof motor (see page 20-59), and check the
following items:
Check the gear portion and the inner cable for breakage and damage. If the gear portion is
broken, replace the motor. If the inner cable is
damaged, remove the frame (see page 20-60),
and replace the cable (see page 20-62).
Check the moonroof motor (see page 22- 290). If
the motor fails to run or doesn’t turn smoothly,
replace it.
Check the opening drag. Go to step 4. 4. Opening drag check: Protect the leading edge of the
glass with a shop towel (A). Measure the effort
required to open the glass using a spring scale (B)
as shown.
5. If the load is over 40 N (4 kgf, 9 lbf), check: The side clearance and glass position adjustment(see page 20-55).
For broken or damaged sliding parts. If any sliding parts are damaged, replace them.
08/08/21 15:01:24 61SNR030_200_0066
ProCarManuals.com
DYNOMITE -2009-
Page 1819 of 2893
�������
����
�(�#�'���������������
���������������
� �����)����
20-13820-138 Seats
Rear Seat Armrest Beverage Holder
Replacement (cont’d)
Rear Seat Armrest Replacement
A
B C
B A
B
A
B
C
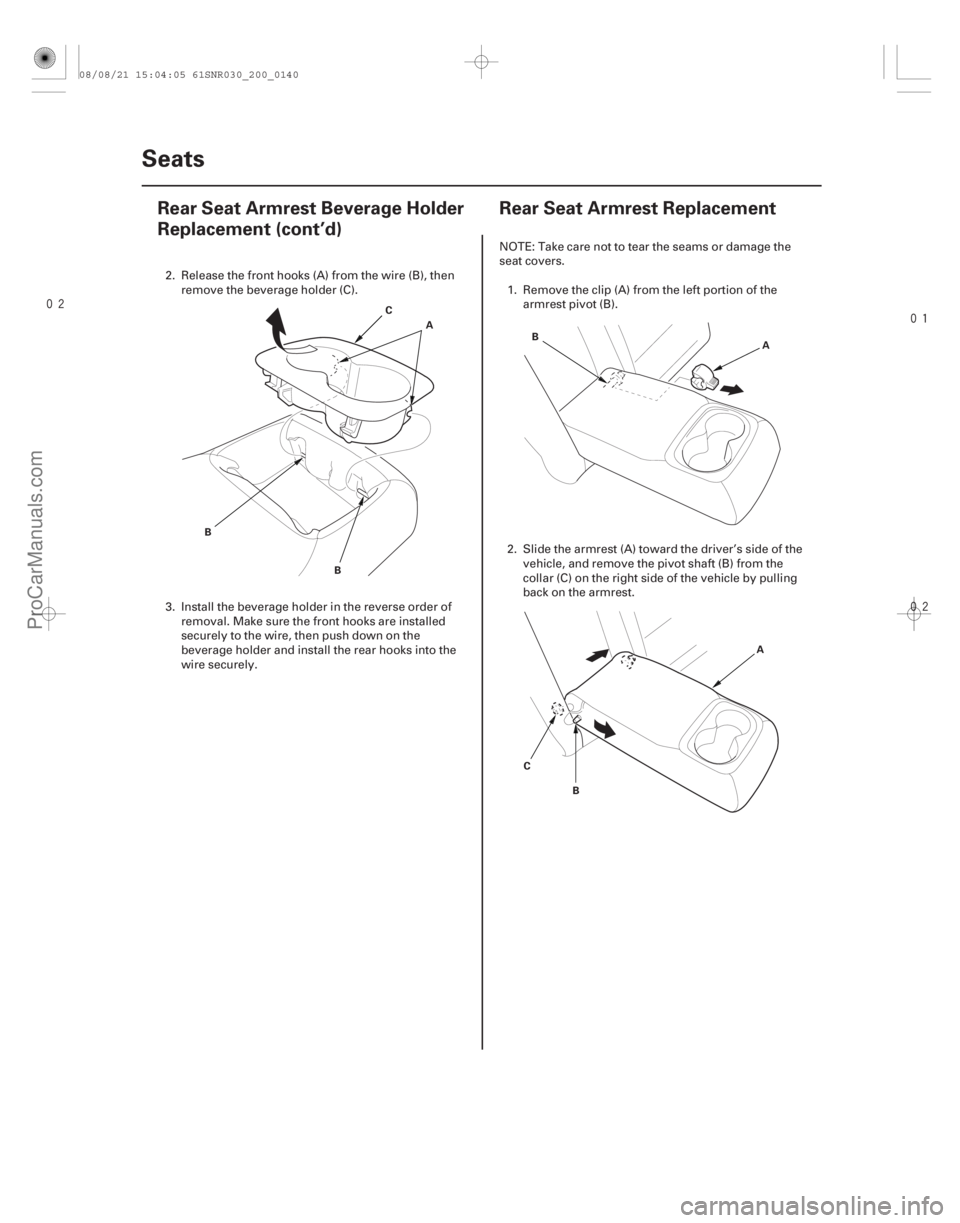
2. Release the front hooks (A) from the wire (B), then
remove the beverage holder (C).
3. Install the beverage holder in the reverse order of removal. Make sure the front hooks are installed
securely to the wire, then push down on the
beverage holder and install the rear hooks into the
wire securely. NOTE: Take care not to tear the seams or damage the
seat covers.
1. Remove the clip (A) from the left portion of the armrest pivot (B).
2. Slide the armrest (A) toward the driver’s side of the vehicle, and remove the pivot shaft (B) from the
collar (C) on the right side of the vehicle by pulling
back on the armrest.
08/08/21 15:04:05 61SNR030_200_0140
ProCarManuals.com
DYNOMITE -2009-
Page 1820 of 2893
�������
����
�(�#�'���������������
���������������
� �����)����
20-13820-138 Seats
Rear Seat Armrest Beverage Holder
Replacement (cont’d)
Rear Seat Armrest Replacement
A
B C
B A
B
A
B
C
2. Release the front hooks (A) from the wire (B), then
remove the beverage holder (C).
3. Install the beverage holder in the reverse order of removal. Make sure the front hooks are installed
securely to the wire, then push down on the
beverage holder and install the rear hooks into the
wire securely. NOTE: Take care not to tear the seams or damage the
seat covers.
1. Remove the clip (A) from the left portion of the armrest pivot (B).
2. Slide the armrest (A) toward the driver’s side of the vehicle, and remove the pivot shaft (B) from the
collar (C) on the right side of the vehicle by pulling
back on the armrest.
08/08/21 15:04:05 61SNR030_200_0140
ProCarManuals.com
DYNOMITE -2009-
Page 1855 of 2893
���� ���
�(�#������������
�����������������
�
� �����)����
20-16820-168 Exterior Trim
Side Sill Protection Tape
Replacement
Rear License Trim Replac")
���
�(�#�'�����������
��������������������� �����)���� ���
�(�#�'�����������
�����������������
�
� �����)����
20-16820-168 Exterior Trim
Side Sill Protection Tape
Replacement
Rear License Trim Replacement
AB
C
D
E F
A
D Fastener Locations
: Clip, 4
A : Clip, 2 B
A BC
D
B AA
A
1. Slowly peel up the old side sill protection tape.
2. Clean the body bonding surface with a shop towel
dampened in isopropyl alcohol. After cleaning,
keep oil, grease, and water from getting on the
surface.
3. Peel the adhesive backing from the side sill protection tape.
4. Align the alignment marks (A) of the side sill protection tape (B) with the body line (C), and align
the alignment marks (D) of the application tape (E)
with the round body bulge (F), then press the side
sill protection tape into place. 1. Detach the clips (A, B), and on both sides of the rear
license trim (C), release the edge of the trim from
the inner taillight (D), then remove the trim. Take
care not to scratch the trunk lid.
2. Install the trim in the reverse order of removal, and note these items:
If the clips are damaged or stress-whitened, replace them with new ones.
Push the clips into place securely.
08/08/21 15:05:04 61SNR030_200_0170
ProCarManuals.com
DYNOMITE -2009-
Page 1857 of 2893
����
20-170Exterior Trim
Emblem/Sticker Replacement
FRONT ’’A’’ EMBLEM
REAR ’’A’’ EMBLEM
CSX EMBLEM
FRONT GRILLE BASE REAR ’’A’�")
���
�(�#�'�����������
���������������
���
� �����)����
20-170Exterior Trim
Emblem/Sticker Replacement
FRONT ’’A’’ EMBLEM
REAR ’’A’’ EMBLEM
CSX EMBLEM
FRONT GRILLE BASE REAR ’’A’’ EMBLEM
ADHESIVE
TAPE
TRUNK LIDCLIP
CSX EMBLEM
Edge of the trunk lid
20 (0.79) ACURA EMBLEM
SCREWS
33
(1.3) 24
(0.94)
55
(2.17)
Edge of the inner taillight
Edge of the trunk lid
ACURA EMBLEM TYPE-S EMBLEM
(For some models)
Unit: mm (in.)
Adhesive tape: Thickness 0.8 mm (0.03 in.)
FRONT ’’A’’ EMBLEM
Edge of the trunk lidEdge of the inner taillight
104.5
(4.12)
21 (0.83)
17 (0.67)
22 (0.87)
CSX EMBLEM
TYPE-S EMBLEM
(For some models)
NOTE: When removing the emblems, take care not to scratch the body.1. To remove the front ‘‘A’’ emblem, remove the front grille (see page 20-160).
2. Clean the body surface with a shop towel dampened in isopropyl alcohol. After cleaning, keep oil, grease, and water from getting on the surface.
3. Apply the emblem where shown.
4. After installing the front ‘‘A’’ emblem, reinstall the front grille.
08/08/21 15:05:05 61SNR030_200_0172
ProCarManuals.com
DYNOMITE -2009-
Page 1977 of 2893

A
C B
Use only Tracer-Stic")
����
Fluorescent Dye Usage Tips
Refrigerant Capacity:
400 to 450 g
0.40 to 0.45 kg
0.9 to 1.0 lbs
14.1 to 15.9 oz
21-94Climate Control
Refrigerant Leak Check (cont’d)
A
C B
Use only Tracer-Stick single dose fluorescent dyecapsules from Tracerline
. Other dyes contain
solvents that may contaminate the refrigerant oil,
leading to component failure.
Adding excessive amounts of dye can damage the compressor.
PAG oil is water soluble, so condensation on the evaporator core or the refrigerant lines may wash the
PAG oil and fluorescent dye away from the actual
leak. Condensation may also carry dye through the
evaporator module drain.
After checking and repairing leaks, thoroughly clean any residual dye from the areas where leaks were
found. Use GLO-AWAY dye cleaner, from Tracerline
,
and hot water to remove the dye (follow the
instructions on the bottle). Residual dye stains can
cause misdiagnosis of any future A/C system leaks.
If any refrigerant dye contacts an exterior paint surface, remove it by doing this:
– Carefully wash the affected surfaces to remove any dirt, and to prevent paint scratching.
– Mix water and isopropyl alcohol in a 50/50 mixture.
– Soak a soft 100 percent cotton towel with the water/ alcohol mixture, and place the cloth on the affected
areas to remove the dye.
– After removing the dye with the water/alcohol- soaked cloth, carefully wash the affected areas, and
check that there is no remaining dye. 1. Connect an R-134a refrigerant recovery/recycling/
charging station (A) to the high-pressure service
port (B) and the low-pressure service port (C), as
shown, following the equipment manufacturer’s
instructions.
2. Recover refrigerant from the A/C system (see page 21-90), and evacuate the system (see page 21-91). If
the system achieves a vacuum of approximately
93.3 kPa (700 mmHg, 27.6 in.Hg) in 15 minutes, and
holds the vacuum for 15 minutes, then the system
does not have a leak at this time. If the system
cannot achieve or hold a vacuum, continue the
refrigerant leak check.
3. Open the high pressure valve to charge the system to the specified capacity.
Select the appropriate units of measure for your
refrigerant charging station.
08/08/21 14:44:54 61SNR030_210_0095
ProCarManuals.com
DYNOMITE -2009-