Page 1736 of 2893
����
20-60 Moonroof
Frame and Drain Tube Replacement
A
A B
C
A
A C
C
C
A
B Fastener Locations
:Bolt,9
6x1.0mm
9.8 N·m
(1.0 kgf·m,")
���
��������
����
�(�#�'�������������������������������
� �����)����
20-60 Moonroof
Frame and Drain Tube Replacement
A
A B
C
A
A C
C
C
A
B Fastener Locations
:Bolt,9
6x1.0mm
9.8 N·m
(1.0 kgf·m, 7.2 lbf·ft) A
B
B
B
B B
C
A
SRS components are located in this area. Review the
SRS component locations (see page 24-11) and the
precautions and procedures (see page 24-13) before
doing repairs or service.
1. Remove these items: Headliner (see page 20-84)
Moonroof glass (see page 20-55)
2. Put on gloves to protect your hands. Disconnect the motor connector (A).
3. Disconnect the drain tubes (A).
4. Remove the roof wire harness (B) by detaching the harnessclips(C). 5. With an assistant holding the frame (A), remove the
bolts, starting at the rear, and release the rear
hooks (B) by moving the frame forward.
6. With the help of an assistant, carefully remove the frame through the front door opening. Take care
not to scratch the interior trim or the body, or tear
the seat covers.
7. To remove a front drain tube (A) from the body, remove the kick panel, left or right (see page 20-66),
and the driver’s dashboard undercover (see page
20-103) or the passenger’s dashboard undercover
(see page 20-104). Detach the clips (B) and remove
the drain valve (C) from the body hole, then remove
the front drain tube.
08/08/21 15:01:21 61SNR030_200_0062
ProCarManuals.com
DYNOMITE -2009-
Page 1746 of 2893

A
B C
A
B
C
Fastener Locations : Clip, 2(Black)
A
B A
B
C
D
E
3. Pull the front of the A-pillar trim (A) back by ha")
�
�
�
���
��
20-70Interior Trim
Trim Removal/Installation - Pillar Areas (cont’d)
A
B C
A
B
C
Fastener Locations : Clip, 2(Black)
A
B A
B
C
D
E
3. Pull the front of the A-pillar trim (A) back by hand toremove the upper clip (B) from the body (C).
4. Pull the A-pillar trim (A) by hand to detach the clips. Pull the trim up from the dashboard (B), then
remove it. 5. If the side curtain airbag has deployed, replace the
A-pillar trim and all clips on the trim with new ones
(see page 24-185).
6. If the side curtain airbag has not deployed, remove the upper clip (A) from the removed A-p illar trim (B)
and discard it. Then check the trim:
To prevent the side curtain airbags from deploying improperly and possibly causing
injury, inspect the A-pillar trim and replace it if it
has any of the following damage:
– Any cracks, deformations, or stress-whitening in the A-pillar trim
– Any cracks or stress-whitening in the clip seating surfaces (C, D)
If the clips (E) are damaged or stress-whitened, replace them with new ones.
Replace the upper clip with a new one.
08/08/21 15:01:31 61SNR030_200_0072
ProCarManuals.com
DYNOMITE -2009-
Page 1747 of 2893

7. Before installing the A-pillar trim (A), whether it is
being replaced or reinstalled, temporarily rem")
�
��
�
���
��
20-71
A
B
A
B C
D
B
C
D A
B C
D E
F
A
D
EA
C
Fastener Locations
:Clip,2
E
(Black)
7. Before installing the A-pillar trim (A), whether it is
being replaced or reinstalled, temporarily remove
the new upper clip (B).
8. Check the overlap between the headliner and A-pillar trim, and if necessary, adjust it (see page
24-185).
9. Carefully install a new upper clip (A) to the A-pillar trim (B). Be sure that the grommet (C) is nearest to
the top of the pin (D) as shown. 10. Reinstall the A-pillar trim (A).
–1 Insert the bottom of the trim into thedashboard (B).
–2 Place the trim over the A-pillar (C), and fit its upper clip (D), and lower clips (E) into the holes
(F) in the A-pillar, then lightly push the trim into
place.
NOTE: Make sure the side curtain airbag is not tucked down under the clips and the ribs.
Push lightly on the upper clip. If you push too hard, the clip will be damaged, and it will not
hold the trim properly.
11. Reinstall the front door opening seal.
08/08/21 15:01:32 61SNR030_200_0073
ProCarManuals.com
DYNOMITE -2009-
Page 1761 of 2893

Fastener Locations
:Bolt,2
C
E
F
G A
B
C
A
Fastener Locations :Bolt,4
8x1.25mm
22 N·m
(2.2 kgf·m,
16 lbf·ft) A
6. Push th")
����
��������
����
20-85
A
B
B
A
B D
B
5x0.8mm
5N·m
(0.5 kgf·m,
4lbf·ft)
Fastener Locations
:Bolt,2
C
E
F
G A
B
C
A
Fastener Locations :Bolt,4
8x1.25mm
22 N·m
(2.2 kgf·m,
16 lbf·ft) A
6. Push the hook (A) with a flat-tip screwdriver
wrapped with protective tape, and turn the holder
(B) 90 °, then pull it out.
7. Remove the individual map light assembly (A). –1 Remove the lenses (B).
–2 Remove the bolts.
–3 If equipped, release the four tabs (C), then pullout the moonroof switch (D) or the navigation
microphone.
–4 Disconnect the front individual map light connector (E). If equipped, disconnect the
moonroof switch connector (F) and the
navigation microphone connector (G). 8. Without moonroof: Remove the driver’s dashboard
undercover (see page 20-104).
9. Detach the harness clips (A) from the A-pillar (B), and disconnect the roof wire harness connector (C).
10. Remove the center console (see page 20-92).
11. Slide both front seats all the way back, and recline the seat-backs fully.
12. Remove the bolts securing the parking brake base frame (A), and lay it down as needed.
(cont’d)
08/08/21 15:01:40 61SNR030_200_0087
ProCarManuals.com
DYNOMITE -2009-
Page 1764 of 2893
����
H
eadliner
Grab handle
Sunvisor Special Tools Required
20-8820-88
Interior Trim
Headliner Removal/Installation
(cont’d)
Carpet Repl")
�
�
�
��
�
��
�(�#�'�����������������������
���
���
� �����)����
H
eadliner
Grab handle
Sunvisor Special Tools Required
20-8820-88
Interior Trim
Headliner Removal/Installation
(cont’d)
Carpet Replacement
A
C
H
I
C
J K
B
B
F
D
E G
KTC trim tool set SOJATP2014
SRS components are located in this area. Review the
S
RS component locations (see page 24-11) and the
precautions and procedures (see page 24-13) before
doing repairs or service.
NOTE: Put on gloves to protect your hands.
Use the appropriate tool from the KTC trim tool set to avoid damage when removing components.
Take care not to damage, wrinkle, or twist the carpet.
Be careful not to damage the dashboard or other interior trim pieces.
1. Remove these items: Front seats, both sides (see page 20-118)
Rear seat cushion (see page 20-133)
Front door sill trim, both sides (see page 20-66)
Rear door sill trim, both sides (see page 20-67)
Kick panels, both sides (see step 5 on page 20-67)
B-pillar lower trim (see page 20-72)
Driver’s dashboard undercover (see page 20- 103)
Passenger’s dashboard undercover (see page 20-104)
Center console (see page 20-92)
Steering joint cover (see page 17-10)
08/08/21 15:01:42 61SNR030_200_0090
ProCarManuals.com
DYNOMITE -2009-
Page 1765 of 2893
����
H
eadliner
Grab handle
Sunvisor Special Tools Required
20-8820-88
Interior Trim
Headliner Removal/Installation
(cont’d)
Carpet Repl")
�
�
�
��
�
��
�(�#�'�����������������������
���
���
� �����)����
H
eadliner
Grab handle
Sunvisor Special Tools Required
20-8820-88
Interior Trim
Headliner Removal/Installation
(cont’d)
Carpet Replacement
A
C
H
I
C
J K
B
B
F
D
E G
KTC trim tool set SOJATP2014
SRS components are located in this area. Review the
S
RS component locations (see page 24-11) and the
precautions and procedures (see page 24-13) before
doing repairs or service.
NOTE: Put on gloves to protect your hands.
Use the appropriate tool from the KTC trim tool set to avoid damage when removing components.
Take care not to damage, wrinkle, or twist the carpet.
Be careful not to damage the dashboard or other interior trim pieces.
1. Remove these items: Front seats, both sides (see page 20-118)
Rear seat cushion (see page 20-133)
Front door sill trim, both sides (see page 20-66)
Rear door sill trim, both sides (see page 20-67)
Kick panels, both sides (see step 5 on page 20-67)
B-pillar lower trim (see page 20-72)
Driver’s dashboard undercover (see page 20- 103)
Passenger’s dashboard undercover (see page 20-104)
Center console (see page 20-92)
Steering joint cover (see page 17-10)
08/08/21 15:01:42 61SNR030_200_0090
ProCarManuals.com
DYNOMITE -2009-
Page 1768 of 2893
����
20-91
AB
C
C
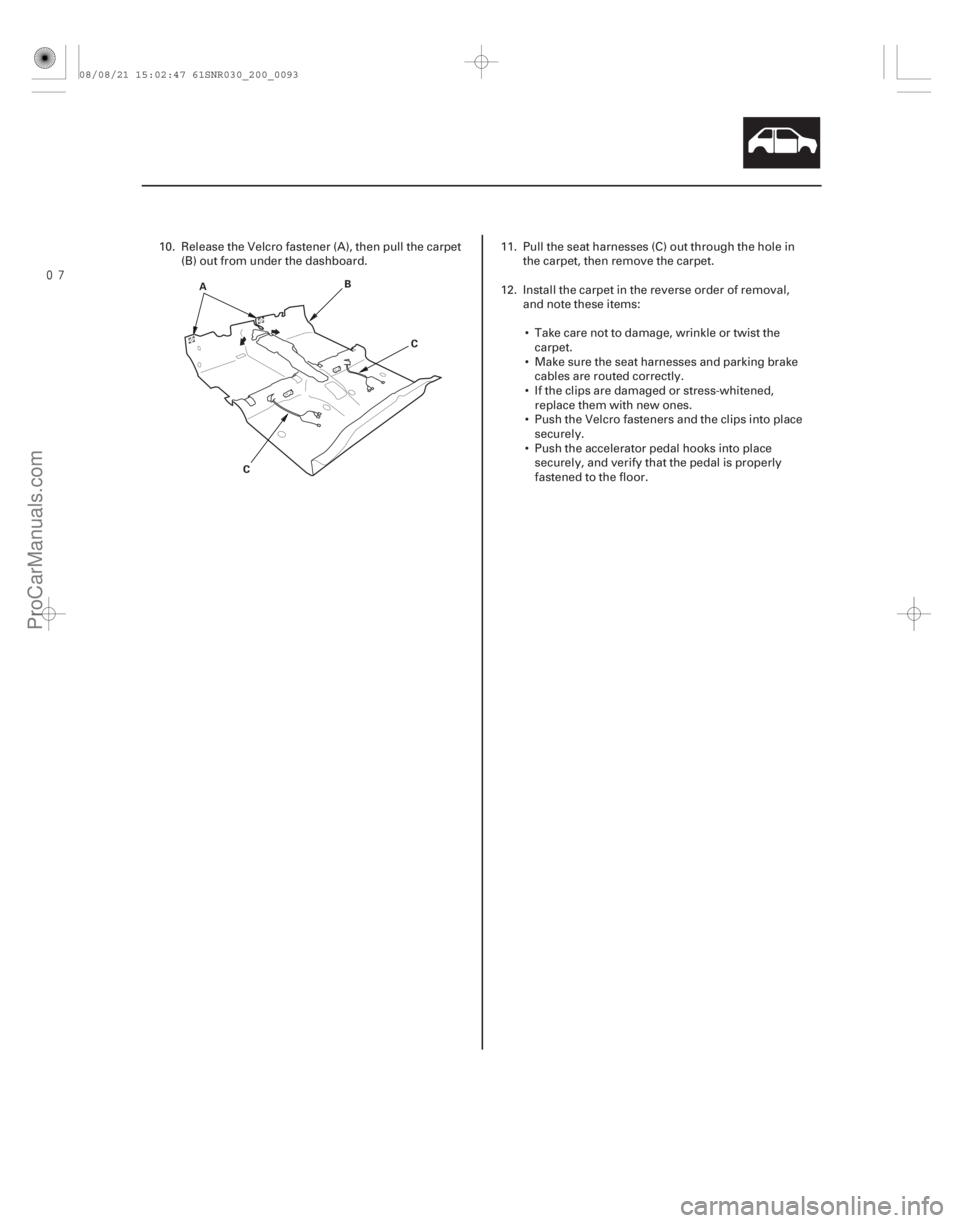
10. Release the Velcro fastener (A), then pull the carpet (B) out from under the dashboard. 11. Pull the seat harnesses (C) out through the hole in
the carpet, then remove the carpet.
12. Install the carpet in the reverse order of removal, and note these items:
Take care not to damage, wrinkle or twist the carpet.
Make sure the seat harnesses and parking brake cables are routed correctly.
If the clips are damaged or stress-whitened, replace them with new ones.
Push the Velcro fasteners and the clips into place securely.
Push the accelerator pedal hooks into place securely, and verify that the pedal is properly
fastened to the floor.
08/08/21 15:02:47 61SNR030_200_0093
ProCarManuals.com
DYNOMITE -2009-
Page 1769 of 2893
����
Special Tools Required
20-92 Consoles
Center Console Removal/Installation
A
B C F
astener Locations
:Clip,4
A
Fastener Locations :Clip")
���
����
����
�(�#�'�����������������
�����
�������
� �����)����
Special Tools Required
20-92 Consoles
Center Console Removal/Installation
A
B C F
astener Locations
:Clip,4
A
Fastener Locations :Clip,3
B : Clip, 2
C
C B
B
B
C A
KTC trim tool set SOJATP2014
SRS components are located in this area. Review the
S
RS component locations (see page 24-11) and the
precautions and procedures (see page 24-13) before
doing repairs or service.
NOTE: Use the appropriate tool from the KTC trim tool set to avoid damage when removing components.
Take care not to scratch the front seat, dashboard, and related parts.
1. Remove the passenger’s dashboard undercover (see page 20-104).
2. M/T model: Lower the shift lever boot (A) to release
the hooks (B) from the boot, then remove the shift
knob (C). 3.
Detach the clips by pulling the front inner panel (A)
up.
4. Gently pull out along the rear of the center console panel (A) to release the clips (B, C).
08/08/21 15:02:47 61SNR030_200_0094
ProCarManuals.com
DYNOMITE -2009-