Page 2889 of 5135
550YT±01
I35273
Manual A/C:
Heater Control HousingAir Conditioning Control Assy
Air Conditioning Control Bulb
Heater Control Housing Sub±assy
Heater Control Lens Assy
Heater Control Housing
Heater Control Knob No.2
Heater Control Knob No.3Heater Control Knob
Cooler Wire No.1
Air Conditioning Panel Sub±assy 55±48
± HEATER & AIR CONDITIONERAIR CONDITIONING CONTROL ASSY
AVENSIS REPAIR MANUAL (RM1018E)
AIR CONDITIONING CONTROL ASSY
COMPONENTS
Page 3052 of 5135

65±8
± LIGHTINGLIGHTING SYSTEM
AVENSIS REPAIR MANUAL (RM1018E)
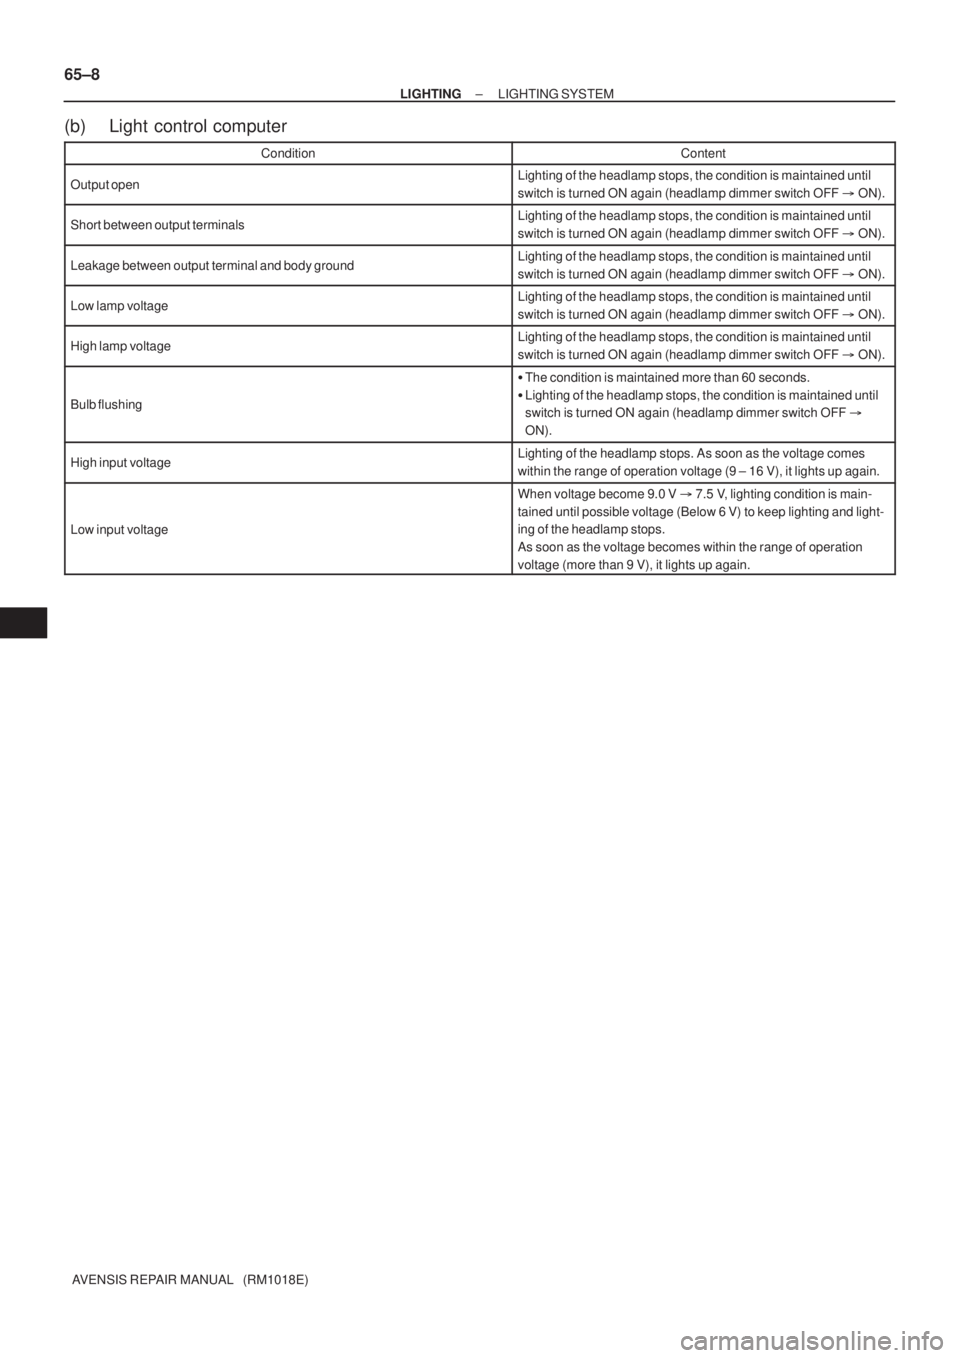
(b) Light control computer
ConditionContent
Output openLighting of the headlamp stops, the condition is maintained until
switch is turned ON again (headlamp dimmer switch OFF � ON).
Short between output terminalsLighting of the headlamp stops, the condition is maintained until
switch is turned ON again (headlamp dimmer switch OFF � ON).
Leakage between output terminal and body groundLighting of the headlamp stops, the condition is maintained until
switch is turned ON again (headlamp dimmer switch OFF � ON).
Low lamp voltageLighting of the headlamp stops, the condition is maintained until
switch is turned ON again (headlamp dimmer switch OFF � ON).
High lamp voltageLighting of the headlamp stops, the condition is maintained until
switch is turned ON again (headlamp dimmer switch OFF � ON).
Bulb flushing
�The condition is maintained more than 60 seconds.
�Lighting of the headlamp stops, the condition is maintained until
switch is turned ON again (headlamp dimmer switch OFF �
ON).
High input voltageLighting of the headlamp stops. As soon as the voltage comes
within the range of operation voltage (9 ± 16 V), it lights up again.
Low input voltage
When voltage become 9.0 V � 7.5 V, lighting condition is main-
tained until possible voltage (Below 6 V) to keep lighting and light-
ing of the headlamp stops.
As soon as the voltage becomes within the range of operation
voltage (more than 9 V), it lights up again.
Page 3053 of 5135

650SQ±01
65±2
±
LIGHTING LIGHTING SYSTEM
AVENSIS REPAIR MANUAL (RM1018E)
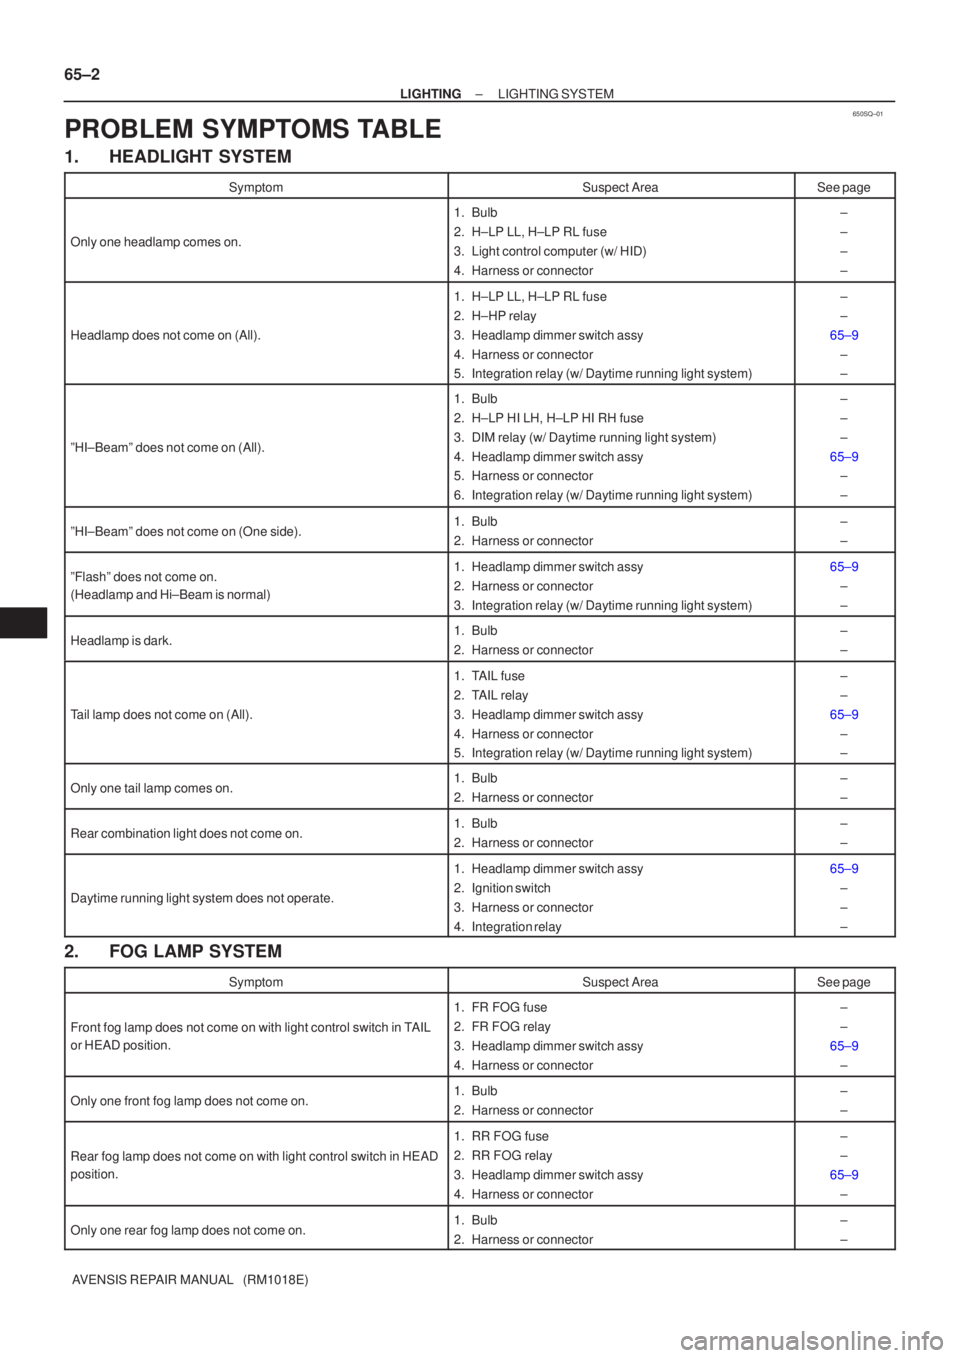
PROBLEM SYMPTOMS TABLE
1. HEADLIGHT SYSTEM
SymptomSuspect AreaSee page
Only one headlamp comes on.
1. Bulb
2. H±LP LL, H±LP RL fuse
3. Light control computer (w/ HID)
4. Harness or connector±
±
±
±
Headlamp does not come on (All).
1. H±LP LL, H±LP RL fuse
2. H±HP relay
3. Headlamp dimmer switch assy
4. Harness or connector
5. Integration relay (w/ Daytime running light system)±
±
65±9 ±
±
ºHI±Beamº does not come on (All).
1. Bulb
2. H±LP HI LH, H±LP HI RH fuse
3. DIM relay (w/ Daytime running light system)
4. Headlamp dimmer switch assy
5. Harness or connector
6. Integration relay (w/ Daytime running light system)±
±
±
65±9 ±
±
ºHI±Beamº does not come on (One side).1. Bulb
2. Harness or connector±
±
ºFlashº does not come on.
(Headlamp and Hi±Beam is normal)1. Headlamp dimmer switch assy
2. Harness or connector
3. Integration relay (w/ Daytime running light system)65±9
±
±
Headlamp is dark.1. Bulb
2. Harness or connector±
±
Tail lamp does not come on (All).
1. TAIL fuse
2. TAIL relay
3. Headlamp dimmer switch assy
4. Harness or connector
5. Integration relay (w/ Daytime running light system)±
±
65±9 ±
±
Only one tail lamp comes on.1. Bulb
2. Harness or connector±
±
Rear combination light does not come on.1. Bulb
2. Harness or connector±
±
Daytime running light system does not operate.
1. Headlamp dimmer switch assy
2. Ignition switch
3. Harness or connector
4. Integration relay65±9±
±
±
2. FOG LAMP SYSTEM
SymptomSuspect AreaSee page
Front fog lamp does not come on with light control switch in TAIL
or HEAD position.
1. FR FOG fuse
2. FR FOG relay
3. Headlamp dimmer switch assy
4. Harness or connector±
±
65±9 ±
Only one front fog lamp does not come on.1. Bulb
2. Harness or connector±
±
Rear fog lamp does not come on with light control switch in HEAD
position.
1. RR FOG fuse
2. RR FOG relay
3. Headlamp dimmer switch assy
4. Harness or connector±
±
65±9 ±
Only one rear fog lamp does not come on.1. Bulb
2. Harness or connector±
±
Page 3054 of 5135

±
LIGHTING LIGHTING SYSTEM
65±3
AVENSIS REPAIR MANUAL (RM1018E)
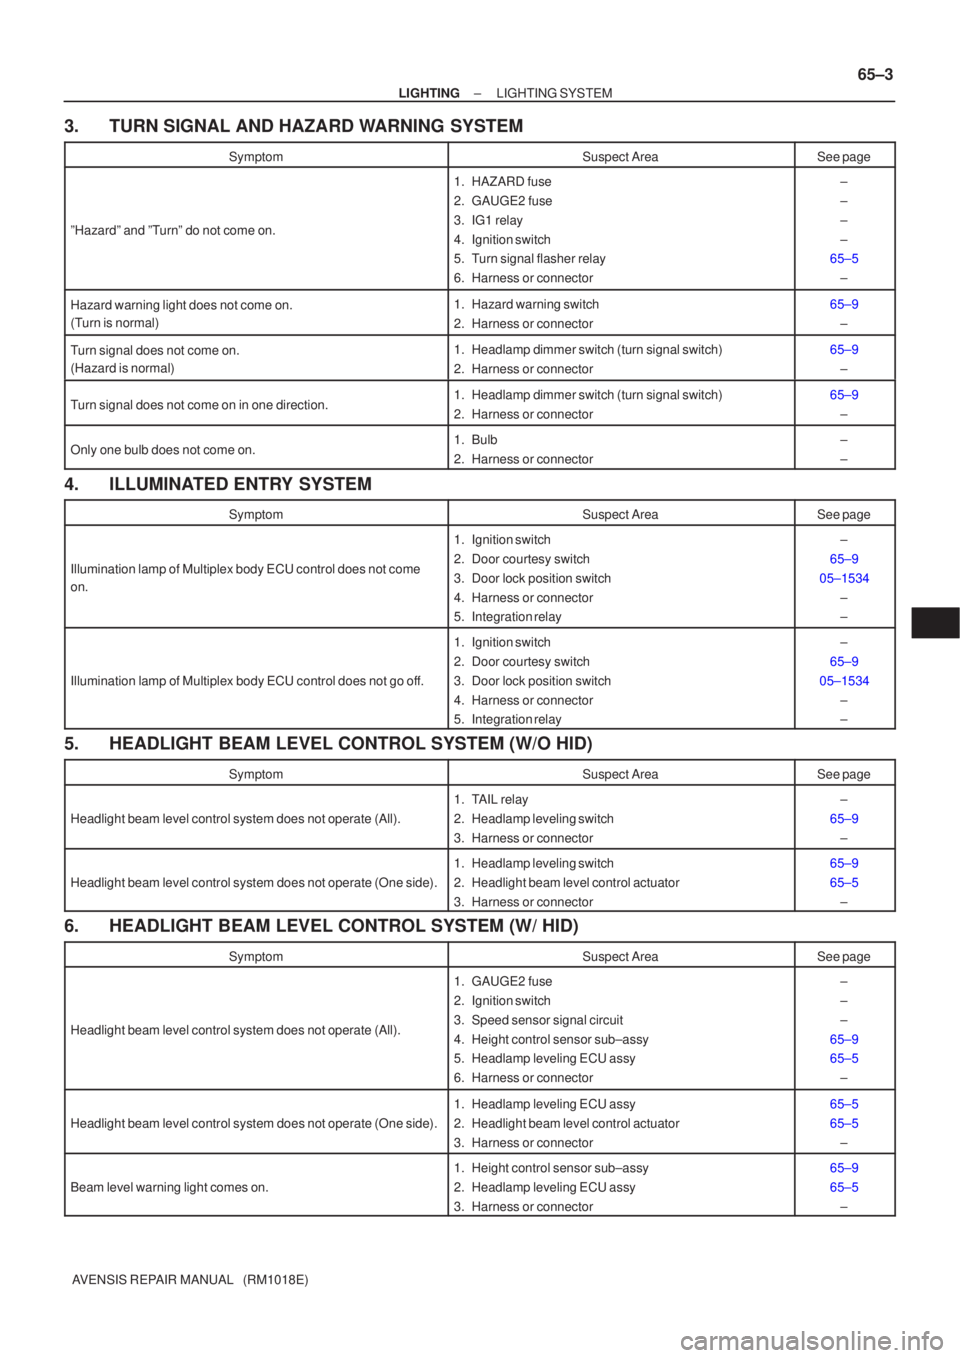
3. TURN SIGNAL AND HAZARD WARNING SYSTEM
SymptomSuspect AreaSee page
ºHazardº and ºTurnº do not come on.
1. HAZARD fuse
2. GAUGE2 fuse
3. IG1 relay
4. Ignition switch
5. Turn signal flasher relay
6. Harness or connector±
±
±
±
65±5
±
Hazard warning light does not come on.
(Turn is normal)1. Hazard warning switch
2. Harness or connector65±9±
Turn signal does not come on.
(Hazard is normal)1. Headlamp dimmer switch (turn signal switch)
2. Harness or connector65±9±
Turn signal does not come on in one direction.1. Headlamp dimmer switch (turn signal switch)
2. Harness or connector65±9±
Only one bulb does not come on.1. Bulb
2. Harness or connector±
±
4. ILLUMINATED ENTRY SYSTEM
SymptomSuspect AreaSee page
Illumination lamp of Multiplex body ECU control does not come
on.
1. Ignition switch
2. Door courtesy switch
3. Door lock position switch
4. Harness or connector
5. Integration relay±
65±9
05±1534 ±
±
Illumination lamp of Multiplex body ECU control does not go off.
1. Ignition switch
2. Door courtesy switch
3. Door lock position switch
4. Harness or connector
5. Integration relay±
65±9
05±1534 ±
±
5. HEADLIGHT BEAM LEVEL CONTROL SYSTEM (W/O HID)
SymptomSuspect AreaSee page
Headlight beam level control system does not operate (All).
1. TAIL relay
2. Headlamp leveling switch
3. Harness or connector±
65±9 ±
Headlight beam level control system does not operate (One side).
1. Headlamp leveling switch
2. Headlight beam level control actuator
3. Harness or connector65±9
65±5±
6. HEADLIGHT BEAM LEVEL CONTROL SYSTEM (W/ HID)
SymptomSuspect AreaSee page
Headlight beam level control system does not operate (All).
1. GAUGE2 fuse
2. Ignition switch
3. Speed sensor signal circuit
4. Height control sensor sub±assy
5. Headlamp leveling ECU assy
6. Harness or connector±
±
±
65±9
65±5 ±
Headlight beam level control system does not operate (One side).
1. Headlamp leveling ECU assy
2. Headlight beam level control actuator
3. Harness or connector65±5
65±5±
Beam level warning light comes on.
1. Height control sensor sub±assy
2. Headlamp leveling ECU assy
3. Harness or connector65±9
65±5±
Page 3055 of 5135
65±4
± LIGHTINGLIGHTING SYSTEM
AVENSIS REPAIR MANUAL (RM1018E)
7. OTHERS
SymptomSuspect AreaSee page
Vanity light does not operate.1. Bulb
2. Harness s or connector±
±
Instrument panel illumination does not operate (All).
1. TAIL relay
2. PANEL fuse
3. Harness or connector
4. Integration relay (w/ DRL)±
±
±
±
Stop light does not operate (All).
1. STOP fuse
2. Stop light switch
3. Harness or connector±
±
±
Back up lamp does not come on (All).
1. GAUGE fuse
2. IG1 relay
3. Back up lamp switch assy (M/T)
4. Park/neutral position switch (A/T)
5. Harness or connector±
±
±
±
±
Page 3056 of 5135

650NC±02
± LIGHTINGLIGHTING SYSTEM
65±1
AVENSIS REPAIR MANUAL (RM1018E)
LIGHTING SYSTEM
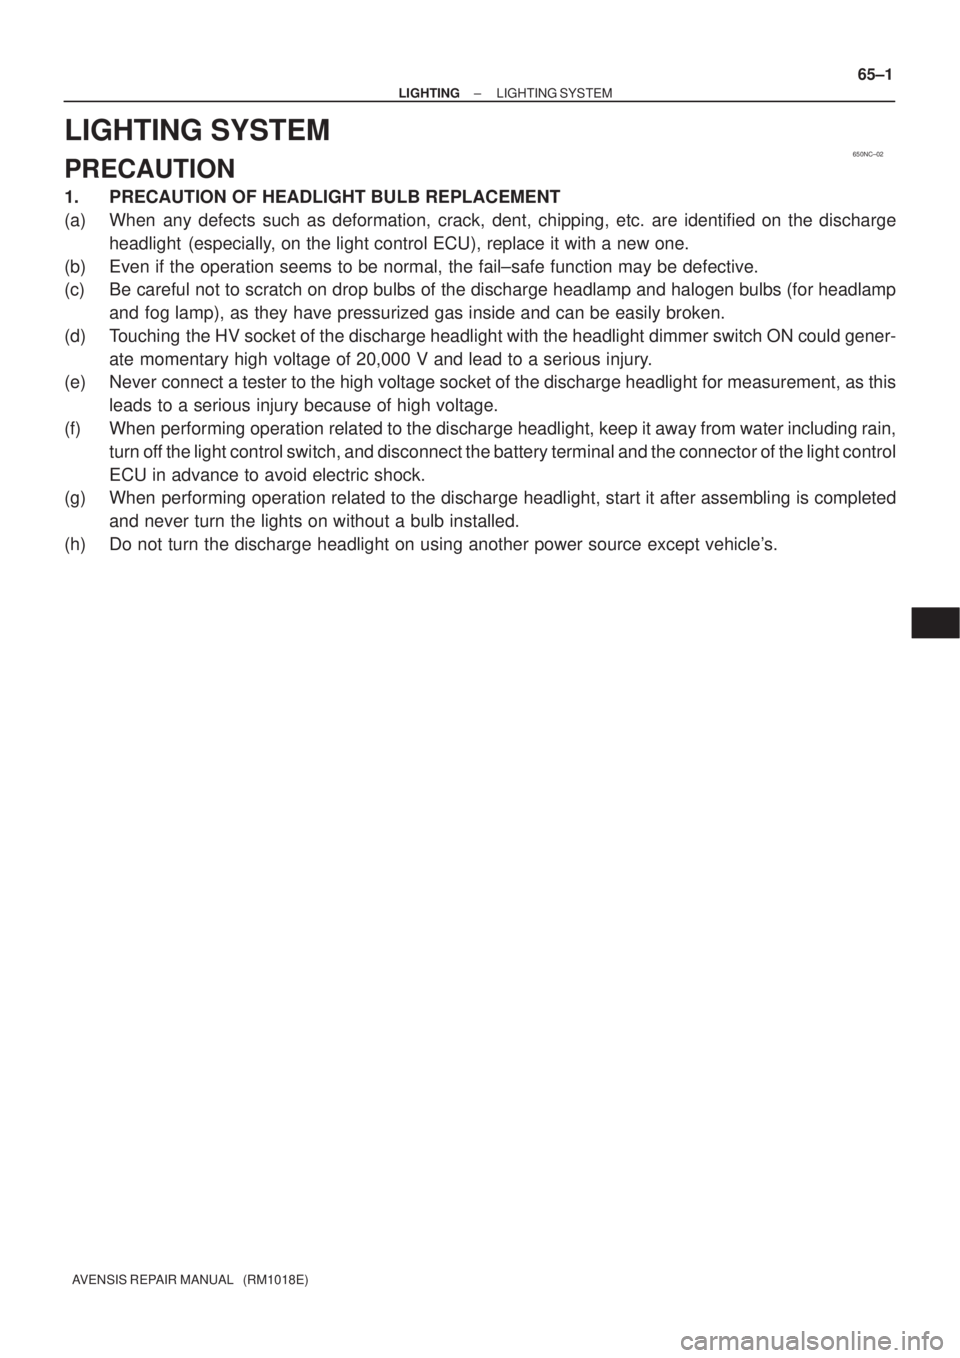
PRECAUTION
1. PRECAUTION OF HEADLIGHT BULB REPLACEMENT
(a) When any defects such as deformation, crack, dent, chipping, etc. are identified on the discharge
headlight (especially, on the light control ECU), replace it with a new one.
(b) Even if the operation seems to be normal, the fail±safe function may be defective.
(c) Be careful not to scratch on drop bulbs of the discharge headlamp and halogen bulbs (for headlamp
and fog lamp), as they have pressurized gas inside and can be easily broken.
(d) Touching the HV socket of the discharge headlight with the headlight dimmer switch ON could gener-
ate momentary high voltage of 20,000 V and lead to a serious injury.
(e) Never connect a tester to the high voltage socket of the discharge headlight for measurement, as this
leads to a serious injury because of high voltage.
(f) When performing operation related to the discharge headlight, keep it away from water including rain,
turn off the light control switch, and disconnect the battery terminal and the connector of the light control
ECU in advance to avoid electric shock.
(g) When performing operation related to the discharge headlight, start it after assembling is completed
and never turn the lights on without a bulb installed.
(h) Do not turn the discharge headlight on using another power source except vehicle's.
Page 3100 of 5135
650T1±01
I352352Clamps
I35236
I35238
I35239
65±26
±
LIGHTING CENTER STOP LAMP ASSY
AVENSIS REPAIR MANUAL (RM1018E)
CENTER STOP LAMP ASSY
REPLACEMENT
1.REMOVE REAR SPOILER (WAGON MODELS) (See page 76±30)
2.REMOVE BACK DOOR TRIM BOARD ASSY (LIFTBACK MODELS) (See page 75±40) 3. REMOVE CENTER STOP LAMP ASSY (SEDANMODELS)
(a) Remove the center stop lamp assy as shown in the il- lustration.
(b) Disconnect the connector.
(c) Remove the center stop lamp bulb as shown in the il- lustration.
4. REMOVE CENTER STOP LAMP ASSY (WAGON MODELS)
(a) Remove the 2 screws and center stop lamp assy.
5. REMOVE CENTER STOP LAMP ASSY (LIFTBACK MODELS)
(a) Disconnect the connector.
(b) Remove the 3 screws and center stop lamp assy.
(c) Remove the center stop lamp socket and the bulb.
Page 3101 of 5135
650T0±02
E60618
±
LIGHTIN GLICENSE PL ATE LAMP ASSY
65±25
AVENSIS RE PAIR MANUAL (RM1018E)
LICENSE PL ATE LAMP ASSY
REPLACEMENT
1. REMOV E BACK DOOR TRIM BOARD ASSY ( See page LIFTBACK 75±40, W AGON 75±45 )
2. REMOVE LUGGAGE COMPARTMENT DOOR GARNISH SUB±ASSY OUTSIDE (SEDAN MODELS ) ( See page 76±27 )
3. REMOVE BACK DOOR GARNISH SUB±ASSY OUTSIDE (LIFTBACK MODELS) (See page 76±28 )
4 . REMOVE BACK DOOR GARNISH SUB±ASSY OUTSIDE ( WAGON MODELS) ( See page 76±29)
5. REMOVE LICENSE PLATE LAMP ASSY
(a) Pull the license plate lamp assy to the side of vehicle as shown in the illustration and release the claw.
(b) Disconnect the connector and remove the license plate lamp assy.
(c) Remove the license plate lamp bulb.