Page 3070 of 5135

DISPOSAL
HINT:
When scrapping vehicles equipped with a seat belt pretensioner or disposing of a front se")
610CO±02
B50515
SST
B50511
± SEAT BELTFRONT SEAT BELT
61±9
AVENSIS REPAIR MANUAL (RM1018E)
DISPOSAL
HINT:
When scrapping vehicles equipped with a seat belt pretensioner or disposing of a front seat outer belt (with
seat belt pretensioner), always first activate the seat belt pretensioner in accordance with the procedures
described below. If any abnormality occurs in activation of the seat belt pretensioner, contact the SERVICE
DEPT. of the DISTRIBUTOR. When disposing of a front seat outer belt assy (with seat belt pretensioner)
that was activated in a collision, follow the same procedure listed in step 1±(e) in ºDISPOSALº.
CAUTION:
�Never dispose of a front seat outer belt assy with an
inactivated pretensioner.
�The seat belt pretensioner produces a sizeable ex-
ploding sound when it activates, so perform the op-
eration outdoors so as not to disturb nearby resi-
dents.
�When activating a front seat outer belt (with seat belt
pretensioner), control operation at least 10 m (33 ft)
away from the front seat outer belt.
�Use gloves and safety glasses when handling a front
seat belt with an activated pretensioner.
�Always wash your hands with water after completing
activation.
�Do not apply water, etc. to a front seat outer belt with
an activated pretensioner.
�When activating the seat belt pretensioner, always
use the specified SST (SRS airbag deployment tool).
Perform operation in a place away from electrical in-
terference.
SST 09082±00700
1. DISPOSE OF FRONT SEAT OUTER BELT ASSY RH
(WHEN INSTALLED IN VEHICLE)
HINT:
Check that the battery positive voltage is above 12 V.
Page 3102 of 5135
650SZ±01
������������������I35249
Sedan:
Wagon:
Liftback: 65±24
± LIGHTINGREAR COMBINATION LAMP ASSY LH
AVENSIS REPAIR MANUAL (RM1018E)
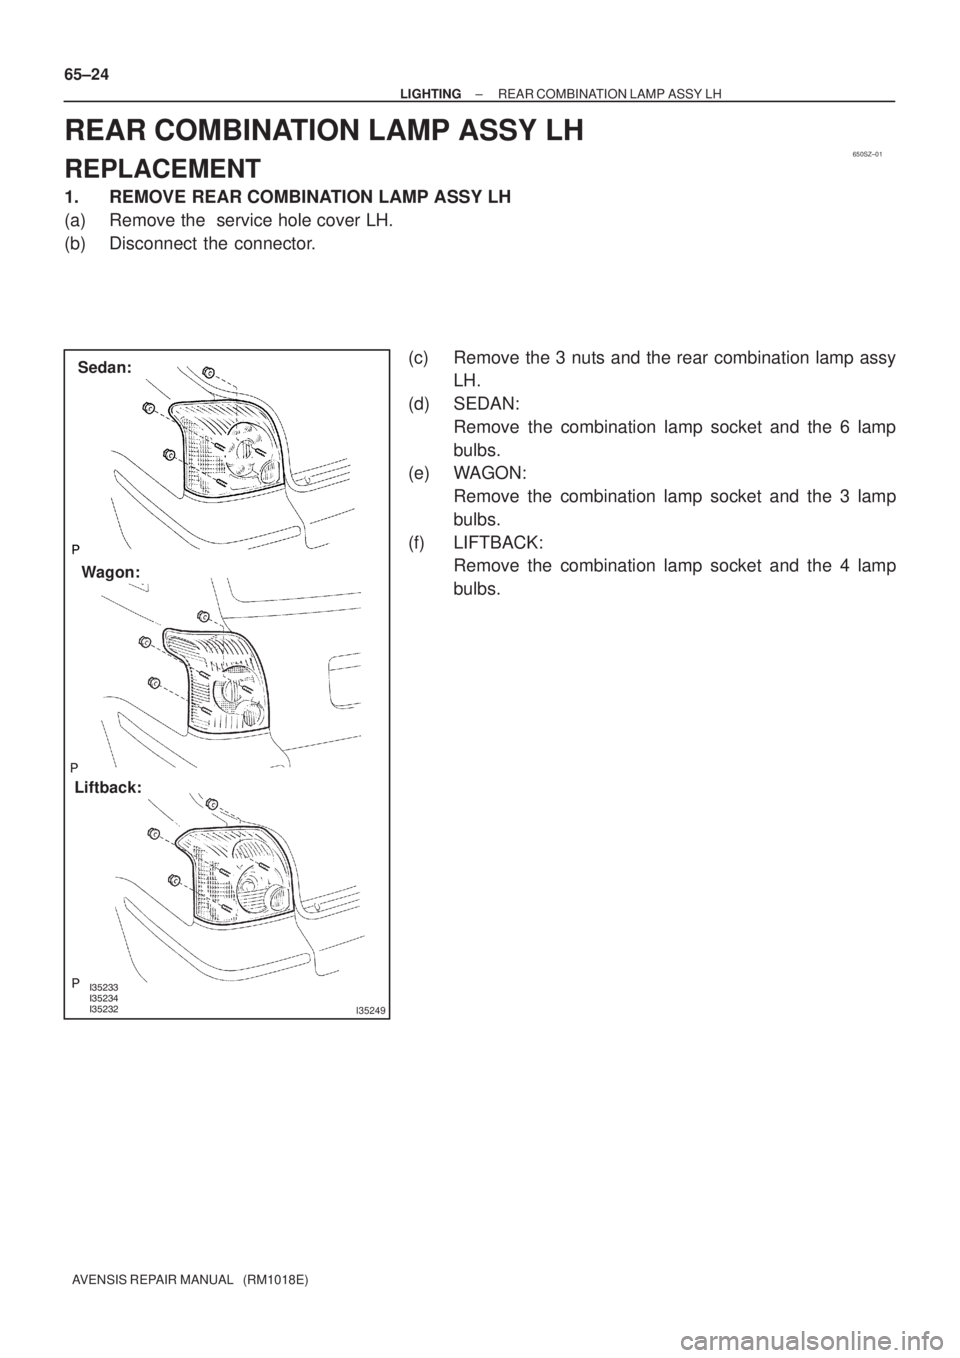
REAR COMBINATION LAMP ASSY LH
REPLACEMENT
1. REMOVE REAR COMBINATION LAMP ASSY LH
(a) Remove the service hole cover LH.
(b) Disconnect the connector.
(c) Remove the 3 nuts and the rear combination lamp assy
LH.
(d) SEDAN:
Remove the combination lamp socket and the 6 lamp
bulbs.
(e) WAGON:
Remove the combination lamp socket and the 3 lamp
bulbs.
(f) LIFTBACK:
Remove the combination lamp socket and the 4 lamp
bulbs.
Page 3241 of 5135

OUTER REAR VIEW MIRROR ASSY LH
REPLACEMENT
HINT:
�The installation is i")
700TI±01
B68929
B68929
±
WINDSHIELD/WINDOWGLASS/MIRROR OUTER REAR VIEW MIRROR ASSY LH
70±65
AVENSIS REPAIR MANUAL (RM1018E)
OUTER REAR VIEW MIRROR ASSY LH
REPLACEMENT
HINT:
�The installation is in the reverse order of the removal. However, when there is a special point concern-
ing the installation, it is indicated.
�Use the same procedures on the RH side as on the LH side.
1.REMOVE FRONT DOOR HOLE COVER SUB±ASSY NO.1 LH (See page 75±8)
(a) Remove the front door lower frame bracket garnish.
(b) Remove the front door trim base.
(c) Only driver side: Remove the fuel lid opener switch.
(d) w/ Power window: Remove the power window regulator switch.
(e) Remove the front door trim board sub.
(f) Remove the front door inside handle.
(g) remove the front service hole cover No. 1.
2. REMOVE OUTER REAR VIEW MIRROR ASSY LH
(a) Disconnect the connector.
(b) Remove the 3 screws and mirror .
3. INSTALL OUTER REAR VIEW MIRROR ASSY LH
(a) Install the mirror with the 3 screws.Torque: 10 N �m (102 kgf �cm, 7 ft �lbf)
(b) Connect the connector.
Page 3341 of 5135

4. REMOVE")
B66977: ClipScrew
Protective
TapeProtective
Tape
Bolt
Cushion Rubber
B70121
B68930
Claw A
: Claw 1
2
B66979
Butyl Tape
± ENGINE HOOD/DOORREAR DOOR
75±23
AVENSIS REPAIR MANUAL (RM1018E)
4. REMOVE REAR DOOR TRIM BOARD SUB±ASSY LH
(a) Remove the cushion rubber.
(b) Remove the bolt and 2 screws.
(c) Using a clip remover, remove the 10 clips and the trim
board upward.
HINT:
In order to prevent the door panel from being damaged, cover
the areas indicated by the arrow marks in the illustration with
protective tape.
5. REMOVE REAR DOOR GLASS WEATHERSTRIP
INNER LH
(a) Remove the weatherstrip inner, as shown in the illustra-
tion.
6. REMOVE REAR DOOR INSIDE HANDLE SUB±ASSY
LH
(a) Using a screwdriver, disengage the claw A as indicated.
HINT:
Tape the screwdriver tip before use.
(b) Move the inside handle in the direction indicated by the
arrow mark in the illustration.
(c) Disconnect the 2 cables from the inside handle.
7. REMOVE REAR DOOR SERVICE HOLE COVER
(a) Remove the service hole cover.
NOTICE:
Remove the remaining tape on the door side.
Page 3343 of 5135

(c) Remove the door lock link silencer.
13. REMOVE REAR DOOR GLASS SUB±ASSY LH
(a) Carefully pull up")
B66980
B66983
B62438
B57767
± ENGINE HOOD/DOORREAR DOOR
75±25
AVENSIS REPAIR MANUAL (RM1018E)
(c) Remove the door lock link silencer.
13. REMOVE REAR DOOR GLASS SUB±ASSY LH
(a) Carefully pull up the door glass out of the door panel.
HINT:
Insert a shop rag inside the door panel to prevent the glass from being scratched.
14. REMOVE REAR DOOR WINDOW REGULATOR
SUB±ASSY LH
(a) w/ Power window:
Disconnect the window regulator connector.
(b) Remove the 4 bolts and window regulator.
NOTICE:
When the bolts are removed, the window regulator may fall
and become deformed.
HINT:
Remove the door window regulator through the service hole.
15. REMOVE REAR DOOR W/MOTOR LOCK ASSY LH
(a) Disconnect the door lock connector.
(b) Using a torx socket wrench (T30), remove the 3 screws
and door lock.
HINT:
Remove the door lock through the service hole.
(c) Remove the door lock wire harness packing.
16. REMOVE REAR DOOR OUTSIDE HANDLE COVER LH
(a) Using a torx socket wrench (T30), loosen the screw.
(b) Remove the cover.
HINT:
Remove the cover through the service hole.
17. REMOVE REAR DOOR OUTSIDE HANDLE ASSY LH
(a) Pull and hold the release plate of the handle frame as
shown in the illustration.
Page 3344 of 5135

(2)
B68931
Screw
B68928
B68928
Adhesive
75±26
± ENGINE HOOD/DOORREAR DOOR
AVENSIS REPAIR MANUAL (RM1018E)
(b) Remove the handle pushing and pulling it in the direction
indicated by the")
B56613
(1)
(2)
B68931
Screw
B68928
B68928
Adhesive
75±26
± ENGINE HOOD/DOORREAR DOOR
AVENSIS REPAIR MANUAL (RM1018E)
(b) Remove the handle pushing and pulling it in the direction
indicated by the arrow mark in the illustration.
NOTICE:
If the release plate is not pulled and held when removing
the handle, the release plate will interfere with the handle
and become damaged .
(c) Remove the outside handle pads front and rear.
18. REMOVE REAR DOOR OUTSIDE HANDLE FRAME
SUB±ASSY LH
(a) Using a torx socket wrench (T30), loosen the screw and
remove the frame.
19. REMOVE REAR DOOR CHECK ASSY LH
(a) Remove the 2 nuts, bolt and check.
HINT:
Remove the check through the service hole.
20. REMOVE REAR DOOR WEATHERSTRIP LH
(a) Using a clip remover, disengage the clip and remove the weatherstrip.
HINT:
If the clip is damaged, replace it with a new clip.
21. INSTALL REAR DOOR CHECK ASSY LH
(a) Apply MP grease to the sliding areas of the check.
(b) Install the check to the door panel with the 2 nuts.
Torque: 5.5 N�m (56 kgf�cm, 49 in.�lbf)
(c) Apply adhesive to the threads of the bolt.
Adhesive:
Part No. 08833±00070, THREE BOND 1324 or equiva-
lent
(d) Install the check to the body panel with the bolt.
Torque: 30 N�m (306 kgf�cm, 22 ft�lbf)
Page 3349 of 5135
B66979
Butyl Tape
������B70387
30�12�
Front
Snap Ring
± ENGINE HOOD/DOORREAR DOOR
75±31
AVENSIS REPAIR MANUAL (RM1018E)
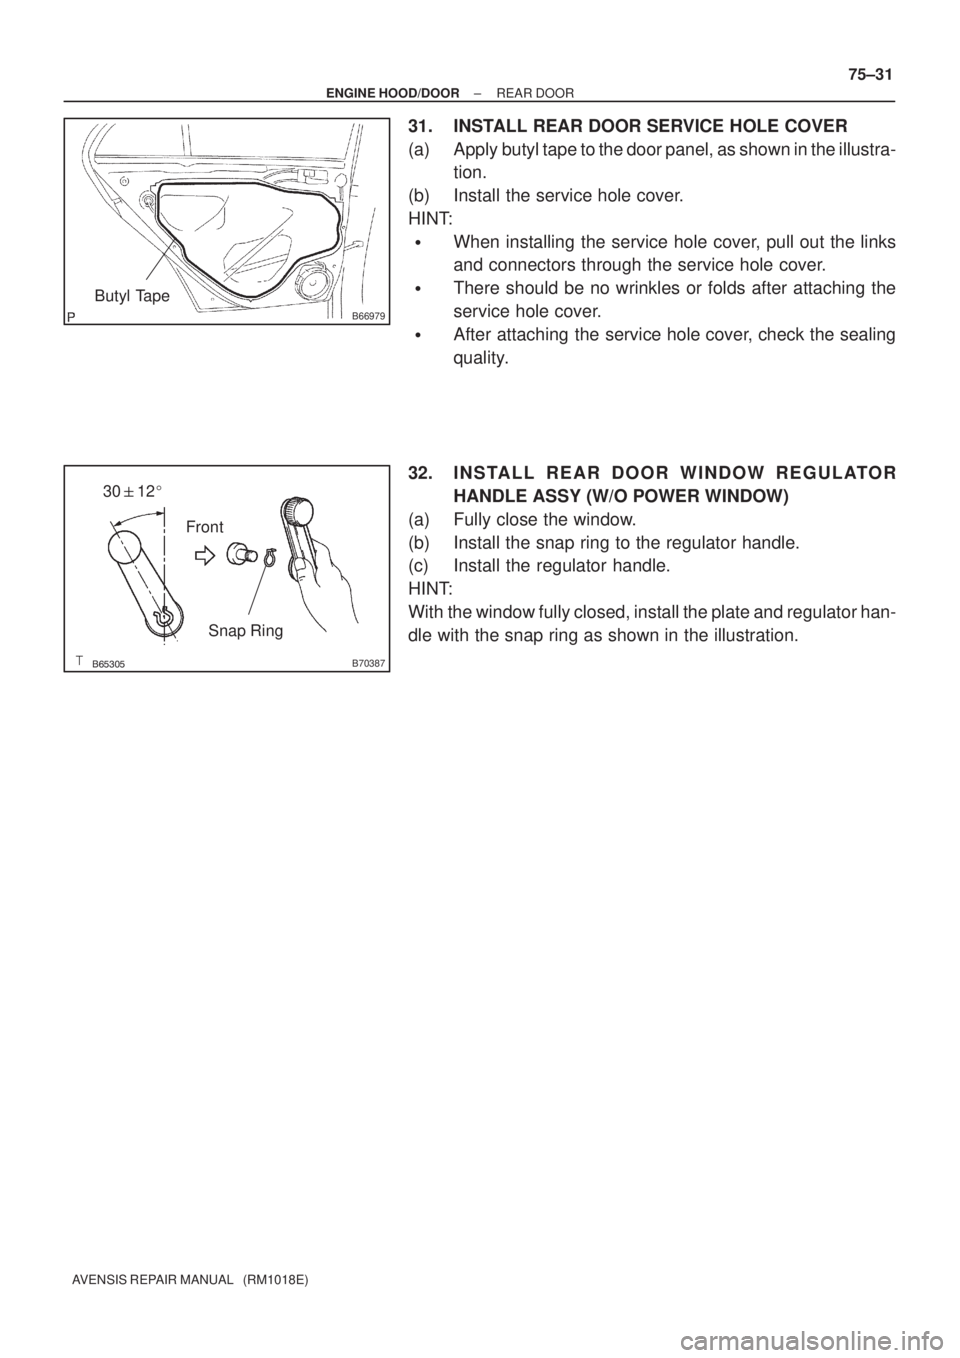
31. INSTALL REAR DOOR SERVICE HOLE COVER
(a) Apply butyl tape to the door panel, as shown in the illustra-
tion.
(b) Install the service hole cover.
HINT:
�When installing the service hole cover, pull out the links
and connectors through the service hole cover.
�There should be no wrinkles or folds after attaching the
service hole cover.
�After attaching the service hole cover, check the sealing
quality.
32. INSTALL REAR DOOR WINDOW REGULATOR
HANDLE ASSY (W/O POWER WINDOW)
(a) Fully close the window.
(b) Install the snap ring to the regulator handle.
(c) Install the regulator handle.
HINT:
With the window fully closed, install the plate and regulator han-
dle with the snap ring as shown in the illustration.
Page 3353 of 5135
B67991
Rear Door Lock w/ Motor Assy LH
26 (265, 19)
26 (265, 19)
5.5 (56, 49 in.´lbf)
30 (306, 22)
Rear Door Check Assy
Rear Door Weatherstrip LHRear Door Belt Moulding LH Rear Door Outside Handle Frame Sub±assy LHRear Door Outside Handle Cover LH
Rear Door Outside Handle Assy LH
Rear Door Outside Handle Pad Rear Rear Door Outside Handle Pad Front
Child Protector
Lock Hole PlugDoor Lock Wire Harness Packing
�
5.0 (51, 44 in.´lbf)�
Clip
Cushion Rubber
Cushion Rubber
Rear Door Hinge Assy Lower LH Rear Door Hinge Assy Upper LH
Rear Door Speaker Assy No. 2Door Lock Link Silencer
: Specified torqueN´m (kgf´cm, ft´lbf)
�
Precoated Part Non±reusable part ��Front Door Service Hole Cover �
Butyl Tape�
± ENGINE HOOD/DOORREAR DOOR
75±19
AVENSIS REPAIR MANUAL (RM1018E)

26 (265, 19)
5.5 (56, 49 in.´lbf)
30 (306, 22)
Rear Door Check Assy
Rear Door Weatherstrip LHRear Door Belt Moulding LH Rear Door Outside Handle Fr")