Page 1845 of 5135
B16534Push
B16535Pull
11±18
±
FUEL FUEL SYSTEM(1AZ±FE)
AVENSIS REPAIR MANUAL (RM1018E)
(f)Observe these precautions when connecting the fuel tube connectors (Quick Type):
(1)Check that there is no damage or foreign objects inthe connected part of the pipe.
(2)Match the axis of the connector with the axis of the pipe, and push into the connector until the connec-
tor makes a ºclickº sound. If the connection is tight,
apply little amount of fresh engine oil on the tip of the
pipe.
(3)After having finished the connection, check if the pipe and the connector are securely connected by
pulling on them.
(4)Check for fuel leaks.
4.CHECK FOR FUEL LEAKS
(a)Check that there are no fuel leaks after doing maintenance anywhere on t\
he fuel system. (See page 11±19)
Page 1848 of 5135

A78477
New O±ring
1ZZ±FE:
A78478
New O±ring
3ZZ±FE:
New Grommet
A78479
Turn
Push
A78474
Turn
A
A
B
± FUELFUEL INJECTOR ASSY (1ZZ±FE/3ZZ±FE)
11±13
AVENSIS REPAIR MANUAL (RM1018E)
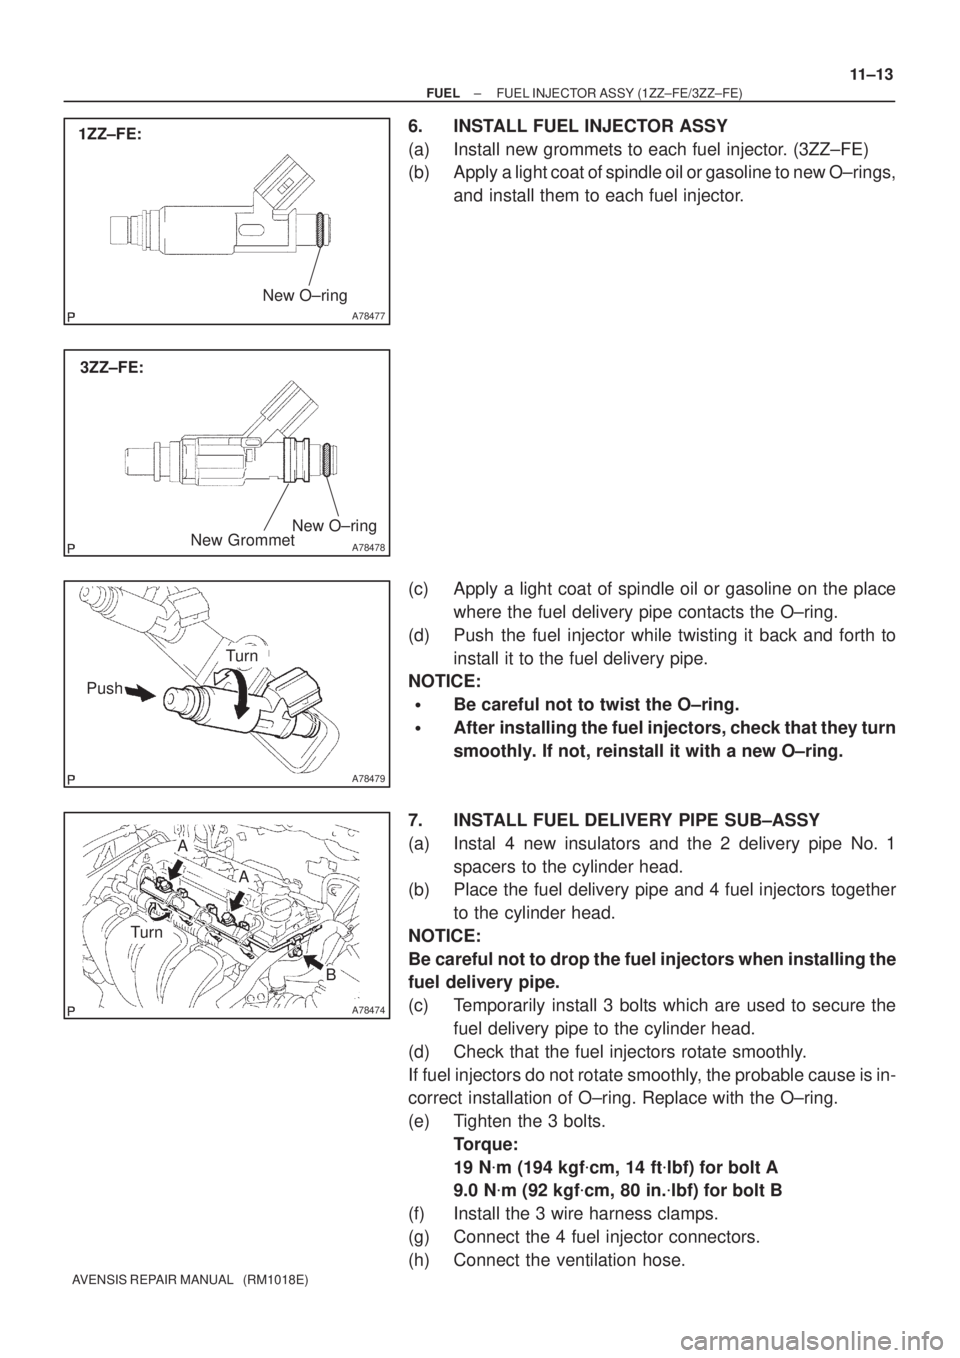
6. INSTALL FUEL INJECTOR ASSY
(a) Install new grommets to each fuel injector. (3ZZ±FE)
(b) Apply a light coat of spindle oil or gasoline to new O±rings,
and install them to each fuel injector.
(c) Apply a light coat of spindle oil or gasoline on the place
where the fuel delivery pipe contacts the O±ring.
(d) Push the fuel injector while twisting it back and forth to
install it to the fuel delivery pipe.
NOTICE:
�Be careful not to twist the O±ring.
�After installing the fuel injectors, check that they turn
smoothly. If not, reinstall it with a new O±ring.
7. INSTALL FUEL DELIVERY PIPE SUB±ASSY
(a) Instal 4 new insulators and the 2 delivery pipe No. 1
spacers to the cylinder head.
(b) Place the fuel delivery pipe and 4 fuel injectors together
to the cylinder head.
NOTICE:
Be careful not to drop the fuel injectors when installing the
fuel delivery pipe.
(c) Temporarily install 3 bolts which are used to secure the
fuel delivery pipe to the cylinder head.
(d) Check that the fuel injectors rotate smoothly.
If fuel injectors do not rotate smoothly, the probable cause is in-
correct installation of O±ring. Replace with the O±ring.
(e) Tighten the 3 bolts.
Torque:
19 N�m (194 kgf�cm, 14 ft�lbf) for bolt A
9.0 N�m (92 kgf�cm, 80 in.�lbf) for bolt B
(f) Install the 3 wire harness clamps.
(g) Connect the 4 fuel injector connectors.
(h) Connect the ventilation hose.
Page 1857 of 5135

O±ring
Delivery Pipe InjectorCORRECT
WRONG
B10707
A75345
Delivery Pipe
InsulatorGrommetO±ring
Insulator
Delivery Pipe
O±ring
1ZZ±FE
3ZZ±FE
O±ring
Retainer Pipe
Nylon Tube
Housing
A50709
A75344
Fuel Pipe Clamp No.2
11±2
± FUELFUEL SYSTEM (1ZZ±FE/3ZZ±FE)
AVENSIS REPAIR MANUAL (RM1018E)
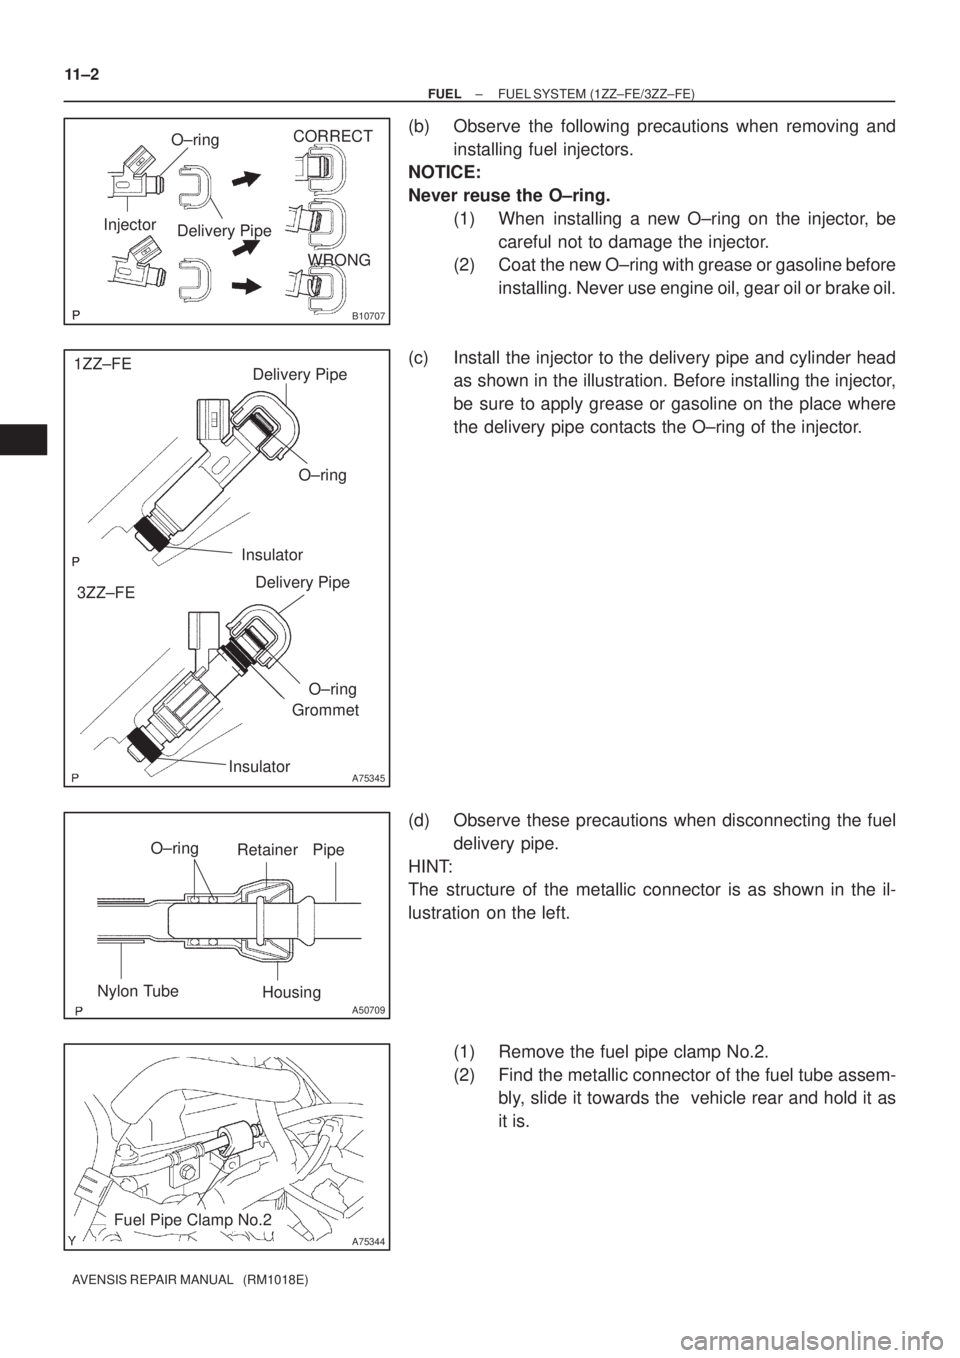
(b) Observe the following precautions when removing and
installing fuel injectors.
NOTICE:
Never reuse the O±ring.
(1) When installing a new O±ring on the injector, be
careful not to damage the injector.
(2) Coat the new O±ring with grease or gasoline before
installing. Never use engine oil, gear oil or brake oil.
(c) Install the injector to the delivery pipe and cylinder head
as shown in the illustration. Before installing the injector,
be sure to apply grease or gasoline on the place where
the delivery pipe contacts the O±ring of the injector.
(d) Observe these precautions when disconnecting the fuel
delivery pipe.
HINT:
The structure of the metallic connector is as shown in the il-
lustration on the left.
(1) Remove the fuel pipe clamp No.2.
(2) Find the metallic connector of the fuel tube assem-
bly, slide it towards the vehicle rear and hold it as
it is.
Page 1859 of 5135
A82344
Vinyl Bag or plastic Bag
B16534Push
B16535Pull
11±4
±
FUEL FUEL SYSTEM(1ZZ±FE/3ZZ±FE)
AVENSIS REPAIR MANUAL (RM1018E)
(6)To prevent the disconnected pipe and connector from being damaged and foreign objects from being
introduced, cover them with a vinyl or plastic bag.
(f)Observe these precautions when connecting the fuel tube connectors (Quick Type):
(1)Check that there is no damage or foreign objects in
the connected part of the pipe.
(2)Match the axis of the connector with the axis of the pipe, and push into the connector until the connec-
tor makes a ºclickº sound. If the connection is tight,
apply little amount of fresh engine oil on the tip of the
pipe.
(3)After having finished the connection, check if the
pipe and the connector are securely connected by
pulling on them.
(4)Check for fuel leaks.
4.CHECK FOR FUEL LEAKS
(a)Check that there are no fuel leaks after doing maintenance anywhere on t\
he fuel system. (See page 11±5)
Page 1887 of 5135

A60083
Fuel Pipe
Clamp No.1
A
A
B12941
B12944
A82344
Vinyl Bag or plastic Bag
± FUELFUEL SYSTEM (1AZ±FSE)
11±31
AVENSIS REPAIR MANUAL (RM1018E)
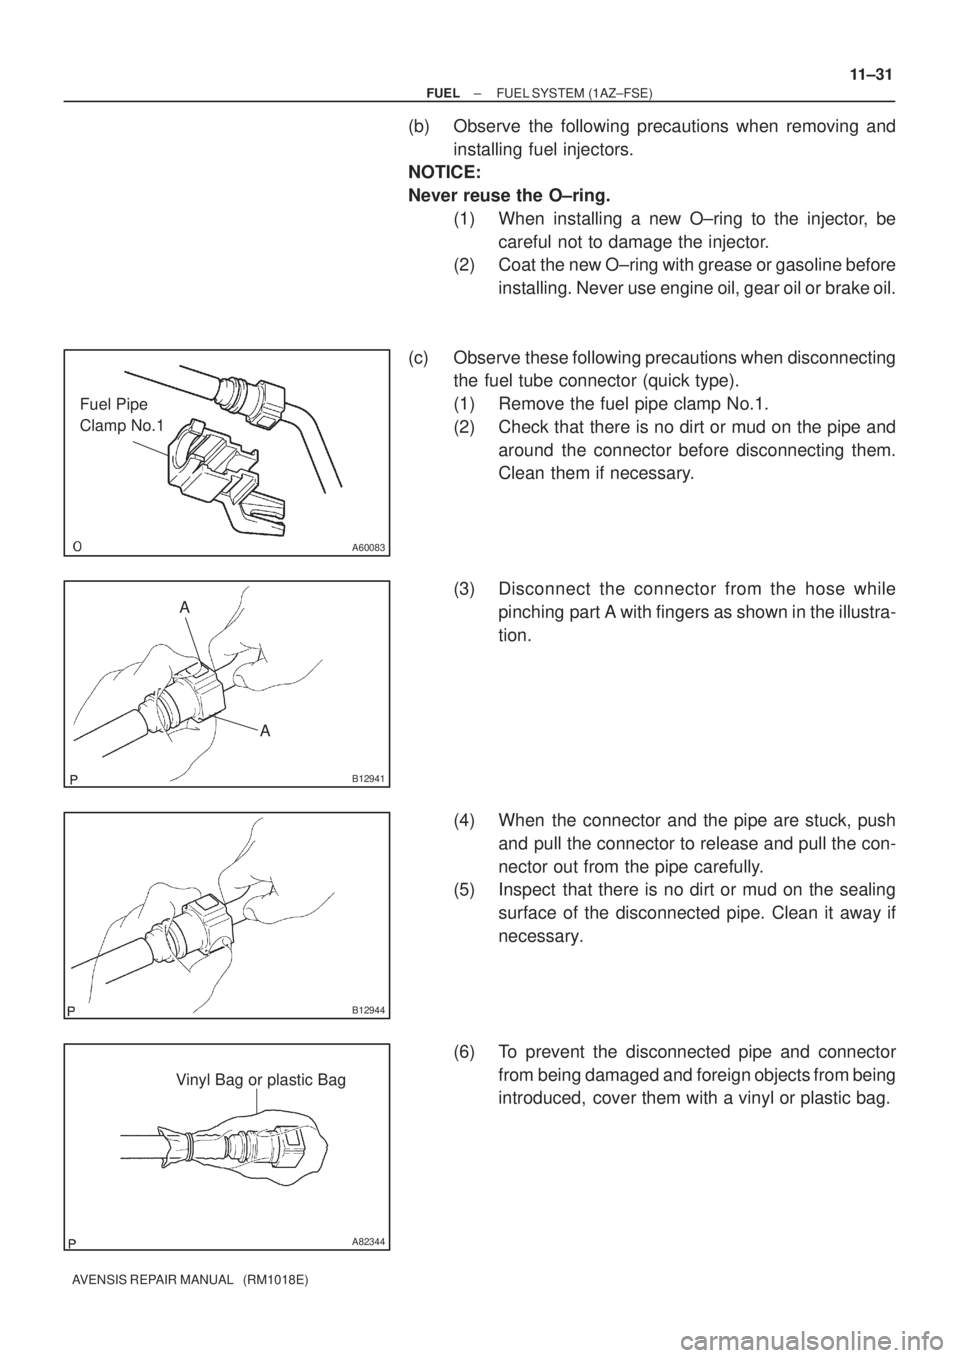
(b) Observe the following precautions when removing and
installing fuel injectors.
NOTICE:
Never reuse the O±ring.
(1) When installing a new O±ring to the injector, be
careful not to damage the injector.
(2) Coat the new O±ring with grease or gasoline before
installing. Never use engine oil, gear oil or brake oil.
(c) Observe these following precautions when disconnecting
the fuel tube connector (quick type).
(1) Remove the fuel pipe clamp No.1.
(2) Check that there is no dirt or mud on the pipe and
around the connector before disconnecting them.
Clean them if necessary.
(3) Disconnect the connector from the hose while
pinching part A with fingers as shown in the illustra-
tion.
(4) When the connector and the pipe are stuck, push
and pull the connector to release and pull the con-
nector out from the pipe carefully.
(5) Inspect that there is no dirt or mud on the sealing
surface of the disconnected pipe. Clean it away if
necessary.
(6) To prevent the disconnected pipe and connector
from being damaged and foreign objects from being
introduced, cover them with a vinyl or plastic bag.
Page 1888 of 5135
B16534Push
B16535Pull
11±32
±
FUEL FUEL SYSTEM(1AZ±FSE)
AVENSIS REPAIR MANUAL (RM1018E)
(d)Observe these precautions when connecting the fuel tube connectors (Quick Type):
(1)Check that there is no damage or foreign objects inthe connected part of the pipe.
(2)Match the axis of the connector with the axis of the pipe, and push into the connector until the connec-
tor makes a ºclickº sound. If the connection is tight,
apply little amount of fresh engine oil on the tip of the
pipe.
(3)After having finished the connection, check if the pipe and the connector are securely connected by
pulling on them.
(4)Check for fuel leaks.
4.CHECK FOR FUEL LEAKS
(a)Check that there are no fuel leaks after doing maintenance anywhere on t\
he fuel system. (See page 11±33)
Page 1889 of 5135
110U2±01
A77915
±
FUEL FUEL PRESSURE PULSATION DAMPER
ASSY(1AZ±FE)11±29
AVENSIS REPAIR MANUAL (RM1018E)
FUEL PRESSURE PULSATION DAMPER ASSY(1AZ±FE)
REPLACEMENT
1.DISCHARGE FUEL SYSTEM PRESSURE (See page 11±15)
2.REMOVE ENGINE COVER SUB±ASSY NO.1 (See page 10±26)
3.REMOVE AIR CLEANER CAP SUB±ASSY (See page 10±26)
4.DISCONNECT FUEL TUBE SUB±ASSY (See page 11±26)
SST09268±21010
5.REMOVE FUEL PRESSURE PULSATION DAMPERASSY
(a)Remove the 2 bolts, and then remove the fuel pressure pulsation damper.
6.INSTALL FUEL PRESSURE PULSATION DAMPER ASSY
(a)Apply a light coat of spindle oil or gasoline to a new O±ring, and instal\
l it to the fuel pressure pulsation damper.
(b)Install the fuel pressure pulsation damper with the 2 bolts. Torque: 9.0 N �m (92 kgf �cm, 80 in. �lbf)
7.CONNECT FUEL TUBE SUB±ASSY (See page 11±26)
8. INSTALL AIR CLEANER CAP SUB±ASSY
9.CHECK FOR FUEL LEAKS (See page 11±19)
10.INSTALL ENGINE COVER SUB±ASSY NO.1 (See page 10±26)
Page 1891 of 5135
A77910
(b)
(b)(c)
(c)
(c)
(c)
A78437
A77911
Delivery Pipe
No. 1 Spacer
Insulator
A77912
A78481
New O±ring
± FUELFUEL INJECTOR ASSY (1AZ±FE)
11±27
AVENSIS REPAIR MANUAL (RM1018E)
(b) Remove the 2 wire harness clamps.
(c) Disconnect the 4 fuel injector connectors.
(d) Remove the 2 bolts, and then remove the fuel delivery
pipe together with the 4 fuel injectors.
NOTICE:
Be careful not to drop the fuel injectors when removing the
delivery pipe.
(e) Remove the 2 delivery pipe No. 1 spacers and the 4 insu-
lators from the cylinder head.
6. REMOVE FUEL INJECTOR ASSY
(a) Pull out the 4 fuel injectors.
7. INSTALL FUEL INJECTOR ASSY
(a) Apply a light coat of spindle oil or gasoline to new O±rings
and install them to each fuel injector.