Page 4631 of 5135
A86430
New GasketHollow
Screw
SST
A09663
:Seal Packing
−
ENGINE MECHANICAL CAMSHAFT (1CD−FTV)(From September, 2003)
14 −157
AVENSIS Supplement (RM1045E)
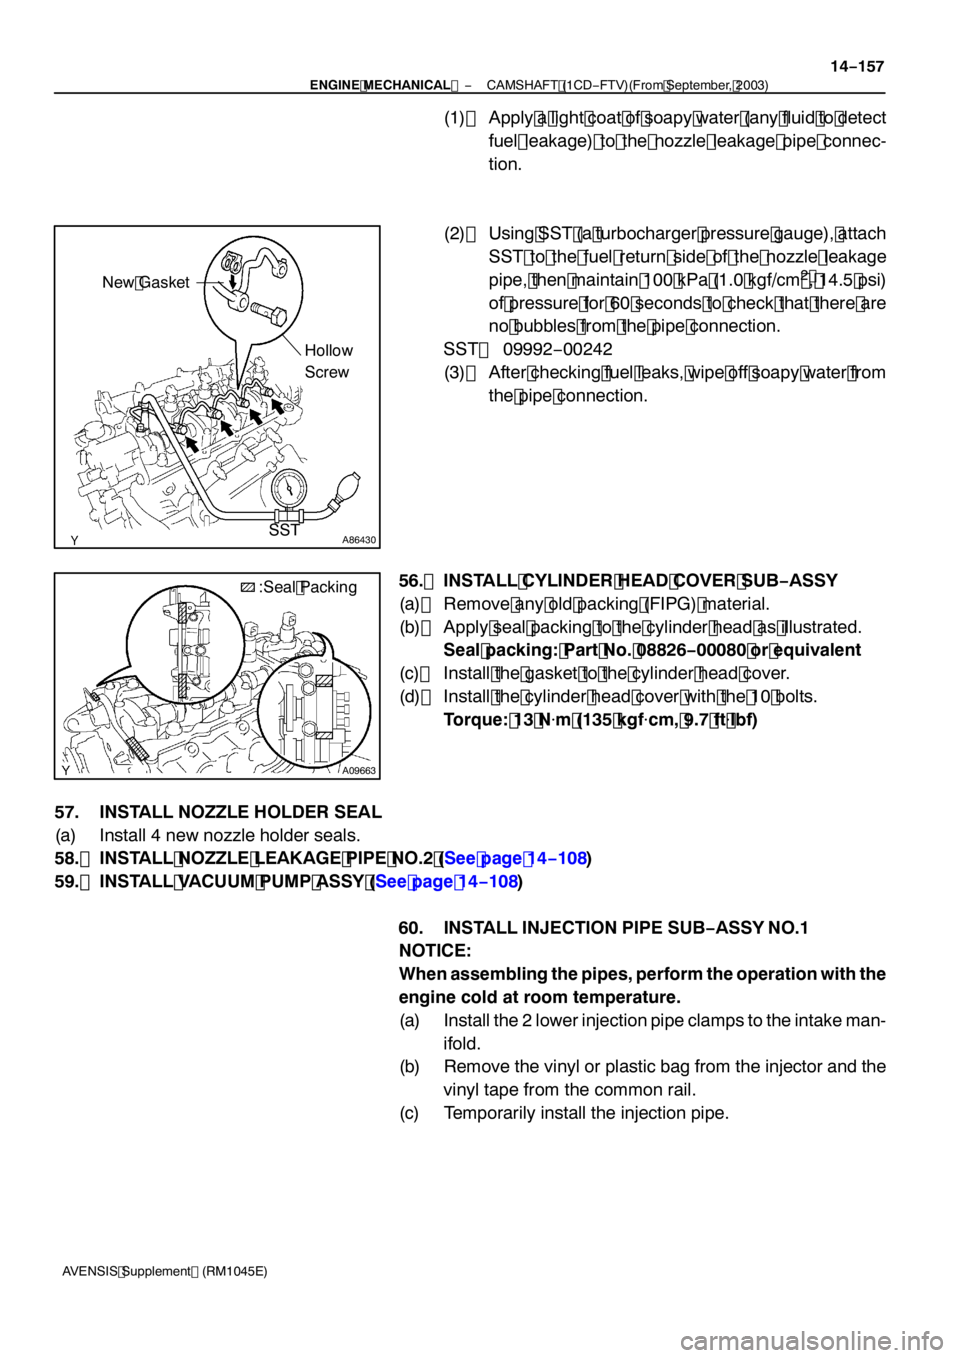
(1) Apply a light coat of soapy water (any fluid to detect
fuel leakage) to the nozzle leakage pipe connec-
tion.
(2) Using SST (a turbocharger pressure gauge), attach SST to the fuel return side of the nozzle leakage
pipe, then maintain 100 kPa (1.0 kgf/cm
2 , 14.5 psi)
of pressure for 60 seconds to check that there are
no bubbles from the pipe connection.
SST 09992 −00242
(3) After checking fuel leaks, wipe off soapy water from the pipe connection.
56. INSTALL CYLINDER HEAD COVER SUB −ASSY
(a) Remove any old packing (FIPG) material.
(b) Apply seal packing to the cylinder head as illustrated. Seal packing: Part No. 08826 −00080 or equivalent
(c) Install the gasket to the cylinder head cover.
(d) Install the cylinder head cover with the 10 bolts. Torque: 13 N �m (135 kgf �cm, 9.7 ft �lbf)
57. INSTALL NOZZLE HOLDER SEAL
(a) Install 4 new nozzle holder seals.
58. INSTALL NOZZLE LEAKAGE PIPE NO.2 (See page 14 −108)
59. INSTALL VACUUM PUMP ASSY (See page 14 −108)
60. INSTALL INJECTION PIPE SUB −ASSY NO.1
NOTICE:
When assembling the pipes, perform the operation with the
engine cold at room temperature.
(a) Install the 2 lower injection pipe clamps to the intake man-
ifold.
(b) Remove the vinyl or plastic bag from the injector and the
vinyl tape from the common rail.
(c) Temporarily install the injection pipe.
Page 4632 of 5135
A87959
Fulcrum Length
30 cm (11.81 in.)
SST
14−158
−
ENGINE MECHANICAL CAMSHAFT (1CD−FTV)(From September, 2003)
AVENSIS Supplement (RM1045E)
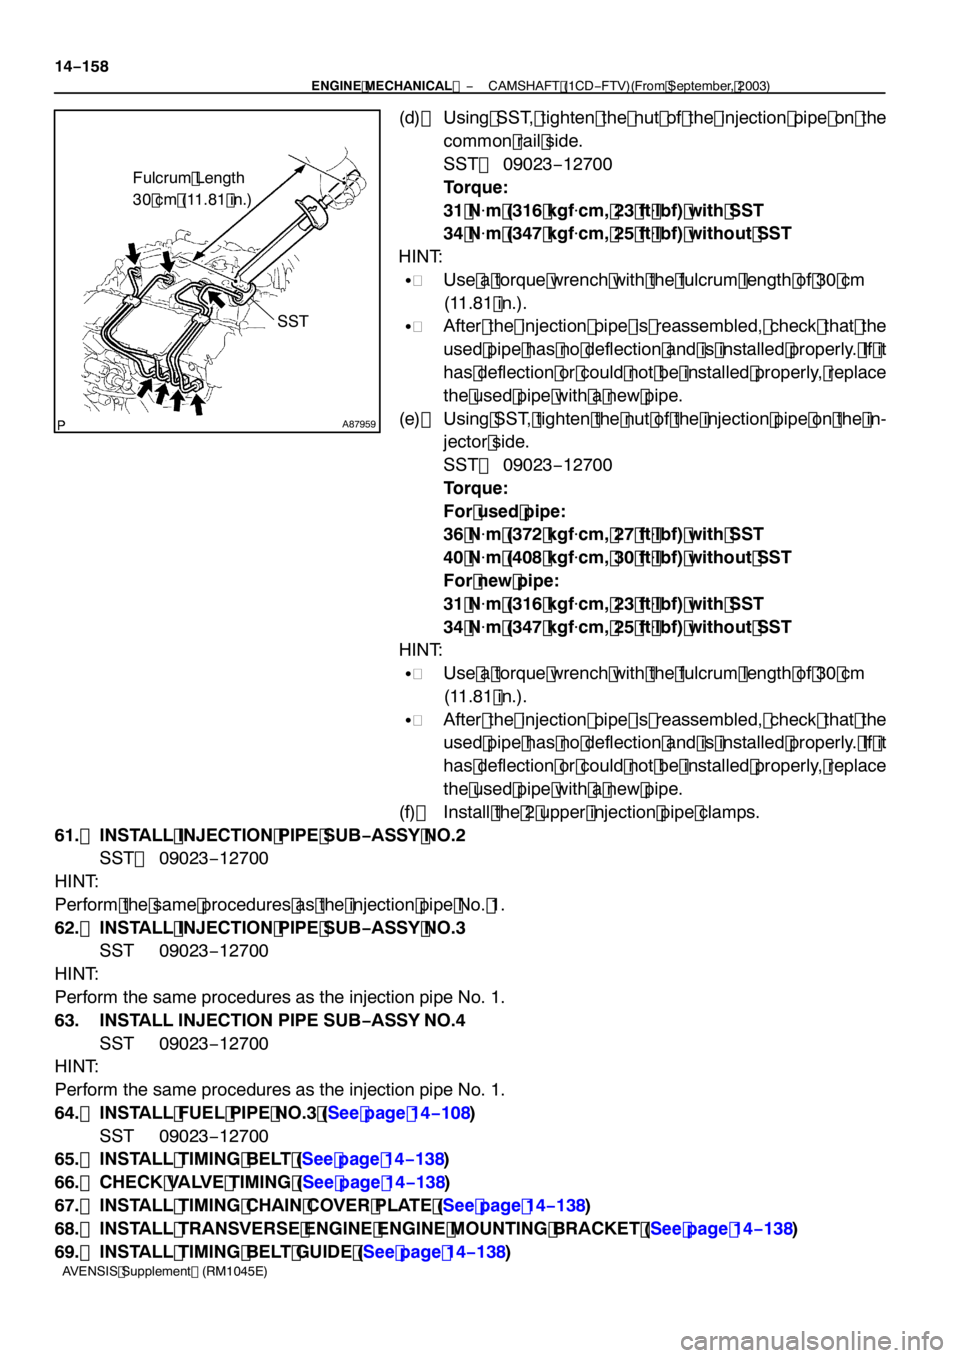
(d) Using SST, tighten the nut of the injection pipe on the common rail side.
SST 09023 −12700
Torque:
31 N �m (316 kgf �cm, 23 ft �lbf) with SST
34 N �m (347 kgf �cm, 25 ft �lbf) without SST
HINT:
S Use a torque wrench with the fulcrum length of 30 cm
(11.81 in.).
S After the injection pipe is reassembled, check that the
used pipe has no deflection and is installed properly. If it
has deflection or could not be installed properly, replace
the used pipe with a new pipe.
(e) Using SST, tighten the nut of the injection pipe on the in- jector side.
SST 09023 −12700
Torque:
For used pipe:
36 N �m (372 kgf �cm, 27 ft �lbf) with SST
40 N �m (408 kgf �cm, 30 ft �lbf) without SST
For new pipe:
31 N �m (316 kgf �cm, 23 ft �lbf) with SST
34 N �m (347 kgf �cm, 25 ft �lbf) without SST
HINT:
S Use a torque wrench with the fulcrum length of 30 cm
(11.81 in.).
S After the injection pipe is reassembled, check that the
used pipe has no deflection and is installed properly. If it
has deflection or could not be installed properly, replace
the used pipe with a new pipe.
(f) Install the 2 upper injection pipe clamps.
61. INSTALL INJECTION PIPE SUB −ASSY NO.2
SST 09023 −12700
HINT:
Perform the same procedures as the injection pipe No. 1.
62. INSTALL INJECTION PIPE SUB −ASSY NO.3
SST 09023 −12700
HINT:
Perform the same procedures as the injection pipe No. 1.
63. INSTALL INJECTION PIPE SUB −ASSY NO.4
SST 09023 −12700
HINT:
Perform the same procedures as the injection pipe No. 1.
64. INSTALL FUEL PIPE NO.3 (See page 14 −108)
SST 09023 −12700
65. INSTALL TIMING BELT (See page 14 −138)
66. CHECK VALVE TIMING (See page 14 −138)
67. INSTALL TIMING CHAIN COVER PLATE (See page 14 −138)
68. INSTALL TRANSVERSE ENGINE ENGINE MOUNTING BRACKET (See page 14 −138)
69. INSTALL TIMING BELT GUIDE (See page 14 −138)
Page 4633 of 5135
−
ENGINE MECHANICAL CAMSHAFT (1CD−FTV)(From September, 2003)
14 −159
AVENSIS Supplement (RM1045E)
70. INSTALL TIMING BELT NO.1 COVER (See page 14 −138)
71. INSTALL TIMING BELT NO.2 COVER (See page 14 −138)
72. INSTALL IDLER PULLEY SUB −ASSY (See page 14 −138)
73. INSTALL CRANKSHAFT PULLEY (See page 14 −138)
SST 09213 −54015 (09213 −70020), 09330 −00021
74. INSTALL ENGINE MOUNTING INSULATOR SUB −ASSY RH (See page 14 −138)
75. INSTALL POWER STEERING IDLE PULLEY BRACKET (See page 14 −108)
76. ADJUST V (COOLER COMPRESSOR TO CRANKSHAFT PULLEY) BELT NO.1
(See Pub. No. RM1018E on page 14 −269)
77. INSTALL INJECTOR DRIVER (See page 14 −108)
78. INSTALL AIR TUBE NO.1 (See page 14 −108)
79. INSTALL VACUUM RESERVOIR SUB −ASSY (See page 14 −108)
80. INSTALL BATTERY (See page 14 −108)
81. INSTALL AIR CLEANER ASSY (See page 14 −108)
82. INSTALL ENGINE COVER SUB −ASSY NO.1 (See page 14 −90)
83. INSTALL FRONT WHEEL RH Torque: 103 N �m (1,050 kgf �cm, 76 ft �lbf)
84. CHECK FOR FUEL LEAKS (See page 11 −46)
Page 4637 of 5135
A85617
23.5 (240, 17)
Fuel Pipe No. 3
5.0 (51, 44 in.·lbf)
5.0 (51, 44 in.·lbf)
5.0 (51, 44 in.·lbf)
27 (275, 20)
zNozzle Holder Seal
Cylinder Head Cover Sub−assy
Gasket
20 (204, 15)
zGasket
18 (184, 13)
27 (270, 20)
Washer
Nozzle Holder ClampInjector AssyFuel Injector
Back−up Ring No. 1 z
zO−ringzInjection Nozzle Seat
N·m (kgf·cm, ft·lbf)
: Specified torque
zNon−reusable part
* Use SSTInjection Pipe Clamp No. 2
Injection Pipe Sub−assy
zGasket
zGasket
13 (135, 9.7)
* 36 (372, 27)
40 (408, 30)
* 31 (316, 23)
34 (347, 25)
Nozzle Leakage Pipe Assy
− ENGINE MECHANICALCAMSHAFT (1CD−FTV)(From September, 2003)
14−149
AVENSIS Supplement (RM1045E)
Page 4649 of 5135
141NG−01
A84393
(a)
(a)
(b)(b)
(a)
A84286
14 −108−
ENGINE MECHANICAL PARTIAL ENGINE ASSY (1CD −FTV)(From September,
2003)
AVENSIS Supplement (RM1045E)
REPLACEMENT
1. REMOVE FRONT WHEELS
2. REMOVE ENGINE UNDER COVER LH
3. REMOVE ENGINE UNDER COVER SUB −ASSY NO.1
4. REMOVE ENGINE UNDER COVER RH
5. REMOVE RADIATOR SUPPORT OPENING COVER
6. REMOVE ENGINE ROOM COVER SIDE
7. DRAIN ENGINE COOLANT (See page 16 −19)
8. DRAIN ENGINE OIL (See Pub No. RM1018E on page 17 −30)
9. DRAIN MANUAL TRANSAXLE OIL
Torque: 49 N �m (500 kgf �cm, 36 ft �lbf)
10. REMOVE ENGINE COVER SUB −ASSY NO.1
(a) Remove the 5 nuts, then remove the engine cover.
11. REMOVE BATTERY
12. REMOVE AIR CLEANER ASSY
(a) Disconnect the mass air flow meter connector.
(b) Remove the air cleaner cap together with the air cleaner hose.
(c) Remove the air cleaner filter element.
(d) Remove the 3 bolts and air cleaner case.
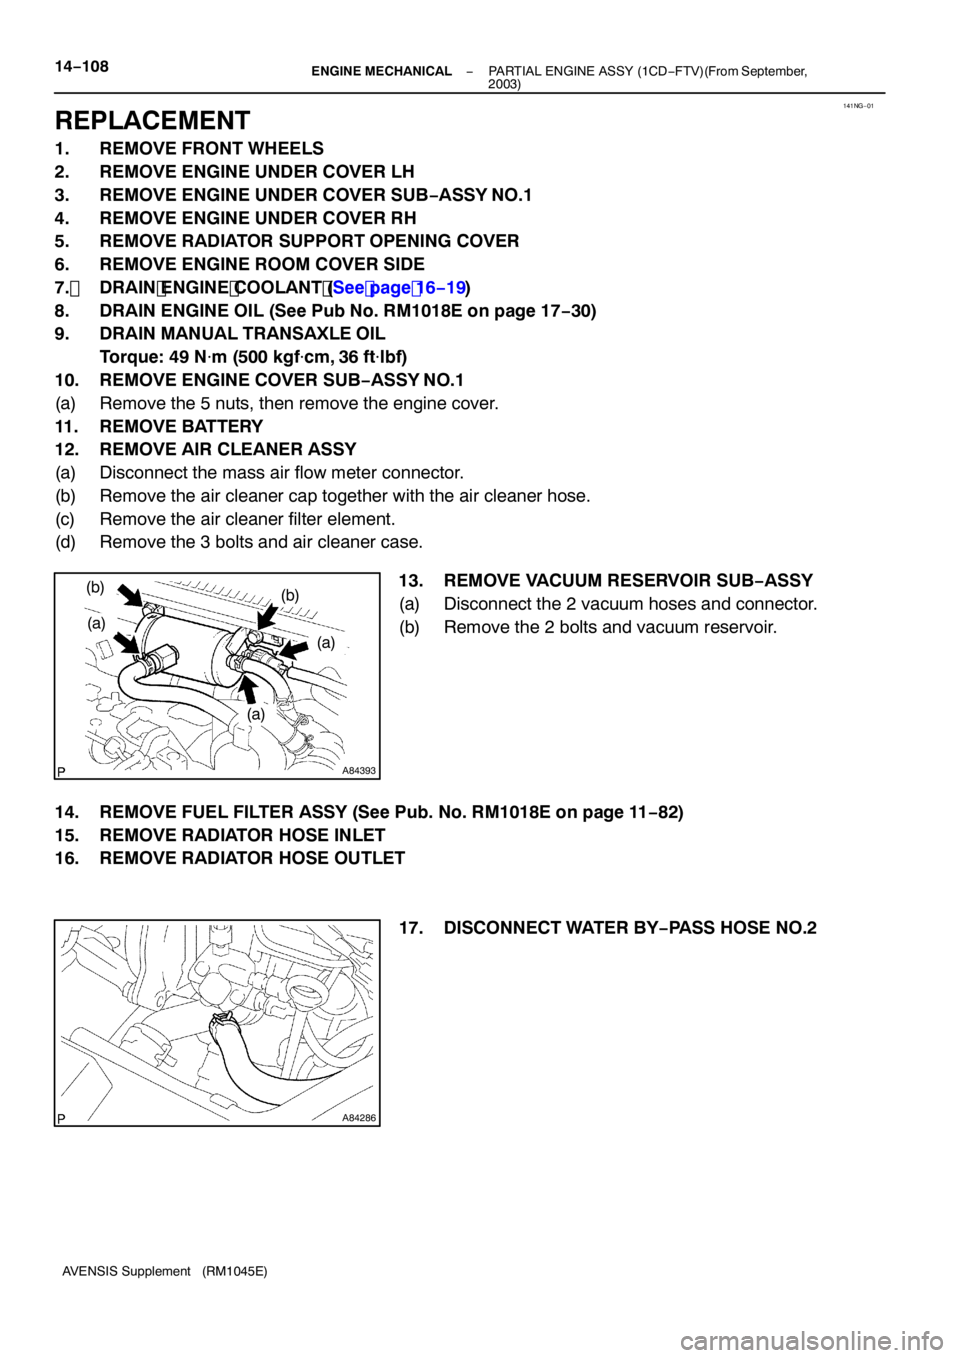
13. REMOVE VACUUM RESERVOIR SUB −ASSY
(a) Disconnect the 2 vacuum hoses and connector.
(b) Remove the 2 bolts and vacuum reservoir.
14. REMOVE FUEL FILTER ASSY (See Pub. No. RM1018E on page 11 −82)
15. REMOVE RADIATOR HOSE INLET
16. REMOVE RADIATOR HOSE OUTLET
17. DISCONNECT WATER BY−PASS HOSE NO.2
Page 4650 of 5135
A84285
A87968
Air Hose No. 3
(a)(b)
(a)
(b)
A79178
− ENGINE MECHANICALPARTIAL ENGINE ASSY (1CD−FTV)(From September,
2003)14−109
AVENSIS Supplement (RM1045E)
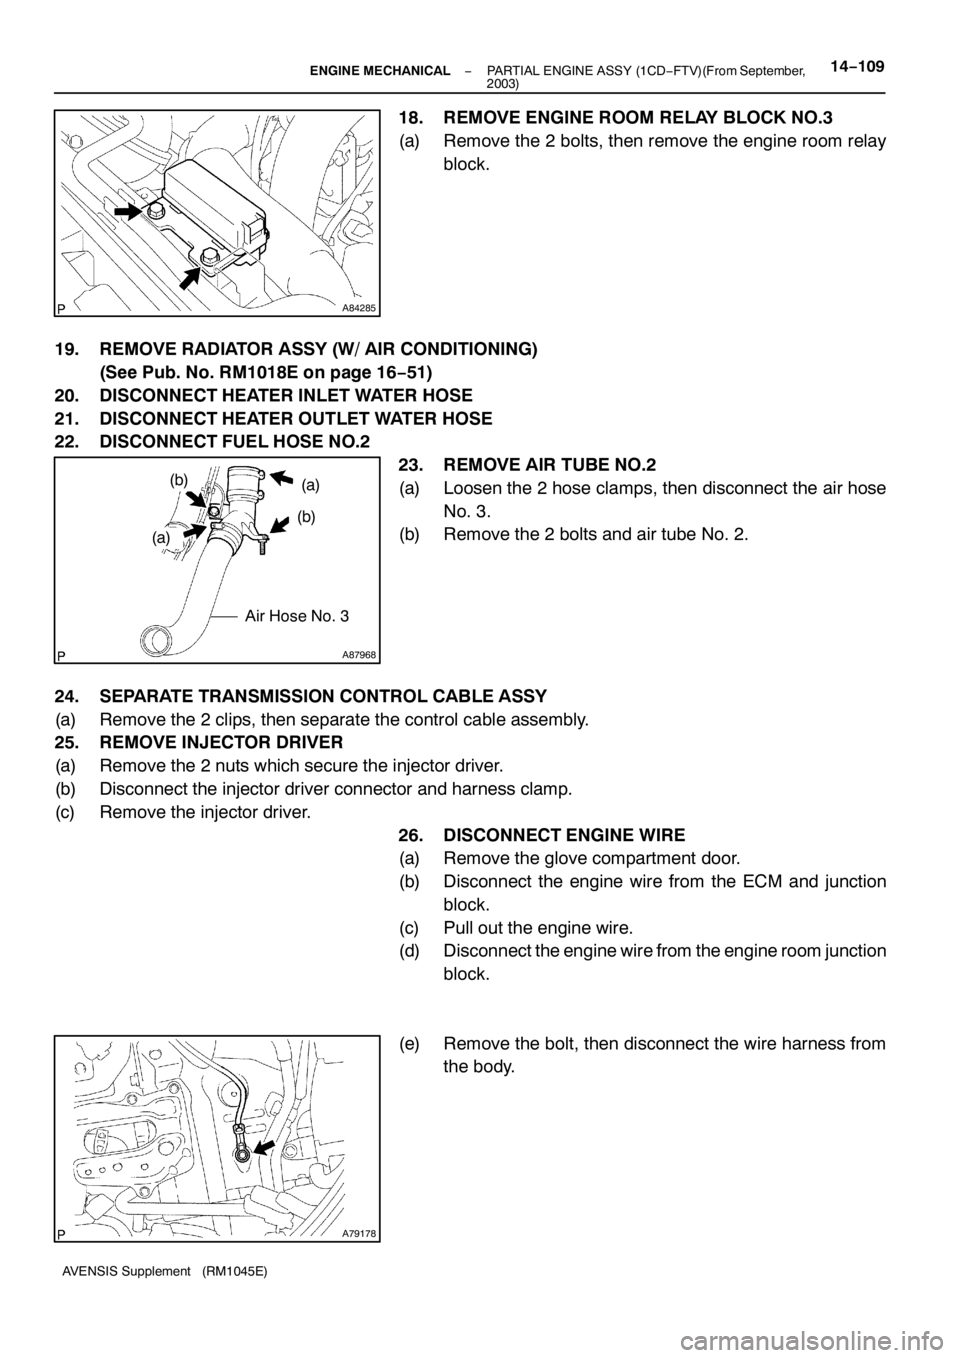
18. REMOVE ENGINE ROOM RELAY BLOCK NO.3
(a) Remove the 2 bolts, then remove the engine room relay
block.
19. REMOVE RADIATOR ASSY (W/ AIR CONDITIONING)
(See Pub. No. RM1018E on page 16−51)
20. DISCONNECT HEATER INLET WATER HOSE
21. DISCONNECT HEATER OUTLET WATER HOSE
22. DISCONNECT FUEL HOSE NO.2
23. REMOVE AIR TUBE NO.2
(a) Loosen the 2 hose clamps, then disconnect the air hose
No. 3.
(b) Remove the 2 bolts and air tube No. 2.
24. SEPARATE TRANSMISSION CONTROL CABLE ASSY
(a) Remove the 2 clips, then separate the control cable assembly.
25. REMOVE INJECTOR DRIVER
(a) Remove the 2 nuts which secure the injector driver.
(b) Disconnect the injector driver connector and harness clamp.
(c) Remove the injector driver.
26. DISCONNECT ENGINE WIRE
(a) Remove the glove compartment door.
(b) Disconnect the engine wire from the ECM and junction
block.
(c) Pull out the engine wire.
(d) Disconnect the engine wire from the engine room junction
block.
(e) Remove the bolt, then disconnect the wire harness from
the body.
Page 4651 of 5135
A85929
(g)
(f)
(g)
A84394
A84395
A84396
(a)
(b)
A93840
Air Hose No. 2
To
Turbocharger (b)
(b)(c)
(c)
(c) 14−11 0
− ENGINE MECHANICALPARTIAL ENGINE ASSY (1CD−FTV)(From September,
2003)
AVENSIS Supplement (RM1045E)
(f) Remove the bolt and engine room relay block No. 3.
(g) Disconnect the 2 connectors.
(h) Disconnect the wire harness from the fuel filter support.
(i) Disconnect the 2 exhaust gas temperature sensor con-
nectors.
27. DISCONNECT VACUUM HOSE
(a) Disconnect the 2 vacuum hoses.
28. REMOVE DIFFERENTIAL PRESSURE SENSOR ASSY
(a) Disconnect the connector.
(b) Remove the bolt and differential pressure sensor.
29. REMOVE AIR TUBE NO.1
(a) Disconnect the vacuum hoses and connectors.
(b) Loosen the 2 hose clamps.
(c) Remove the 2 bolts and nut, then detach the air tube No.
1.
Page 4660 of 5135
A84293
A09660
A85628
(a)
(a)(b)
(b)
A93407SST
A85630
− ENGINE MECHANICALPARTIAL ENGINE ASSY (1CD−FTV)(From September,
2003)14−11 9
AVENSIS Supplement (RM1045E)
95. REMOVE WATER OUTLET SUB−ASSY
(a) Remove the 2 bolts, water outlet and gasket.
96. REMOVE VACUUM PUMP ASSY
(a) Remove the 2 bolts, vacuum pump and 2 O−rings.
97. REMOVE NOZZLE LEAKAGE PIPE NO.2
(a) Disconnect the 2 hoses.
(b) Remove the 2 bolts, nozzle leakage pipe No. 2.
98. REMOVE FUEL INLET PIPE SUB−ASSY
(a) Using SST, remove the fuel inlet pipe from the common
rail side.
SST 09023−12700
(b) Using SST, remove the fuel inlet pipe from the pump side.
SST 09023−12700
99. REMOVE FUEL PIPE NO.3
(a) Remove the fuel pipe insulator.