Page 3552 of 4555
![NISSAN X-TRAIL 2005 Service Repair Manual SRS-20
TROUBLE DIAGNOSIS
a. Touch “SELF-DIAG [CURRENT]”.
�Diagnostic code is displayed on “SELF-DIAG [CURRENT]”.
i. If the malfunction is displayed in the “SRS Operation Check” (Air bag NISSAN X-TRAIL 2005 Service Repair Manual SRS-20
TROUBLE DIAGNOSIS
a. Touch “SELF-DIAG [CURRENT]”.
�Diagnostic code is displayed on “SELF-DIAG [CURRENT]”.
i. If the malfunction is displayed in the “SRS Operation Check” (Air bag](/manual-img/5/57403/w960_57403-3551.png)
SRS-20
TROUBLE DIAGNOSIS
a. Touch “SELF-DIAG [CURRENT]”.
�Diagnostic code is displayed on “SELF-DIAG [CURRENT]”.
i. If the malfunction is displayed in the “SRS Operation Check” (Air bag warning lamp blinking) but no mal-
function is displayed in the “SELF-DIAG [CURRENT]”, the following possibilities shall be checked. Refer
to SRS-21, "
DIAGNOSTIC PROCEDURE 3" .
�Low battery voltage (Less than 9 V)
�After the malfunction part is repaired, the diagnosis results in “SELF-DIAG [PAST]” has not been
erased.
�An intermittent malfunction has been stored in the past.
NOTE:
Intermittent malfunction is a malfunction that has occurred once in the past, but soon recovered.
b. Touch “SELF-DIAG [PAST]”.
�The diagnostic code is displayed until erasing the memory in
the “SELF-DIAG [CURRENT]”.
c. Touch “TROUBLE DIAG RECORD”.
�The diagnosis results (malfunction parts stored in the diagno-
sis sensor unit) stored in the self-diagnosis results are dis-
played.
�The memory of “TROUBLE DIAG RECORD” cannot be
erased.
7. Each diagnostic code is displayed. Refer to SRS-22, "
Diagnostic
Code Chart" .
8. Touch “PRINT”, if required.
9. Based on each diagnosis result, repair or replace the malfunc-
tion parts.
CAUTION:
Be sure to start the work after the following steps. Turn the
ignition switch OFF, and disconnect both battery cables.
Then wait for at least 3 minutes.
SHIA0203E
SHIA0181E
SHIA0182E
SHIA0180E
Page 3553 of 4555
![NISSAN X-TRAIL 2005 Service Repair Manual TROUBLE DIAGNOSIS
SRS-21
C
D
E
F
G
I
J
K
L
MA
B
SRS
10. After repairing the malfunction, touch “SELF-DIAG [CURRENT]”
to check that “No DTC IS DETECTED” is displayed.
�After checking the disp NISSAN X-TRAIL 2005 Service Repair Manual TROUBLE DIAGNOSIS
SRS-21
C
D
E
F
G
I
J
K
L
MA
B
SRS
10. After repairing the malfunction, touch “SELF-DIAG [CURRENT]”
to check that “No DTC IS DETECTED” is displayed.
�After checking the disp](/manual-img/5/57403/w960_57403-3552.png)
TROUBLE DIAGNOSIS
SRS-21
C
D
E
F
G
I
J
K
L
MA
B
SRS
10. After repairing the malfunction, touch “SELF-DIAG [CURRENT]”
to check that “No DTC IS DETECTED” is displayed.
�After checking the display, touch “ERASE”.
�If any malfunction is displayed on “SELF-DIAG [CURRENT]”,
repair or replace the malfunctioning again.
11. Touch “BACK” key of CONSULT-II to “SELECT SYSTEM”
screen. Touch “SELF-DIAG [PAST]”.
12. Check that no malfunction is detected on “SELF-DIAG [PAST]”.
�If any malfunction is deployed, Touch “ERASE” in the “SELF-
DIAG [CURRENT]” screen, and check the display.
13. Turn ignition switch OFF, then turn off and disconnect CONSULT-II.
14. Turn ignition switch ON, and check the system with the SRS air bag warning lamp (User mode).
15. Check that no malfunction is detected. Now the diagnosis is complete.
DIAGNOSTIC PROCEDURE 3
Inspecting SRS Malfunctioning Record
If any malfunction is detected in “SRS Operation Check”, but no malfunction is detected in “SELF-DIAG [CUR-
RENT]” on CONSULT-II, carry out the following steps.
1. CHECK BATTERY VOLTAGE
Disconnect both battery cables and check that the battery voltage is 9 V or more.
OK or NG
OK >> GO TO 2.
NG >> Charge the battery.
2. CONSIDER POSSIBILITY OF NOT ERASING SELF-DIAGNOSTIC RESULT AFTER REPAIRING.
Is it the first time for maintenance of SRS?
YES or NO
YES >> GO TO 3.
NO >> Erase the self-diagnostic results, and Check the “SRS Operation Check”. Refer to SRS-17, "
SRS
Operation Check" .
3. CHECK “SELF-DIAG [PAST]” BY CONSULT-II
Store the memory in “SELF-DIAG [PAST]”.
YES or NO
YES >> Repair the part of “SELF-DIAG[PAST]”.
NO >> Check the “TROUBLE DIAG RECORD”, and then repair it. Refer to SRS-22, "
Diagnostic Code
Chart" .
SRS701
SRS702
Page 3560 of 4555
SRS-28
TROUBLE DIAGNOSIS
Trouble Diagnosis: “AIR BAG” Warning Lamp Does Not Turn OFFEHS000OB
DIAGNOSTIC PROCEDURE 5
1. CHECK THE DEPLOYMENT OF AIR BAG MODULE
Is air bag module deployed?
YES or NO
YES >> Refer to SRS-48, "COLLISION DIAGNOSIS" .
NO >> GO TO 2.
2. CHECK THE AIR BAG FUSE
Check 10A fuse [No. 9, located in fuse block (J/B)].
Refer to PG-2, "
POWER SUPPLY ROUTING" .
OK or NG
OK >> GO TO 4.
NG >> GO TO 3.
3. CHECK AIR BAG FUSE AGAIN
Replace “AIR BAG” fuse and turn ignition switch ON.
Is
“AIR BAG” fuse blown again?
YES >> Repair main harness.
NO >>INSPECTION END
4. CHECK DIAGNOSIS SENSOR UNIT
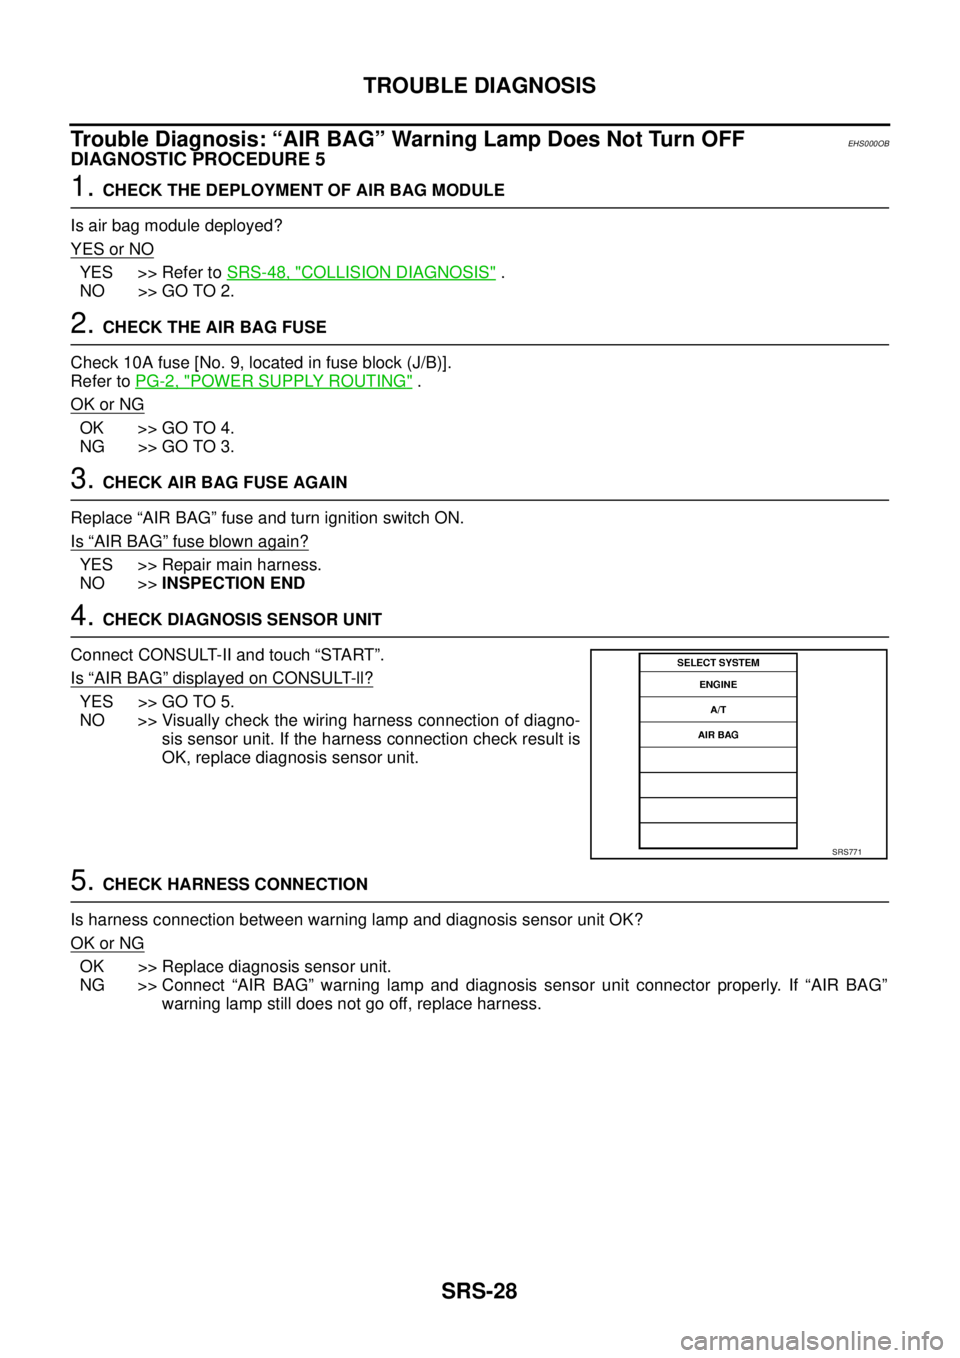
Connect CONSULT-II and touch “START”.
Is
“AIR BAG” displayed on CONSULT-ll?
YES >> GO TO 5.
NO >> Visually check the wiring harness connection of diagno-
sis sensor unit. If the harness connection check result is
OK, replace diagnosis sensor unit.
5. CHECK HARNESS CONNECTION
Is harness connection between warning lamp and diagnosis sensor unit OK?
OK or NG
OK >> Replace diagnosis sensor unit.
NG >> Connect “AIR BAG” warning lamp and diagnosis sensor unit connector properly. If “AIR BAG”
warning lamp still does not go off, replace harness.
SRS771
Page 3701 of 4555
NATS (NISSAN ANTI-THEFT SYSTEM)
BL-119
C
D
E
F
G
H
J
K
L
MA
B
BL
Trouble DiagnosesEIS008F5
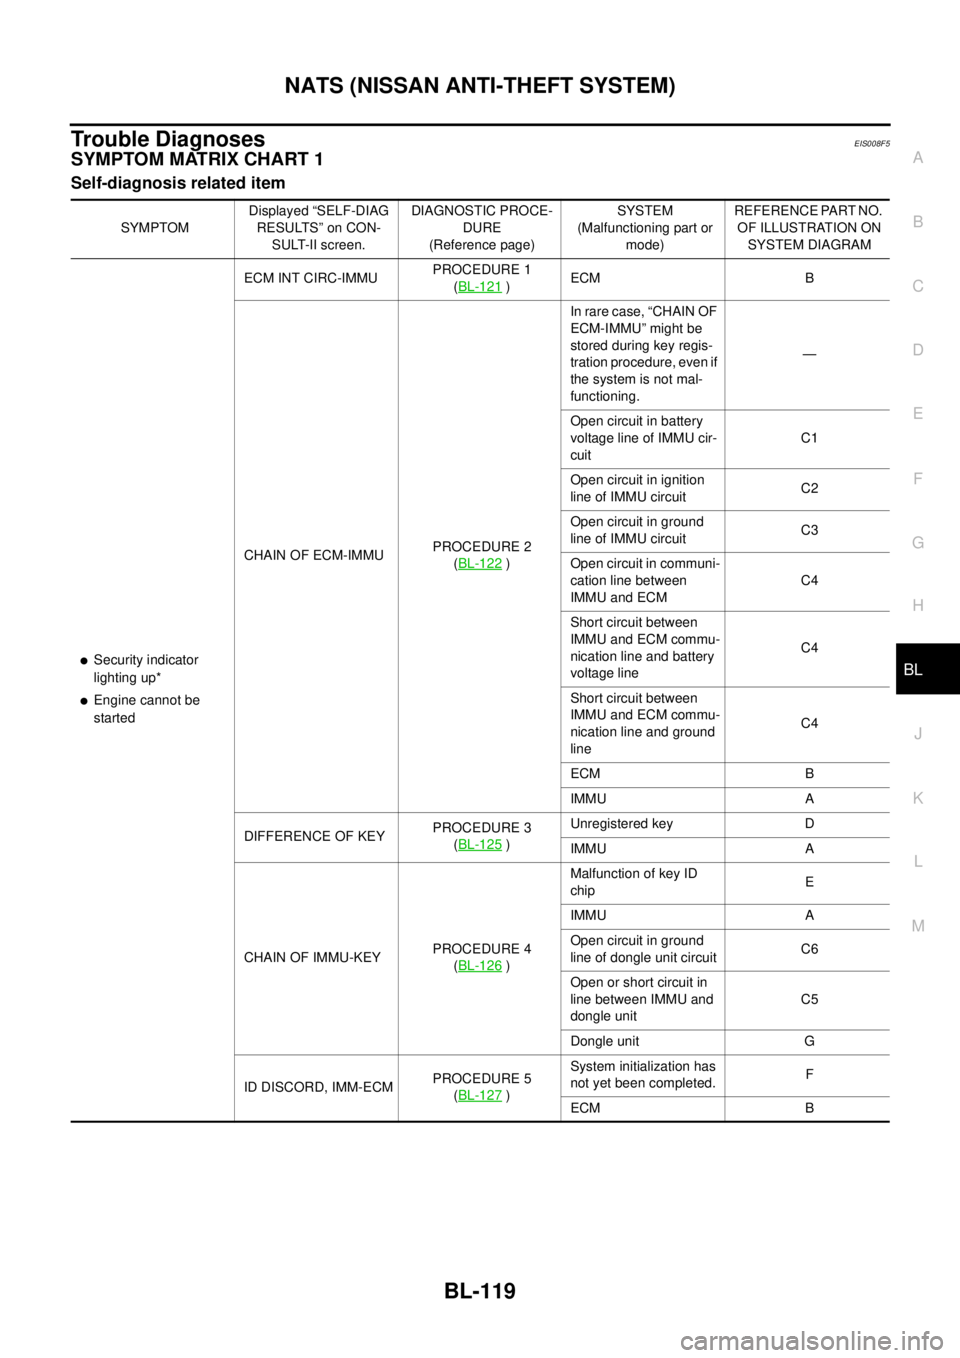
SYMPTOM MATRIX CHART 1
Self-diagnosis related item
SYMPTOMDisplayed “SELF-DIAG
RESULTS” on CON-
SULT-II screen.DIAGNOSTIC PROCE-
DURE
(Reference page)SYSTEM
(Malfunctioning part or
mode)REFERENCE PART NO.
OF ILLUSTRATION ON
SYSTEM DIAGRAM
�Security indicator
lighting up*
�Engine cannot be
startedECM INT CIRC-IMMUPROCEDURE 1
(BL-121
)ECM B
CHAIN OF ECM-IMMUPROCEDURE 2
(BL-122
)In rare case, “CHAIN OF
ECM-IMMU” might be
stored during key regis-
tration procedure, even if
the system is not mal-
functioning.—
Open circuit in battery
voltage line of IMMU cir-
cuitC1
Open circuit in ignition
line of IMMU circuitC2
Open circuit in ground
line of IMMU circuitC3
Open circuit in communi-
cation line between
IMMU and ECMC4
Short circuit between
IMMU and ECM commu-
nication line and battery
voltage lineC4
Short circuit between
IMMU and ECM commu-
nication line and ground
lineC4
ECM B
IMMU A
DIFFERENCE OF KEYPROCEDURE 3
(BL-125
)Unregistered key D
IMMU A
CHAIN OF IMMU-KEYPROCEDURE 4
(BL-126
)Malfunction of key ID
chipE
IMMU A
Open circuit in ground
line of dongle unit circuitC6
Open or short circuit in
line between IMMU and
dongle unitC5
Dongle unit G
ID DISCORD, IMM-ECMPROCEDURE 5
(BL-127
)System initialization has
not yet been completed.F
ECM B
Page 3702 of 4555

BL-120
NATS (NISSAN ANTI-THEFT SYSTEM)
*: When NATS detects trouble, the security indicator lights up while ignition key is in the “ON” position.
*: When the vehicle is equipped with a dongle unit (RHD models), the security indicator blinks 6 times just after the ignition switch is
turned to ON. Then the security indicator lights up while the ignition key is in the “ON” position.
�Security indicator
lighting up*
�Engine cannot be
startedLOCK MODEPROCEDURE 7
(BL-129 )LOCK MODEWhen the starting opera-
tion is carried out five or
more times consecu-
tively under the follow-
ing conditions, NATS will
shift the mode to one
which prevents the
engine from being
started.
�Unregistered ignition
key is used.
�IMMU or ECM's mal-
functioning.
�MIL staying ON
�Security indicator
lighting up*DON'T ERASE
BEFORE CHECKING
ENG DIAGWORK FLOW
(BL-118 )Engine trouble data and
NATS trouble data have
been detected in ECM— SYMPTOMDisplayed “SELF-DIAG
RESULTS” on CON-
SULT-II screen.DIAGNOSTIC PROCE-
DURE
(Reference page)SYSTEM
(Malfunctioning part or
mode)REFERENCE PART NO.
OF ILLUSTRATION ON
SYSTEM DIAGRAM
Page 3703 of 4555
NATS (NISSAN ANTI-THEFT SYSTEM)
BL-121
C
D
E
F
G
H
J
K
L
MA
B
BL
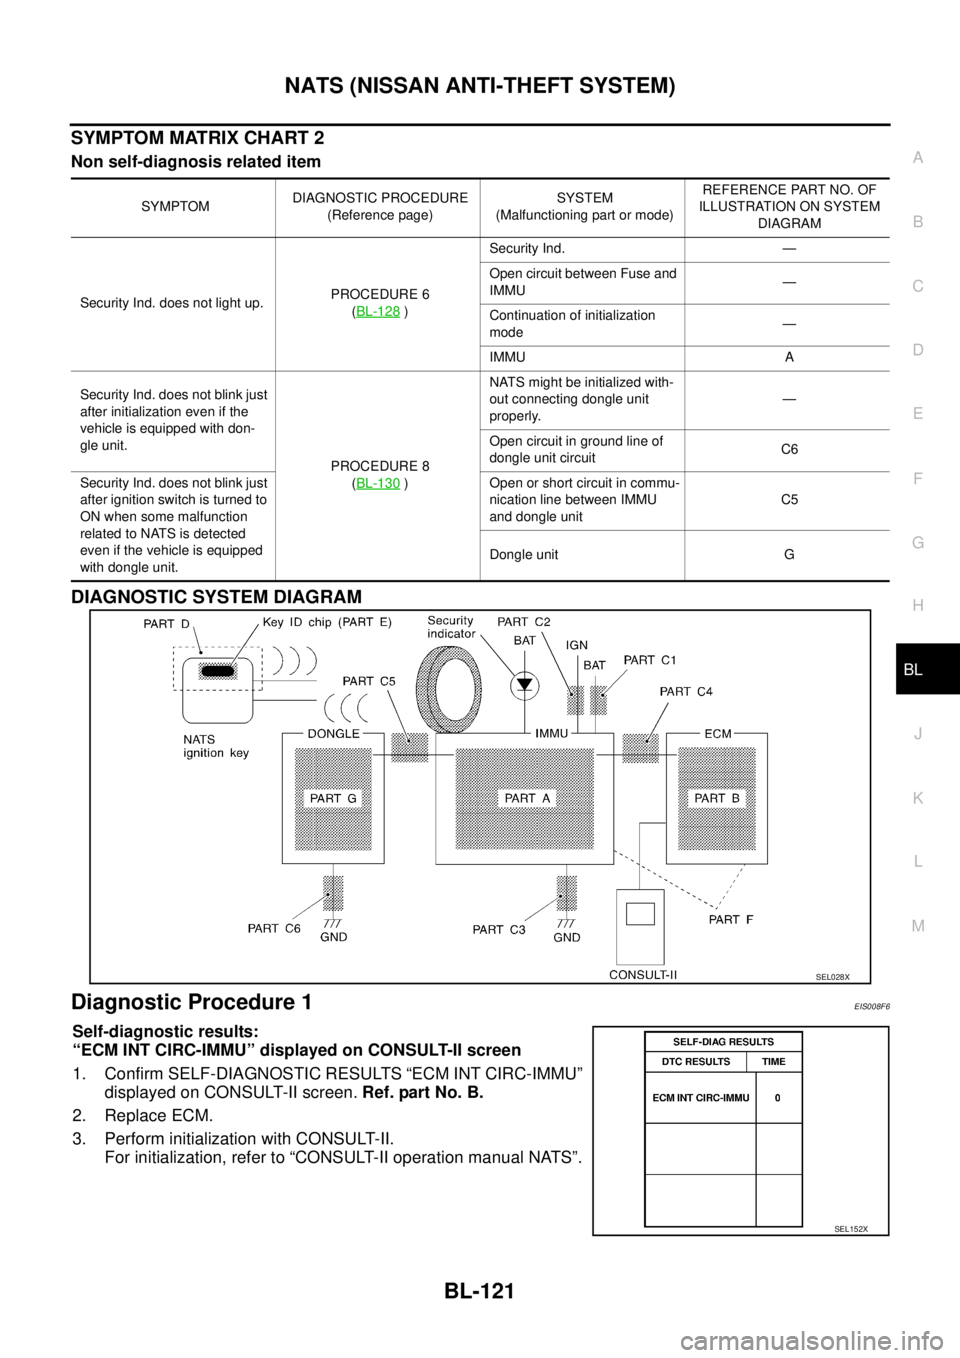
SYMPTOM MATRIX CHART 2
Non self-diagnosis related item
DIAGNOSTIC SYSTEM DIAGRAM
Diagnostic Procedure 1EIS008F6
Self-diagnostic results:
“ECM INT CIRC-IMMU” displayed on CONSULT-II screen
1. Confirm SELF-DIAGNOSTIC RESULTS “ECM INT CIRC-IMMU”
displayed on CONSULT-II screen. Ref. part No. B.
2. Replace ECM.
3. Perform initialization with CONSULT-II.
For initialization, refer to “CONSULT-II operation manual NATS”.
SYMPTOMDIAGNOSTIC PROCEDURE
(Reference page)SYSTEM
(Malfunctioning part or mode)REFERENCE PART NO. OF
ILLUSTRATION ON SYSTEM
DIAGRAM
Security Ind. does not light up.PROCEDURE 6
(BL-128
)Security Ind. —
Open circuit between Fuse and
IMMU—
Continuation of initialization
mode—
IMMU A
Security Ind. does not blink just
after initialization even if the
vehicle is equipped with don-
gle unit.
PROCEDURE 8
(BL-130
)NATS might be initialized with-
out connecting dongle unit
properly.—
Open circuit in ground line of
dongle unit circuitC6
Security Ind. does not blink just
after ignition switch is turned to
ON when some malfunction
related to NATS is detected
even if the vehicle is equipped
with dongle unit.Open or short circuit in commu-
nication line between IMMU
and dongle unitC5
Dongle unit G
SEL028X
SEL152X
Page 3704 of 4555
BL-122
NATS (NISSAN ANTI-THEFT SYSTEM)
Diagnostic Procedure 2EIS008F7
Self-diagnostic results:
“CHAIN OF ECM-IMMU” displayed on CONSULT-II screen
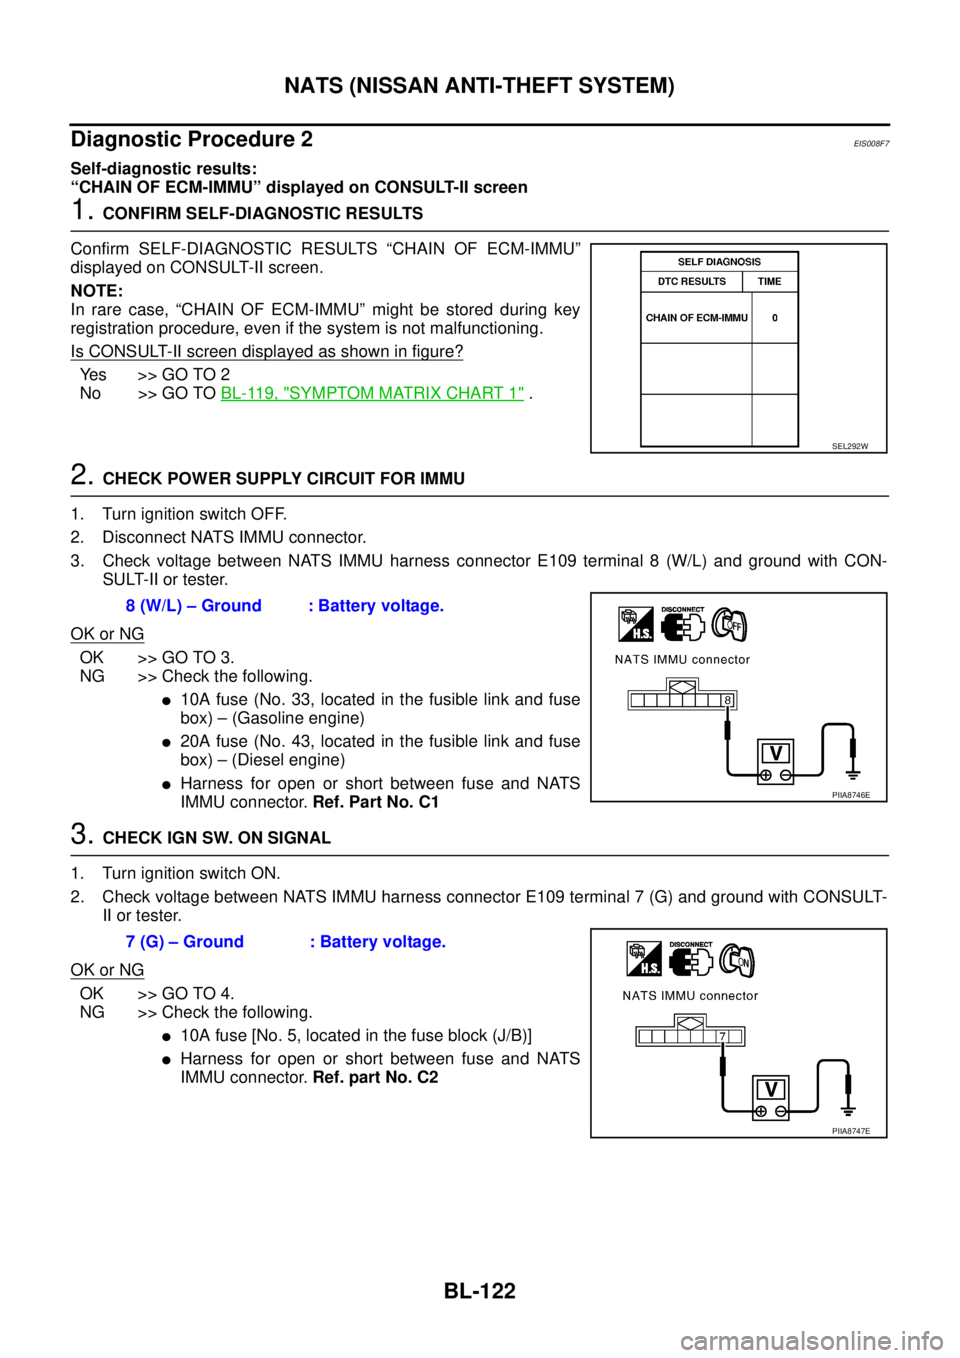
1. CONFIRM SELF-DIAGNOSTIC RESULTS
Confirm SELF-DIAGNOSTIC RESULTS “CHAIN OF ECM-IMMU”
displayed on CONSULT-II screen.
NOTE:
In rare case, “CHAIN OF ECM-IMMU” might be stored during key
registration procedure, even if the system is not malfunctioning.
Is CONSULT-II screen displayed as shown in figure?
Yes >> GO TO 2
No >> GO TO BL-119, "
SYMPTOM MATRIX CHART 1" .
2. CHECK POWER SUPPLY CIRCUIT FOR IMMU
1. Turn ignition switch OFF.
2. Disconnect NATS IMMU connector.
3. Check voltage between NATS IMMU harness connector E109 terminal 8 (W/L) and ground with CON-
SULT-II or tester.
OK or NG
OK >> GO TO 3.
NG >> Check the following.
�10A fuse (No. 33, located in the fusible link and fuse
box) – (Gasoline engine)
�20A fuse (No. 43, located in the fusible link and fuse
box) – (Diesel engine)
�Harness for open or short between fuse and NATS
IMMU connector. Ref. Part No. C1
3. CHECK IGN SW. ON SIGNAL
1. Turn ignition switch ON.
2. Check voltage between NATS IMMU harness connector E109 terminal 7 (G) and ground with CONSULT-
II or tester.
OK or NG
OK >> GO TO 4.
NG >> Check the following.
�10A fuse [No. 5, located in the fuse block (J/B)]
�Harness for open or short between fuse and NATS
IMMU connector. Ref. part No. C2
SEL292W
8 (W/L) – Ground : Battery voltage.
PIIA8746E
7 (G) – Ground : Battery voltage.
PIIA8747E
Page 3707 of 4555
NATS (NISSAN ANTI-THEFT SYSTEM)
BL-125
C
D
E
F
G
H
J
K
L
MA
B
BL
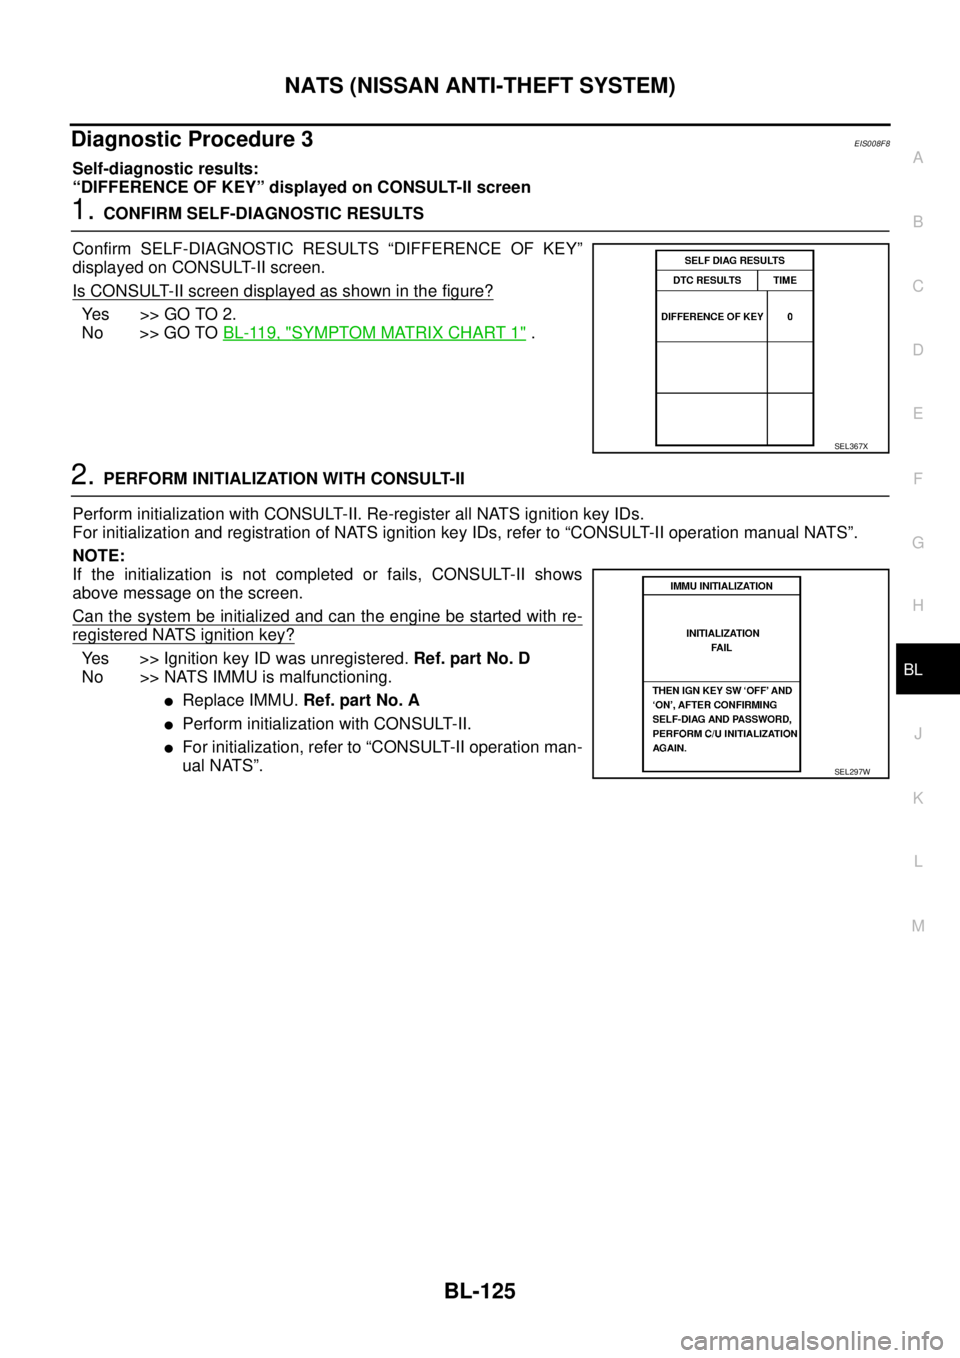
Diagnostic Procedure 3EIS008F8
Self-diagnostic results:
“DIFFERENCE OF KEY” displayed on CONSULT-II screen
1. CONFIRM SELF-DIAGNOSTIC RESULTS
Confirm SELF-DIAGNOSTIC RESULTS “DIFFERENCE OF KEY”
displayed on CONSULT-II screen.
Is CONSULT-II screen displayed as shown in the figure?
Ye s > > G O T O 2 .
No >> GO TO BL-119, "
SYMPTOM MATRIX CHART 1" .
2. PERFORM INITIALIZATION WITH CONSULT-II
Perform initialization with CONSULT-II. Re-register all NATS ignition key IDs.
For initialization and registration of NATS ignition key IDs, refer to “CONSULT-II operation manual NATS”.
NOTE:
If the initialization is not completed or fails, CONSULT-II shows
above message on the screen.
Can the system be initialized and can the engine be started with re-
registered NATS ignition key?
Yes >> Ignition key ID was unregistered. Ref. part No. D
No >> NATS IMMU is malfunctioning.
�Replace IMMU. Ref. part No. A
�Perform initialization with CONSULT-II.
�For initialization, refer to “CONSULT-II operation man-
ual NATS”.
SEL367X
SEL297W