Page 2169 of 4555
M/T OIL
MT-13
D
E
F
G
H
I
J
K
L
MA
B
MT
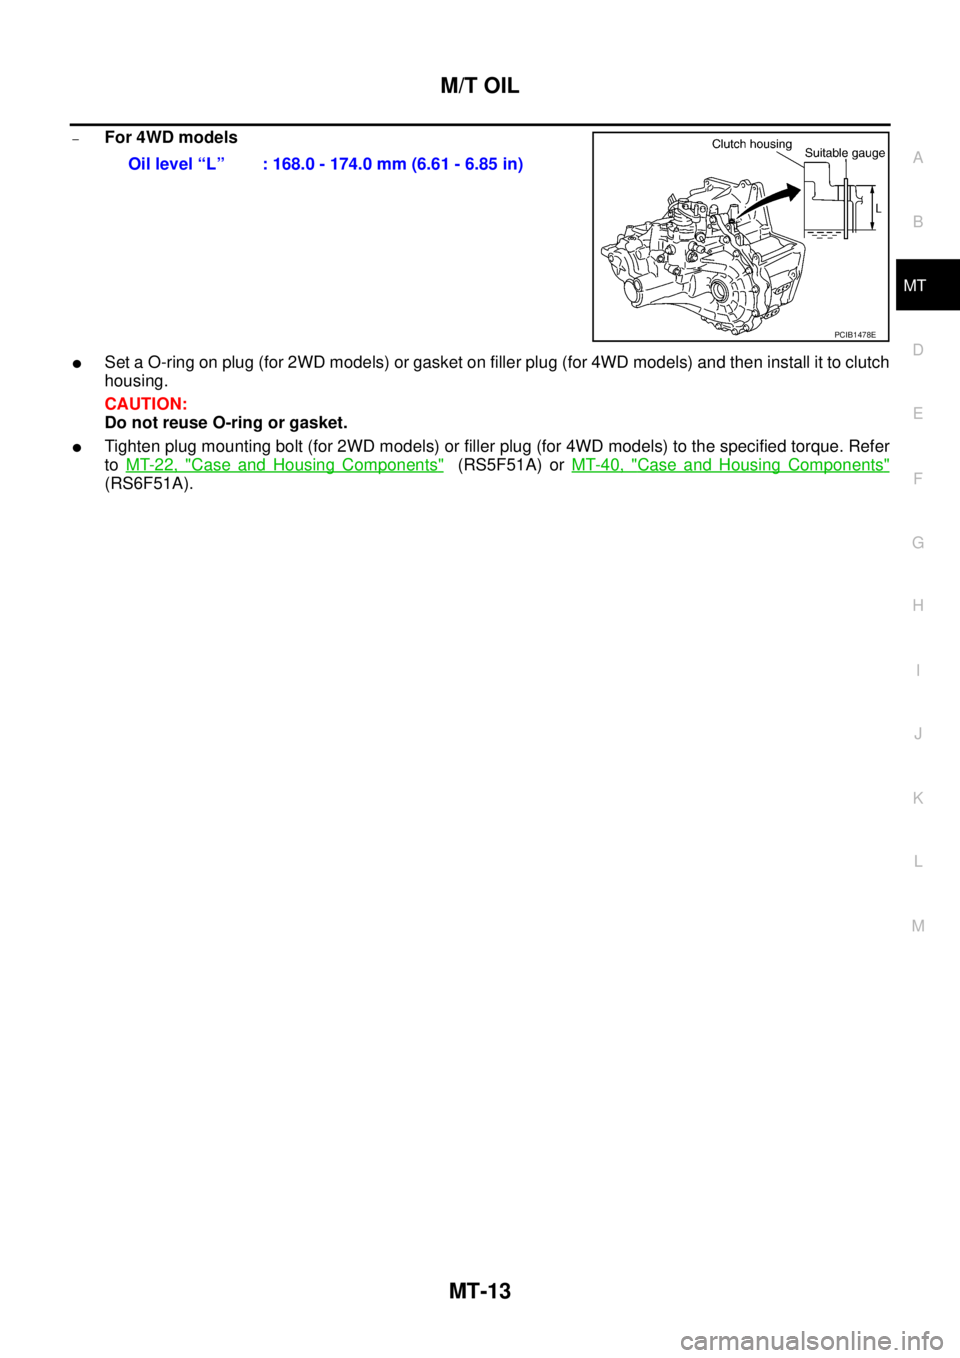
–For 4WD models
�Set a O-ring on plug (for 2WD models) or gasket on filler plug (for 4WD models) and then install it to clutch
housing.
CAUTION:
Do not reuse O-ring or gasket.
�Tighten plug mounting bolt (for 2WD models) or filler plug (for 4WD models) to the specified torque. Refer
to MT-22, "
Case and Housing Components" (RS5F51A) or MT-40, "Case and Housing Components"
(RS6F51A).Oil level “L” : 168.0 - 174.0 mm (6.61 - 6.85 in)
PCIB1478E
Page 2177 of 4555

TRANSAXLE ASSEMBLY
MT-21
D
E
F
G
H
I
J
K
L
MA
B
MT
17. Remove transaxle assembly from the vehicle.
CAUTION:
Secure transaxle assembly to a jack while removing it.
INSTALLATION
Note the following, and install in the reverse order of removal.
�When installing the transaxle assembly to the engine, install the mounting bolts following the standard
below.
CAUTION:
When installing transaxle assembly, be careful not to bring transaxle input shaft into contact with
clutch cover.
–QR engine models
*: Tightening the bolt for 4WD models.
–YD engine models
�After installation, check oil level, and check for leaks and loose
mechanisms. Refer to MT-12, "
Checking M/T Oil" .
MTD0062D
Bolt No. 1 2 3* 4 5 6
Quantity 2 1 1 2 2 2
Bolt length “ ”
mm (in)40
(1.57)75
(2.95)45
(1.77)40
(1.57)30
(1.18)40
(1.57)
Tightening torque
N·m (kg - m, ft- lb)74.5
(7.6, 55)42.7
(4.4, 31)35.3
(3.6, 26)
SCIA0353E
Bolt No. 1 2 3 4 5 6
Quantity 2 2 1 1 3 1
Bolt length “ ”
mm (in)55
(2.17)50
(2.76)120
(4.72)45
(1.77)40
(1.57)35
(1.38)
Tightening torque
N·m (kg - m, ft- lb)44
(4.5, 32)33.5
(3.4, 25)
SCIA0748E
Page 2187 of 4555
TRANSAXLE ASSEMBLY
MT-31
D
E
F
G
H
I
J
K
L
MA
B
MT
4. Install mainshaft front bearing to clutch housing using the drift.
CAUTION:
Be careful with the orientation of installation.
5. Install mainshaft bearing retainer to clutch housing and tighten
mounting bolt to the specified torque. Refer to MT-23, "
Gear
Components" .
CAUTION:
Install with punched surface facing up.
6. Install differential side bearing outer race to clutch housing using
the drifts.
7. Install final drive assembly into clutch housing.
8. Install input shaft assembly, mainshaft assembly, and reverse
idler gear assembly into clutch housing.
CAUTION:
Be sure not to damage input shaft oil seal.
SCIA0401E
PCIB0789E
SCIA0987E
SCIA0888E
SCIA0395E
Page 2189 of 4555

TRANSAXLE ASSEMBLY
MT-33
D
E
F
G
H
I
J
K
L
MA
B
MT
b. While lifting reverse shift fork, align cam with 5th-reverse
bracket.
c. Install reverse lever assembly to clutch housing, and then
tighten mounting bolts to the specified torque. Refer to MT-25,
"Shift Control Components" .
22. Install check ball, shift check sleeve, check spring and check
plug to clutch housing.
CAUTION:
�Do not reuse check plug.
�Do not drop check ball.
23. Install the magnet onto clutch housing.
24. Install differential side oil seal until it is flush with end face of
transaxle case using the drift.
CAUTION:
Do not reuse differential side oil seal.
25. Install selected differential side bearing adjusting shim and dif-
ferential side bearing outer race.
�For selection of adjusting shim, refer to MT-36, "Differential
Side Bearing Preload" .
26. Install selected reverse idler gear adjusting shim onto reverse
idler gear assembly.
�For selection of adjusting shims, refer to MT-37, "Reverse
Idler Gear End Play" .
27. Install selected input shaft rear bearing adjusting shim onto input shaft.
�For selection of adjusting shims, refer to MT-37, "Input Shaft End Play" .
28. Install baffle plate and oil gutter to transaxle case.
29. Install transaxle case following the procedures below.
a. Install selected mainshaft rear bearing adjusting shim into transaxle case.
�For selection of adjusting shims, refer to MT-38, "Mainshaft End Play" .
b. Temporarily install snap ring of mainshaft rear bearing into transaxle case.
CAUTION:
Do not reuse snap ring.
c. Apply recommended sealant to mating surfaces of transaxle
case and clutch housing.
CAUTION:
Remove old sealant adhering to mounting surfaces. Also
remove any moisture, oil, or foreign material adhering to
application and mounting surfaces.
PCIB0929E
SCIA0390E
SCIA0887E
PCIB0816E
Page 2190 of 4555

MT-34
TRANSAXLE ASSEMBLY
d. With snap ring of mainshaft rear bearing temporarily installed,
place transaxle case over clutch housing.
e. Through bore plug mounting hole, with snap ring stretched, and
lift up mainshaft assembly from the control assembly mounting
hole.
f. Securely install snap ring onto mainshaft rear bearing.
g. Tighten mounting bolts to the specified torque.
CAUTION:
Always replace bolts B as they are self-sealing bolts.
h. Apply gear oil to O-ring and install it to control assembly. Then
install control assembly to transaxle case. Tighten bolts to the
specified torque. Refer to MT-25, "
Shift Control Components" .
CAUTION:
Do not reuse O-ring.
i. Install shift check to transaxle case, and then tighten shift check to the specified torque. Refer to MT-25,
"Shift Control Components" .
CAUTION:
Do not reuse shift check.
j. Install stopper bolt to transaxle case, and then tighten stopper bolt to the specified torque. Refer to MT-25,
"Shift Control Components" .
CAUTION:
Do not reuse stopper bolt.
SCIA0892E
SCIA0893E
Bolt A:
: 52 N·m (5.3 kg-m, 38 ft-lb)
Bolt B:
: 65 N·m (6.6 kg-m, 48 ft-lb)
SCIA1064E
Page 2191 of 4555

TRANSAXLE ASSEMBLY
MT-35
D
E
F
G
H
I
J
K
L
MA
B
MT
30. Install bore plug to transaxle case using the drift.
CAUTION:
Do not reuse bore plug.
31. Install welch plug to transaxle case using the drift.
CAUTION:
Do not reuse welch plug.
32. Install 2 check balls, 2 check springs and 2 check plugs to tran-
saxle case, and then tighten check plug to the specified torque.
Refer to MT-25, "
Shift Control Components" .
CAUTION:
Do not reuse check plug.
33. Apply recommended sealant to threads of park/neutral position
switch and back-up lamp switch. Then install them to transaxle
case and tighten to the specified torque. Refer to MT-22, "
Case
and Housing Components" .
34. Install gaskets onto drain plug and plug, and then install them
into transaxle case. Tighten drain plug and plug to the specified
torque. Refer to MT-22, "
Case and Housing Components" .
CAUTION:
Do not reuse gasket.
35. Install O-ring onto plug (for 2WD models) or gasket onto filler
plug (for 4WD models), and then install it into clutch housing.
Tighten plug mounting bolt or filler plug to the specified torque.
Refer to MT-22, "
Case and Housing Components" .
CAUTION:
�Do not reuse O-ring or gasket.
�After oil is filled, tighten plug mounting bolt or filler plug to specified torque.
SCIA0894E
SCIA0403E
SCIA1668J
SCIA0895E
Page 2205 of 4555
TRANSAXLE ASSEMBLY
MT-49
D
E
F
G
H
I
J
K
L
MA
B
MT
3. Install oil channel on mainshaft side.
CAUTION:
Be careful with the orientation of installation.
4. Install mainshaft front bearing to clutch housing using the drift.
CAUTION:
Be careful with the orientation of installation.
5. Install mainshaft bearing retainer to clutch housing and tighten
mounting bolt to the specified torque. Refer to MT-41, "
Gear
Components" .
CAUTION:
Install with punched surface facing up.
6. Install differential side bearing outer race to clutch housing using
the drifts.
7. Install final drive assembly into clutch housing.
SCIA0986E
SCIA0401E
PCIB0789E
SCIA0987E
SCIA0888E
Page 2207 of 4555

TRANSAXLE ASSEMBLY
MT-51
D
E
F
G
H
I
J
K
L
MA
B
MT
19. Install retaining pin onto 5th-6th shift fork.
CAUTION:
Do not reuse retaining pin.
20. Install 2 check balls.
21. Install check ball, shift check sleeve, check spring and check
plug.
CAUTION:
�Do not reuse check plug.
�Do not drop check ball.
22. Install reverse bracket fork rod and reverse bracket.
23. Install retaining pin onto reverse bracket.
CAUTION:
Do not reuse retaining pin.
24. Install reverse shift fork and reverse fork rod.
25. Install reverse lever assembly following the procedures below.
a. Install shifter cap onto reverse lever assembly cam, and then
install them onto reverse shift fork.
CAUTION:
Do not drop shifter cap.
b. While lifting reverse shift fork, align cam with reverse bracket.
c. Install reverse lever assembly to clutch housing, and then
tighten mounting bolts to the specified torque. Refer to MT-43,
"Shift Control Components" .
26. Install check ball, shift check sleeve, check spring and check
plug to clutch housing.
CAUTION:
�Do not reuse check plug.
�Do not drop check ball.
27. Install the magnet onto clutch housing.
28. Install differential side oil seal until it is flush with end face of
transaxle case using the drift.
CAUTION:
Do not reuse differential side oil seal.
29. Install selected differential side bearing adjusting shim and dif-
ferential side bearing outer race.
�For selection of adjusting shim, refer to MT-54, "Differential
Side Bearing Preload" .
30. Install selected reverse idler gear adjusting shim onto reverse
idler gear assembly.
SCIA0962E
SCIA0961E
PCIB0791E
SCIA0960E
SCIA0887E