2005 NISSAN NAVARA ignition
[x] Cancel search: ignitionPage 1675 of 3171

TOW TRUCK TOWING
GI-53
C
D
E
F
G
H
I
J
K
L
MB
GI
TOW TRUCK TOWINGPFP:00000
To w Tr u c k To w i n gEAS001DI
WARNING:
lNever get under the vehicle while it is supported only by the jack. Always use safety stands to
support the frame when you have to get under the vehicle.
lPlace wheel chocks at both front and back of the wheels on the ground.
CAUTION:
lAll applicable local laws regarding the towing operation must be obeyed.
lIt is necessary to use proper towing equipment to avoid possible damage during towing opera-
tion. Towing is in accordance with Towing Procedure Manual at dealer.
lAlways attach safety chains before towing.
lWhen towing, make sure that the transmission, steering system and powertrain are in good order.
If any unit is damaged, dollies must be used.
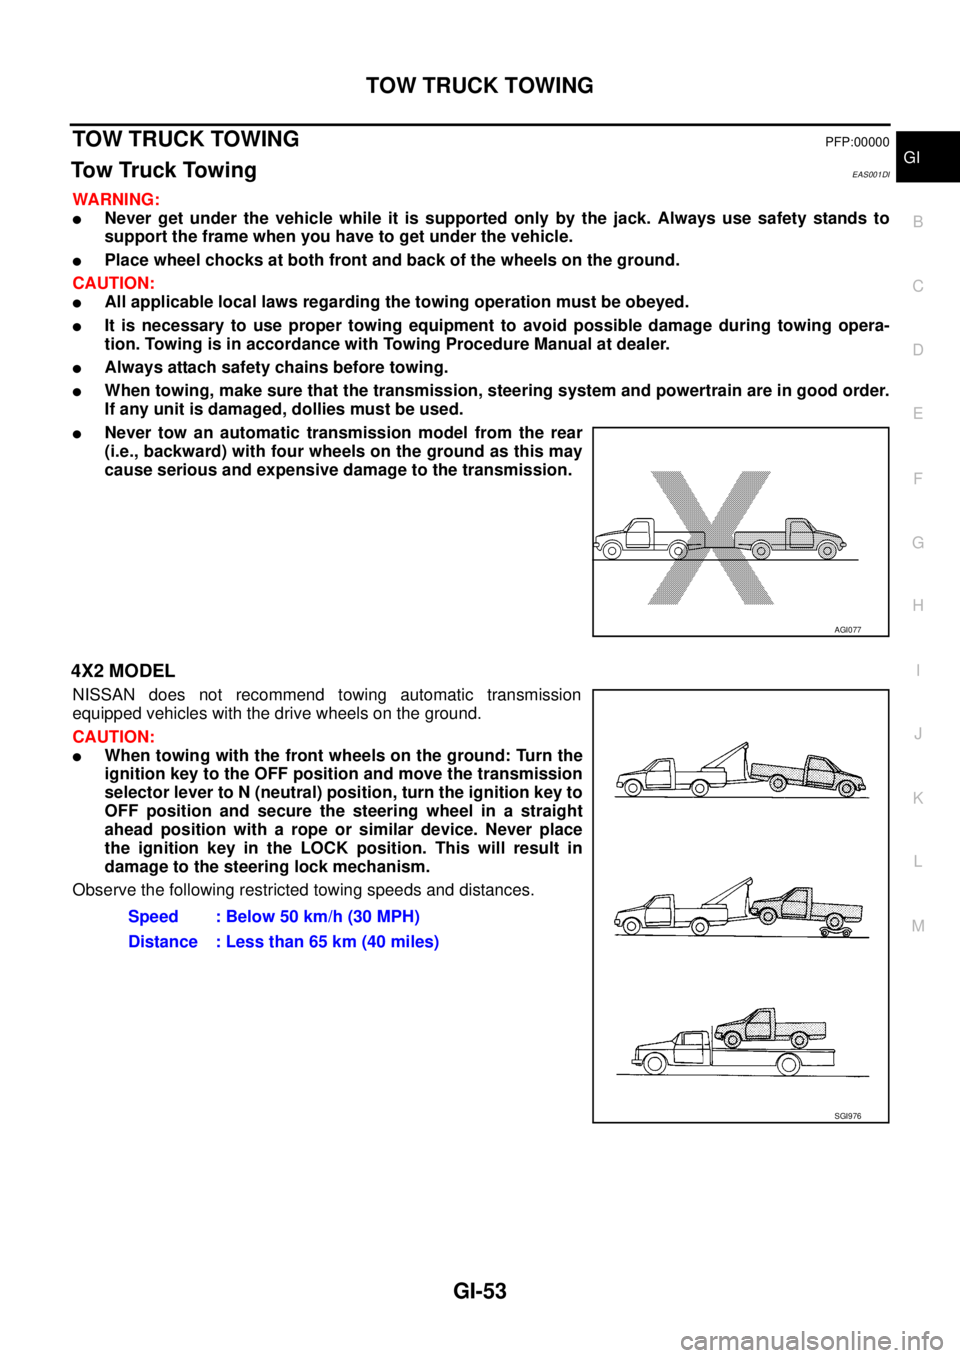
lNever tow an automatic transmission model from the rear
(i.e., backward) with four wheels on the ground as this may
cause serious and expensive damage to the transmission.
4X2 MODEL
NISSAN does not recommend towing automatic transmission
equipped vehicles with the drive wheels on the ground.
CAUTION:
lWhen towing with the front wheels on the ground: Turn the
ignition key to the OFF position and move the transmission
selector lever to N (neutral) position, turn the ignition key to
OFF position and secure the steering wheel in a straight
ahead position with a rope or similar device. Never place
the ignition key in the LOCK position. This will result in
damage to the steering lock mechanism.
Observe the following restricted towing speeds and distances.
AGI077
Speed : Below 50 km/h (30 MPH)
Distance : Less than 65 km (40 miles)
SGI976
Page 1676 of 3171

GI-54
TOW TRUCK TOWING
4X4 MODEL
NISSAN does not recommend towing automatic transmission
equipped vehicles with the drive wheels on the ground.
CAUTION:
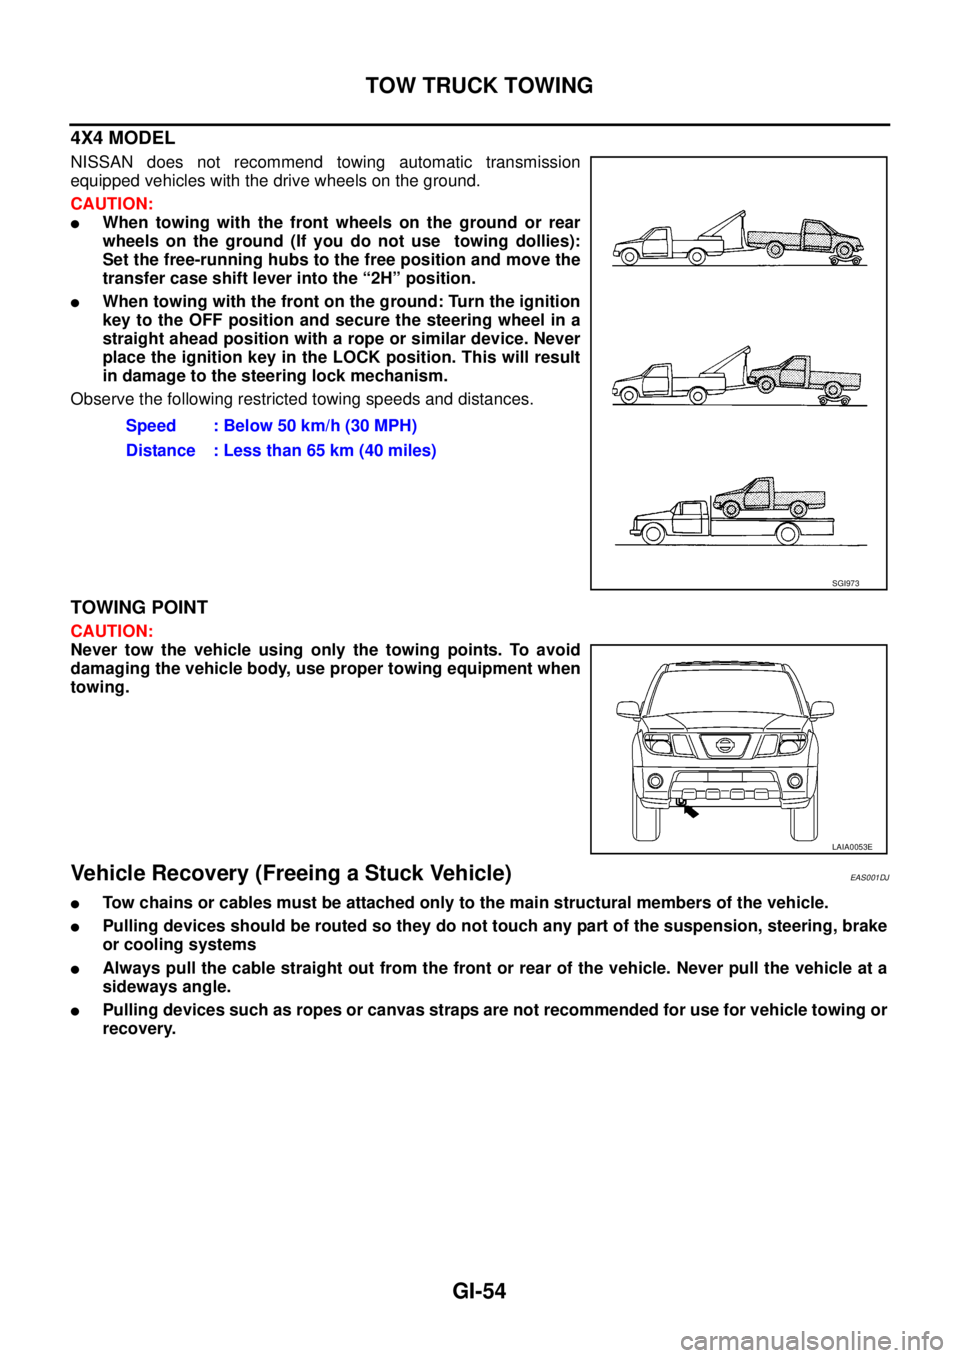
lWhen towing with the front wheels on the ground or rear
wheels on the ground (If you do not use towing dollies):
Set the free-running hubs to the free position and move the
transfer case shift lever into the “2H” position.
lWhen towing with the front on the ground: Turn the ignition
key to the OFF position and secure the steering wheel in a
straight ahead position with a rope or similar device. Never
place the ignition key in the LOCK position. This will result
in damage to the steering lock mechanism.
Observe the following restricted towing speeds and distances.
TOWING POINT
CAUTION:
Never tow the vehicle using only the towing points. To avoid
damaging the vehicle body, use proper towing equipment when
towing.
Vehicle Recovery (Freeing a Stuck Vehicle)EAS001DJ
lTow chains or cables must be attached only to the main structural members of the vehicle.
lPulling devices should be routed so they do not touch any part of the suspension, steering, brake
or cooling systems
lAlways pull the cable straight out from the front or rear of the vehicle. Never pull the vehicle at a
sideways angle.
lPulling devices such as ropes or canvas straps are not recommended for use for vehicle towing or
recovery.Speed : Below 50 km/h (30 MPH)
Distance : Less than 65 km (40 miles)
SGI973
LAIA0053E
Page 1683 of 3171

TERMINOLOGY
GI-61
C
D
E
F
G
H
I
J
K
L
MB
GI
TERMINOLOGYPFP:00011
ISO 15031-2 Terminology ListEAS001H9
All emission related terms used in this publication in accordance with ISO 15031-2 are listed. Accordingly, new
terms, new acronyms/abbreviations and old terms are listed in the following chart.
NEW TERMNEW ACRONYM /
ABBREVIATIONOLD TERM
Air cleaner ACL Air cleaner
Barometric pressure BARO ***
Barometric pressure sensor-BCDD BAROS-BCDD BCDD
Camshaft position CMP ***
Camshaft position sensor CMPS Crank angle sensor
Canister *** Canister
Carburetor CARB Carburetor
Charge air cooler CAC Intercooler
Closed loop CL Closed loop
Closed throttle position switch CTP switch Idle switch
Clutch pedal position switch CPP switch Clutch switch
Continuous fuel injection system CFI system ***
Continuous trap oxidizer system CTOX system ***
Crankshaft position CKP ***
Crankshaft position sensor CKPS ***
Data link connector DLC ***
Data link connector for CONSULT-II DLC for CONSULT-II Diagnostic connector for CONSULT-II
Diagnostic test mode DTM Diagnostic mode
Diagnostic test mode selector DTM selector Diagnostic mode selector
Diagnostic test mode I DTM I Mode I
Diagnostic test mode II DTM II Mode II
Diagnostic trouble code DTC Malfunction code
Direct fuel injection system DFI system ***
Distributor ignition system DI system Ignition timing control
Early fuel evaporation-mixture heater EFE-mixture heater Mixture heater
Early fuel evaporation system EFE system Mixture heater control
Electrically erasable programmable read
only memoryEEPROM ***
Electronic ignition system EI system Ignition timing control
Engine control EC ***
Engine control module ECM ECCS control unit
Engine coolant temperature ECT Engine temperature
Engine coolant temperature sensor ECTS Engine temperature sensor
Engine modification EM ***
Engine speed RPM Engine speed
Erasable programmable read only memory EPROM ***
Evaporative emission canister EVAP canister Canister
Evaporative emission system EVAP system Canister control solenoid valve
Exhaust gas recirculation valve EGR valve EGR valve
Page 1684 of 3171

GI-62
TERMINOLOGY
Exhaust gas recirculation control-BPT
valveEGRC-BPT valve BPT valve
Exhaust gas recirculation control-solenoid
valveEGRC-solenoid valve EGR control solenoid valve
Exhaust gas recirculation temperature sen-
sor
EGRT sensor Exhaust gas temperature sensor
EGR temperature sensor
Flash electrically erasable programmable
read only memoryFEEPROM ***
Flash erasable programmable read only
memoryFEPROM ***
Flexible fuel sensor FFS ***
Flexible fuel system FF system ***
Fuel pressure regulator *** Pressure regulator
Fuel pressure regulator control solenoid
valve*** PRVR control solenoid valve
Fuel trim FT ***
Heated Oxygen sensor HO2S Exhaust gas sensor
Idle air control system IAC system Idle speed control
Idle air control valve-air regulator IACV-air regulator Air regulator
Idle air control valve-auxiliary air control
valveIACV-AAC valve Auxiliary air control (AAC) valve
Idle air control valve-FICD solenoid valve IACV-FICD solenoid valve FICD solenoid valve
Idle air control valve-idle up control sole-
noid valveIACV-idle up control solenoid valve Idle up control solenoid valve
Idle speed control-FI pot ISC-FI pot FI pot
Idle speed control system ISC system ***
Ignition control IC ***
Ignition control module ICM ***
Indirect fuel injection system IFI system ***
Intake air IA Air
Intake air temperature sensor IAT sensor Air temperature sensor
Knock *** Detonation
Knock sensor KS Detonation sensor
Malfunction indicator lamp MIL Check engine light
Manifold absolute pressure MAP ***
Manifold absolute pressure sensor MAPS ***
Manifold differential pressure MDP ***
Manifold differential pressure sensor MDPS ***
Manifold surface temperature MST ***
Manifold surface temperature sensor MSTS ***
Manifold vacuum zone MVZ ***
Manifold vacuum zone sensor MVZS ***
Mass air flow sensor MAFS Air flow meter
Mixture control solenoid valve MC solenoid valve Air-fuel ratio control solenoid valve
Multiport fuel injection System MFI system Fuel injection controlNEW TERMNEW ACRONYM /
ABBREVIATIONOLD TERM
Page 1701 of 3171

POWER WINDOW SYSTEM
GW-15
C
D
E
F
G
H
J
K
L
MA
B
GW
POWER WINDOW SYSTEMPFP:25401
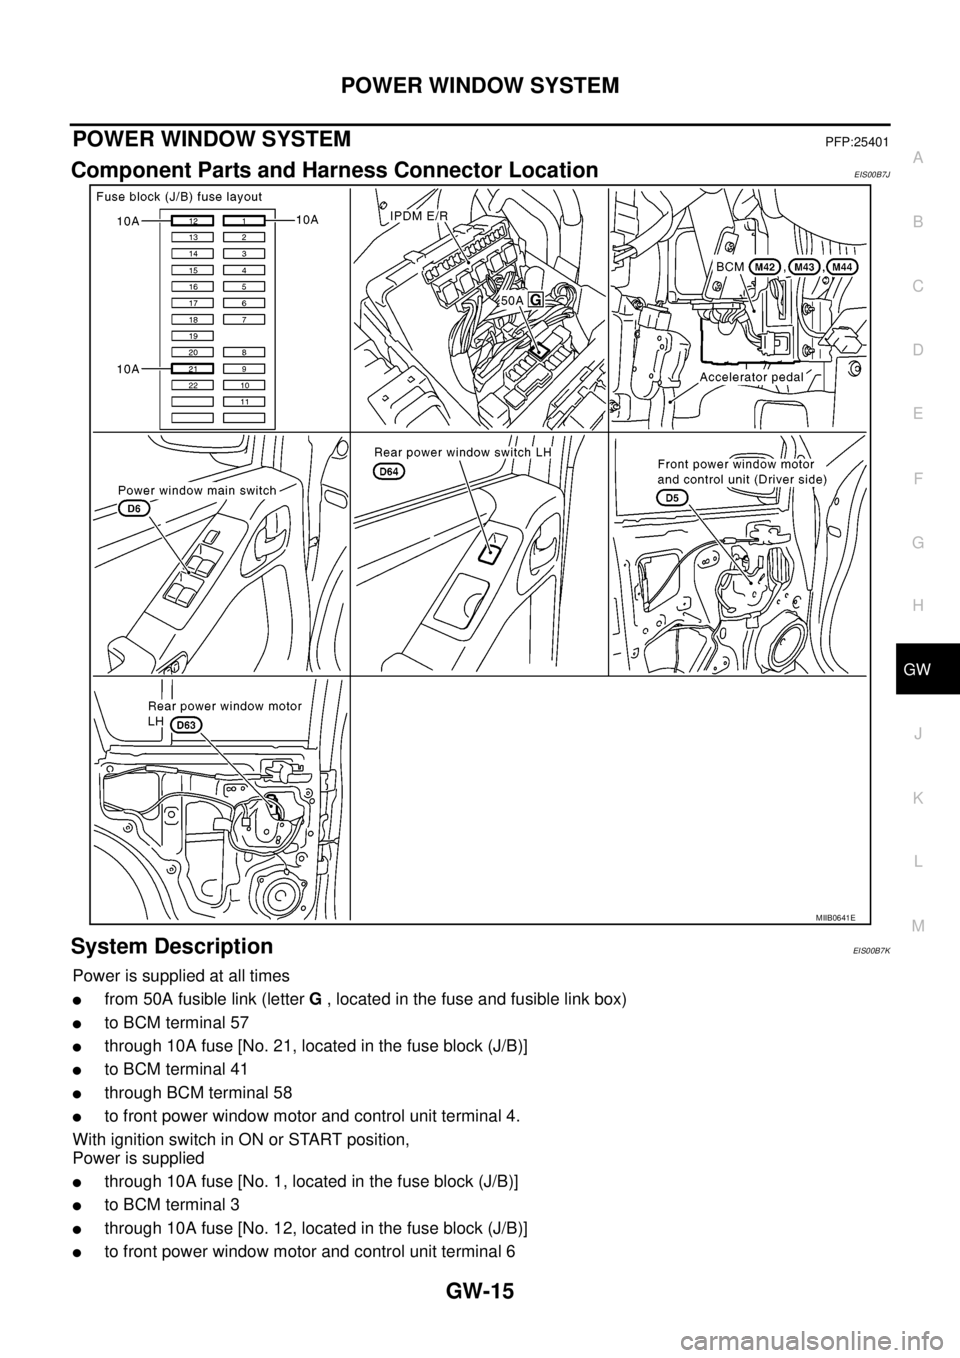
Component Parts and Harness Connector LocationEIS00B7J
System DescriptionEIS00B7K
Power is supplied at all times
lfrom 50A fusible link (letterG, located in the fuse and fusible link box)
lto BCM terminal 57
lthrough 10A fuse [No. 21, located in the fuse block (J/B)]
lto BCM terminal 41
lthrough BCM terminal 58
lto front power window motor and control unit terminal 4.
With ignition switch in ON or START position,
Power is supplied
lthrough 10A fuse [No. 1, located in the fuse block (J/B)]
lto BCM terminal 3
lthrough 10A fuse [No. 12, located in the fuse block (J/B)]
lto front power window motor and control unit terminal 6
MIIB0641E
Page 1704 of 3171

GW-18
POWER WINDOW SYSTEM
lthrough power window main switch terminal 11 (LH) or 9 (RH).
Then, the motor raises the window until the switch is released.
WINDOW DOWN
When the rear LH or RH switch in the power window main switch is operated in the down position
Power is supplied
lthrough power window main switch terminal 11 (LH) or 9 (RH)
lto rear power window switch LH or RH terminal 4 and 3
lto rear power window motor LH or RH terminal 2.
Ground is supplied
lto rear power window motor LH or RH terminal 1
lthrough rear power window switch LH or RH terminal 5 and 2
lthrough power window main switch terminal 10 (LH) or 8 (RH).
Then, the motor raises the window until the switch is released.
AUTO OPERATION
The power window AUTO feature enables the driver to open the window without holding the window switch in
thedownposition.
POWER WINDOW LOCK
The power window lock is designed to lock operation of all windows except for front door window LH and RH.
When in the lock position, the power window lock disables power window and door lock/unlock switch RH and
rear power window switch LH and RH by disconnecting switch ground signal. This prevents the power window
motors from operating.
DRIVER WINDOW ANTI-PINCH FUNCTION
During raising operation of driver side window, if door control module detects that foreign object is pinched,
power window lowers approximately 150 mm (5.91 in).
NOTE:
Depending on environment and driving conditions, if a similar impact or load is applied to power window, it
may lower.
Operation Conditions
lDriver side window is between fully-open and just before fully-closed position (when the limit switch is
ON).
lDuring automatic operation when ignition switch is turned ON.
lDuring automatic or manual operation when ignition switch is other than ON position (when the timer
operates).
Page 1710 of 3171

GW-24
POWER WINDOW SYSTEM
Terminal and Reference Value for Power Window Main Switch
EIS00C08
Terminal and Reference Value for Each Door's Power Window SwitchEIS00C09
*1:RearLH
*2:RearRH TerminalWire
colorItem ConditionVoltage (V)
(Approx.)
2 W IGN power supply Ignition switch (ON or START position) Battery voltage
3 B Ground — 0
4 G Driver power window motor UP signalDriver side switch UP operation 0
Other than above Battery voltage
5 L Driver power window motor DOWN signalDriver side switch DOWN operation 0
Other than above Battery voltage
6 L Passenger power window motor UP signalPassenger side switch UP operation Battery voltage
Other than above 0
7GRPassenger power window motor DOWN
signalPassenger side switch DOWN operation Battery voltage
Other than above 0
8 Y Rear RH power window motor UP signalRear RH switch UP operation Battery voltage
Other than above 0
9RRear RH power window motor DOWN sig-
nalRear RH switch DOWN operation Battery voltage
Other than above 0
10 G Rear LH power window motor UP signalRear LH switch UP operation Battery voltage
Other than above 0
11 L GRear LH power window motor DOWN sig-
nalRear LH switch DOWN operation Battery voltage
Other than above 0
TerminalWire
colorItem ConditionVo l ta g e (V )
(Approx.)
1 W IGN power supply Ignition switch (ON or START position) Battery voltage
2L
G*
1
Y*2
Power window UP signal
from power window main switchPower window main switch
UP operationBattery voltage
Other than above 0
3L
LG*
1
R*2
Power window DOWN signal
from power window main switchPower window main switch
DOWN operationBattery voltage
Other than above 0
4L
Y*
1
Y*2Power window motor DOWN signalWhen DOWN operation Battery voltage
Other than above 0
5G
L*
1
L*2Power window motor UP signalWhen UP operation Battery voltage
Other than above 0
Page 1711 of 3171

POWER WINDOW SYSTEM
GW-25
C
D
E
F
G
H
J
K
L
MA
B
GW
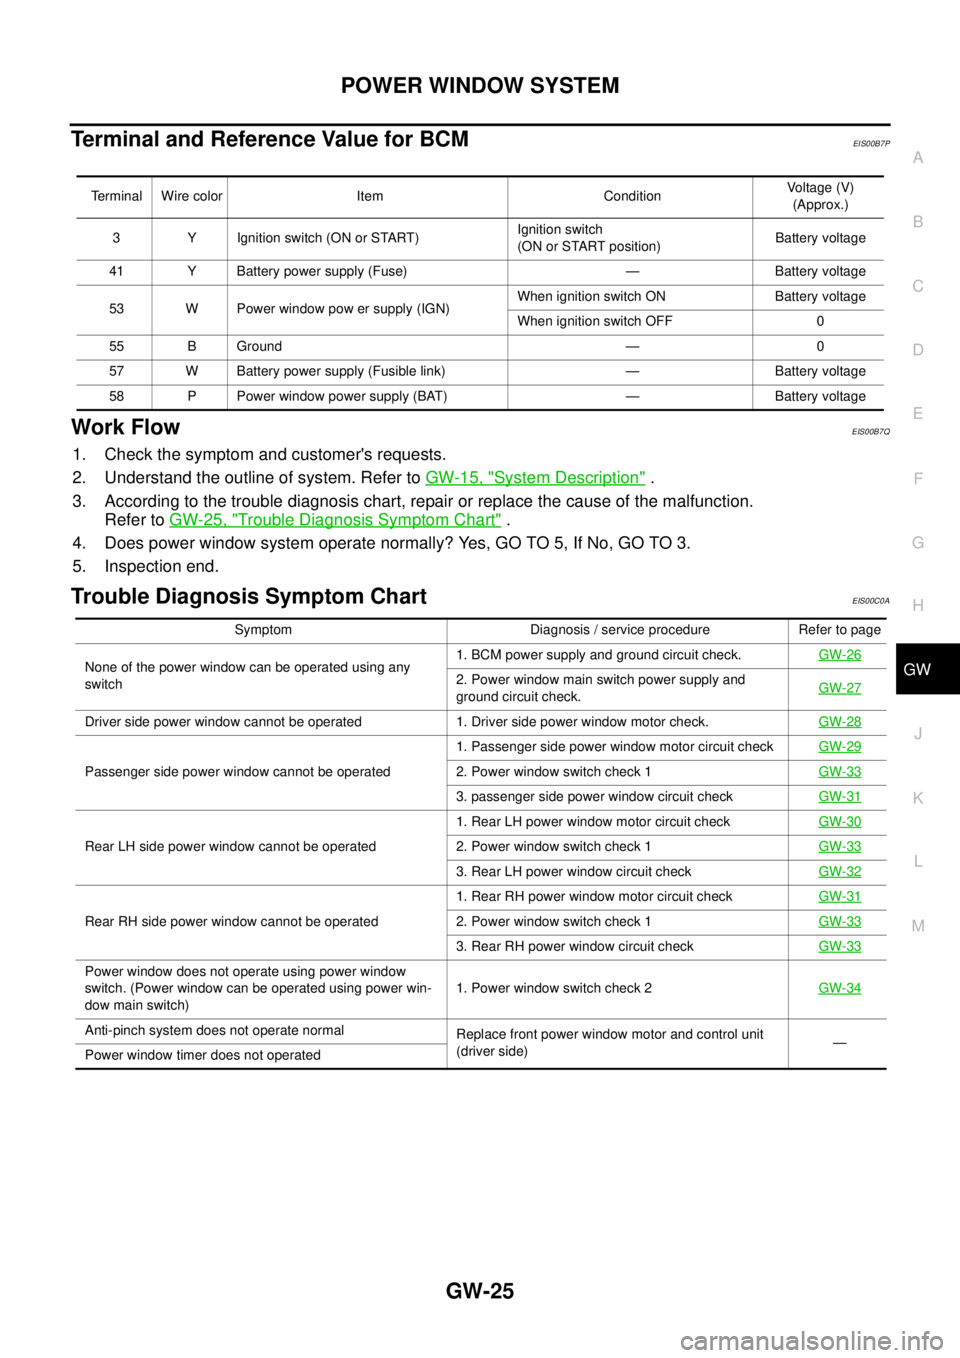
Terminal and Reference Value for BCMEIS00B7P
Work FlowEIS00B7Q
1. Check the symptom and customer's requests.
2. Understand the outline of system. Refer toGW-15, "
System Description".
3. According to the trouble diagnosis chart, repair or replace the cause of the malfunction.
Refer toGW-25, "
Trouble Diagnosis Symptom Chart".
4. Does power window system operate normally? Yes, GO TO 5, If No, GO TO 3.
5. Inspection end.
Trouble Diagnosis Symptom ChartEIS00C0A
Terminal Wire color Item ConditionVoltage (V)
(Approx.)
3 Y Ignition switch (ON or START)Ignition switch
(ON or START position)Battery voltage
41 Y Battery power supply (Fuse) — Battery voltage
53 W Power window pow er supply (IGN)When ignition switch ON Battery voltage
When ignition switch OFF 0
55 B Ground — 0
57 W Battery power supply (Fusible link) — Battery voltage
58 P Power window power supply (BAT) — Battery voltage
Symptom Diagnosis / service procedure Refer to page
None of the power window can be operated using any
switch1. BCM power supply and ground circuit check.GW-26
2. Power window main switch power supply and
ground circuit check.GW-27
Driver side power window cannot be operated 1. Driver side power window motor check.GW-28
Passenger side power window cannot be operated1. Passenger side power window motor circuit checkGW-292. Power window switch check 1GW-33
3. passenger side power window circuit checkGW-31
Rear LH side power window cannot be operated1. Rear LH power window motor circuit checkGW-302. Power window switch check 1GW-33
3. Rear LH power window circuit checkGW-32
Rear RH side power window cannot be operated1. Rear RH power window motor circuit checkGW-312. Power window switch check 1GW-33
3. Rear RH power window circuit checkGW-33
Power window does not operate using power window
switch. (Power window can be operated using power win-
dow main switch)1. Power window switch check 2GW-34
Anti-pinch system does not operate normal
Replace front power window motor and control unit
(driver side)—
Power window timer does not operated