Page 237 of 3171
ON-VEHICLE SERVICE
AT-229
D
E
F
G
H
I
J
K
L
MA
B
AT
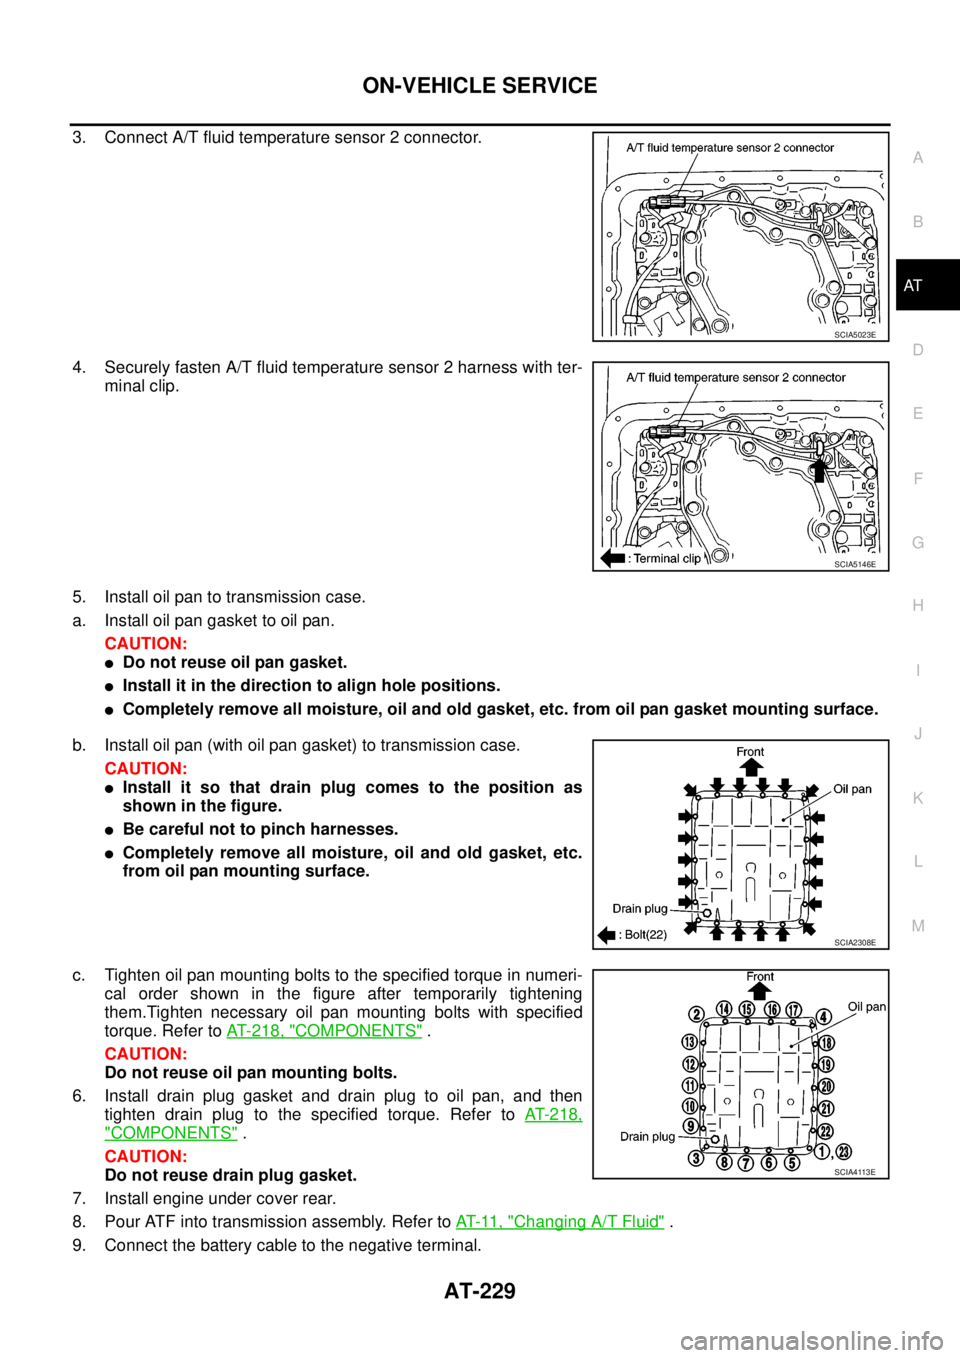
3. Connect A/T fluid temperature sensor 2 connector.
4. Securely fasten A/T fluid temperature sensor 2 harness with ter-
minal clip.
5. Install oil pan to transmission case.
a. Install oil pan gasket to oil pan.
CAUTION:
lDo not reuse oil pan gasket.
lInstall it in the direction to align hole positions.
lCompletely remove all moisture, oil and old gasket, etc. from oil pan gasket mounting surface.
b. Install oil pan (with oil pan gasket) to transmission case.
CAUTION:
lInstall it so that drain plug comes to the position as
shown in the figure.
lBe careful not to pinch harnesses.
lCompletely remove all moisture, oil and old gasket, etc.
from oil pan mounting surface.
c. Tighten oil pan mounting bolts to the specified torque in numeri-
cal order shown in the figure after temporarily tightening
them.Tighten necessary oil pan mounting bolts with specified
torque. Refer toAT- 2 1 8 , "
COMPONENTS".
CAUTION:
Do not reuse oil pan mounting bolts.
6. Install drain plug gasket and drain plug to oil pan, and then
tighten drain plug to the specified torque. Refer toAT-218,
"COMPONENTS".
CAUTION:
Do not reuse drain plug gasket.
7. Install engine under cover rear.
8. Pour ATF into transmission assembly. Refer toAT-11, "
Changing A/T Fluid".
9. Connect the battery cable to the negative terminal.
SCIA5023E
SCIA5146E
SCIA2308E
SCIA4113E
Page 238 of 3171
AT-230
ON-VEHICLE SERVICE
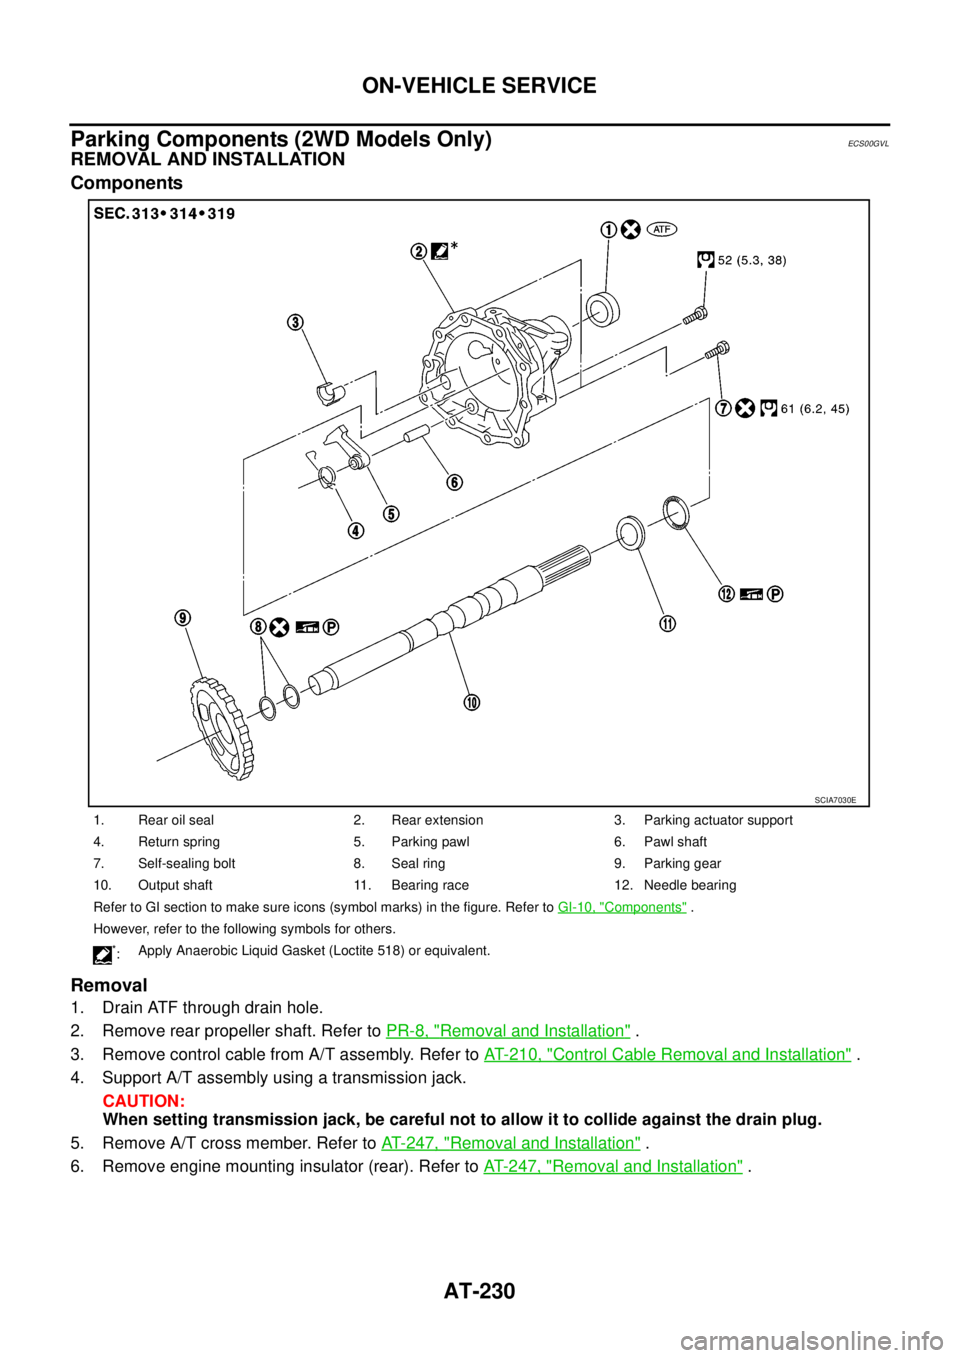
Parking Components (2WD Models Only)
ECS00GVL
REMOVAL AND INSTALLATION
Components
Removal
1. Drain ATF through drain hole.
2. Remove rear propeller shaft. Refer toPR-8, "
Removal and Installation".
3. Remove control cable from A/T assembly. Refer toAT- 2 1 0 , "
Control Cable Removal and Installation".
4. Support A/T assembly using a transmission jack.
CAUTION:
When setting transmission jack, be careful not to allow it to collide against the drain plug.
5. Remove A/T cross member. Refer toAT- 2 4 7 , "
Removal and Installation".
6. Remove engine mounting insulator (rear). Refer toAT- 2 4 7 , "
Removal and Installation".
1. Rear oil seal 2. Rear extension 3. Parking actuator support
4. Return spring 5. Parking pawl 6. Pawl shaft
7. Self-sealing bolt 8. Seal ring 9. Parking gear
10. Output shaft 11. Bearing race 12. Needle bearing
Refer to GI section to make sure icons (symbol marks) in the figure. Refer toGI-10, "
Components".
However, refer to the following symbols for others.
*:Apply Anaerobic Liquid Gasket (Loctite 518) or equivalent.
SCIA7030E
Page 244 of 3171
AT-236
ON-VEHICLE SERVICE
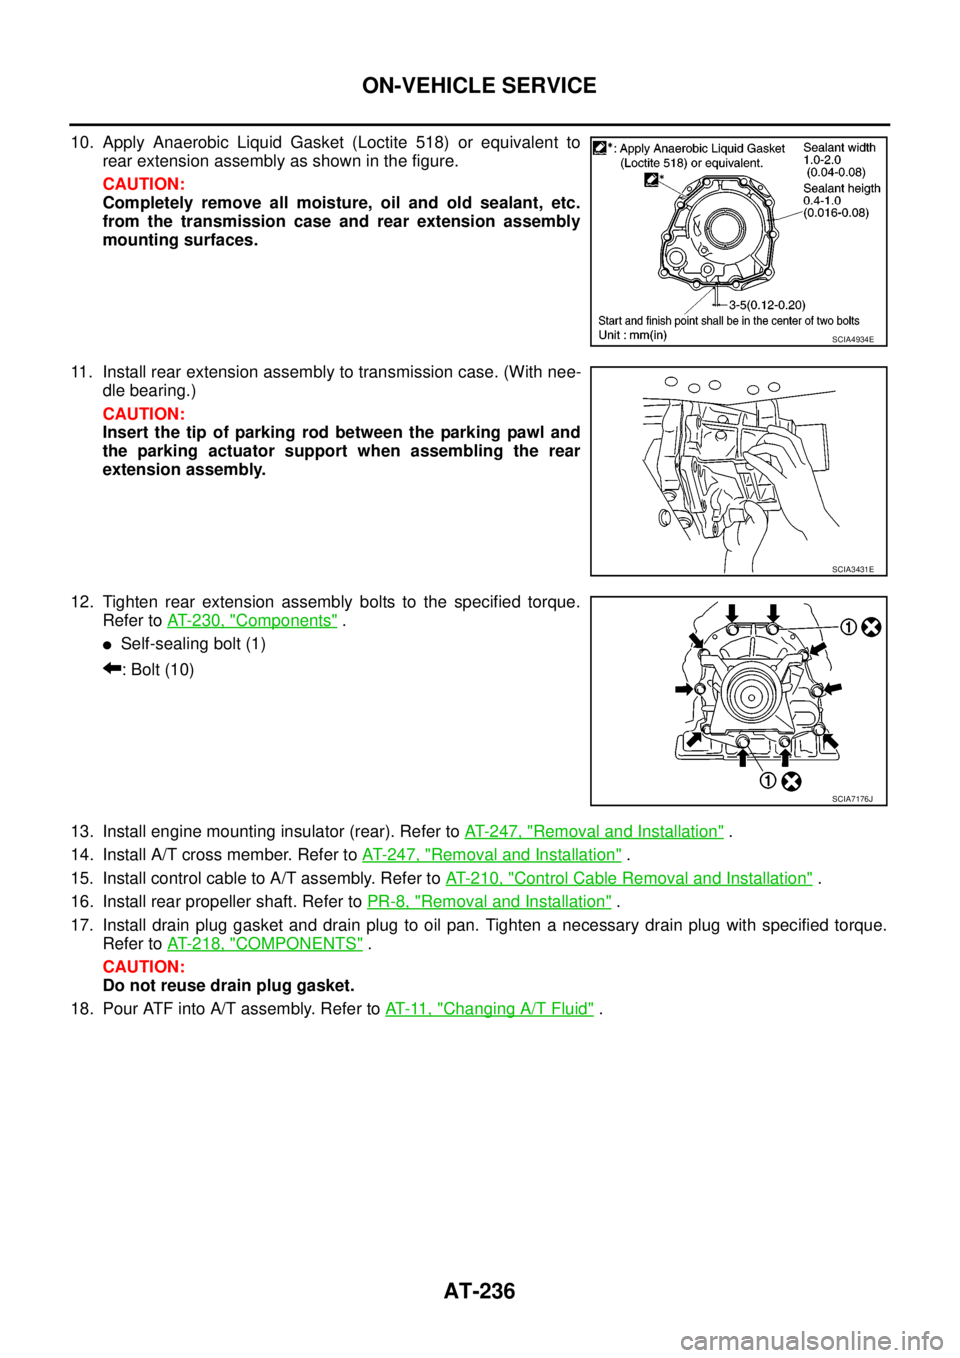
10. Apply Anaerobic Liquid Gasket (Loctite 518) or equivalent to
rear extension assembly as shown in the figure.
CAUTION:
Completely remove all moisture, oil and old sealant, etc.
from the transmission case and rear extension assembly
mounting surfaces.
11. Install rear extension assembly to transmission case. (With nee-
dle bearing.)
CAUTION:
Insert the tip of parking rod between the parking pawl and
the parking actuator support when assembling the rear
extension assembly.
12. Tighten rear extension assembly bolts to the specified torque.
Refer toAT- 2 3 0 , "
Components".
lSelf-sealing bolt (1)
:Bolt(10)
13. Install engine mounting insulator (rear). Refer toAT- 2 4 7 , "
Removal and Installation".
14. Install A/T cross member. Refer toAT- 2 4 7 , "
Removal and Installation".
15. Install control cable to A/T assembly. Refer toAT- 2 1 0 , "
Control Cable Removal and Installation".
16. Install rear propeller shaft. Refer toPR-8, "
Removal and Installation".
17. Install drain plug gasket and drain plug to oil pan. Tighten a necessary drain plug with specified torque.
Refer toAT- 2 1 8 , "
COMPONENTS".
CAUTION:
Do not reuse drain plug gasket.
18. Pour ATF into A/T assembly. Refer toAT-11, "
Changing A/T Fluid".
SCIA4934E
SCIA3431E
SCIA7176J
Page 255 of 3171
TRANSMISSION ASSEMBLY
AT-247
D
E
F
G
H
I
J
K
L
MA
B
AT
TRANSMISSION ASSEMBLYPFP:31020
Removal and InstallationECS00HR4
COMPONENTS
2WD models
SCIA7307E
1. Self-sealing bolt 2. Engine mounting insulator (rear) 3. A/T cross member
4. Copper washer 5. Fluid cooler tube 6. Bracket
7. Front cross member 8. A/T assembly 9. O-ring
10. A/T fluid charging pipe 11. A/T fluid level gauge
Refer to GI section to make sure icons (symbol marks) in the figure. Refer toGI-10, "
Components".
: For tightening torque, refer toAT- 2 5 0 , "
INSTALLATION".
Page 256 of 3171
AT-248
TRANSMISSION ASSEMBLY
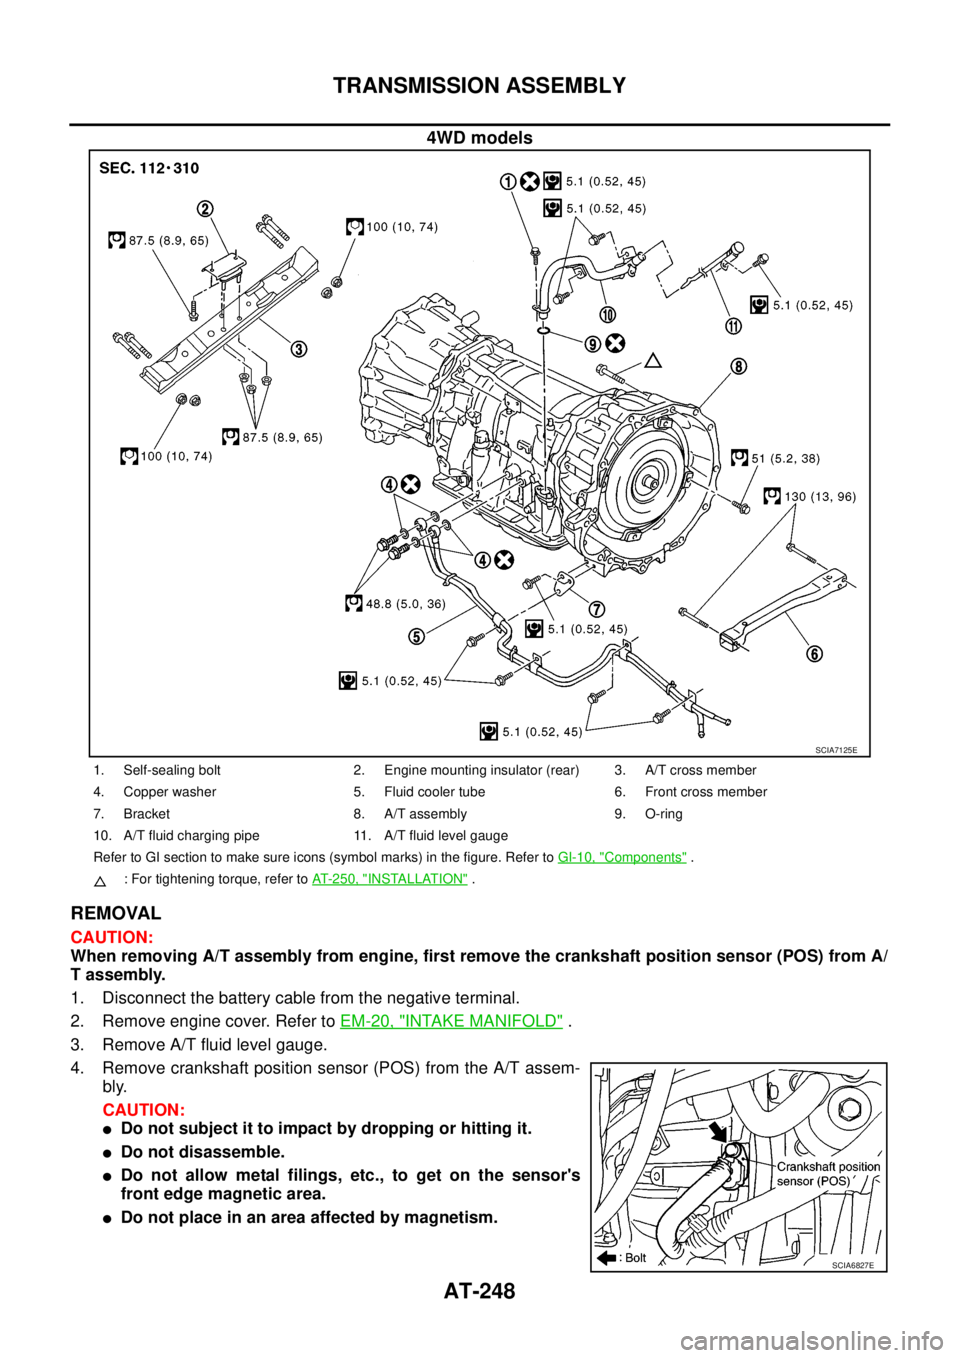
4WD models
REMOVAL
CAUTION:
When removing A/T assembly from engine, first remove the crankshaft position sensor (POS) from A/
T assembly.
1. Disconnect the battery cable from the negative terminal.
2. Remove engine cover. Refer toEM-20, "
INTAKE MANIFOLD".
3. Remove A/T fluid level gauge.
4. Remove crankshaft position sensor (POS) from the A/T assem-
bly.
CAUTION:
lDo not subject it to impact by dropping or hitting it.
lDo not disassemble.
lDo not allow metal filings, etc., to get on the sensor's
front edge magnetic area.
lDo not place in an area affected by magnetism.
SCIA7125E
1. Self-sealing bolt 2. Engine mounting insulator (rear) 3. A/T cross member
4. Copper washer 5. Fluid cooler tube 6. Front cross member
7. Bracket 8. A/T assembly 9. O-ring
10. A/T fluid charging pipe 11. A/T fluid level gauge
Refer to GI section to make sure icons (symbol marks) in the figure. Refer toGI-10, "
Components".
: For tightening torque, refer toAT-250, "
INSTALLATION".
SCIA6827E
Page 257 of 3171

TRANSMISSION ASSEMBLY
AT-249
D
E
F
G
H
I
J
K
L
MA
B
AT
5. Remove front valance center, engine undercover front, engine under cover middle and engine under
coverrear.RefertoEI-15, "
FRONT BUMPER".
6. Remove front cross member.
7. Remove main muffler. Refer toEX-2, "
EXHAUST SYSTEM".
8. Remove rear propeller shaft. Refer toPR-8, "
Removal and Installation".
9. Remove front propeller shaft. Refer toPR-4, "
Removal and Installation".
10. Remove starter motor. Refer toSC-31, "
Removal and Installation".
11. Remove control cable and bracket. Refer toAT- 2 1 0 , "
Control Cable Removal and Installation".
12. Disconnect fluid cooler tube.
13. Remove A/T fluid charging pipe from A/T assembly.
14. Remove O-ring from A/T fluid charging pipe.
15. Plug up openings such as A/T fluid charging pipe hole, etc.
16. Remove rear plate cover from rear plate.
17. Turn crankshaft to access and remove the four bolts for drive
plate and torque converter.
CAUTION:
When turning crankshaft, turn it clockwise as viewed from
the front of engine.
18. Support A/T assembly using a transmission jack.
CAUTION:
When setting transmission jack, be careful not to allow it to
collide against drain plug.
19. Remove protector (fuel tube), and then disconnect fuel tubes.
Refer toFL-7, "
FUEL COOLER". (4WD models)
20. Remove A/T cross member.
21. Remove engine mounting insulator (rear) from A/T assembly.
22. Disconnect the following:
lA/T assembly harness connector
lATP switch connector
l4LO switch connector
lWait detection switch connector
lTransfer control device connector
23. Support transfer assembly using a transmission jack. (4WD models)
24. Remove the wiring harness from bracket.
25. Remove bolts fixing A/T assembly to engine assembly.
26. Remove A/T assembly from the vehicle.
CAUTION:
lSecure torque converter to prevent it from dropping.
lSecure A/T assembly to a transmission jack.
27. Remove A/T air breather hose. Refer toAT- 2 4 3 , "
AIR
BREATHER HOSE".
28. Remove transfer assembly from A/T assembly. Refer toT F - 111 ,
"Removal and Installation". (4WD models)
SCIA6828E
SCIA6927E
SCIA2203E
Page 258 of 3171
AT-250
TRANSMISSION ASSEMBLY
INSPECTION
Installation and Inspection of Torque Converter
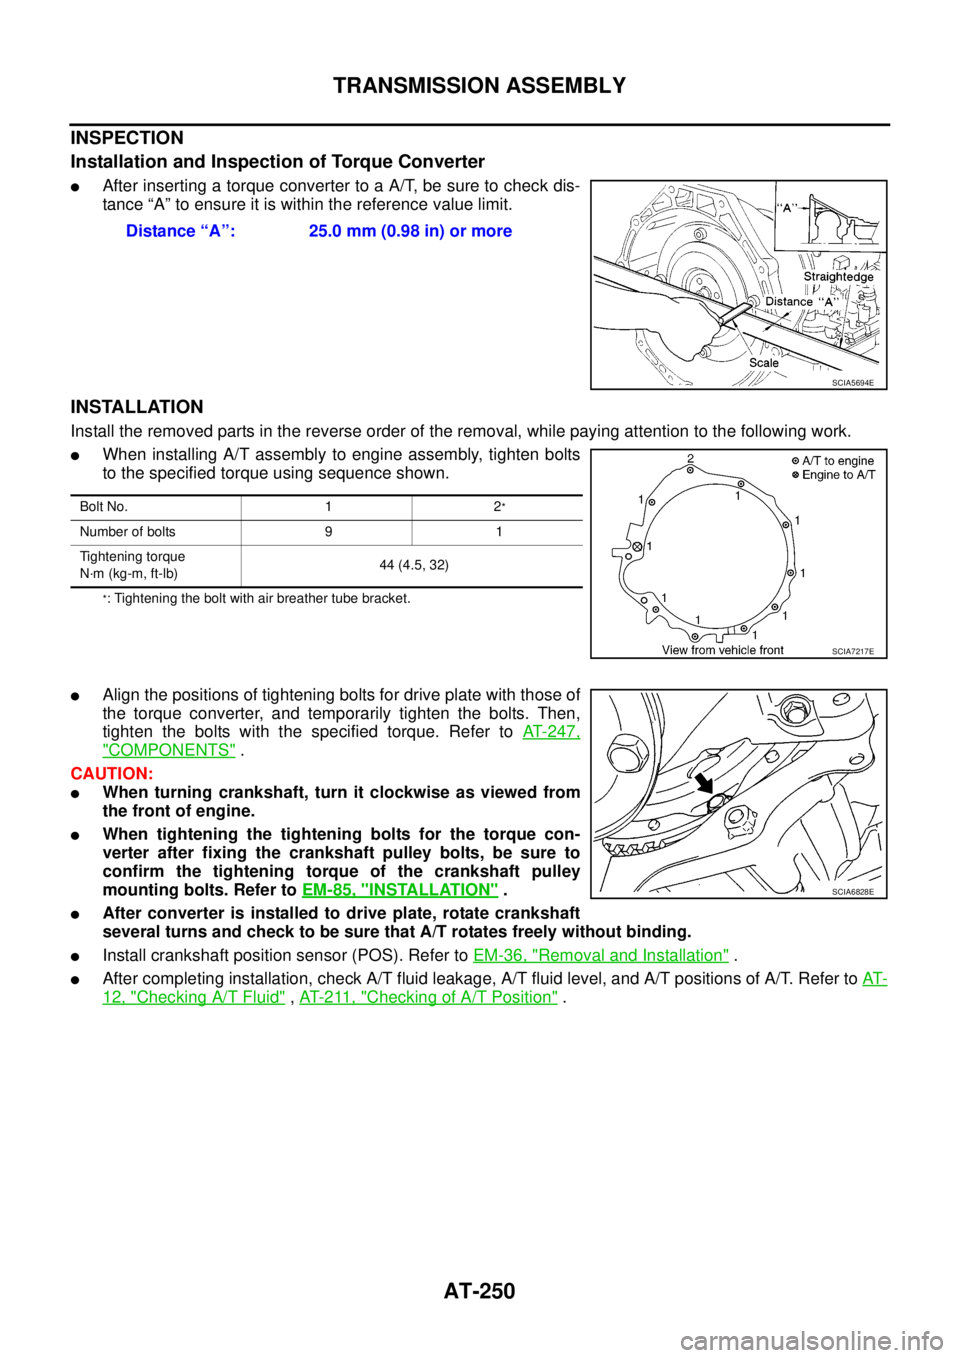
lAfter inserting a torque converter to a A/T, be sure to check dis-
tance “A” to ensure it is within the reference value limit.
INSTALLATION
Install the removed parts in the reverse order of the removal, while paying attention to the following work.
lWhen installing A/T assembly to engine assembly, tighten bolts
to the specified torque using sequence shown.
*: Tightening the bolt with air breather tube bracket.
lAlign the positions of tightening bolts for drive plate with those of
the torque converter, and temporarily tighten the bolts. Then,
tighten the bolts with the specified torque. Refer toAT-247,
"COMPONENTS".
CAUTION:
lWhen turning crankshaft, turn it clockwise as viewed from
the front of engine.
lWhen tightening the tightening bolts for the torque con-
verter after fixing the crankshaft pulley bolts, be sure to
confirm the tightening torque of the crankshaft pulley
mounting bolts. Refer toEM-85, "
INSTALLATION".
lAfter converter is installed to drive plate, rotate crankshaft
several turns and check to be sure that A/T rotates freely without binding.
lInstall crankshaft position sensor (POS). Refer toEM-36, "Removal and Installation".
lAfter completing installation, check A/T fluid leakage, A/T fluid level, and A/T positions of A/T. Refer toAT-
12, "Checking A/T Fluid",AT- 2 11 , "Checking of A/T Position". Distance “A”: 25.0 mm (0.98 in) or more
SCIA5694E
Bolt No. 1 2*
Number of bolts 9 1
Tightening torque
N·m (kg-m, ft-lb)44 (4.5, 32)
SCIA7217E
SCIA6828E
Page 331 of 3171
SERVICE DATA AND SPECIFICATIONS (SDS)
AT-323
D
E
F
G
H
I
J
K
L
MA
B
AT
SERVICE DATA AND SPECIFICATIONS (SDS)PFP:00030
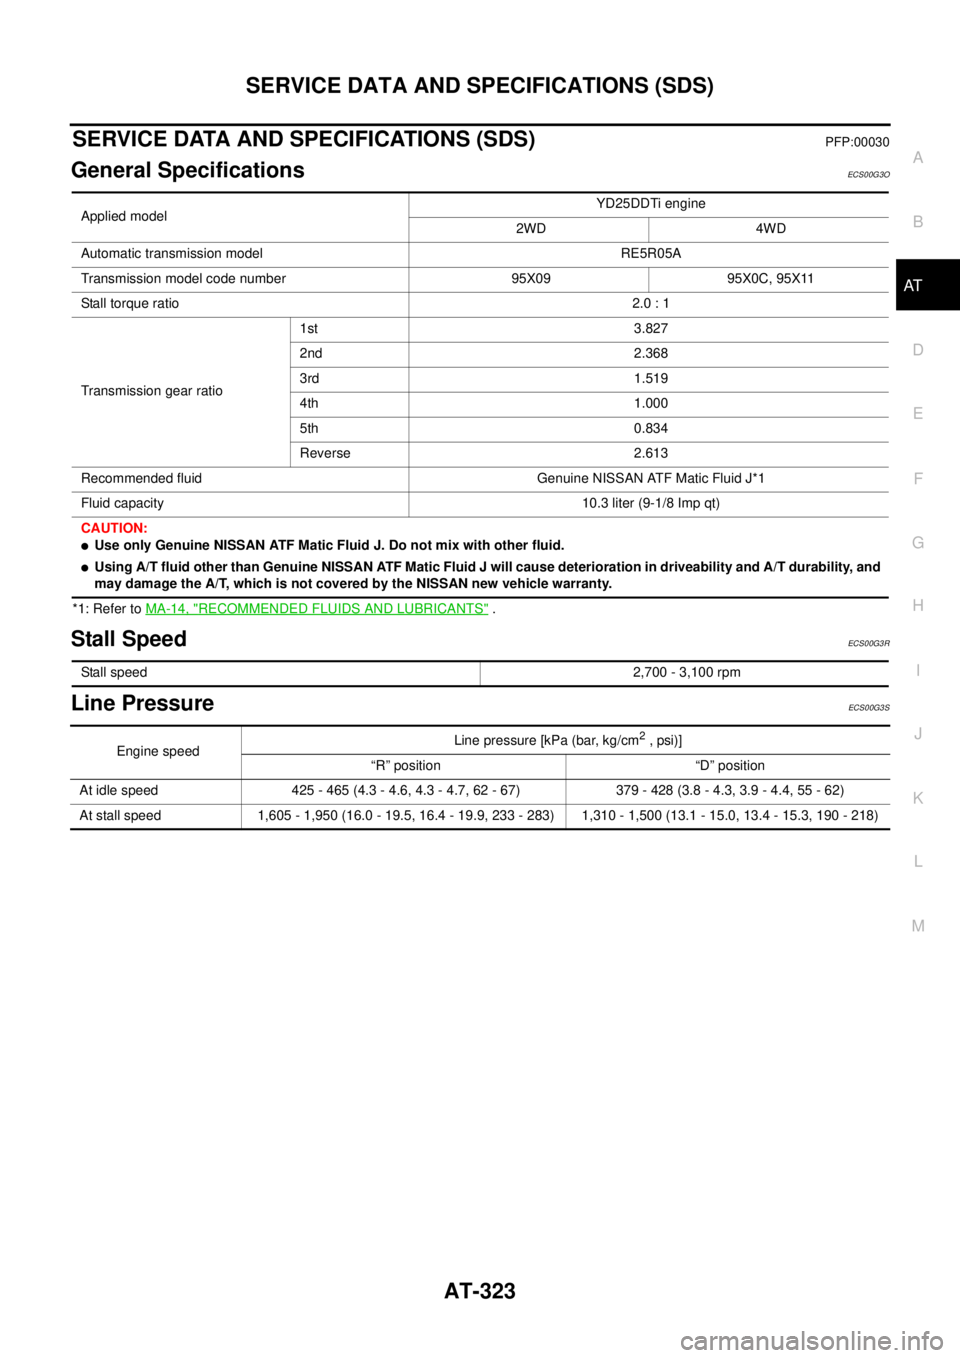
General SpecificationsECS00G3O
*1: Refer toMA-14, "RECOMMENDED FLUIDS AND LUBRICANTS".
Stall SpeedECS00G3R
Line PressureECS00G3S
Applied modelYD25DDTi engine
2WD 4WD
Automatic transmission model RE5R05A
Transmission model code number 95X09 95X0C, 95X11
Stall torque ratio2.0 : 1
Transmission gear ratio1st 3.827
2nd 2.368
3rd 1.519
4th 1.000
5th 0.834
Reverse 2.613
Recommended fluid Genuine NISSAN ATF Matic Fluid J*1
Fluid capacity 10.3 liter (9-1/8 Imp qt)
CAUTION:
lUse only Genuine NISSAN ATF Matic Fluid J. Do not mix with other fluid.
lUsing A/T fluid other than Genuine NISSAN ATF Matic Fluid J will cause deterioration in driveability and A/T durability, and
may damage the A/T, which is not covered by the NISSAN new vehicle warranty.
Stall speed2,700 - 3,100 rpm
Engine speedLine pressure [kPa (bar, kg/cm2,psi)]
“R” position “D” position
At idle speed 425 - 465 (4.3 - 4.6, 4.3 - 4.7, 62 - 67) 379 - 428 (3.8 - 4.3, 3.9 - 4.4, 55 - 62)
At stall speed 1,605 - 1,950 (16.0 - 19.5, 16.4 - 19.9, 233 - 283) 1,310 - 1,500 (13.1 - 15.0, 13.4 - 15.3, 190 - 218)