2005 NISSAN NAVARA engine
[x] Cancel search: enginePage 200 of 3171
AT-192
TROUBLE DIAGNOSIS FOR SYMPTOMS
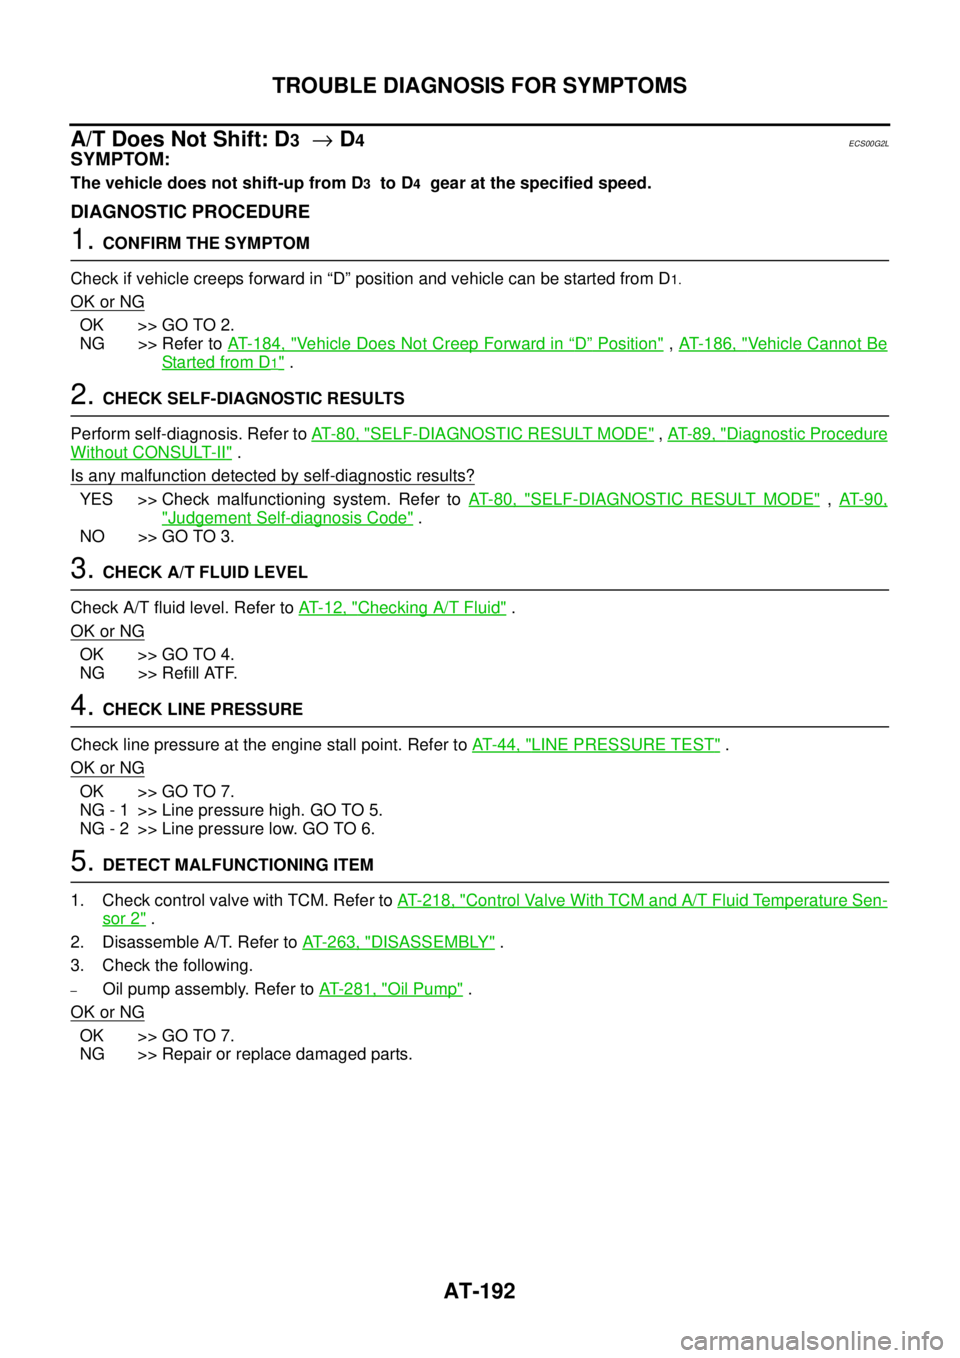
A/T Does Not Shift: D
3®D4ECS00G2L
SYMPTOM:
The vehicle does not shift-up from D3to D4gear at the specified speed.
DIAGNOSTIC PROCEDURE
1.CONFIRM THE SYMPTOM
Check if vehicle creeps forward in “D” position and vehicle can be started from D
1.
OK or NG
OK >> GO TO 2.
NG >> Refer toAT- 1 8 4 , "
Vehicle Does Not Creep Forward in“D”Position",AT- 1 8 6 , "Vehicle Cannot Be
Start ed fro m D1".
2.CHECK SELF-DIAGNOSTIC RESULTS
Perform self-diagnosis. Refer toAT-80, "
SELF-DIAGNOSTIC RESULT MODE",AT-89, "Diagnostic Procedure
Without CONSULT-II".
Is any malfunction detected by self-diagnostic results?
YES >> Check malfunctioning system. Refer toAT-80, "SELF-DIAGNOSTIC RESULT MODE",AT- 9 0 ,
"Judgement Self-diagnosis Code".
NO >> GO TO 3.
3.CHECK A/T FLUID LEVEL
Check A/T fluid level. Refer toAT-12, "
Checking A/T Fluid".
OK or NG
OK >> GO TO 4.
NG >> Refill ATF.
4.CHECK LINE PRESSURE
Check line pressure at the engine stall point. Refer toAT-44, "
LINE PRESSURE TEST".
OK or NG
OK >> GO TO 7.
NG - 1 >> Line pressure high. GO TO 5.
NG - 2 >> Line pressure low. GO TO 6.
5.DETECT MALFUNCTIONING ITEM
1. Check control valve with TCM. Refer toAT- 2 1 8 , "
Control Valve With TCM and A/T Fluid Temperature Sen-
sor 2".
2. Disassemble A/T. Refer toAT- 2 6 3 , "
DISASSEMBLY".
3. Check the following.
–Oil pump assembly. Refer toAT- 2 8 1 , "Oil Pump".
OK or NG
OK >> GO TO 7.
NG >> Repair or replace damaged parts.
Page 202 of 3171
AT-194
TROUBLE DIAGNOSIS FOR SYMPTOMS
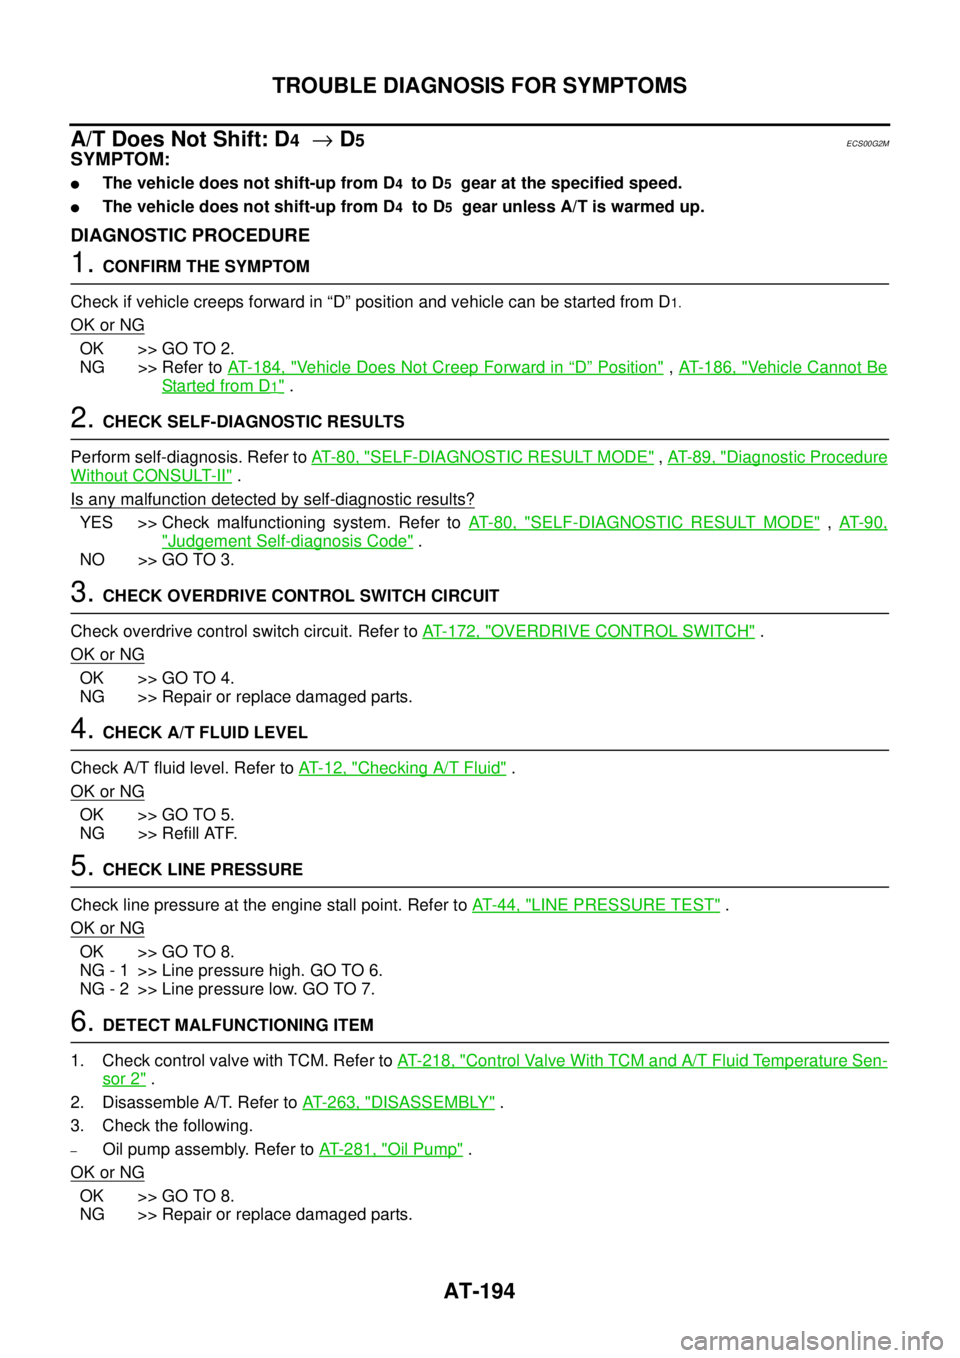
A/T Does Not Shift: D
4®D5ECS00G2M
SYMPTOM:
lThe vehicle does not shift-up from D4to D5gear at the specified speed.
lThe vehicle does not shift-up from D4to D5gear unless A/T is warmed up.
DIAGNOSTIC PROCEDURE
1.CONFIRM THE SYMPTOM
Check if vehicle creeps forward in “D” position and vehicle can be started from D
1.
OK or NG
OK >> GO TO 2.
NG >> Refer toAT- 1 8 4 , "
Vehicle Does Not Creep Forward in“D”Position",AT- 1 8 6 , "Vehicle Cannot Be
Start ed fro m D1".
2.CHECK SELF-DIAGNOSTIC RESULTS
Perform self-diagnosis. Refer toAT-80, "
SELF-DIAGNOSTIC RESULT MODE",AT-89, "Diagnostic Procedure
Without CONSULT-II".
Is any malfunction detected by self-diagnostic results?
YES >> Check malfunctioning system. Refer toAT-80, "SELF-DIAGNOSTIC RESULT MODE",AT- 9 0 ,
"Judgement Self-diagnosis Code".
NO >> GO TO 3.
3.CHECK OVERDRIVE CONTROL SWITCH CIRCUIT
Check overdrive control switch circuit. Refer toAT- 1 7 2 , "
OVERDRIVE CONTROL SWITCH".
OK or NG
OK >> GO TO 4.
NG >> Repair or replace damaged parts.
4.CHECK A/T FLUID LEVEL
Check A/T fluid level. Refer toAT-12, "
Checking A/T Fluid".
OK or NG
OK >> GO TO 5.
NG >> Refill ATF.
5.CHECK LINE PRESSURE
Check line pressure at the engine stall point. Refer toAT-44, "
LINE PRESSURE TEST".
OK or NG
OK >> GO TO 8.
NG - 1 >> Line pressure high. GO TO 6.
NG - 2 >> Line pressure low. GO TO 7.
6.DETECT MALFUNCTIONING ITEM
1. Check control valve with TCM. Refer toAT- 2 1 8 , "
Control Valve With TCM and A/T Fluid Temperature Sen-
sor 2".
2. Disassemble A/T. Refer toAT- 2 6 3 , "
DISASSEMBLY".
3. Check the following.
–Oil pump assembly. Refer toAT- 2 8 1 , "Oil Pump".
OK or NG
OK >> GO TO 8.
NG >> Repair or replace damaged parts.
Page 204 of 3171
AT-196
TROUBLE DIAGNOSIS FOR SYMPTOMS
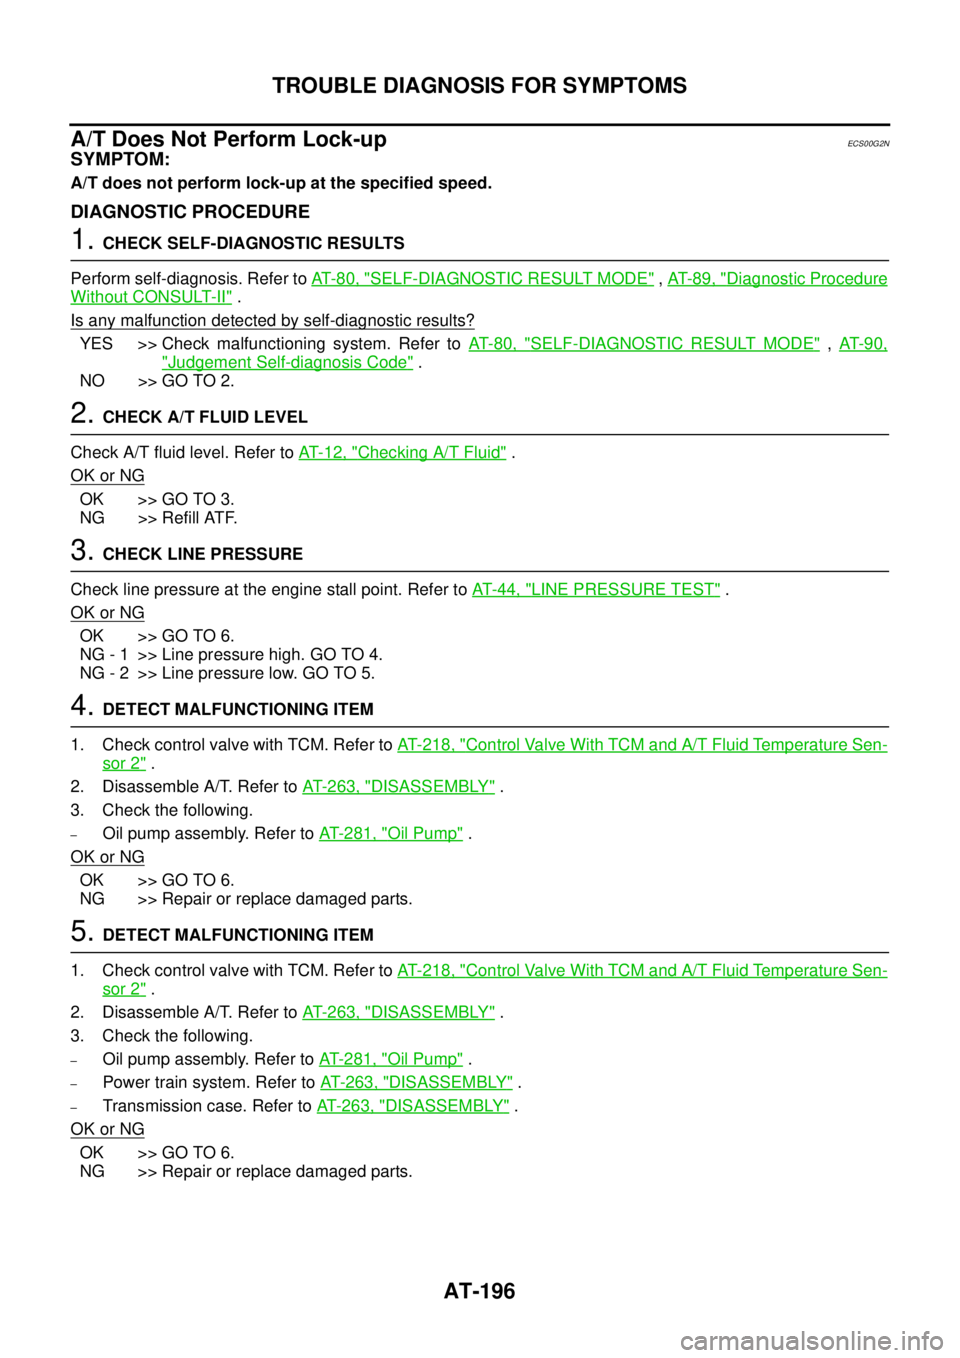
A/T Does Not Perform Lock-up
ECS00G2N
SYMPTOM:
A/T does not perform lock-up at the specified speed.
DIAGNOSTIC PROCEDURE
1.CHECK SELF-DIAGNOSTIC RESULTS
Perform self-diagnosis. Refer toAT-80, "
SELF-DIAGNOSTIC RESULT MODE",AT-89, "Diagnostic Procedure
Without CONSULT-II".
Is any malfunction detected by self-diagnostic results?
YES >> Check malfunctioning system. Refer toAT-80, "SELF-DIAGNOSTIC RESULT MODE",AT- 9 0 ,
"Judgement Self-diagnosis Code".
NO >> GO TO 2.
2.CHECK A/T FLUID LEVEL
Check A/T fluid level. Refer toAT-12, "
Checking A/T Fluid".
OK or NG
OK >> GO TO 3.
NG >> Refill ATF.
3.CHECK LINE PRESSURE
Check line pressure at the engine stall point. Refer toAT-44, "
LINE PRESSURE TEST".
OK or NG
OK >> GO TO 6.
NG - 1 >> Line pressure high. GO TO 4.
NG - 2 >> Line pressure low. GO TO 5.
4.DETECT MALFUNCTIONING ITEM
1. Check control valve with TCM. Refer toAT- 2 1 8 , "
Control Valve With TCM and A/T Fluid Temperature Sen-
sor 2".
2. Disassemble A/T. Refer toAT- 2 6 3 , "
DISASSEMBLY".
3. Check the following.
–Oil pump assembly. Refer toAT- 2 8 1 , "Oil Pump".
OK or NG
OK >> GO TO 6.
NG >> Repair or replace damaged parts.
5.DETECT MALFUNCTIONING ITEM
1. Check control valve with TCM. Refer toAT- 2 1 8 , "
Control Valve With TCM and A/T Fluid Temperature Sen-
sor 2".
2. Disassemble A/T. Refer toAT- 2 6 3 , "
DISASSEMBLY".
3. Check the following.
–Oil pump assembly. Refer toAT- 2 8 1 , "Oil Pump".
–Power train system. Refer toAT- 2 6 3 , "DISASSEMBLY".
–Transmission case. Refer toAT- 2 6 3 , "DISASSEMBLY".
OK or NG
OK >> GO TO 6.
NG >> Repair or replace damaged parts.
Page 207 of 3171
TROUBLE DIAGNOSIS FOR SYMPTOMS
AT-199
D
E
F
G
H
I
J
K
L
MA
B
AT
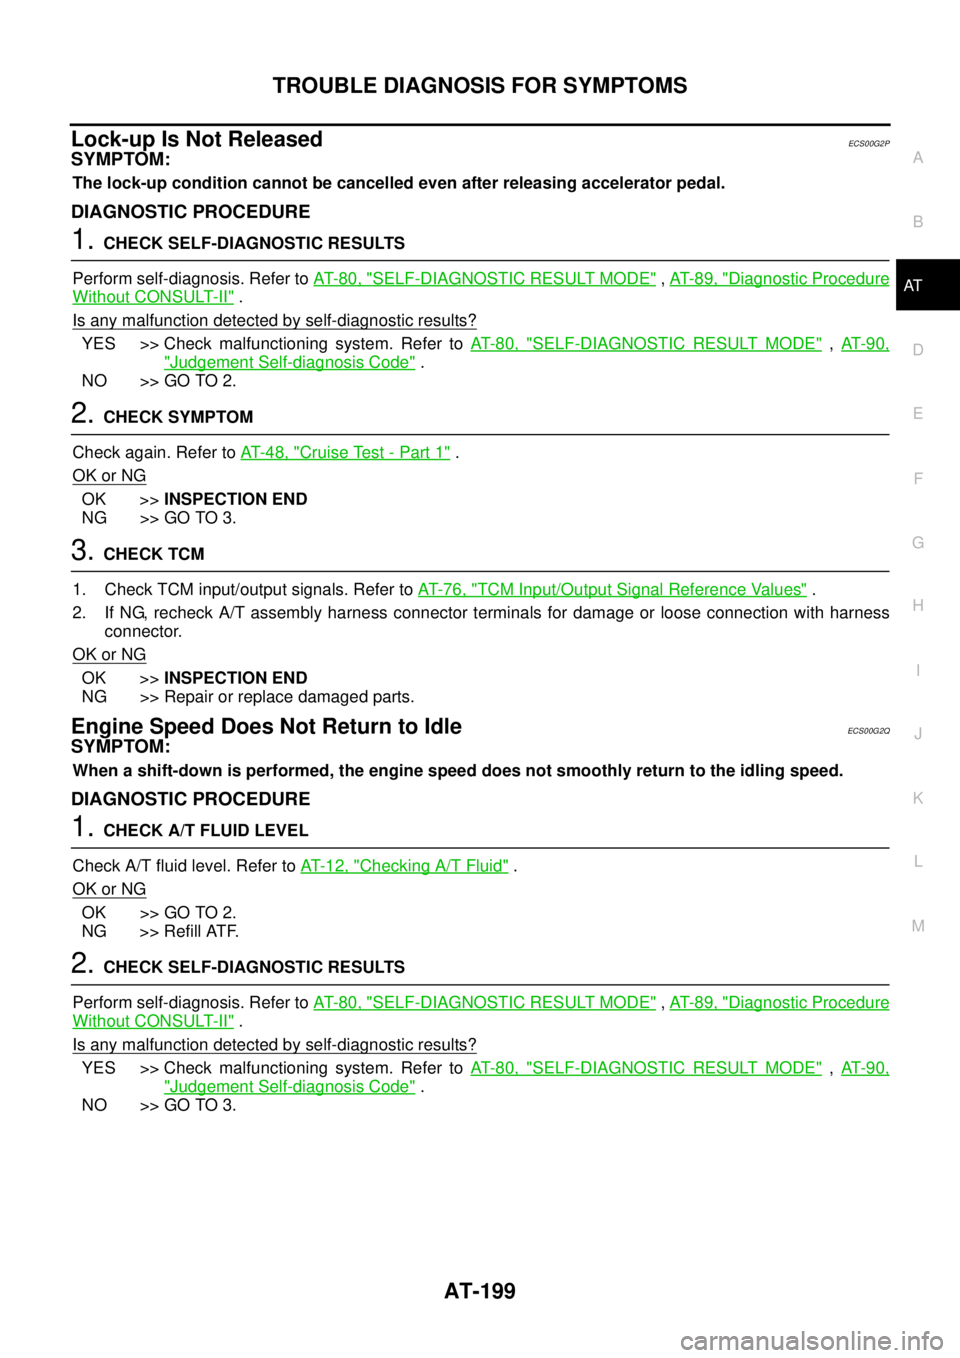
Lock-up Is Not ReleasedECS00G2P
SYMPTOM:
The lock-up condition cannot be cancelled even after releasing accelerator pedal.
DIAGNOSTIC PROCEDURE
1.CHECK SELF-DIAGNOSTIC RESULTS
Perform self-diagnosis. Refer toAT-80, "
SELF-DIAGNOSTIC RESULT MODE",AT-89, "Diagnostic Procedure
Without CONSULT-II".
Is any malfunction detected by self-diagnostic results?
YES >> Check malfunctioning system. Refer toAT-80, "SELF-DIAGNOSTIC RESULT MODE",AT- 9 0 ,
"Judgement Self-diagnosis Code".
NO >> GO TO 2.
2.CHECK SYMPTOM
Check again. Refer toAT-48, "
Cruise Test - Part 1".
OK or NG
OK >>INSPECTION END
NG >> GO TO 3.
3.CHECK TCM
1. Check TCM input/output signals. Refer toAT-76, "
TCM Input/Output Signal Reference Values".
2. If NG, recheck A/T assembly harness connector terminals for damage or loose connection with harness
connector.
OK or NG
OK >>INSPECTION END
NG >> Repair or replace damaged parts.
Engine Speed Does Not Return to IdleECS00G2Q
SYMPTOM:
When a shift-down is performed, the engine speed does not smoothly return to the idling speed.
DIAGNOSTIC PROCEDURE
1.CHECK A/T FLUID LEVEL
Check A/T fluid level. Refer toAT-12, "
Checking A/T Fluid".
OK or NG
OK >> GO TO 2.
NG >> Refill ATF.
2.CHECK SELF-DIAGNOSTIC RESULTS
Perform self-diagnosis. Refer toAT-80, "
SELF-DIAGNOSTIC RESULT MODE",AT-89, "Diagnostic Procedure
Without CONSULT-II".
Is any malfunction detected by self-diagnostic results?
YES >> Check malfunctioning system. Refer toAT-80, "SELF-DIAGNOSTIC RESULT MODE",AT- 9 0 ,
"Judgement Self-diagnosis Code".
NO >> GO TO 3.
Page 214 of 3171
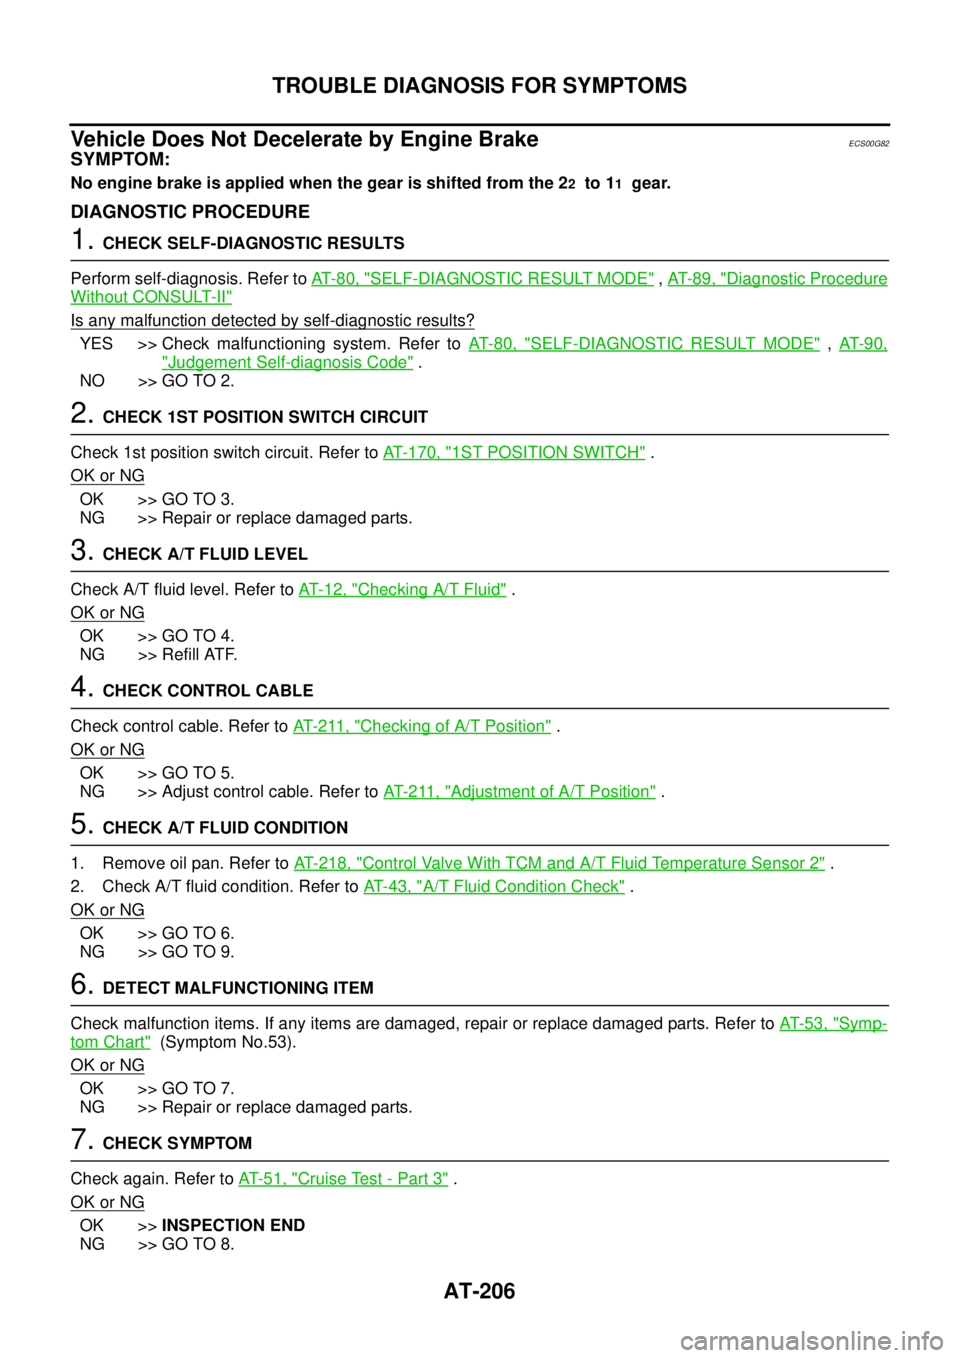
AT-206
TROUBLE DIAGNOSIS FOR SYMPTOMS
Vehicle Does Not Decelerate by Engine Brake
ECS00G82
SYMPTOM:
No engine brake is applied when the gear is shifted from the 22to 11gear.
DIAGNOSTIC PROCEDURE
1.CHECK SELF-DIAGNOSTIC RESULTS
Perform self-diagnosis. Refer toAT-80, "
SELF-DIAGNOSTIC RESULT MODE",AT-89, "Diagnostic Procedure
Without CONSULT-II"
Is any malfunction detected by self-diagnostic results?
YES >> Check malfunctioning system. Refer toAT-80, "SELF-DIAGNOSTIC RESULT MODE",AT- 9 0 ,
"Judgement Self-diagnosis Code".
NO >> GO TO 2.
2.CHECK 1ST POSITION SWITCH CIRCUIT
Check 1st position switch circuit. Refer toAT- 1 7 0 , "
1ST POSITION SWITCH".
OK or NG
OK >> GO TO 3.
NG >> Repair or replace damaged parts.
3.CHECK A/T FLUID LEVEL
Check A/T fluid level. Refer toAT-12, "
Checking A/T Fluid".
OK or NG
OK >> GO TO 4.
NG >> Refill ATF.
4.CHECK CONTROL CABLE
Check control cable. Refer toAT- 2 11 , "
Checking of A/T Position".
OK or NG
OK >> GO TO 5.
NG >> Adjust control cable. Refer toAT- 2 11 , "
Adjustment of A/T Position".
5.CHECK A/T FLUID CONDITION
1. Remove oil pan. Refer toAT- 2 1 8 , "
Control Valve With TCM and A/T Fluid Temperature Sensor 2".
2. Check A/T fluid condition. Refer toAT-43, "
A/T Fluid Condition Check".
OK or NG
OK >> GO TO 6.
NG >> GO TO 9.
6.DETECT MALFUNCTIONING ITEM
Check malfunction items. If any items are damaged, repair or replace damaged parts. Refer toAT-53, "
Symp-
tom Chart"(Symptom No.53).
OK or NG
OK >> GO TO 7.
NG >> Repair or replace damaged parts.
7.CHECK SYMPTOM
Check again. Refer toAT-51, "
Cruise Test - Part 3".
OK or NG
OK >>INSPECTION END
NG >> GO TO 8.
Page 219 of 3171
SHIFT CONTROL SYSTEM
AT-211
D
E
F
G
H
I
J
K
L
MA
B
AT
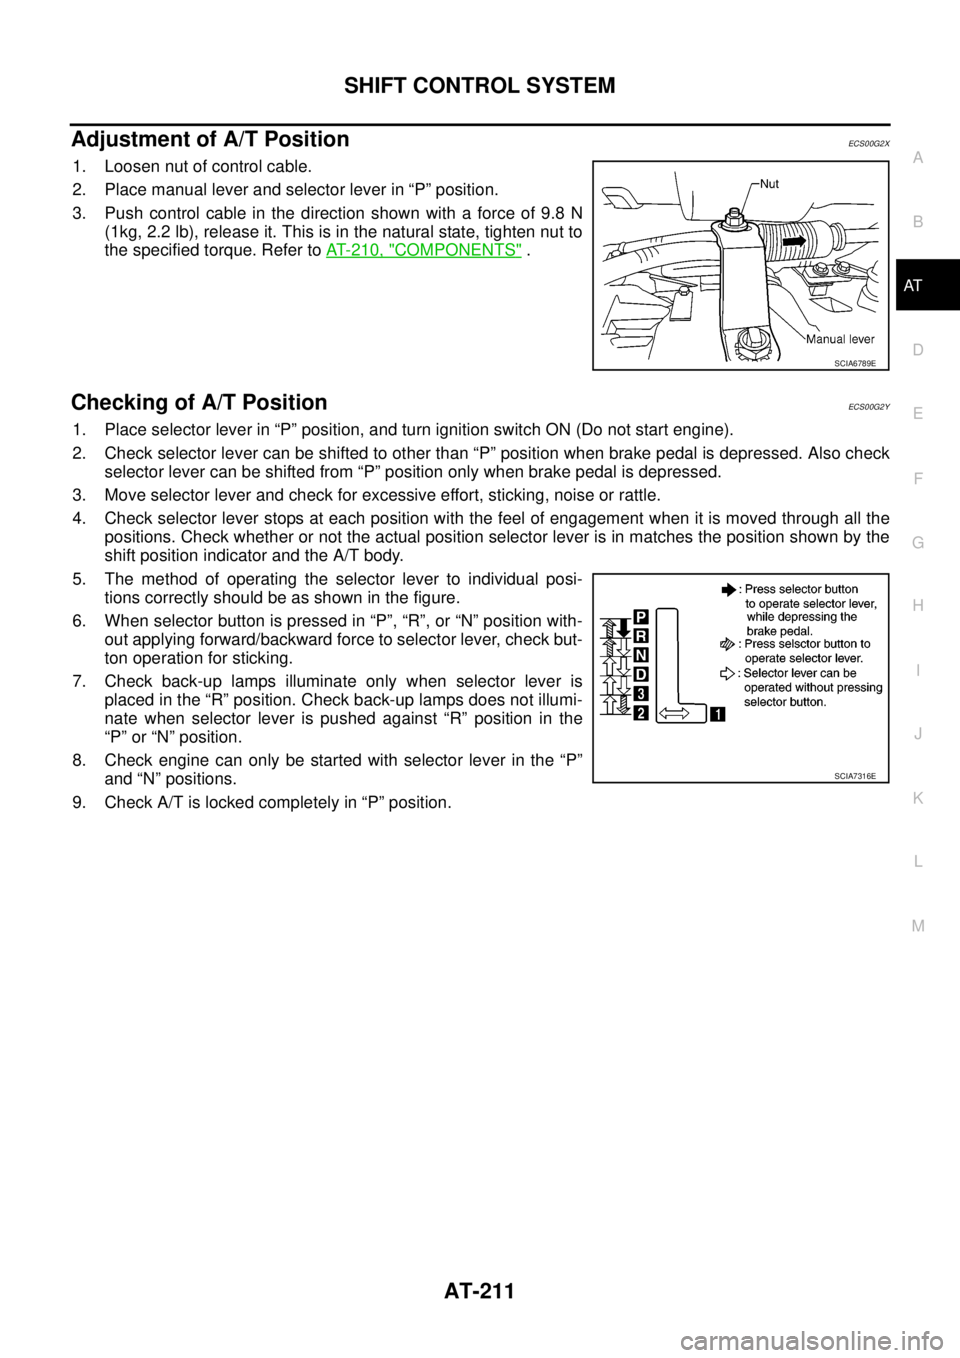
Adjustment of A/T PositionECS00G2X
1. Loosen nut of control cable.
2. Place manual lever and selector lever in “P” position.
3. Push control cable in the direction shown with a force of 9.8 N
(1kg, 2.2 lb), release it. This is in the natural state, tighten nut to
the specified torque. Refer toAT- 2 1 0 , "
COMPONENTS".
Checking of A/T PositionECS00G2Y
1. Place selector lever in “P” position, and turn ignition switch ON (Do not start engine).
2. Check selector lever can be shifted to other than “P” position when brake pedal is depressed. Also check
selector lever can be shifted from “P” position only when brake pedal is depressed.
3. Move selector lever and check for excessive effort, sticking, noise or rattle.
4. Check selector lever stops at each position with the feel of engagement when it is moved through all the
positions. Check whether or not the actual position selector lever is in matches the position shown by the
shift position indicator and the A/T body.
5. The method of operating the selector lever to individual posi-
tions correctly should be as shown in the figure.
6. When selector button is pressed in “P”, “R”, or “N” position with-
out applying forward/backward force to selector lever, check but-
ton operation for sticking.
7. Check back-up lamps illuminate only when selector lever is
placed in the “R” position. Check back-up lamps does not illumi-
nate when selector lever is pushed against “R” position in the
“P” or “N” position.
8. Check engine can only be started with selector lever in the “P”
and “N” positions.
9. Check A/T is locked completely in “P” position.
SCIA6789E
SCIA7316E
Page 222 of 3171

AT-214
A/T SHIFT LOCK SYSTEM
Diagnostic Procedure
ECS00G32
SYMPTOM 1:
lSelector lever cannot be moved from “P” position with key in ON position and brake pedal
applied.
lSelector lever can be moved from “P” position with key in ON position and brake pedal released.
lSelector lever can be moved from “P” position when key is removed from key cylinder.
SYMPTOM 2:
lIgnition key cannot be removed when selector lever is set to “P” position.
lIgnition key can be removed when selector lever is set to any position except “P” position.
1.CHECK KEY INTERLOCK CABLE
Check key interlock cable for damage.
OK or NG
OK >> GO TO 2.
NG >> Repair or replace key interlock cable. Refer toAT- 2 1 6 , "
Removal and Installation".
2.CHECK SELECTOR LEVER POSITION
Check selector lever position for damage. Refer toAT- 2 11 , "
Checking of A/T Position"
OK or NG
OK >> GO TO 3.
NG >> Adjust control cable. Refer toAT- 2 11 , "
Adjustment of A/T Position".
3.CHECK SHIFT LOCK SOLENOID AND PARK POSITION SWITCH
1. Connect A/T device harness connector.
2. Turn ignition switch ON. (Do not start engine.)
3. Selector lever is set in “P” position.
4. Check operation.
OK or NG
OK >>INSPECTION END
NG >> GO TO 4.
4.CHECK POWER SOURCE
1. Turn ignition switch ON. (Do not start engine.)
2. Check voltage between A/T device harness connector M79 ter-
minal 1 and ground.
OK or NG
OK >> GO TO 7.
NG >> GO TO 5.
Condition Brake pedal Operation
When ignition switch is turned to ON and selector lever is
set in “P” position.Depressed Yes
Released No
Condition Brake pedal Data (Approx.)
When ignition switch is turned to ON.Depressed Battery voltage
Released 0V
SCIA2122E
Page 234 of 3171
AT-226
ON-VEHICLE SERVICE
15. Install oil pan to transmission case.
a. Install oil pan gasket to oil pan.
CAUTION:
lDo not reuse oil pan gasket.
lInstall it in the direction to align hole positions.
lCompletely remove all moisture, oil and old gasket, etc. from oil pan gasket mounting surface.
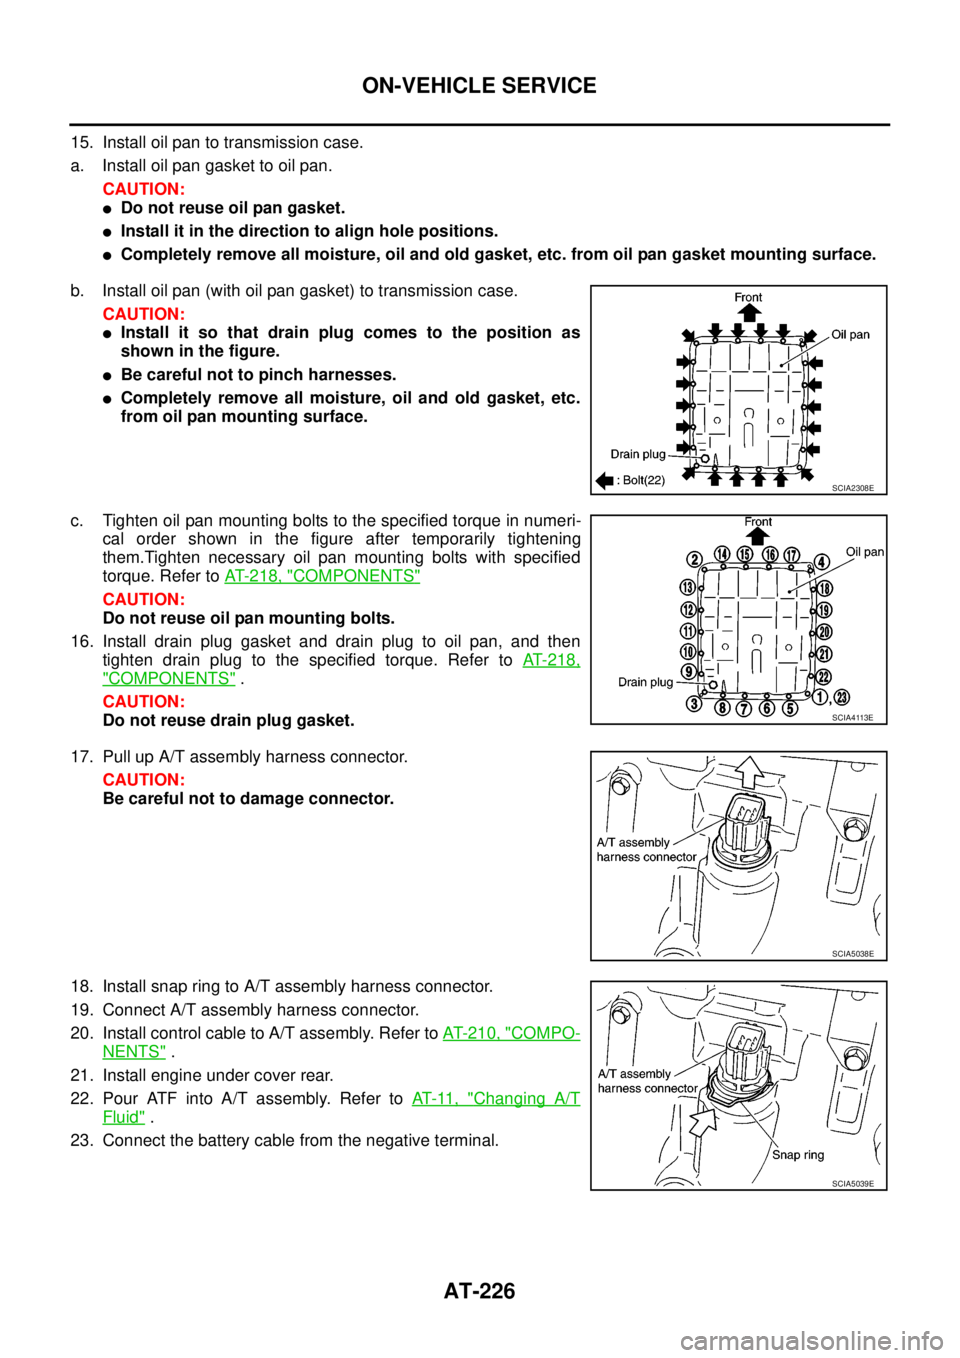
b. Install oil pan (with oil pan gasket) to transmission case.
CAUTION:
lInstall it so that drain plug comes to the position as
shown in the figure.
lBe careful not to pinch harnesses.
lCompletely remove all moisture, oil and old gasket, etc.
from oil pan mounting surface.
c. Tighten oil pan mounting bolts to the specified torque in numeri-
cal order shown in the figure after temporarily tightening
them.Tighten necessary oil pan mounting bolts with specified
torque. Refer toAT- 2 1 8 , "
COMPONENTS"
CAUTION:
Do not reuse oil pan mounting bolts.
16. Install drain plug gasket and drain plug to oil pan, and then
tighten drain plug to the specified torque. Refer toAT-218,
"COMPONENTS".
CAUTION:
Do not reuse drain plug gasket.
17. Pull up A/T assembly harness connector.
CAUTION:
Be careful not to damage connector.
18. Install snap ring to A/T assembly harness connector.
19. Connect A/T assembly harness connector.
20. Install control cable to A/T assembly. Refer toAT- 2 1 0 , "
COMPO-
NENTS".
21. Install engine under cover rear.
22. Pour ATF into A/T assembly. Refer toAT-11, "
Changing A/T
Fluid".
23. Connect the battery cable from the negative terminal.
SCIA2308E
SCIA4113E
SCIA5038E
SCIA5039E