2005 NISSAN NAVARA heating
[x] Cancel search: heatingPage 336 of 3171

ATC-2
DATA MONITOR .................................................. 34
How to Perform Trouble Diagnosis for Quick and
Accurate Repair ...................................................... 35
WORK FLOW ...................................................... 35
SYMPTOM TABLE .............................................. 35
Component Parts and Harness Connector Location... 36
ENGINE COMPARTMENT .................................. 36
FRONT PASSENGER COMPARTMENT ............ 37
Schematic —LHD MODELS— ............................... 38
Wiring Diagram —A/C— —LHD MODELS— ......... 39
Schematic —RHD MODELS— ............................... 46
Wiring Diadram —A/C— —RHD MODELS— ......... 47
Front Air Control Terminals and Reference Value... 53
PIN CONNECTOR TERMINAL LAYOUT ............ 53
TERMINALS AND REFERENCE VALUE FOR
FRONT AIR CONTROL ....................................... 53
A/C System Self-diagnosis Function ...................... 55
DESCRIPTION .................................................... 55
Operational Check .................................................. 57
CHECKING MEMORY FUNCTION ..................... 57
CHECKING BLOWER ......................................... 57
CHECKING DISCHARGE AIR ............................ 58
CHECKING RECIRCULATION ............................ 58
CHECKING TEMPERATURE DECREASE ......... 58
CHECKING TEMPERATURE INCREASE .......... 59
CHECK A/C SWITCH .......................................... 59
CHECKING AUTO MODE ................................... 59
Power Supply and Ground Circuit for Front Air Con-
trol ........................................................................... 60
INSPECTION FLOW ........................................... 60
COMPONENT DESCRIPTION ............................ 61
DIAGNOSTIC PROCEDURE FOR A/C SYSTEM... 61
Mode Door Motor Circuit ........................................ 63
INSPECTION FLOW ........................................... 63
SYSTEM DESCRIPTION .................................... 64
COMPONENT DESCRIPTION ............................ 65
DIAGNOSTIC PROCEDURE FOR MODE
DOOR MOTOR ................................................... 65
Air Mix Door Motor Circuit ...................................... 68
INSPECTION FLOW ........................................... 68
SYSTEM DESCRIPTION .................................... 69
COMPONENT DESCRIPTION ............................ 70
DIAGNOSTIC PROCEDURE FOR AIR MIX
DOOR MOTOR (DRIVER) ................................... 71
DIAGNOSTIC PROCEDURE FOR AIR MIX
DOOR MOTOR (PASSENGER) .......................... 73
Intake Door Motor Circuit ........................................ 77
INSPECTION FLOW ........................................... 77
SYSTEM DESCRIPTION .................................... 78
COMPONENT DESCRIPTION ............................ 79
DIAGNOSTIC PROCEDURE FOR INTAKE
DOOR MOTOR ................................................... 79
Blower Motor Circuit ............................................... 80
INSPECTION FLOW ........................................... 80
SYSTEM DESCRIPTION .................................... 81
COMPONENT DESCRIPTION ............................ 82
DIAGNOSTIC PROCEDURE FOR BLOWER
MOTOR ............................................................... 82
COMPONENT INSPECTION .............................. 86Magnet Clutch Circuit .............................................. 87
INSPECTION FLOW ............................................ 87
SYSTEM DESCRIPTION ..................................... 88
DIAGNOSTIC PROCEDURE FOR MAGNET
CLUTCH .............................................................. 88
COMPONENT INSPECTION ............................... 92
Insufficient Cooling .................................................. 93
INSPECTION FLOW ............................................ 93
PERFORMANCE TEST DIAGNOSES ................ 94
PERFORMANCE CHART .................................... 96
TROUBLE DIAGNOSES FOR UNUSUAL PRES-
SURE ................................................................... 97
Insufficient Heating ...............................................100
INSPECTION FLOW ..........................................100
Noise .....................................................................101
INSPECTION FLOW ..........................................101
Self-diagnosis .......................................................103
INSPECTION FLOW ..........................................103
Memory Function ..................................................104
INSPECTION FLOW ..........................................104
Ambient Sensor Circuit .........................................105
COMPONENT DESCRIPTION ..........................105
AMBIENT TEMPERATURE INPUT PROCESS.105
DIAGNOSTIC PROCEDURE FOR AMBIENT
SENSOR ............................................................105
COMPONENT INSPECTION .............................107
In-vehicle Sensor Circuit .......................................108
COMPONENT DESCRIPTION ..........................108
DIAGNOSTIC PROCEDURE FOR IN-VEHICLE
SENSOR ............................................................109
COMPONENT INSPECTION ............................. 111
Optical Sensor Circuit ...........................................112
COMPONENT DESCRIPTION ..........................112
OPTICAL INPUT PROCESS .............................112
DIAGNOSTIC PROCEDURE FOR SUNLOAD
SENSOR ............................................................112
Intake Sensor Circuit .............................................114
COMPONENT DESCRIPTION ..........................114
DIAGNOSTIC PROCEDURE FOR INTAKE SEN-
SOR ...................................................................114
COMPONENT INSPECTION .............................115
CONTROL UNIT ......................................................116
Removal and Installation .......................................116
REMOVAL ..........................................................116
INSTALLATION ..................................................116
AMBIENT SENSOR ................................................117
Removal and Installation .......................................117
REMOVAL ..........................................................117
INSTALLATION ..................................................117
IN-VEHICLE SENSOR ............................................118
Removal and Installation .......................................118
REMOVAL ..........................................................118
INSTALLATION ..................................................118
OPTICAL SENSOR .................................................119
Removal and Installation .......................................119
INTAKE SENSOR ....................................................120
Removal and Installation .......................................120
REMOVAL ..........................................................120
INSTALLATION ..................................................120
Page 369 of 3171

TROUBLE DIAGNOSIS
ATC-35
C
D
E
F
G
H
I
K
L
MA
B
AT C
How to Perform Trouble Diagnosis for Quick and Accurate RepairEJS006B9
WORK FLOW
SYMPTOM TABLE
*1AT C - 5 7 , "Operational Check".
SHA900E
Symptom Reference Page
A/C system does not come on. Go to Trouble Diagnosis Procedure for A/C System.ATC-60, "
Power
Supply and
Ground Circuit for
Front Air Control"
A/C system display is malfunctioning. Go to "Navigation System".AV-61, "Navigation
System"
A/C system cannot be controlled. Go to Self-diagnosis Function.AT C - 5 5 , "
A/C Sys-
tem Self-diagno-
sis Function"
Air outlet does not change.
Go to Trouble Diagnosis Procedure for Mode Door Motor.AT C - 6 3 , "Mode
Door Motor Cir-
cuit"Mode door motor is malfunctioning.
Discharge air temperature does not change.
Go to Trouble Diagnosis Procedure for Air Mix Door Motor.ATC-68, "
Air Mix
Door Motor Cir-
cuit"Air mix door motor is malfunctioning.
Intake door does not change.
Go to Trouble Diagnosis Procedure for Intake Door Motor.AT C - 7 7 , "
Intake
Door Motor Cir-
cuit"Intake door motor is malfunctioning.
Defroster door motor is malfunctioning. Go to Trouble Diagnosis Procedure for Defroster Door Motor.
Blower motor operation is malfunctioning. Go to Trouble Diagnosis Procedure for Blower Motor.ATC-80, "
Blower
Motor Circuit"
Magnet clutch does not engage. Go to Trouble Diagnosis Procedure for Magnet Clutch.AT C - 8 7 , "Magnet
Clutch Circuit"
Insufficient cooling Go to Trouble Diagnosis Procedure for Insufficient Cooling.AT C - 9 3 , "Insuffi-
cient Cooling"
Insufficient heating Go to Trouble Diagnosis Procedure for Insufficient Heating.ATC-100, "Insuffi-
cient Heating"
Noise Go to Trouble Diagnosis Procedure for Noise.ATC-101, "Noise"
Self-diagnosis cannot be performed. Go to Trouble Diagnosis Procedure for Self-diagnosis.ATC-103, "Self-
diagnosis"
Memory function does not operate. Go to Trouble Diagnosis Procedure for Memory Function.ATC-104, "Mem-
ory Function"
Page 393 of 3171

TROUBLE DIAGNOSIS
ATC-59
C
D
E
F
G
H
I
K
L
MA
B
AT C
CHECKING TEMPERATURE INCREASE
1. Rotate temperature control dial clockwise (driver side) until 32°C
(90°F) is displayed.
2. Check for hot air at appropriate discharge air outlets.
If NG, listen for sound of air mix door motor operation. If OK, go to
trouble diagnosis procedure forATC-100, "
Insufficient Heating".If
air mix door motor appears to be malfunctioning, go toAT C - 7 1 ,
"DIAGNOSTIC PROCEDURE FOR AIR MIX DOOR MOTOR
(DRIVER)".
If OK, continue with next check.
CHECK A/C SWITCH
1. Press A/C switch when AUTO switch is ON, or in manual mode.
2. A/C switch indicator will turn ON.
lConfirm that the compressor clutch engages (sound or visual
inspection).
If NG, go to trouble diagnosis procedure forAT C - 8 7 , "
Magnet Clutch
Circuit".
If OK, continue with next check.
CHECKING AUTO MODE
1. Press AUTO switch.
2. Display should indicate AUTO.
lIf ambient temperature is warm, and selected temperature is
cool, confirm that the compressor clutch engages (sound or
visual inspection). (Discharge air and blower speed will
depend on ambient, in-vehicle, and set temperatures.)
If NG, go to trouble diagnosis procedure forAT C - 6 0 , "
Power Supply
and Ground Circuit for Front Air Control", then if necessary, trouble
diagnosis procedure forAT C - 8 7 , "
Magnet Clutch Circuit".
If all operational checks are OK (symptom cannot be duplicated), go
to malfunction simulation tests inAT C - 3 5 , "
How to Perform Trouble
Diagnosis for Quick and Accurate Repair"and perform tests as out-
lined to simulate driving conditions environment. If symptom appears, refer toAT C - 3 5 , "
How to Perform Trou-
ble Diagnosis for Quick and Accurate Repair",AT C - 3 5 , "SYMPTOM TABLE"and perform applicable trouble
diagnosis procedures.
MJIB0341E
MJIB0342E
MJIB0336E
Page 434 of 3171

ATC-100
TROUBLE DIAGNOSIS
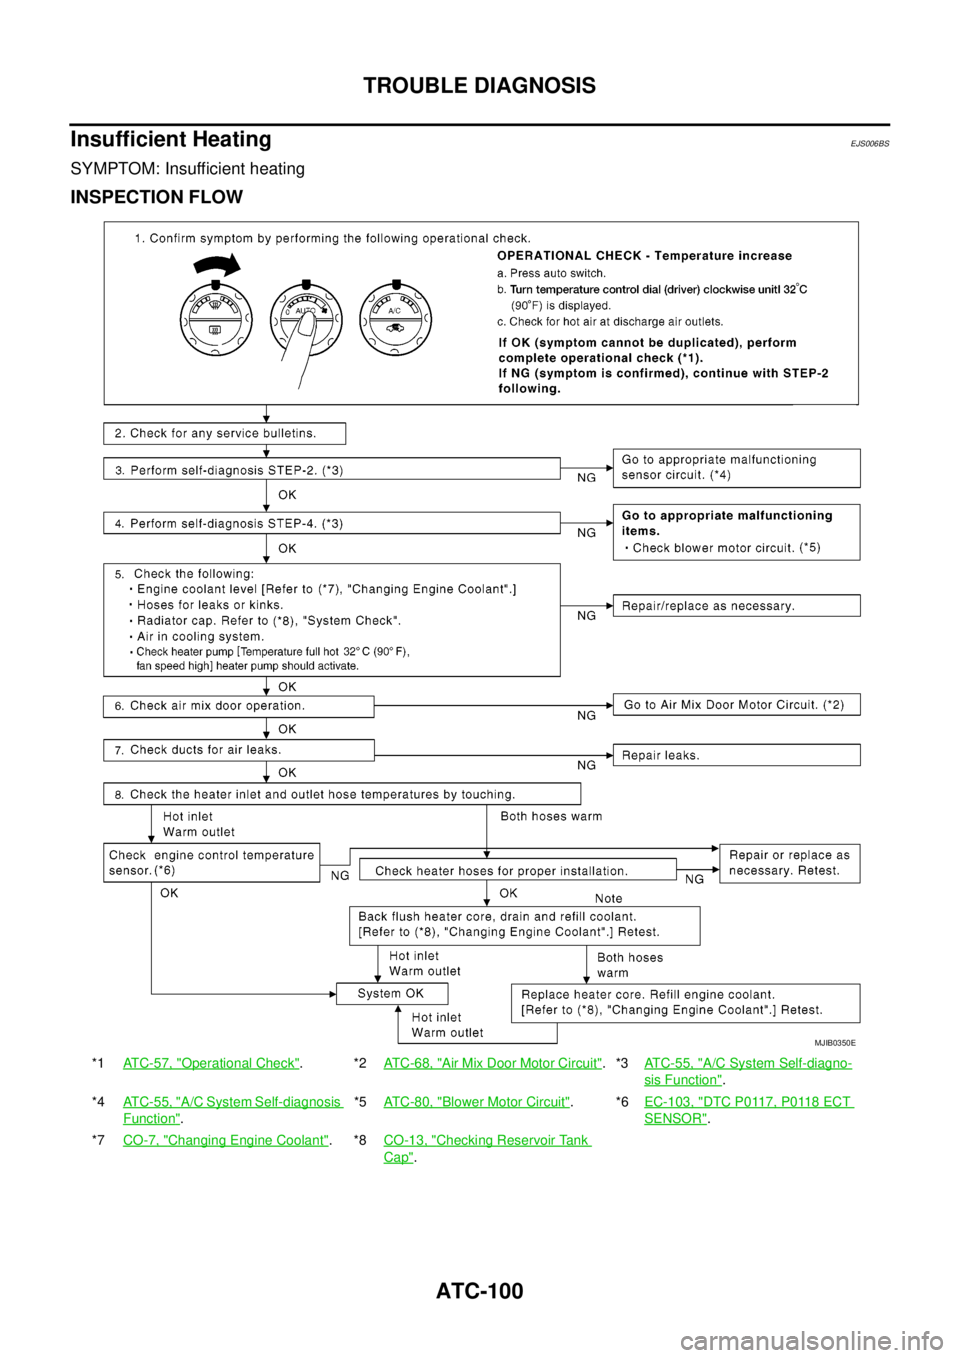
Insufficient Heating
EJS006BS
SYMPTOM: Insufficient heating
INSPECTION FLOW
*1ATC-57, "Operational Check".*2AT C - 6 8 , "Air Mix Door Motor Circuit".*3ATC-55, "A/C System Self-diagno-
sis Function".
*4ATC-55, "
A/C System Self-diagnosis
Function".*5AT C - 8 0 , "
Blower Motor Circuit".*6EC-103, "DTC P0117, P0118 ECT
SENSOR".
*7CO-7, "
Changing Engine Coolant".*8CO-13, "Checking Reservoir Tank
Cap".
MJIB0350E
Page 885 of 3171

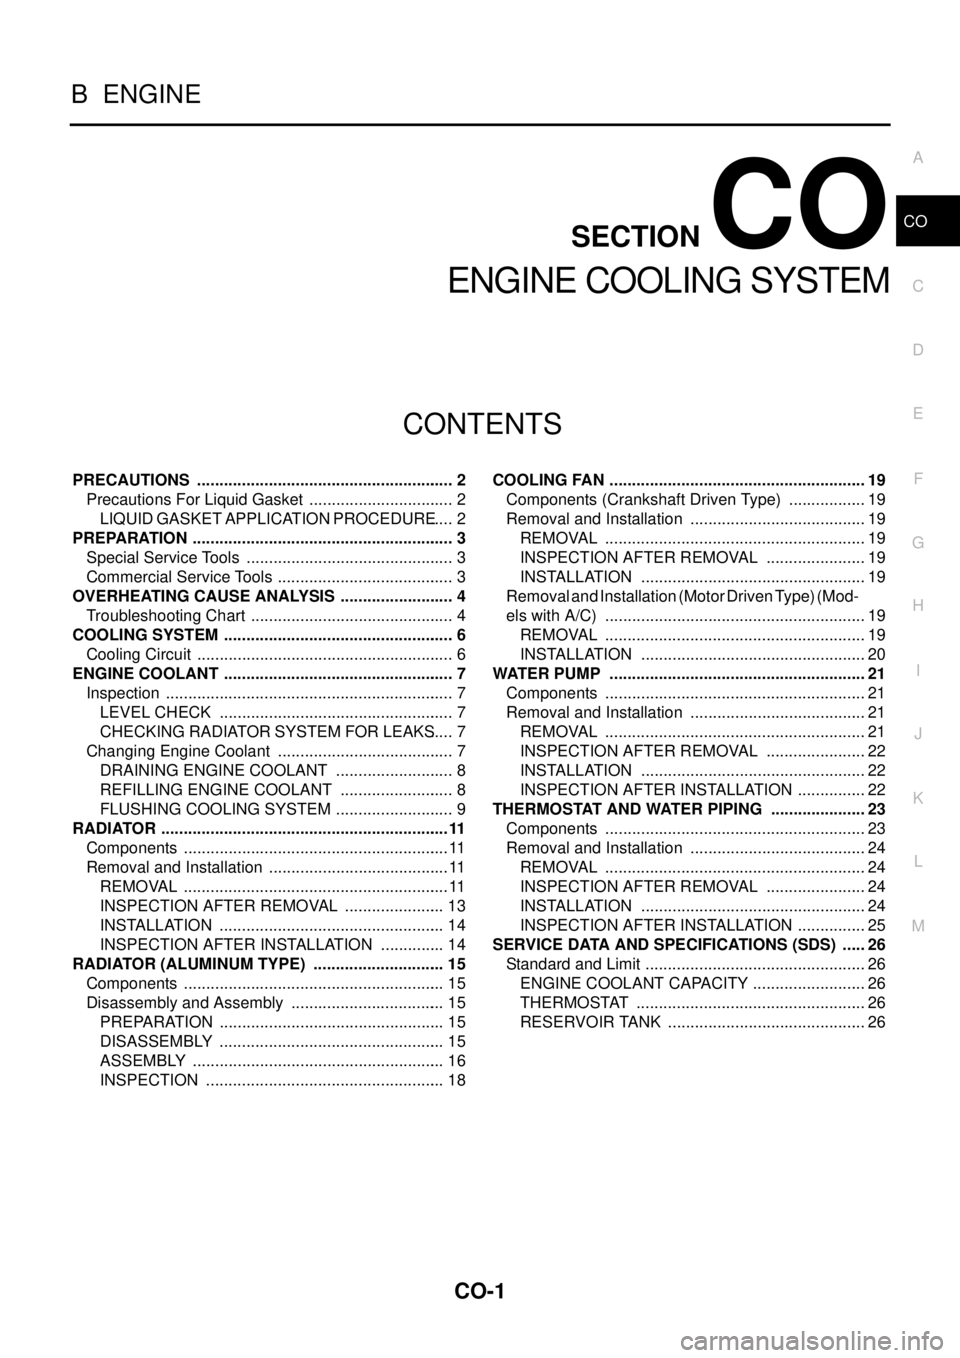
CO-1
ENGINE COOLING SYSTEM
B ENGINE
CONTENTS
C
D
E
F
G
H
I
J
K
L
M
SECTIONCO
A
CO
ENGINE COOLING SYSTEM
PRECAUTIONS .......................................................... 2
Precautions For Liquid Gasket ................................. 2
LIQUID GASKET APPLICATION PROCEDURE..... 2
PREPARATION ........................................................... 3
Special Service Tools ............................................... 3
Commercial Service Tools ........................................ 3
OVERHEATING CAUSE ANALYSIS .......................... 4
Troubleshooting Chart .............................................. 4
COOLING SYSTEM .................................................... 6
Cooling Circuit .......................................................... 6
ENGINE COOLANT .................................................... 7
Inspection ................................................................. 7
LEVEL CHECK ..................................................... 7
CHECKING RADIATOR SYSTEM FOR LEAKS..... 7
Changing Engine Coolant ........................................ 7
DRAINING ENGINE COOLANT ........................... 8
REFILLING ENGINE COOLANT .......................... 8
FLUSHING COOLING SYSTEM ........................... 9
RADIATOR .................................................................11
Components ............................................................ 11
Removal and Installation ......................................... 11
REMOVAL ............................................................ 11
INSPECTION AFTER REMOVAL ....................... 13
INSTALLATION ................................................... 14
INSPECTION AFTER INSTALLATION ............... 14
RADIATOR (ALUMINUM TYPE) .............................. 15
Components ........................................................... 15
Disassembly and Assembly ................................... 15
PREPARATION ................................................... 15
DISASSEMBLY ................................................... 15
ASSEMBLY ......................................................... 16
INSPECTION ...................................................... 18COOLING FAN .......................................................... 19
Components (Crankshaft Driven Type) .................. 19
Removal and Installation ........................................ 19
REMOVAL ........................................................... 19
INSPECTION AFTER REMOVAL ....................... 19
INSTALLATION ................................................... 19
Removal and Installation (Motor Driven Type) (Mod-
els with A/C) ........................................................... 19
REMOVAL ........................................................... 19
INSTALLATION ................................................... 20
WATER PUMP .......................................................... 21
Components ........................................................... 21
Removal and Installation ........................................ 21
REMOVAL ........................................................... 21
INSPECTION AFTER REMOVAL ....................... 22
INSTALLATION ................................................... 22
INSPECTION AFTER INSTALLATION ................ 22
THERMOSTAT AND WATER PIPING ...................... 23
Components ........................................................... 23
Removal and Installation ........................................ 24
REMOVAL ........................................................... 24
INSPECTION AFTER REMOVAL ....................... 24
INSTALLATION ................................................... 24
INSPECTION AFTER INSTALLATION ................ 25
SERVICE DATA AND SPECIFICATIONS (SDS) ...... 26
Standard and Limit .................................................. 26
ENGINE COOLANT CAPACITY .......................... 26
THERMOSTAT .................................................... 26
RESERVOIR TANK ............................................. 26
Page 886 of 3171

CO-2
PRECAUTIONS
PRECAUTIONS
PFP:00001
Precautions For Liquid GasketEBS01E6J
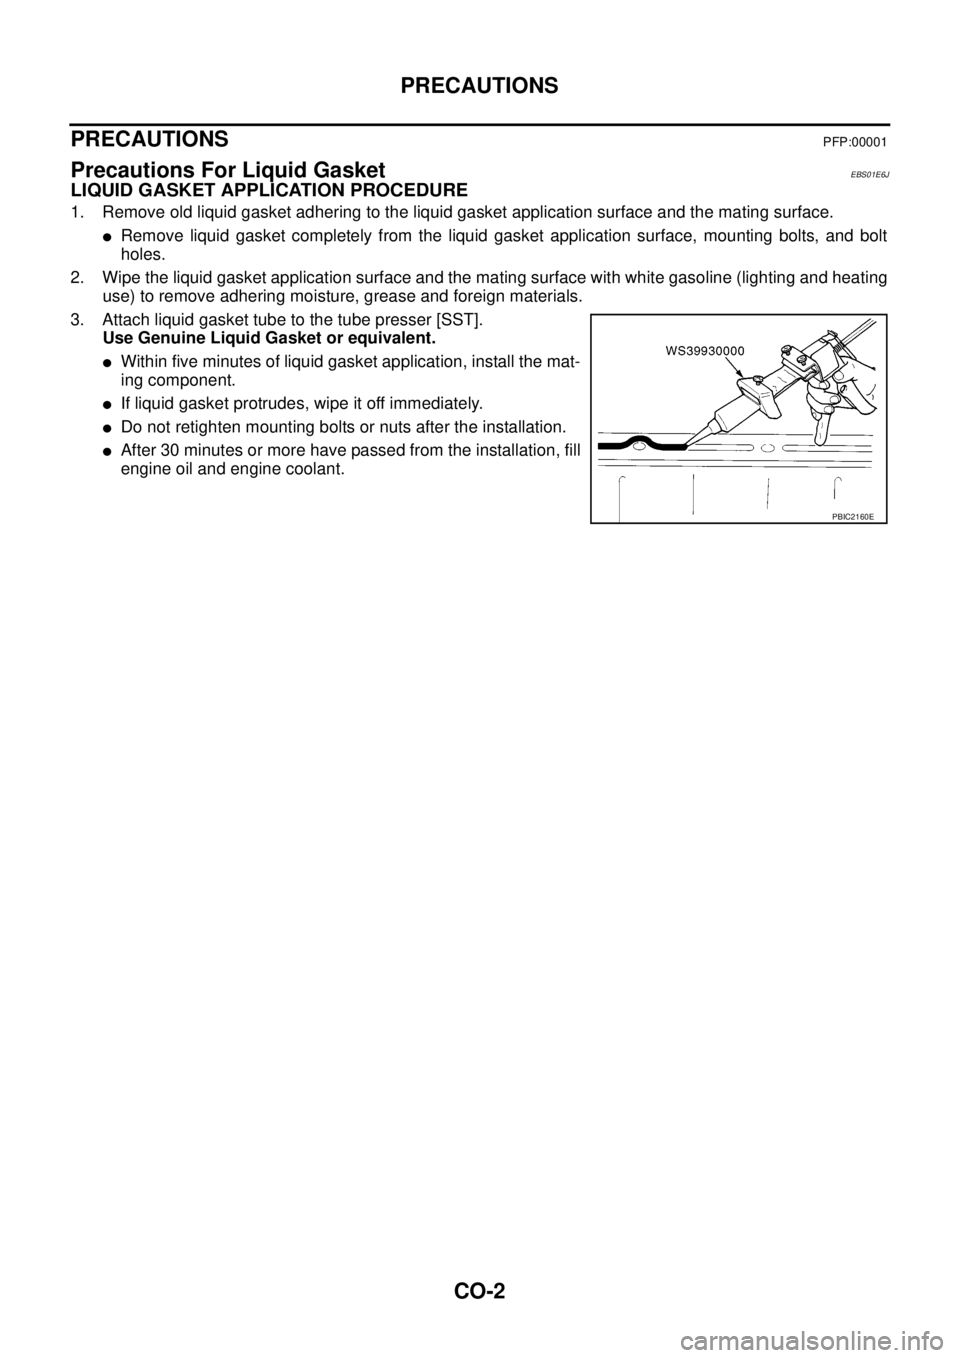
LIQUID GASKET APPLICATION PROCEDURE
1. Remove old liquid gasket adhering to the liquid gasket application surface and the mating surface.
lRemove liquid gasket completely from the liquid gasket application surface, mounting bolts, and bolt
holes.
2. Wipe the liquid gasket application surface and the mating surface with white gasoline (lighting and heating
use) to remove adhering moisture, grease and foreign materials.
3. Attach liquid gasket tube to the tube presser [SST].
Use Genuine Liquid Gasket or equivalent.
lWithin five minutes of liquid gasket application, install the mat-
ing component.
lIf liquid gasket protrudes, wipe it off immediately.
lDo not retighten mounting bolts or nuts after the installation.
lAfter 30 minutes or more have passed from the installation, fill
engine oil and engine coolant.
PBIC2160E
Page 888 of 3171

CO-4
OVERHEATING CAUSE ANALYSIS
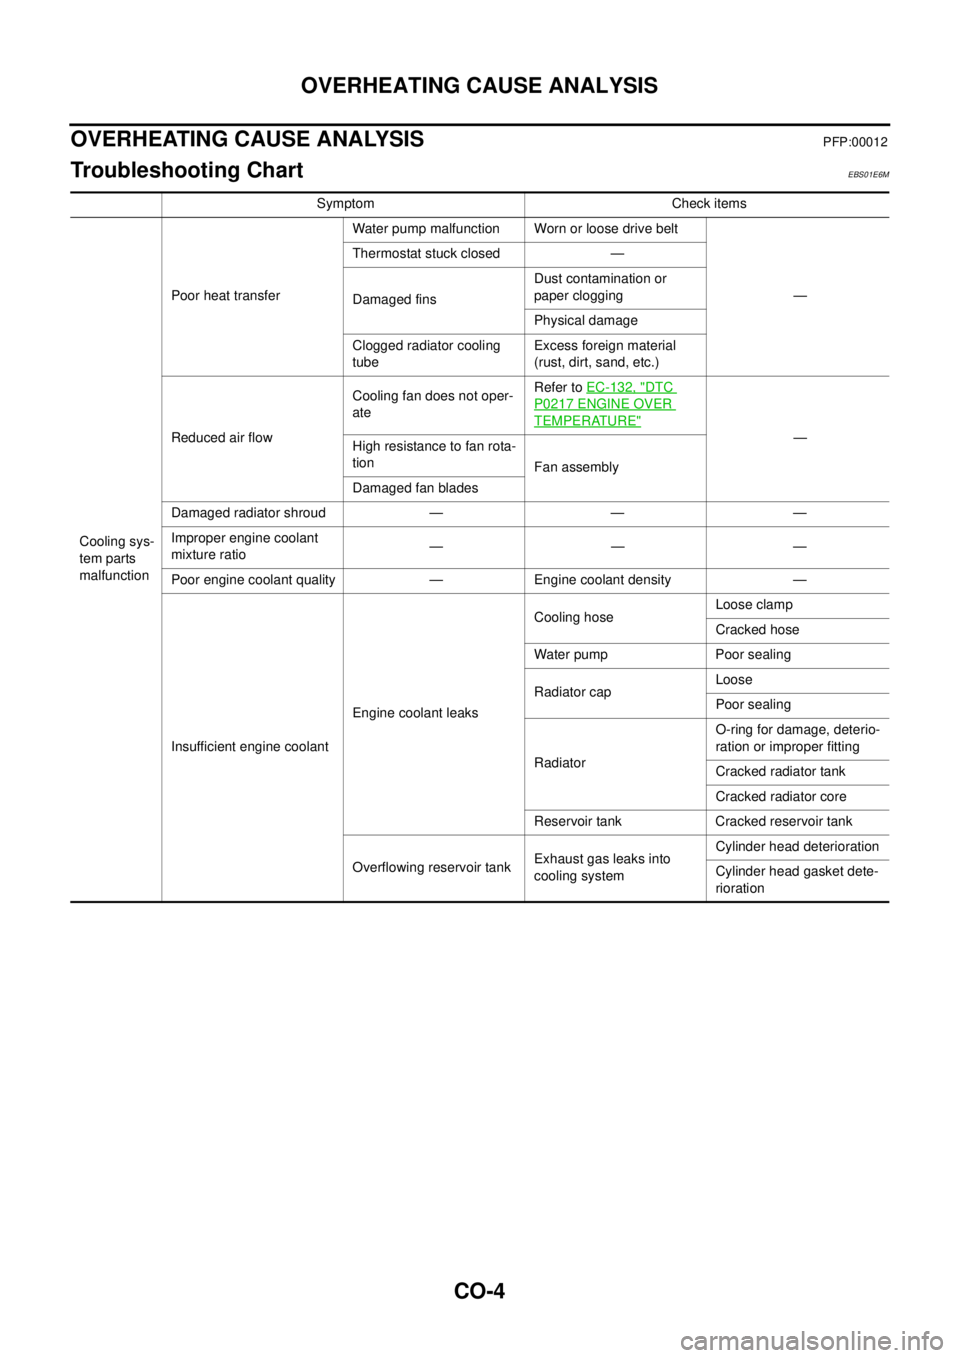
OVERHEATING CAUSE ANALYSIS
PFP:00012
Troubleshooting ChartEBS01E6M
Symptom Check items
Cooling sys-
tem parts
malfunctionPoor heat transferWater pump malfunction Worn or loose drive belt
— Thermostat stuck closed —
Damaged finsDust contamination or
paper clogging
Physical damage
Clogged radiator cooling
tubeExcess foreign material
(rust, dirt, sand, etc.)
Reduced air flowCooling fan does not oper-
ateRefer toEC-132, "
DTC
P0217 ENGINE OVER
TEMPERATURE"
—
Highresistancetofanrota-
tion
Fan assembly
Damaged fan blades
Damaged radiator shroud — — —
Improper engine coolant
mixture ratio—— —
Poor engine coolant quality — Engine coolant density —
Insufficient engine coolantEngine coolant leaksCooling hoseLoose clamp
Cracked hose
Water pump Poor sealing
Radiator capLoose
Poor sealing
RadiatorO-ring for damage, deterio-
ration or improper fitting
Cracked radiator tank
Cracked radiator core
Reservoir tank Cracked reservoir tank
Overflowing reservoir tankExhaust gas leaks into
cooling systemCylinder head deterioration
Cylinder head gasket dete-
rioration
Page 889 of 3171

OVERHEATING CAUSE ANALYSIS
CO-5
C
D
E
F
G
H
I
J
K
L
MA
CO
Except cool-
ing system
parts mal-
function— Overload on engineAbusive drivingHigh engine rpm under no
load
Driving in low gear for
extended time
Driving at extremely high
speed
Powertrain system mal-
function
— Installed improper size
wheels and tires
Dragging brakes
Improper ignition timing
Blocked or restricted air
flowBlocked bumper —
— Blocked radiator grilleInstalled car brassiere
Mud contamination or
paper clogging
Blocked radiator —
Blocked condenser
Blocked air flow
Installed large fog lamp Symptom Check items