2005 NISSAN NAVARA battery
[x] Cancel search: batteryPage 762 of 3171

BL-178
NATS(NISSAN ANTI-THEFT SYSTEM)
Trouble Diagnoses
EIS00DB0
SYMPTOM MATRIX CHART 1
Self-diagnosis related item
*1: When NATS detects trouble, the security indicator lights up while ignition key is in the “ON” position.
SYMPTOM MATRIX CHART 2
Non self-diagnosis related item
*: CONSULT-II self-diagnostic results display screen “no malfunction is detected”.SYMPTOMDisplayed “SELF-DIAG
RESULTS” on CON-
SULT-II screen.DIAGNOSTIC PROCE-
DURE
(Reference page)SYSTEM
(Malfunctioning part or mode)
lSecurity indicator
lighting up*1
lEngine cannot be
startedCHAIN OF ECM-IMMU
[P1612]PROCEDURE 1
(BL-179
)In rare case, “CHAIN OF ECM-IMMU” might be stored
during key registration procedure, even if the system is
not malfunctioning.
Open circuit in battery voltage line of BCM circuit
Open circuit in ignition line of BCM circuit
Open circuit in ground line of BCM circuit
Open or short circuit between BCM and ECM communi-
cation line
ECM
BCM
DIFFERENCE OF KEY
[P1615]PROCEDURE 2
(BL-181
)Unregistered key
BCM
CHAIN OF IMMU-KEY
[P1614]PROCEDURE 3
(BL-181
)Malfunction of key ID chip
Communication line between ANT/ AMP and BCM:
Open circuit or short circuit of battery voltage line or
ground line
Open circuit in power source line of ANT/ AMP circuit
Open circuit in ground line of ANT/ AMP circuit
NATS antenna amp.
BCM
ID DISCORD, IMM-
ECM
[P1611]PROCEDURE 4
(BL-184
)System initialization has not yet been completed.
ECM
ECM
[P1616]EC-269, "
DTC P1616
ECM"ECM
lSecurity indicator
lighting up*1
lEngine cannot be
startedLOCK MODE
[P1610]PROCEDURE 6
(BL-187)When the starting operation is carried out five or more
times consecutively under the following conditions, NATS
will shift the mode to one which prevents the engine from
being started.
lUnregistered ignition key is used.
lBCM or ECM’s malfunctioning.
Security indicator
lighting up*
1
DON'T ERASE
BEFORE CHECKING
ENG DIAGWORK FLOW
(BL-177
)Engine trouble data and NATS trouble data have been
detected in ECM
SYMPTOMDIAGNOSTIC PROCEDURE
(Reference page)SYSTEM
(Malfunctioning part or mode)
Security indicator does not light up*.PROCEDURE 5
(BL-185
)Security indictor.
Open circuit between Fuse and BCM
BCM
Page 763 of 3171
NATS(NISSAN ANTI-THEFT SYSTEM)
BL-179
C
D
E
F
G
H
J
K
L
MA
B
BL
Diagnostic Procedure 1EIS00DB1
Self-diagnostic results:
“CHAIN OF ECM-IMMU” displayed on CONSULT-II screen
First perform the “SELF-DIAG RESULTS” in “BCM” with CONSULT-II, then perform the trouble diagno-
sis of malfunction system indicated “SELF-DIAG RESULTS” of “BCM”. Refer toBCS-16, "
CAN Com-
munication Inspection Using CONSULT-II (Self-Diagnosis)".
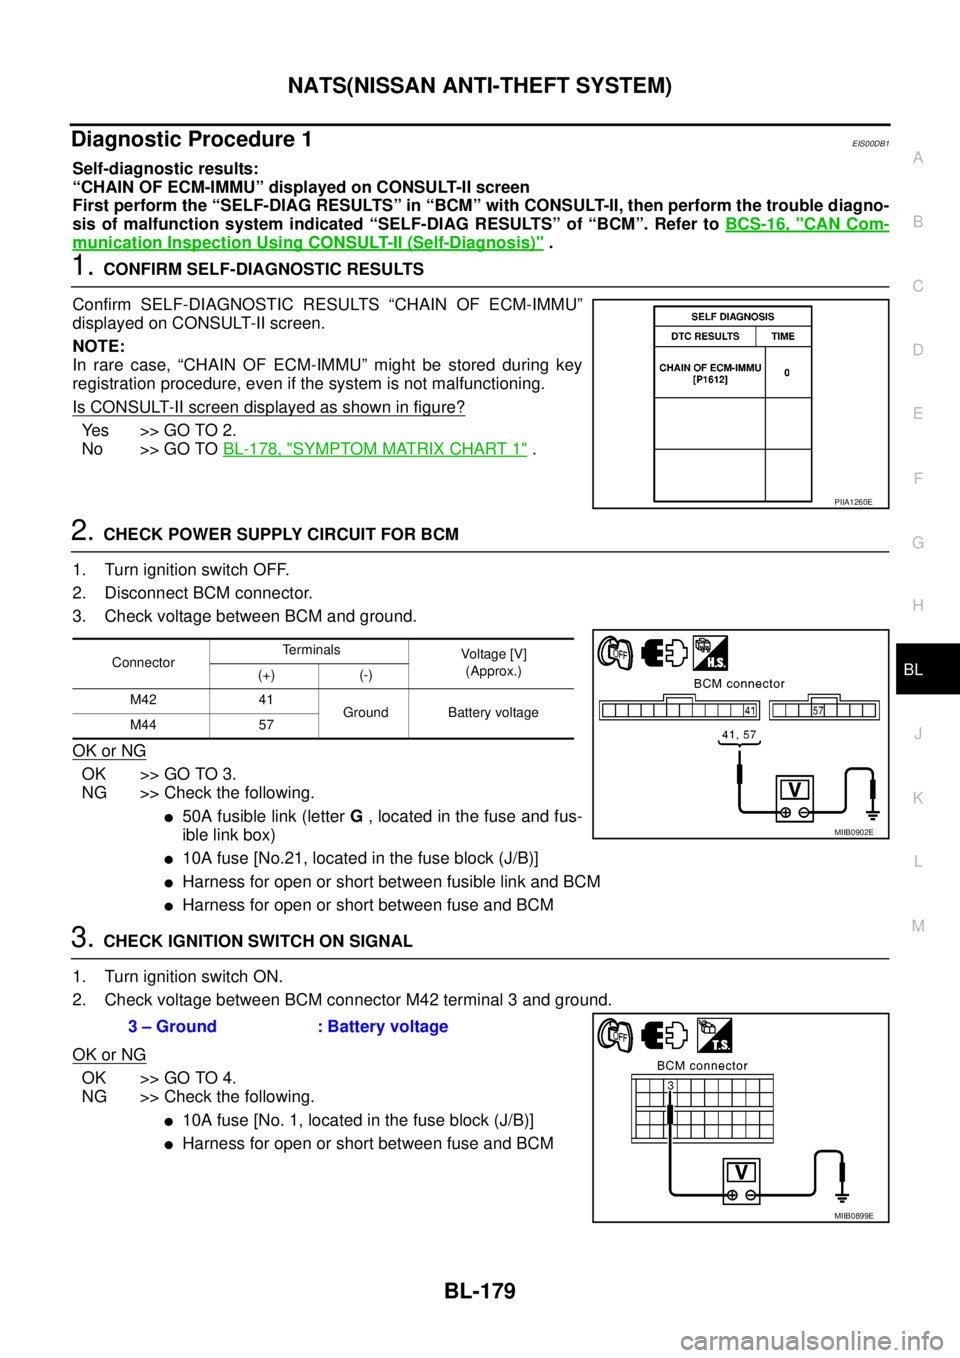
1.CONFIRM SELF-DIAGNOSTIC RESULTS
Confirm SELF-DIAGNOSTIC RESULTS “CHAIN OF ECM-IMMU”
displayed on CONSULT-II screen.
NOTE:
In rare case, “CHAIN OF ECM-IMMU” might be stored during key
registration procedure, even if the system is not malfunctioning.
Is CONSULT-II screen displayed as shown in figure?
Ye s > > G O T O 2 .
No >> GO TOBL-178, "
SYMPTOM MATRIX CHART 1".
2.CHECK POWER SUPPLY CIRCUIT FOR BCM
1. Turn ignition switch OFF.
2. Disconnect BCM connector.
3. Check voltage between BCM and ground.
OK or NG
OK >> GO TO 3.
NG >> Check the following.
l50A fusible link (letterG, located in the fuse and fus-
ible link box)
l10A fuse [No.21, located in the fuse block (J/B)]
lHarness for open or short between fusible link and BCM
lHarness for open or short between fuse and BCM
3.CHECK IGNITION SWITCH ON SIGNAL
1. Turn ignition switch ON.
2. Check voltage between BCM connector M42 terminal 3 and ground.
OK or NG
OK >> GO TO 4.
NG >> Check the following.
l10A fuse [No. 1, located in the fuse block (J/B)]
lHarness for open or short between fuse and BCM
PIIA1260E
ConnectorTerminals
Voltag e [V]
(Approx.)
(+) (-)
M42 41
Ground Battery voltage
M44 57
MIIB0902E
3 – Ground : Battery voltage
MIIB0899E
Page 766 of 3171
BL-182
NATS(NISSAN ANTI-THEFT SYSTEM)
3.CHECK NATS IGNITION KEY ID CHIP
Start engine with another registered NATS ignition key.
Doestheenginestart?
Yes >> Ignition key ID chip is malfunctioning.
lReplace the ignition key
lPerform initialization with CONSULT-II
For initialization, refer to “CONSULT-II Operation Manual NATS”
No >> GO TO 4.
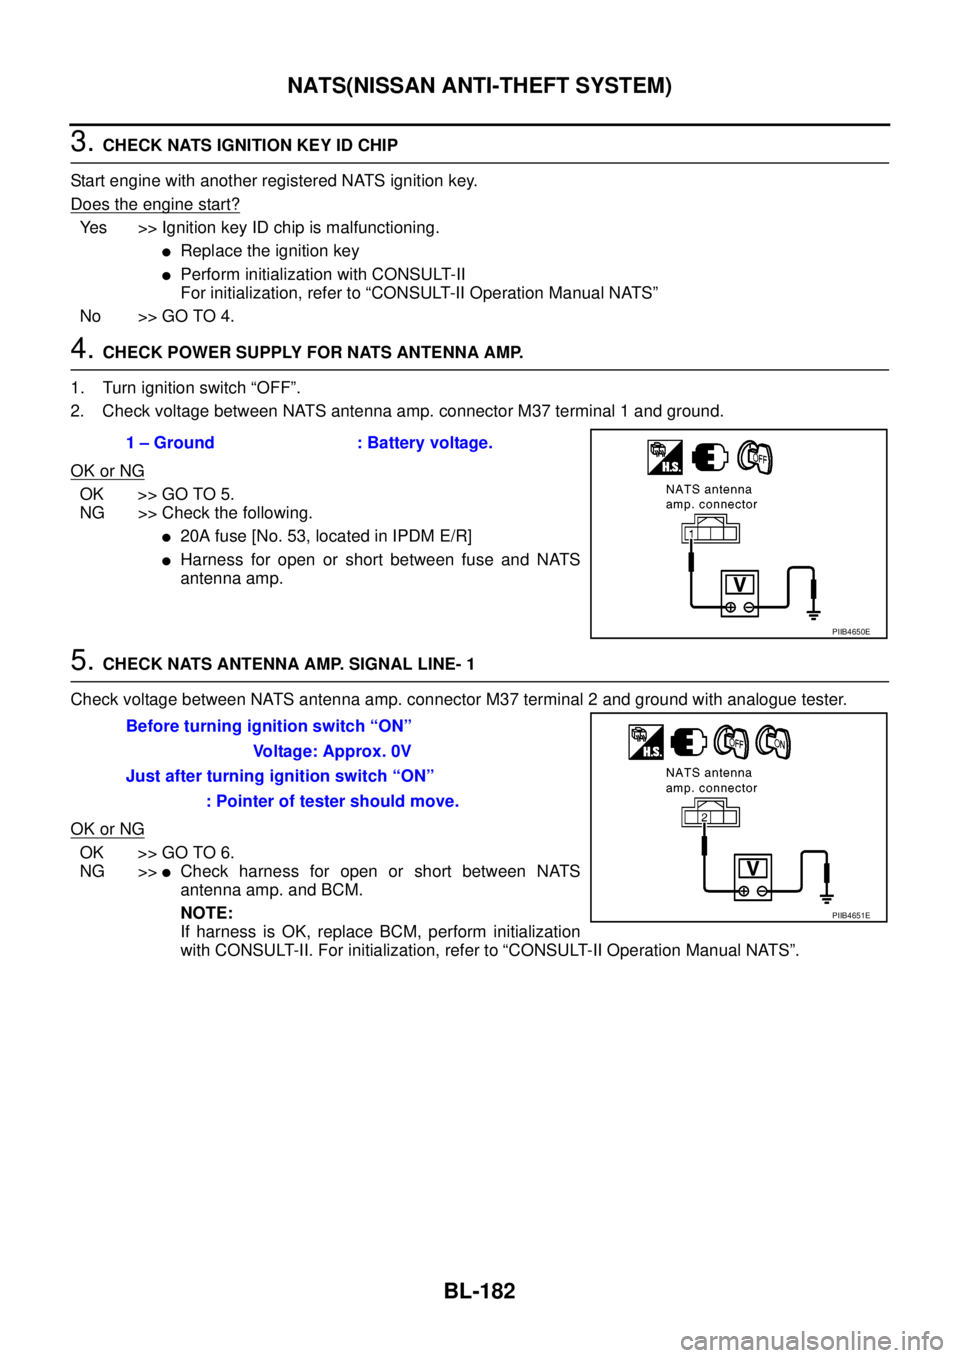
4.CHECK POWER SUPPLY FOR NATS ANTENNA AMP.
1. Turn ignition switch “OFF”.
2. Check voltage between NATS antenna amp. connector M37 terminal 1 and ground.
OK or NG
OK >> GO TO 5.
NG >> Check the following.
l20A fuse [No. 53, located in IPDM E/R]
lHarness for open or short between fuse and NATS
antenna amp.
5.CHECK NATS ANTENNA AMP. SIGNAL LINE- 1
Check voltage between NATS antenna amp. connector M37 terminal 2 and ground with analogue tester.
OK or NG
OK >> GO TO 6.
NG >>
lCheck harness for open or short between NATS
antenna amp. and BCM.
NOTE:
If harness is OK, replace BCM, perform initialization
with CONSULT-II. For initialization, refer to “CONSULT-II Operation Manual NATS”. 1 – Ground : Battery voltage.
PIIB4650E
Before turning ignition switch “ON”
Voltage: Approx. 0V
Just after turning ignition switch “ON”
: Pointer of tester should move.
PIIB4651E
Page 769 of 3171
NATS(NISSAN ANTI-THEFT SYSTEM)
BL-185
C
D
E
F
G
H
J
K
L
MA
B
BL
Diagnostic Procedure 5EIS00DB5
“SECURITY INDICATOR LAMP DOES NOT LIGHT UP”
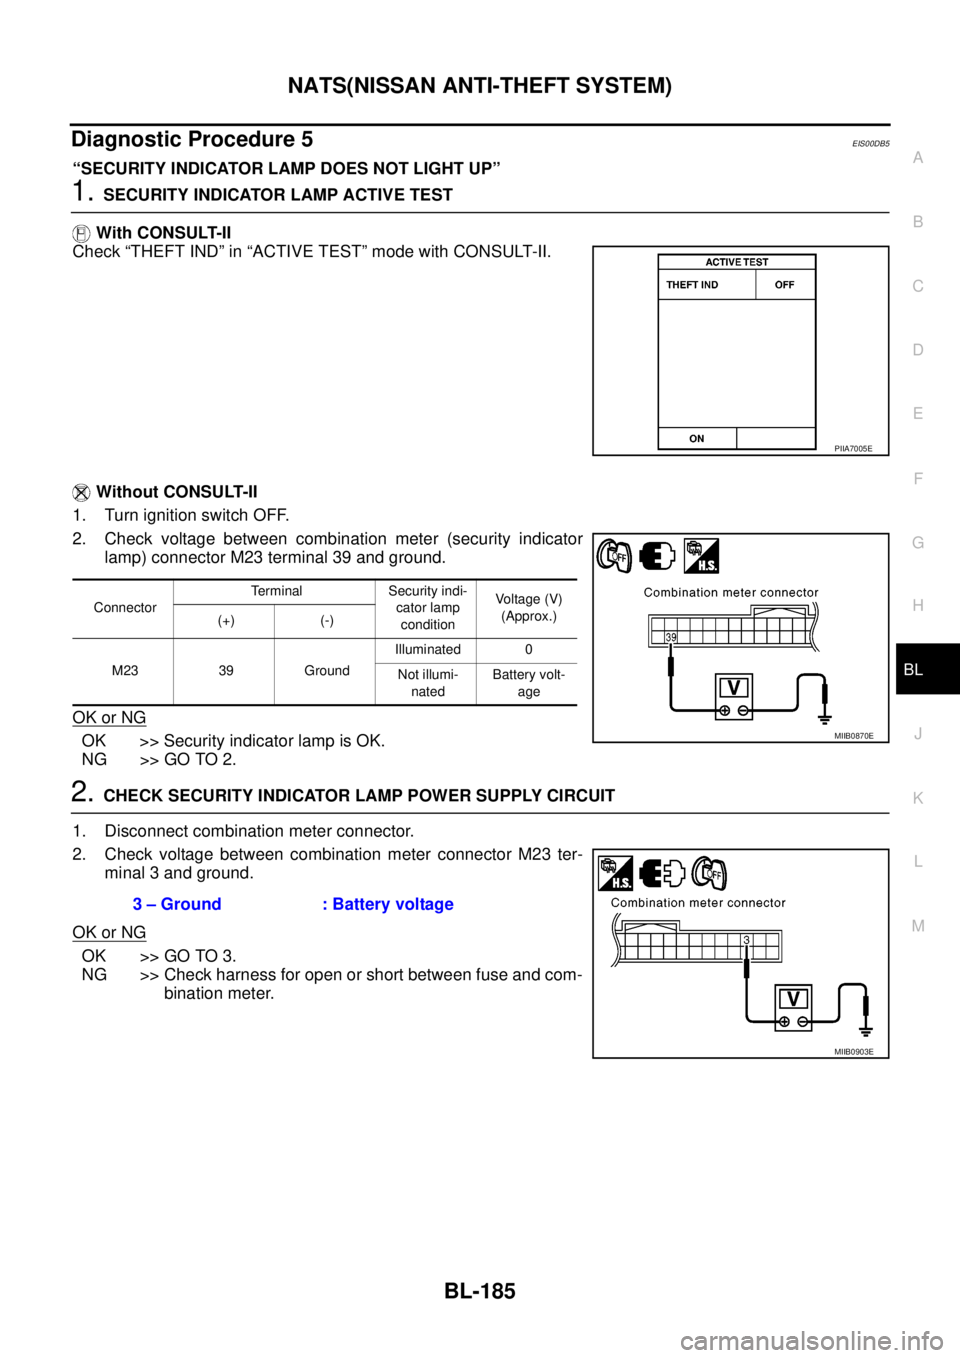
1.SECURITY INDICATOR LAMP ACTIVE TEST
With CONSULT-II
Check “THEFT IND” in “ACTIVE TEST” mode with CONSULT-II.
Without CONSULT-II
1. Turn ignition switch OFF.
2. Check voltage between combination meter (security indicator
lamp) connector M23 terminal 39 and ground.
OK or NG
OK >> Security indicator lamp is OK.
NG >> GO TO 2.
2.CHECK SECURITY INDICATOR LAMP POWER SUPPLY CIRCUIT
1. Disconnect combination meter connector.
2. Check voltage between combination meter connector M23 ter-
minal 3 and ground.
OK or NG
OK >> GO TO 3.
NG >> Check harness for open or short between fuse and com-
bination meter.
PIIA7005E
ConnectorTerminal Security indi-
cator lamp
conditionVoltage (V)
(Approx.)
(+) (-)
M23 39 GroundIlluminated 0
Not illumi-
natedBattery volt-
age
MIIB0870E
3 – Ground : Battery voltage
MIIB0903E
Page 772 of 3171
BL-188
NATS(NISSAN ANTI-THEFT SYSTEM)
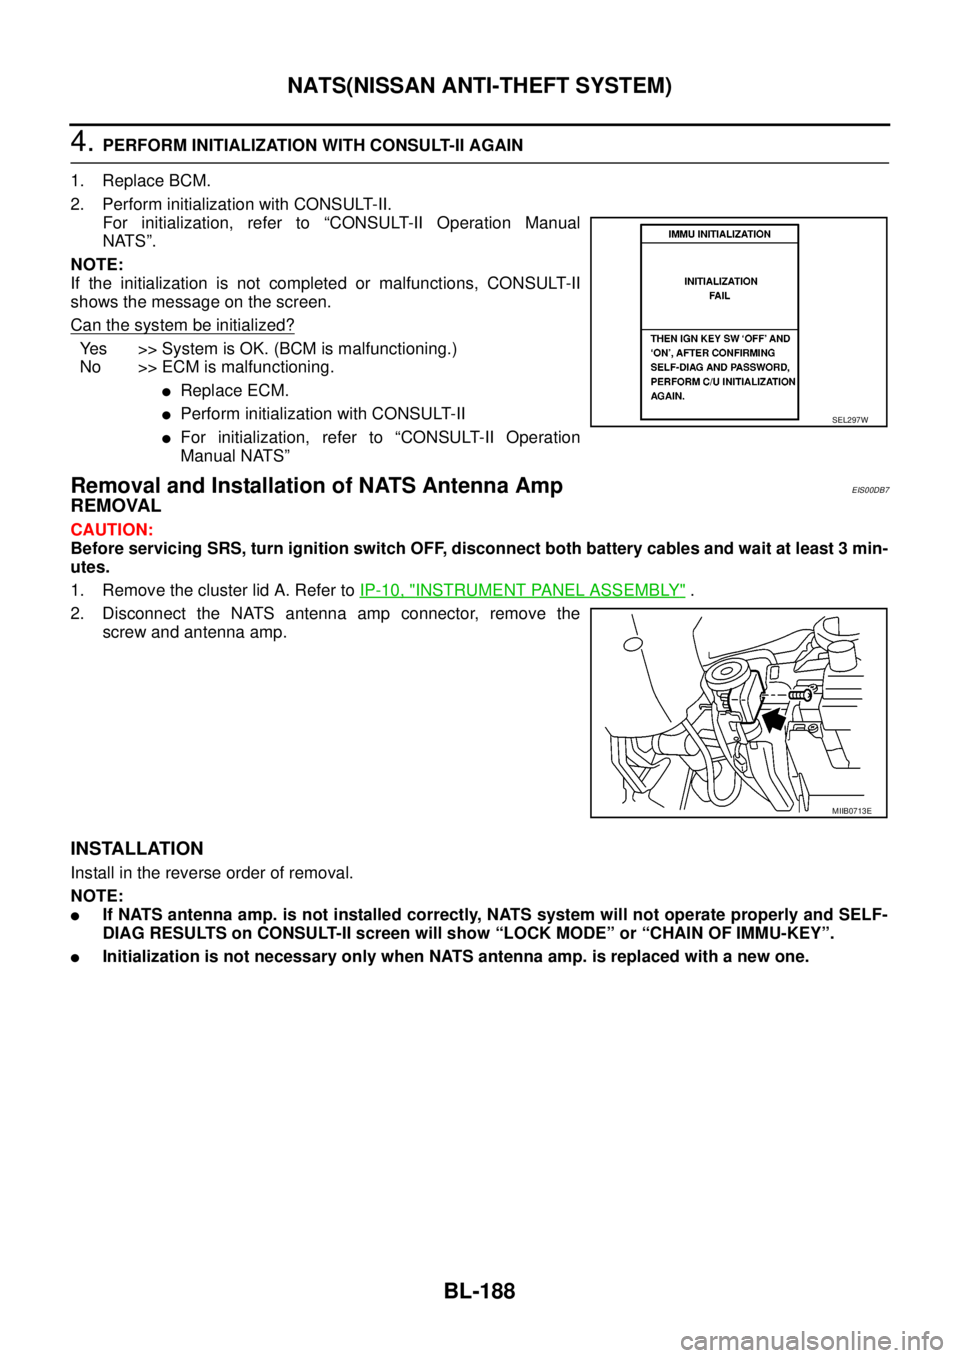
4.PERFORM INITIALIZATION WITH CONSULT-II AGAIN
1. Replace BCM.
2. Perform initialization with CONSULT-II.
For initialization, refer to “CONSULT-II Operation Manual
NATS”.
NOTE:
If the initialization is not completed or malfunctions, CONSULT-II
shows the message on the screen.
Can the system be initialized?
Yes >>SystemisOK.(BCMismalfunctioning.)
No >> ECM is malfunctioning.
lReplace ECM.
lPerform initialization with CONSULT-II
lFor initialization, refer to “CONSULT-II Operation
Manual NATS”
Removal and Installation of NATS Antenna AmpEIS00DB7
REMOVAL
CAUTION:
Before servicing SRS, turn ignition switch OFF, disconnect both battery cables and wait at least 3 min-
utes.
1. Remove the cluster lid A. Refer toIP-10, "
INSTRUMENT PANEL ASSEMBLY".
2. Disconnect the NATS antenna amp connector, remove the
screw and antenna amp.
INSTALLATION
Install in the reverse order of removal.
NOTE:
lIf NATS antenna amp. is not installed correctly, NATS system will not operate properly and SELF-
DIAG RESULTS on CONSULT-II screen will show “LOCK MODE” or “CHAIN OF IMMU-KEY”.
lInitialization is not necessary only when NATS antenna amp. is replaced with a new one.
SEL297W
MIIB0713E
Page 789 of 3171
PRECAUTIONS
BR-3
C
D
E
G
H
I
J
K
L
MA
B
BR
PRECAUTIONSPFP:00001
Precautions for Supplemental Restraint System (SRS) “AIR BAG” and “SEAT
BELT PRE-TENSIONER”
EFS006DL
The Supplemental Restraint System such as “AIR BAG” and “SEAT BELT PRE-TENSIONER”, used along
with a front seat belt, helps to reduce the risk or severity of injury to the driver and front passenger for certain
types of collision. Information necessary to service the system safely is included in the SRS and SB section of
this Service Manual.
WARNING:
lTo avoid rendering the SRS inoperative, which could increase the risk of personal injury or death
in the event of a collision which would result in air bag inflation, all maintenance must be per-
formed by an authorized NISSAN/INFINITI dealer.
lImproper maintenance, including incorrect removal and installation of the SRS, can lead to per-
sonal injury caused by unintentional activation of the system. For removal of Spiral Cable and Air
Bag Module, see the SRS section.
lDo not use electrical test equipment on any circuit related to the SRS unless instructed to in this
Service Manual. SRS wiring harnesses can be identified by yellow and/or orange harnesses or
harness connectors.
Precautions for Brake SystemEFS005SD
lClean dust on front brake and rear brake with a vacuum dust collector. Do not blow with compressed air.
lRecommended fluid is brake fluid “DOT 3” or “DOT 4”.
lNever reuse drained brake fluid.
lBe careful not to splash brake fluid on painted areas; it may cause paint damage. If brake fluid is splashed
on painted areas, wash it away with water immediately.
lTo clean or wash all parts of master cylinder, disc brake caliper, wheel cylinder, use new brake fluid.
lNever use mineral oils such as gasoline or kerosene. They will ruin rubber parts of the hydraulic system.
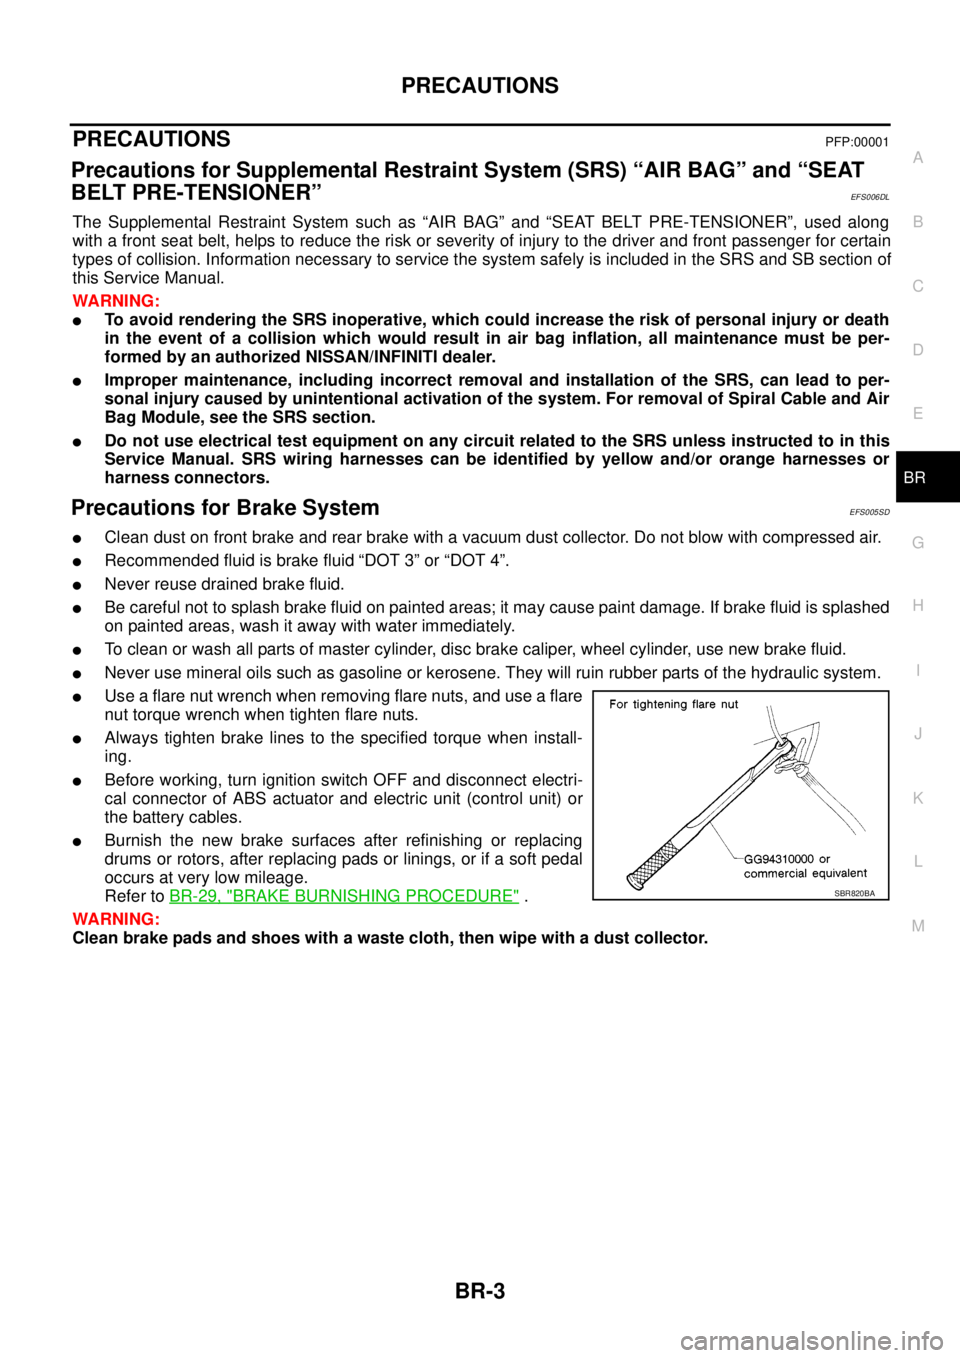
lUse a flare nut wrench when removing flare nuts, and use a flare
nut torque wrench when tighten flare nuts.
lAlways tighten brake lines to the specified torque when install-
ing.
lBefore working, turn ignition switch OFF and disconnect electri-
cal connector of ABS actuator and electric unit (control unit) or
the battery cables.
lBurnish the new brake surfaces after refinishing or replacing
drums or rotors, after replacing pads or linings, or if a soft pedal
occurs at very low mileage.
Refer toBR-29, "
BRAKE BURNISHING PROCEDURE".
WARNING:
Clean brake pads and shoes with a waste cloth, then wipe with a dust collector.SBR820BA
Page 797 of 3171
BRAKE FLUID
BR-11
C
D
E
G
H
I
J
K
L
MA
B
BR
Bleeding Brake SystemEFS005SK
CAUTION:
lWhile bleeding, pay attention to master cylinder fluid level.
lBefore working, disconnect electrical connector of ABS actuator and electric unit (control unit) or
the battery cable from the negative terminal.
LHD MODEL
1. Connect a vinyl tube to the rear right bleed valve.
2. Fully depress brake pedal 4 to 5 times.
3. With brake pedal depressed, loosen bleed valve to let the air out, and then tighten it immediately.
4. Repeat steps 3, 4 until no more air comes out.
5. Tighten bleed valve to specified torque. Refer toBR-24, "
Components"(front disc brake),BR-30, "Com-
ponents"(rear drum brake).
6. From the steps 1 to 5 above, with master cylinder reservoir tank filled at least half way, bleed air from the
front left, rear left, and front right brake, in that order.
RHD MODEL
1. Connect a vinyl tube to the rear left bleed valve.
2. Fully depress brake pedal 4 to 5 times.
3. With brake pedal depressed, loosen bleed valve to let the air out, and then tighten it immediately.
4. Repeat steps 3, 4 until no more air comes out.
5. Tighten bleed valve to specified torque. Refer toBR-24, "
Components"(front disc brake),BR-30, "Com-
ponents"(rear drum brake).
6. From the steps 1 to 5 above, with master cylinder reservoir tank filled at least half way, bleed air from the
front right, rear right, and front left brake, in that order.
Page 823 of 3171

BRC-1
BRAKE CONTROL SYSTEM
F BRAKES
CONTENTS
C
D
E
G
H
I
J
K
L
M
SECTIONBRC
A
B
BRC
BRAKE CONTROL SYSTEM
ABS
PRECAUTIONS .......................................................... 3
Precautions for Supplemental Restraint System
(SRS)“AIRBAG”and“SEATBELTPRE-TEN-
SIONER” .................................................................. 3
Precautions for Brake System .................................. 3
Precautions for Brake Control .................................. 3
PREPARATION ........................................................... 4
Special Service Tools (SST) ..................................... 4
SYSTEM DESCRIPTION ............................................ 5
System Diagram ....................................................... 5
Functions .................................................................. 5
Operation That Is Not “System Error” ...................... 5
Fail-Safe Function .................................................... 5
ABS, EBD SYSTEM .............................................. 5
Hydraulic Circuit Diagram ........................................ 6
CAN COMMUNICATION ............................................ 7
System Description .................................................. 7
TROUBLE DIAGNOSIS .............................................. 8
How to Perform Trouble Diagnosis for Quick and
Accurate Repair ....................................................... 8
INTRODUCTION ................................................... 8
DIAGNOSIS FLOWCHART .................................. 9
ASKING COMPLAINTS ...................................... 10
EXAMPLE OF DIAGNOSIS SHEET ................... 10
Component Parts Location ...................................... 11
Schematic — ABS — ............................................. 12
Wiring Diagram — ABS — ..................................... 13
CONSULT- II Functions .......................................... 17
CONSULT-II MAIN FUNCTION ........................... 17
CONSULT-II BASIC OPERATION PROCEDURE
... 17
Self-Diagnosis ........................................................ 18
OPERATION PROCEDURE ............................... 18
ERASE MEMORY ............................................... 18
DISPLAY ITEM LIST ........................................... 18
Data Monitor ........................................................... 20
OPERATION PROCEDURE ............................... 20
DISPLAY ITEM LIST ........................................... 20Active Test .............................................................. 21
OPERATION PROCEDURE ................................ 21
SOLENOID VALVE .............................................. 22
ABS MOTOR ....................................................... 22
For Fast and Accurate Diagnosis ........................... 23
PRECAUTIONS FOR DIAGNOSIS ..................... 23
Basic Inspection ..................................................... 23
BASIC INSPECTION 1 BRAKE FLUID LEVEL,
LEAKS, AND BRAKE PADS ................................ 23
BASIC INSPECTION 2 POWER SYSTEM TER-
MINAL LOOSENESS AND BATTERY INSPEC-
TION .................................................................... 23
BASIC INSPECTION 3 ABS WARNING LAMP
AND BRAKE WARNING LAMP INSPECTION .... 24
Inspection 1 Wheel Sensor System ........................ 24
Inspection 2 ABS Actuator and Electric Unit (Control
Unit) ........................................................................ 26
Inspection 3 ABS Actuator Relay or ABS Motor
Relay Circuit ........................................................... 26
Inspection 4 CAN Communication Circuit .............. 28
Inspection 5 ABS Actuator and Electric Unit (Control
Unit) Power Supply and Ground Circuit .................. 28
Inspection 6 Brake Fluid Level Switch Circuit ......... 30
Inspection 7 Parking Brake Switch Circuit .............. 32
Inspection 8 Warning lamp system ......................... 33
Symptom 1: Excessive ABS Function Operation
Frequency ............................................................... 33
Symptom 2: Unexpected Pedal Reaction ............... 34
Symptom 3: The Stopping Distance Is Long .......... 34
Symptom 4: ABS Function Does Not Operate ....... 35
Symptom 5: Pedal Vibration or ABS Operation
Sound Occurs ......................................................... 35
Symptom 6: ABS Warning Lamp Indication Is Not
Normal .................................................................... 35
WHEEL SENSORS ................................................... 37
Removal and Installation ........................................ 37
REMOVAL ........................................................... 38
INSTALLATION ................................................... 38