2005 MERCEDES-BENZ SPRINTER heating
[x] Cancel search: heatingPage 1187 of 1232
WARNING: REVIEW THE WARNINGS AND CAU-
TIONS IN THE FRONT OF THIS SECTION BEFORE
PERFORMING THE FOLLOWING OPERATION (Refer
to 24 - HEATING & AIR CONDITIONING/PLUMBING -
WARNING) and (Refer to 24 - HEATING & AIR CON-
DITIONING/PLUMBING - CAUTION).
FRONT SECTION
(1) Recover the refrigerant from the refrigerant
system (Refer to 24 - HEATING & AIR CONDITION-
ING/PLUMBING - STANDARD PROCEDURE).
(2) Disconnect and isolate the battery negative
cable.
(3) Remove the grille (Refer to 23 - BODY/EXTE-
RIOR/GRILLE - REMOVAL).
(4) Remove the nut that secures the liquid line fit-
ting to the condenser outlet port on the left side of
condenser.
(5) Disconnect the liquid line fitting from the con-
denser outlet port.
(6) Remove the seal from the liquid line fitting and
discard.
(7) Install plug in, or tape over the opened liquid
line fitting and the condenser outlet port.
(8) Remove the routing clip retaining nut and dis-
engage the routing clip retainer on top of the left
frame rail from the front section of the liquid line.
(9) Remove the A/C pressure sensor from the front
liquid line fitting (Refer to 24 - HEATING & AIR
CONDITIONING/CONTROLS/A/C PRESSURE
TRANSDUCER - REMOVAL).
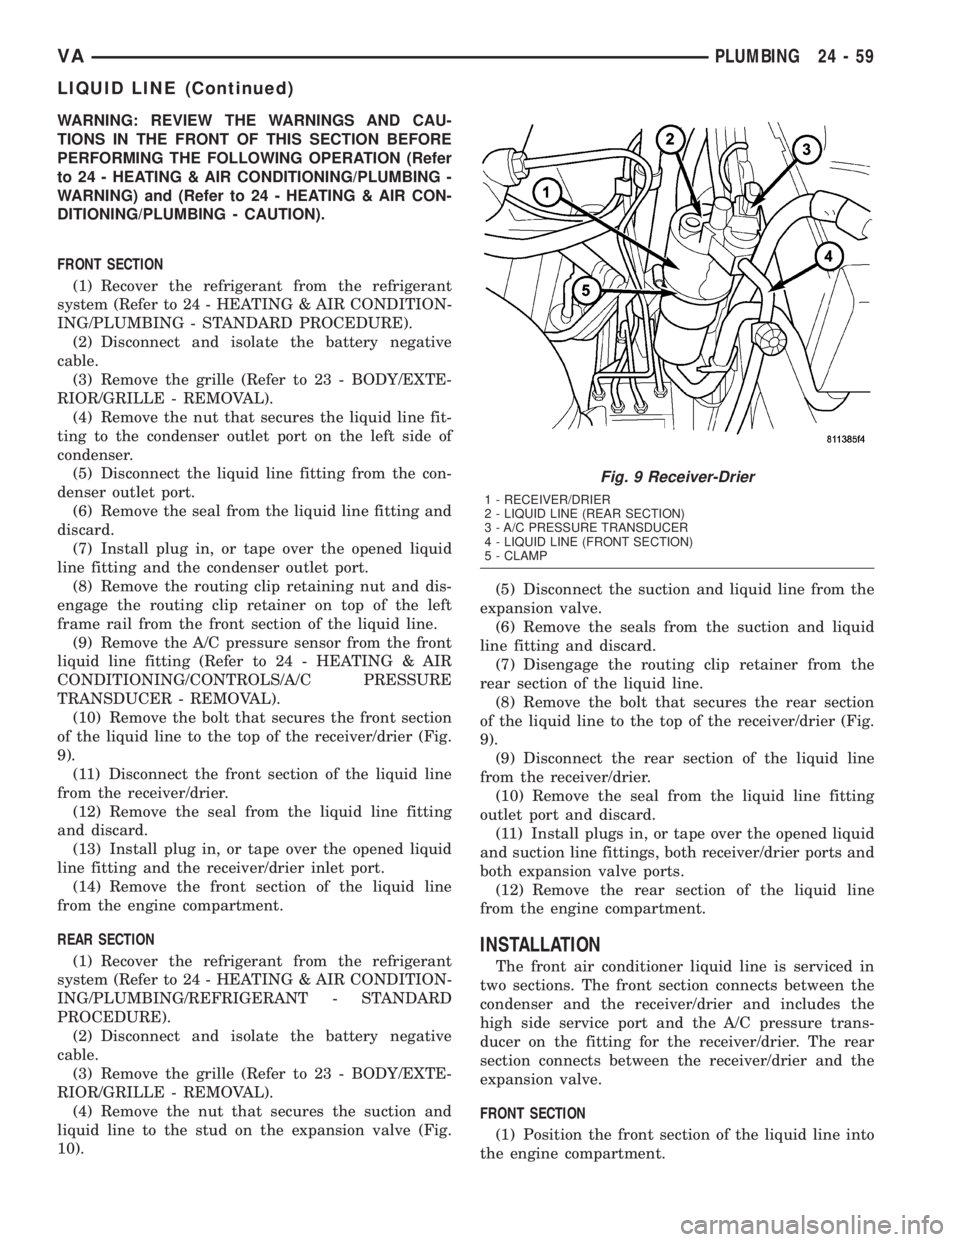
(10) Remove the bolt that secures the front section
of the liquid line to the top of the receiver/drier (Fig.
9).
(11) Disconnect the front section of the liquid line
from the receiver/drier.
(12) Remove the seal from the liquid line fitting
and discard.
(13) Install plug in, or tape over the opened liquid
line fitting and the receiver/drier inlet port.
(14) Remove the front section of the liquid line
from the engine compartment.
REAR SECTION
(1) Recover the refrigerant from the refrigerant
system (Refer to 24 - HEATING & AIR CONDITION-
ING/PLUMBING/REFRIGERANT - STANDARD
PROCEDURE).
(2) Disconnect and isolate the battery negative
cable.
(3) Remove the grille (Refer to 23 - BODY/EXTE-
RIOR/GRILLE - REMOVAL).
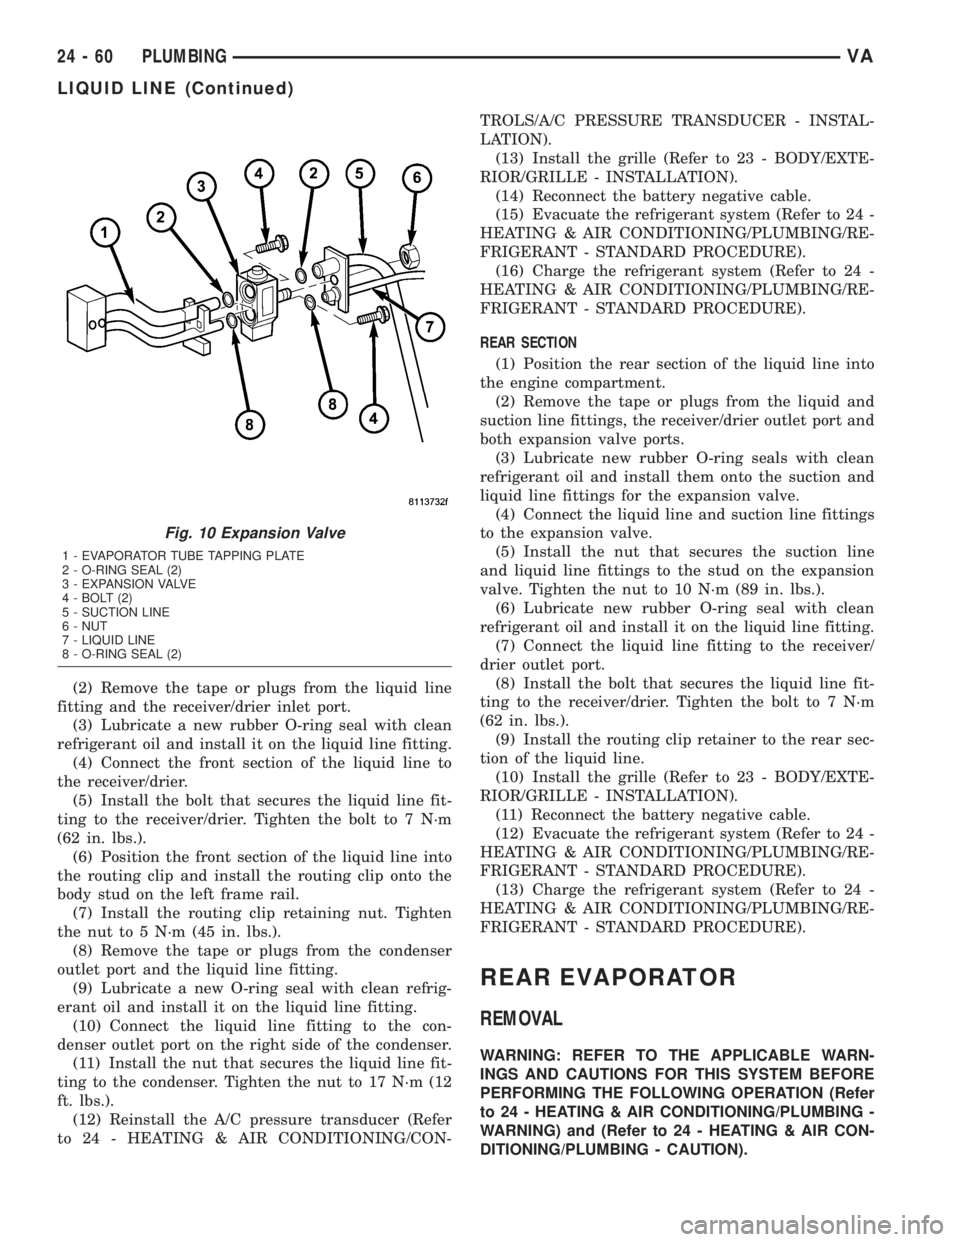
(4) Remove the nut that secures the suction and
liquid line to the stud on the expansion valve (Fig.
10).(5) Disconnect the suction and liquid line from the
expansion valve.
(6) Remove the seals from the suction and liquid
line fitting and discard.
(7) Disengage the routing clip retainer from the
rear section of the liquid line.
(8) Remove the bolt that secures the rear section
of the liquid line to the top of the receiver/drier (Fig.
9).
(9) Disconnect the rear section of the liquid line
from the receiver/drier.
(10) Remove the seal from the liquid line fitting
outlet port and discard.
(11) Install plugs in, or tape over the opened liquid
and suction line fittings, both receiver/drier ports and
both expansion valve ports.
(12) Remove the rear section of the liquid line
from the engine compartment.
INSTALLATION
The front air conditioner liquid line is serviced in
two sections. The front section connects between the
condenser and the receiver/drier and includes the
high side service port and the A/C pressure trans-
ducer on the fitting for the receiver/drier. The rear
section connects between the receiver/drier and the
expansion valve.
FRONT SECTION
(1) Position the front section of the liquid line into
the engine compartment.
Fig. 9 Receiver-Drier
1 - RECEIVER/DRIER
2 - LIQUID LINE (REAR SECTION)
3 - A/C PRESSURE TRANSDUCER
4 - LIQUID LINE (FRONT SECTION)
5 - CLAMP
VAPLUMBING 24 - 59
LIQUID LINE (Continued)
Page 1188 of 1232
(2) Remove the tape or plugs from the liquid line
fitting and the receiver/drier inlet port.
(3) Lubricate a new rubber O-ring seal with clean
refrigerant oil and install it on the liquid line fitting.
(4) Connect the front section of the liquid line to
the receiver/drier.
(5) Install the bolt that secures the liquid line fit-
ting to the receiver/drier. Tighten the bolt to 7 N´m
(62 in. lbs.).
(6) Position the front section of the liquid line into
the routing clip and install the routing clip onto the
body stud on the left frame rail.
(7) Install the routing clip retaining nut. Tighten
the nut to 5 N´m (45 in. lbs.).
(8) Remove the tape or plugs from the condenser
outlet port and the liquid line fitting.
(9) Lubricate a new O-ring seal with clean refrig-
erant oil and install it on the liquid line fitting.
(10) Connect the liquid line fitting to the con-
denser outlet port on the right side of the condenser.
(11) Install the nut that secures the liquid line fit-
ting to the condenser. Tighten the nut to 17 N´m (12
ft. lbs.).
(12) Reinstall the A/C pressure transducer (Refer
to 24 - HEATING & AIR CONDITIONING/CON-TROLS/A/C PRESSURE TRANSDUCER - INSTAL-
LATION).
(13) Install the grille (Refer to 23 - BODY/EXTE-
RIOR/GRILLE - INSTALLATION).
(14) Reconnect the battery negative cable.
(15) Evacuate the refrigerant system (Refer to 24 -
HEATING & AIR CONDITIONING/PLUMBING/RE-
FRIGERANT - STANDARD PROCEDURE).
(16) Charge the refrigerant system (Refer to 24 -
HEATING & AIR CONDITIONING/PLUMBING/RE-
FRIGERANT - STANDARD PROCEDURE).
REAR SECTION
(1) Position the rear section of the liquid line into
the engine compartment.
(2) Remove the tape or plugs from the liquid and
suction line fittings, the receiver/drier outlet port and
both expansion valve ports.
(3) Lubricate new rubber O-ring seals with clean
refrigerant oil and install them onto the suction and
liquid line fittings for the expansion valve.
(4) Connect the liquid line and suction line fittings
to the expansion valve.
(5) Install the nut that secures the suction line
and liquid line fittings to the stud on the expansion
valve. Tighten the nut to 10 N´m (89 in. lbs.).
(6) Lubricate new rubber O-ring seal with clean
refrigerant oil and install it on the liquid line fitting.
(7) Connect the liquid line fitting to the receiver/
drier outlet port.
(8) Install the bolt that secures the liquid line fit-
ting to the receiver/drier. Tighten the bolt to 7 N´m
(62 in. lbs.).
(9) Install the routing clip retainer to the rear sec-
tion of the liquid line.
(10) Install the grille (Refer to 23 - BODY/EXTE-
RIOR/GRILLE - INSTALLATION).
(11) Reconnect the battery negative cable.
(12) Evacuate the refrigerant system (Refer to 24 -
HEATING & AIR CONDITIONING/PLUMBING/RE-
FRIGERANT - STANDARD PROCEDURE).
(13) Charge the refrigerant system (Refer to 24 -
HEATING & AIR CONDITIONING/PLUMBING/RE-
FRIGERANT - STANDARD PROCEDURE).
REAR EVAPORATOR
REMOVAL
WARNING: REFER TO THE APPLICABLE WARN-
INGS AND CAUTIONS FOR THIS SYSTEM BEFORE
PERFORMING THE FOLLOWING OPERATION (Refer
to 24 - HEATING & AIR CONDITIONING/PLUMBING -
WARNING) and (Refer to 24 - HEATING & AIR CON-
DITIONING/PLUMBING - CAUTION).
Fig. 10 Expansion Valve
1 - EVAPORATOR TUBE TAPPING PLATE
2 - O-RING SEAL (2)
3 - EXPANSION VALVE
4 - BOLT (2)
5 - SUCTION LINE
6 - NUT
7 - LIQUID LINE
8 - O-RING SEAL (2)
24 - 60 PLUMBINGVA
LIQUID LINE (Continued)
Page 1189 of 1232
(1) Remove the rear A/C housing (Refer to 24 -
HEATING & AIR CONDITIONING/DISTRIBUTION/
REAR A/C HEATER HOUSING - REMOVAL).
(2) Remove the liquid line between the rear expan-
sion valve and the solenoid valve.
(3) Remove the seals from the liquid line fittings
and discard.
(4) Install plug in, or tape over the opened liquid
line fittings and the solenoid valve outlet port and
the expansion valve inlet port.
(5) Remove the condensation trap.
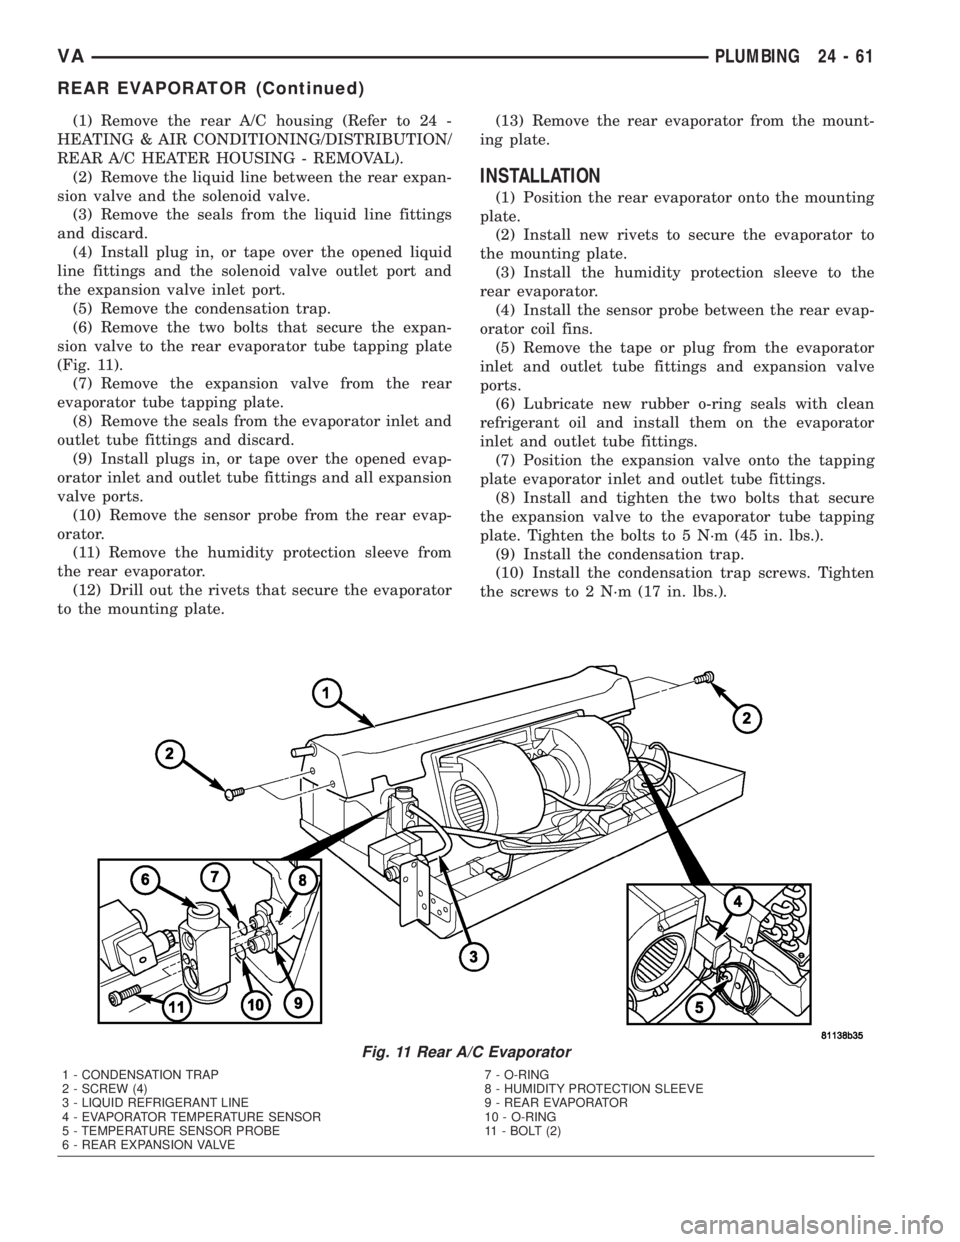
(6) Remove the two bolts that secure the expan-
sion valve to the rear evaporator tube tapping plate
(Fig. 11).
(7) Remove the expansion valve from the rear
evaporator tube tapping plate.
(8) Remove the seals from the evaporator inlet and
outlet tube fittings and discard.
(9) Install plugs in, or tape over the opened evap-
orator inlet and outlet tube fittings and all expansion
valve ports.
(10) Remove the sensor probe from the rear evap-
orator.
(11) Remove the humidity protection sleeve from
the rear evaporator.
(12) Drill out the rivets that secure the evaporator
to the mounting plate.(13) Remove the rear evaporator from the mount-
ing plate.
INSTALLATION
(1) Position the rear evaporator onto the mounting
plate.
(2) Install new rivets to secure the evaporator to
the mounting plate.
(3) Install the humidity protection sleeve to the
rear evaporator.
(4) Install the sensor probe between the rear evap-
orator coil fins.
(5) Remove the tape or plug from the evaporator
inlet and outlet tube fittings and expansion valve
ports.
(6) Lubricate new rubber o-ring seals with clean
refrigerant oil and install them on the evaporator
inlet and outlet tube fittings.
(7) Position the expansion valve onto the tapping
plate evaporator inlet and outlet tube fittings.
(8) Install and tighten the two bolts that secure
the expansion valve to the evaporator tube tapping
plate. Tighten the bolts to 5 N´m (45 in. lbs.).
(9) Install the condensation trap.
(10) Install the condensation trap screws. Tighten
the screws to 2 N´m (17 in. lbs.).
Fig. 11 Rear A/C Evaporator
1 - CONDENSATION TRAP
2 - SCREW (4)
3 - LIQUID REFRIGERANT LINE
4 - EVAPORATOR TEMPERATURE SENSOR
5 - TEMPERATURE SENSOR PROBE
6 - REAR EXPANSION VALVE7 - O-RING
8 - HUMIDITY PROTECTION SLEEVE
9 - REAR EVAPORATOR
10 - O-RING
11 - BOLT (2)
VAPLUMBING 24 - 61
REAR EVAPORATOR (Continued)
Page 1190 of 1232
(11) Remove the tape or plug from the liquid line
fittings and the solenoid valve outlet port and the
expansion valve inlet port.
(12) Lubricate new rubber o-ring seals with clean
refrigerant oil and install them on the liquid line fit-
tings.
(13) Install the liquid line between the rear expan-
sion valve and the solenoid valve.
(14) Install and tighten the nuts that secures the
liquid line fittings to the rear expansion valve and
solenoid valve. Tighten the nuts to 16 N´m (142 in.
lbs.).
(15) Install the rear A/C housing (Refer to 24 -
HEATING & AIR CONDITIONING/DISTRIBUTION/
REAR A/C HEATER HOUSING - INSTALLATION).
NOTE: If the evaporator is being replaced, add 30
milliliters (1 fluid ounce) of refrigerant oil to the
refrigerant system.
REAR EXPANSION VALVE
REMOVAL
WARNING: REFER TO THE APPLICABLE WARN-
INGS AND CAUTIONS FOR THIS SYSTEM BEFORE
PERFORMING THE FOLLOWING OPERATION (Refer
to 24 - HEATING & AIR CONDITIONING/PLUMBING -
WARNING) and (Refer to 24 - HEATING & AIR CON-
DITIONING/PLUMBING - CAUTION).
(1) Recover the refrigerant from the A/C system
(Refer to 24 - HEATING & AIR CONDITIONING/
PLUMBING - STANDARD PROCEDURE).
(2) Disconnect and isolate the battery negative
cable.
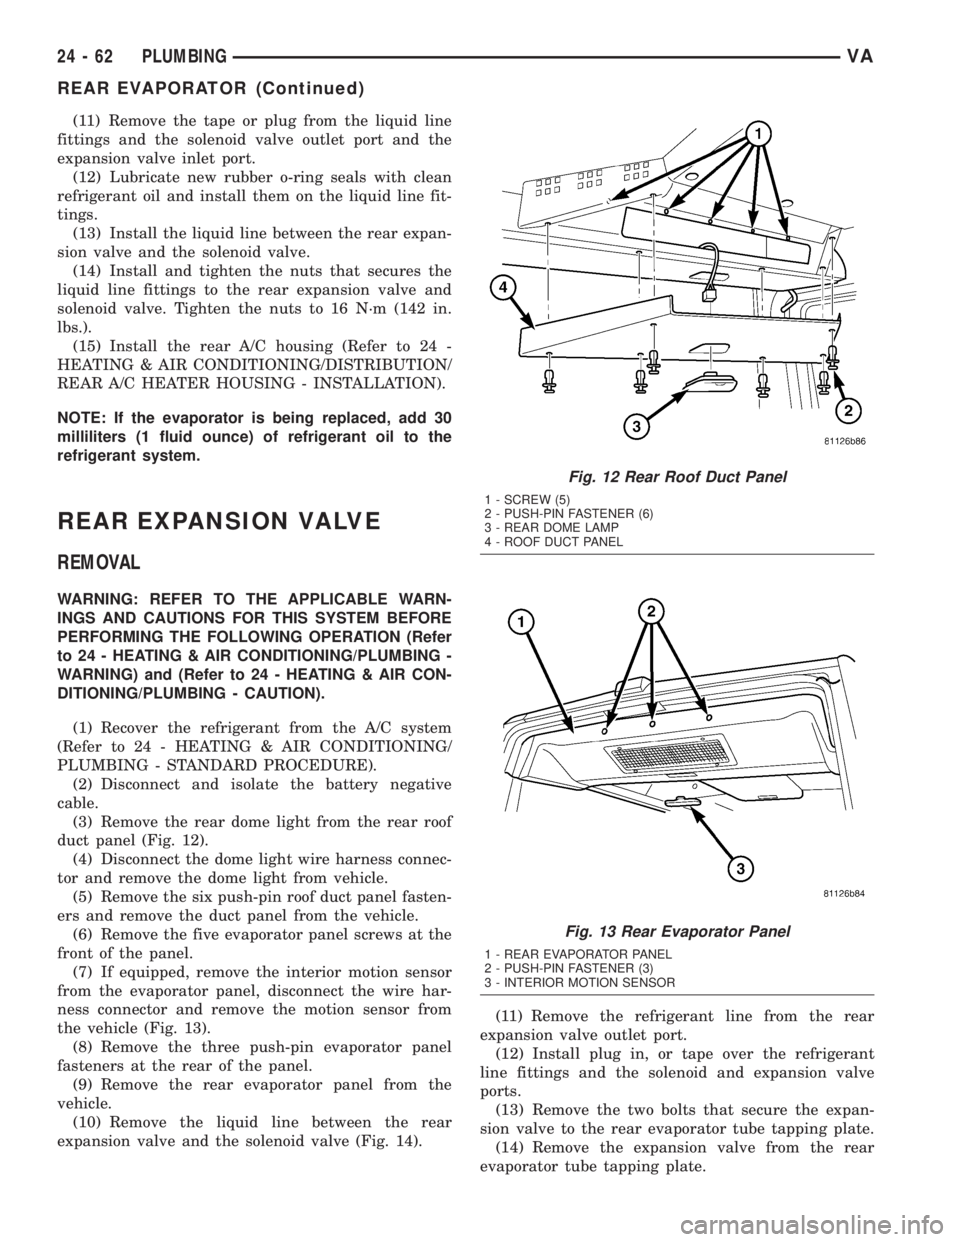
(3) Remove the rear dome light from the rear roof
duct panel (Fig. 12).
(4) Disconnect the dome light wire harness connec-
tor and remove the dome light from vehicle.
(5) Remove the six push-pin roof duct panel fasten-
ers and remove the duct panel from the vehicle.
(6) Remove the five evaporator panel screws at the
front of the panel.
(7) If equipped, remove the interior motion sensor
from the evaporator panel, disconnect the wire har-
ness connector and remove the motion sensor from
the vehicle (Fig. 13).
(8) Remove the three push-pin evaporator panel
fasteners at the rear of the panel.
(9) Remove the rear evaporator panel from the
vehicle.
(10) Remove the liquid line between the rear
expansion valve and the solenoid valve (Fig. 14).(11) Remove the refrigerant line from the rear
expansion valve outlet port.
(12) Install plug in, or tape over the refrigerant
line fittings and the solenoid and expansion valve
ports.
(13) Remove the two bolts that secure the expan-
sion valve to the rear evaporator tube tapping plate.
(14) Remove the expansion valve from the rear
evaporator tube tapping plate.
Fig. 12 Rear Roof Duct Panel
1 - SCREW (5)
2 - PUSH-PIN FASTENER (6)
3 - REAR DOME LAMP
4 - ROOF DUCT PANEL
Fig. 13 Rear Evaporator Panel
1 - REAR EVAPORATOR PANEL
2 - PUSH-PIN FASTENER (3)
3 - INTERIOR MOTION SENSOR
24 - 62 PLUMBINGVA
REAR EVAPORATOR (Continued)
Page 1191 of 1232
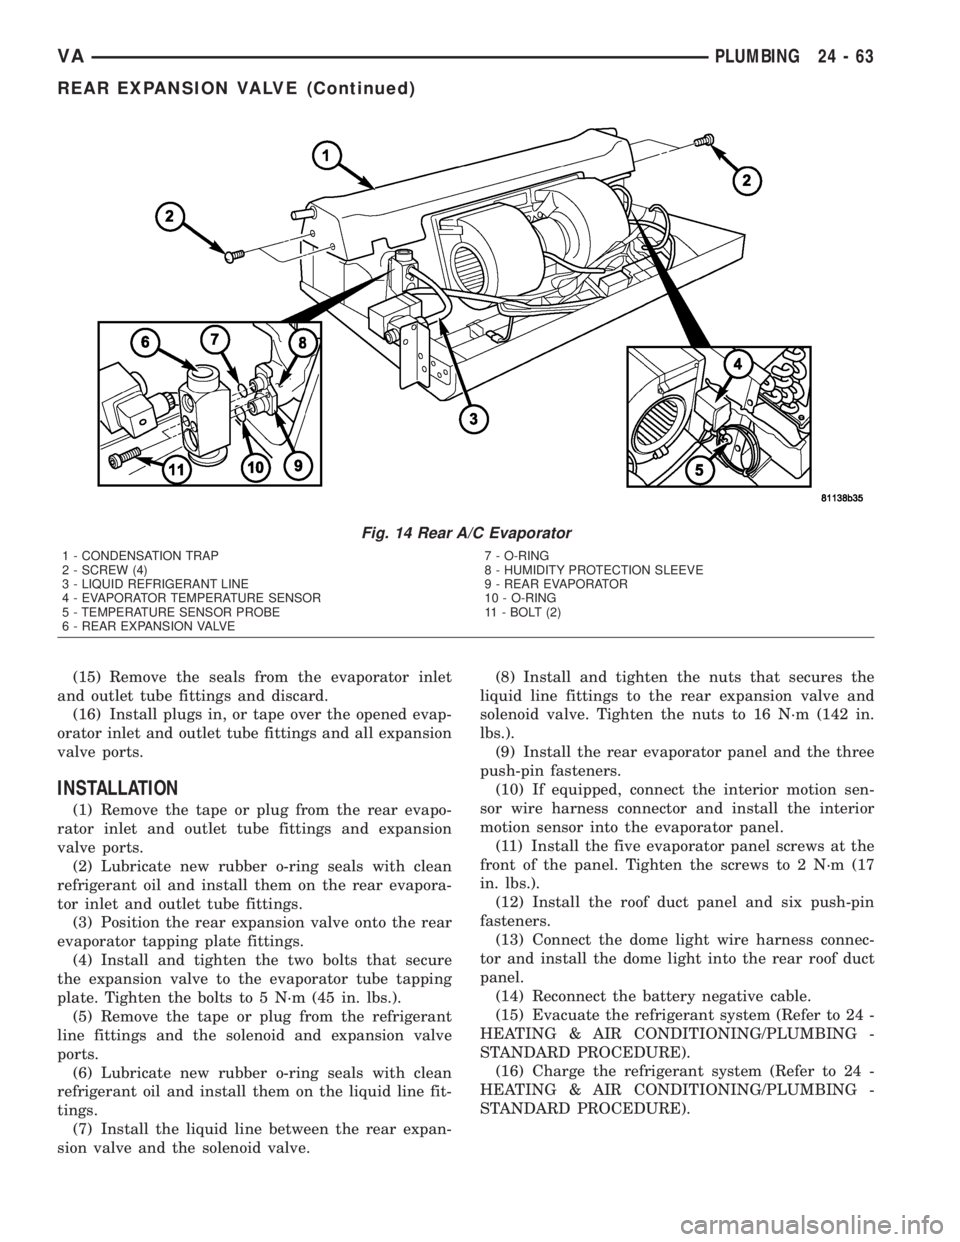
(15) Remove the seals from the evaporator inlet
and outlet tube fittings and discard.
(16) Install plugs in, or tape over the opened evap-
orator inlet and outlet tube fittings and all expansion
valve ports.
INSTALLATION
(1) Remove the tape or plug from the rear evapo-
rator inlet and outlet tube fittings and expansion
valve ports.
(2) Lubricate new rubber o-ring seals with clean
refrigerant oil and install them on the rear evapora-
tor inlet and outlet tube fittings.
(3) Position the rear expansion valve onto the rear
evaporator tapping plate fittings.
(4) Install and tighten the two bolts that secure
the expansion valve to the evaporator tube tapping
plate. Tighten the bolts to 5 N´m (45 in. lbs.).
(5) Remove the tape or plug from the refrigerant
line fittings and the solenoid and expansion valve
ports.
(6) Lubricate new rubber o-ring seals with clean
refrigerant oil and install them on the liquid line fit-
tings.
(7) Install the liquid line between the rear expan-
sion valve and the solenoid valve.(8) Install and tighten the nuts that secures the
liquid line fittings to the rear expansion valve and
solenoid valve. Tighten the nuts to 16 N´m (142 in.
lbs.).
(9) Install the rear evaporator panel and the three
push-pin fasteners.
(10) If equipped, connect the interior motion sen-
sor wire harness connector and install the interior
motion sensor into the evaporator panel.
(11) Install the five evaporator panel screws at the
front of the panel. Tighten the screws to 2 N´m (17
in. lbs.).
(12) Install the roof duct panel and six push-pin
fasteners.
(13) Connect the dome light wire harness connec-
tor and install the dome light into the rear roof duct
panel.
(14) Reconnect the battery negative cable.
(15) Evacuate the refrigerant system (Refer to 24 -
HEATING & AIR CONDITIONING/PLUMBING -
STANDARD PROCEDURE).
(16) Charge the refrigerant system (Refer to 24 -
HEATING & AIR CONDITIONING/PLUMBING -
STANDARD PROCEDURE).
Fig. 14 Rear A/C Evaporator
1 - CONDENSATION TRAP
2 - SCREW (4)
3 - LIQUID REFRIGERANT LINE
4 - EVAPORATOR TEMPERATURE SENSOR
5 - TEMPERATURE SENSOR PROBE
6 - REAR EXPANSION VALVE7 - O-RING
8 - HUMIDITY PROTECTION SLEEVE
9 - REAR EVAPORATOR
10 - O-RING
11 - BOLT (2)
VAPLUMBING 24 - 63
REAR EXPANSION VALVE (Continued)
Page 1192 of 1232
RECEIVER/DRIER
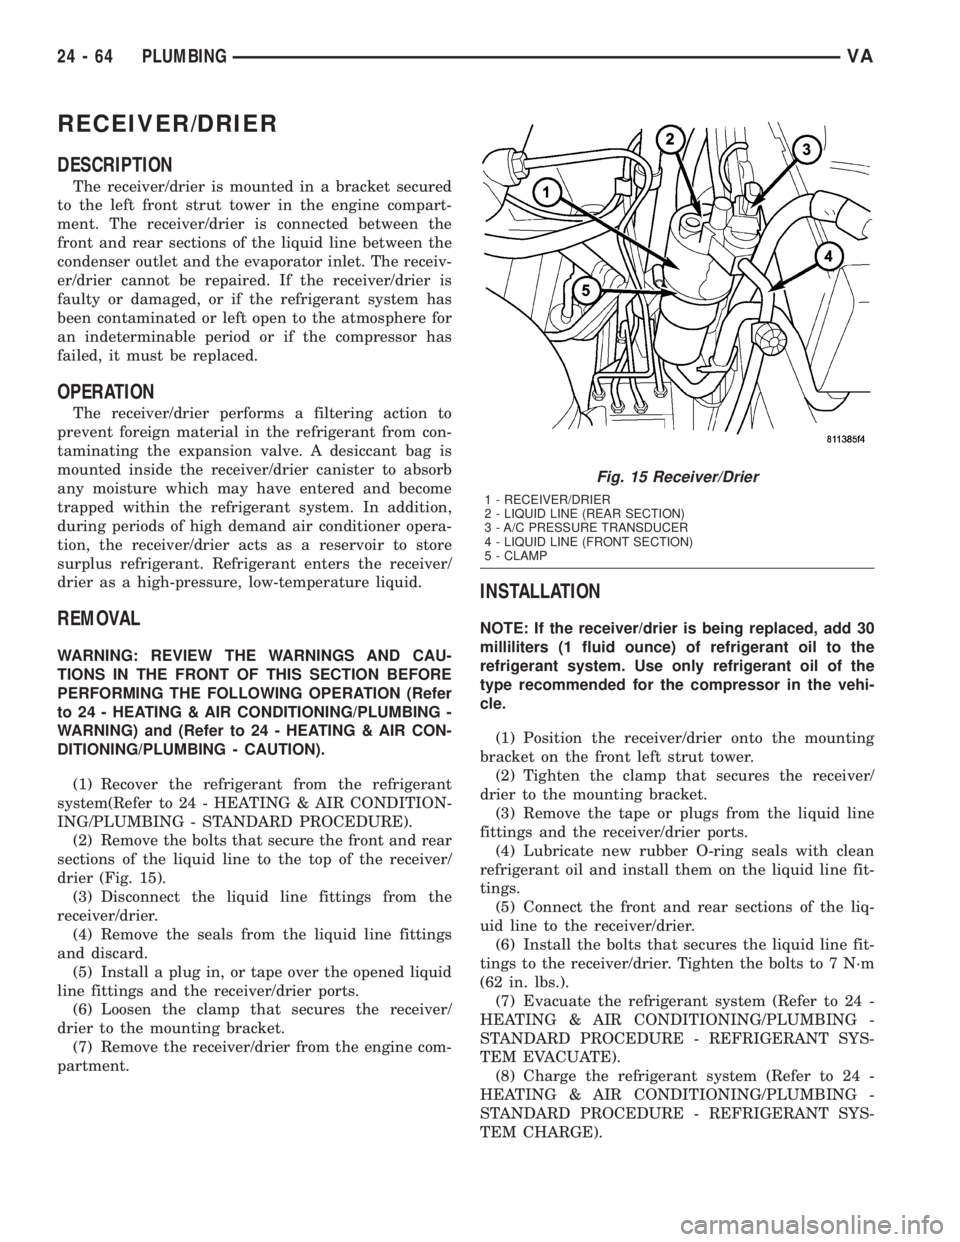
DESCRIPTION
The receiver/drier is mounted in a bracket secured
to the left front strut tower in the engine compart-
ment. The receiver/drier is connected between the
front and rear sections of the liquid line between the
condenser outlet and the evaporator inlet. The receiv-
er/drier cannot be repaired. If the receiver/drier is
faulty or damaged, or if the refrigerant system has
been contaminated or left open to the atmosphere for
an indeterminable period or if the compressor has
failed, it must be replaced.
OPERATION
The receiver/drier performs a filtering action to
prevent foreign material in the refrigerant from con-
taminating the expansion valve. A desiccant bag is
mounted inside the receiver/drier canister to absorb
any moisture which may have entered and become
trapped within the refrigerant system. In addition,
during periods of high demand air conditioner opera-
tion, the receiver/drier acts as a reservoir to store
surplus refrigerant. Refrigerant enters the receiver/
drier as a high-pressure, low-temperature liquid.
REMOVAL
WARNING: REVIEW THE WARNINGS AND CAU-
TIONS IN THE FRONT OF THIS SECTION BEFORE
PERFORMING THE FOLLOWING OPERATION (Refer
to 24 - HEATING & AIR CONDITIONING/PLUMBING -
WARNING) and (Refer to 24 - HEATING & AIR CON-
DITIONING/PLUMBING - CAUTION).
(1) Recover the refrigerant from the refrigerant
system(Refer to 24 - HEATING & AIR CONDITION-
ING/PLUMBING - STANDARD PROCEDURE).
(2) Remove the bolts that secure the front and rear
sections of the liquid line to the top of the receiver/
drier (Fig. 15).
(3) Disconnect the liquid line fittings from the
receiver/drier.
(4) Remove the seals from the liquid line fittings
and discard.
(5) Install a plug in, or tape over the opened liquid
line fittings and the receiver/drier ports.
(6) Loosen the clamp that secures the receiver/
drier to the mounting bracket.
(7) Remove the receiver/drier from the engine com-
partment.
INSTALLATION
NOTE: If the receiver/drier is being replaced, add 30
milliliters (1 fluid ounce) of refrigerant oil to the
refrigerant system. Use only refrigerant oil of the
type recommended for the compressor in the vehi-
cle.
(1) Position the receiver/drier onto the mounting
bracket on the front left strut tower.
(2) Tighten the clamp that secures the receiver/
drier to the mounting bracket.
(3) Remove the tape or plugs from the liquid line
fittings and the receiver/drier ports.
(4) Lubricate new rubber O-ring seals with clean
refrigerant oil and install them on the liquid line fit-
tings.
(5) Connect the front and rear sections of the liq-
uid line to the receiver/drier.
(6) Install the bolts that secures the liquid line fit-
tings to the receiver/drier. Tighten the bolts to 7 N´m
(62 in. lbs.).
(7) Evacuate the refrigerant system (Refer to 24 -
HEATING & AIR CONDITIONING/PLUMBING -
STANDARD PROCEDURE - REFRIGERANT SYS-
TEM EVACUATE).
(8) Charge the refrigerant system (Refer to 24 -
HEATING & AIR CONDITIONING/PLUMBING -
STANDARD PROCEDURE - REFRIGERANT SYS-
TEM CHARGE).
Fig. 15 Receiver/Drier
1 - RECEIVER/DRIER
2 - LIQUID LINE (REAR SECTION)
3 - A/C PRESSURE TRANSDUCER
4 - LIQUID LINE (FRONT SECTION)
5 - CLAMP
24 - 64 PLUMBINGVA
Page 1194 of 1232
REFRIGERANT OIL CAPACITIES
Component ml fl oz
Total System Fill410 (425
w/rear A/C)13.9 (14.4
w/rear A/C
Receiver/Drier 30 1.0
Condenser 30 1.0
Front Evaporator 60 2.0
Rear Evaporator 30 1.0
CompressorDrain and measure the oil
from the old compressor -
see text.
SUCTION LINE
REMOVAL
WARNING: REVIEW THE WARNINGS AND CAU-
TIONS IN THE FRONT OF THIS SECTION BEFORE
PERFORMING THE FOLLOWING OPERATION (Refer
to 24 - HEATING & AIR CONDITIONING/PLUMBING -
WARNING) and (Refer to 24 - HEATING & AIR CON-
DITIONING/PLUMBING - CAUTION).
(1) Recover the refrigerant system. (Refer to 24 -
HEATING & AIR CONDITIONING/PLUMBING -
STANDARD PROCEDURE - REFRIGERANT
RECOVERY)
(2) Disconnect and isolate the negative battery
cable.
(3) Remove the routing clip retaining nut and dis-
engage the metal routing clip from the suction line.
(4) Disengage the plastic routing clip located near
the expansion valve from the suction line.
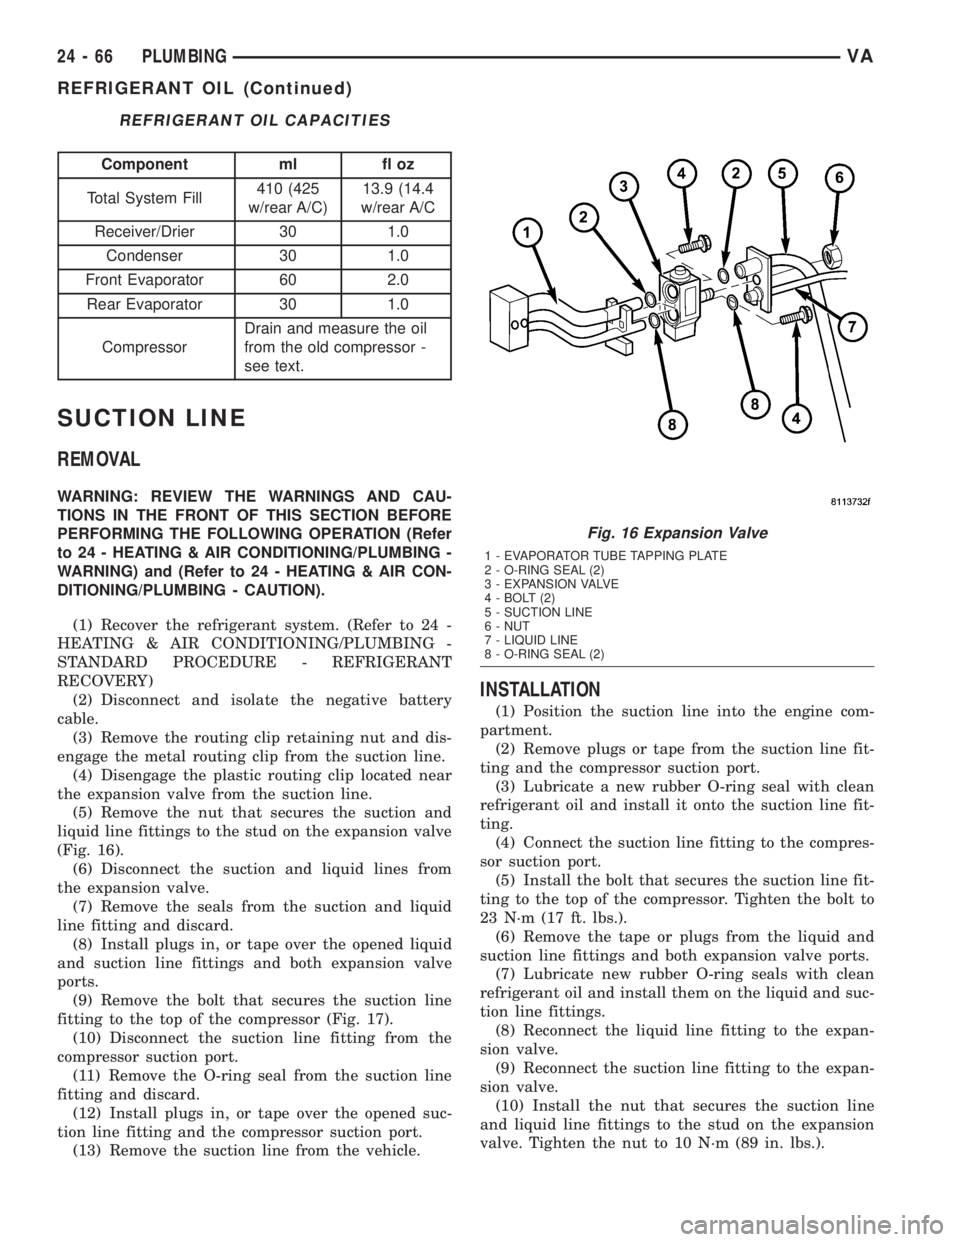
(5) Remove the nut that secures the suction and
liquid line fittings to the stud on the expansion valve
(Fig. 16).
(6) Disconnect the suction and liquid lines from
the expansion valve.
(7) Remove the seals from the suction and liquid
line fitting and discard.
(8) Install plugs in, or tape over the opened liquid
and suction line fittings and both expansion valve
ports.
(9) Remove the bolt that secures the suction line
fitting to the top of the compressor (Fig. 17).
(10) Disconnect the suction line fitting from the
compressor suction port.
(11) Remove the O-ring seal from the suction line
fitting and discard.
(12) Install plugs in, or tape over the opened suc-
tion line fitting and the compressor suction port.
(13) Remove the suction line from the vehicle.
INSTALLATION
(1) Position the suction line into the engine com-
partment.
(2) Remove plugs or tape from the suction line fit-
ting and the compressor suction port.
(3) Lubricate a new rubber O-ring seal with clean
refrigerant oil and install it onto the suction line fit-
ting.
(4) Connect the suction line fitting to the compres-
sor suction port.
(5) Install the bolt that secures the suction line fit-
ting to the top of the compressor. Tighten the bolt to
23 N´m (17 ft. lbs.).
(6) Remove the tape or plugs from the liquid and
suction line fittings and both expansion valve ports.
(7) Lubricate new rubber O-ring seals with clean
refrigerant oil and install them on the liquid and suc-
tion line fittings.
(8) Reconnect the liquid line fitting to the expan-
sion valve.
(9) Reconnect the suction line fitting to the expan-
sion valve.
(10) Install the nut that secures the suction line
and liquid line fittings to the stud on the expansion
valve. Tighten the nut to 10 N´m (89 in. lbs.).
Fig. 16 Expansion Valve
1 - EVAPORATOR TUBE TAPPING PLATE
2 - O-RING SEAL (2)
3 - EXPANSION VALVE
4 - BOLT (2)
5 - SUCTION LINE
6 - NUT
7 - LIQUID LINE
8 - O-RING SEAL (2)
24 - 66 PLUMBINGVA
REFRIGERANT OIL (Continued)
Page 1195 of 1232
(11) Position the metal routing clip around the
suction line and install the routing clip onto the body
stud.
(12) Install the routing clip retaining nut. Tighten
the nut to 5 N´m (45 in. lbs.).
(13) Install the plastic routing clip retainer onto
the suction line.
(14) Reconnect the negative battery cable.
(15) Evacuate the refrigerant system (Refer to 24 -
HEATING & AIR CONDITIONING/PLUMBING -
STANDARD PROCEDURE - REFRIGERANT SYS-
TEM EVACUATE).
(16) Charge the refrigerant system (Refer to 24 -
HEATING & AIR CONDITIONING/PLUMBING -
STANDARD PROCEDURE - REFRIGERANT SYS-
TEM CHARGE).
WATER VALVE
REMOVAL
(1) Disconnect and isolate the battery negative
cable.
(2) Partially drain the engine cooling system
(Refer to 7 - COOLING/ENGINE/COOLANT - STAN-
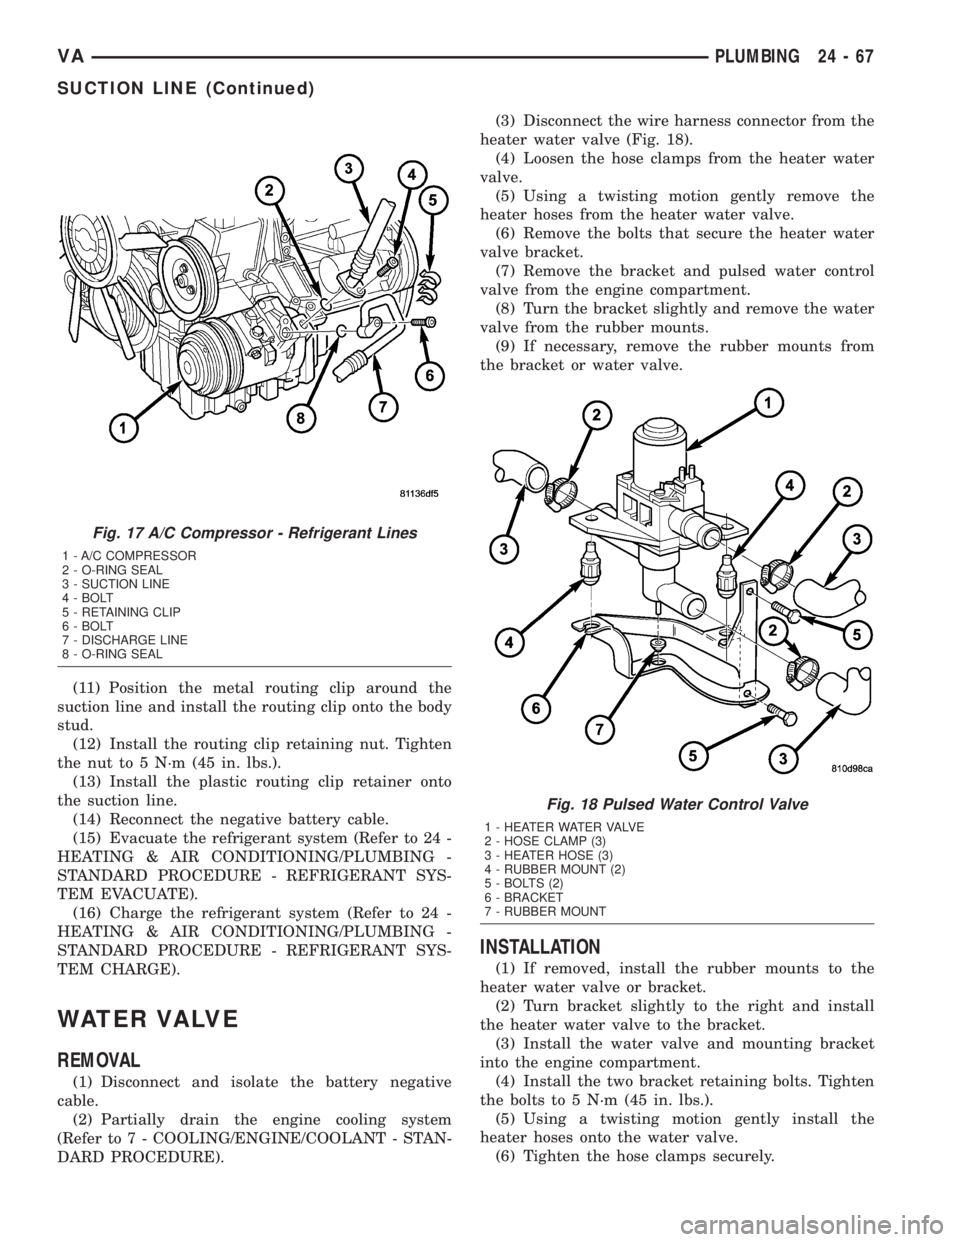
DARD PROCEDURE).(3) Disconnect the wire harness connector from the
heater water valve (Fig. 18).
(4) Loosen the hose clamps from the heater water
valve.
(5) Using a twisting motion gently remove the
heater hoses from the heater water valve.
(6) Remove the bolts that secure the heater water
valve bracket.
(7) Remove the bracket and pulsed water control
valve from the engine compartment.
(8) Turn the bracket slightly and remove the water
valve from the rubber mounts.
(9) If necessary, remove the rubber mounts from
the bracket or water valve.
INSTALLATION
(1) If removed, install the rubber mounts to the
heater water valve or bracket.
(2) Turn bracket slightly to the right and install
the heater water valve to the bracket.
(3) Install the water valve and mounting bracket
into the engine compartment.
(4) Install the two bracket retaining bolts. Tighten
the bolts to 5 N´m (45 in. lbs.).
(5) Using a twisting motion gently install the
heater hoses onto the water valve.
(6) Tighten the hose clamps securely.
Fig. 17 A/C Compressor - Refrigerant Lines
1 - A/C COMPRESSOR
2 - O-RING SEAL
3 - SUCTION LINE
4 - BOLT
5 - RETAINING CLIP
6 - BOLT
7 - DISCHARGE LINE
8 - O-RING SEAL
Fig. 18 Pulsed Water Control Valve
1 - HEATER WATER VALVE
2 - HOSE CLAMP (3)
3 - HEATER HOSE (3)
4 - RUBBER MOUNT (2)
5 - BOLTS (2)
6 - BRACKET
7 - RUBBER MOUNT
VAPLUMBING 24 - 67
SUCTION LINE (Continued)