Page 531 of 969
- ENGINE MECHANICALCYLINDER HEAD ASSY (3MZ-FE)
14-155
2247 Author�: Date�:
2005 LEXUS ES330 REPAIR MANUAL (RM1124U)
35. INSTALL W/HEAD STRAIGHT SCREW PLUG NO.1 (RH CYLINDER)
(a) Using a straight hexagon wrench 14, install 2 new gaskets and the 2 screw plugs.
Torque: 44 NVm (449 kgfVcm, 32 ftVlbf)
36. INSTALL W/HEAD STRAIGHT SCREW PLUG NO.2 (LH CYLINDER)
(a) Using a straight hexagon wrench 14, install 2 new gaskets and the 2 screw plugs.
Torque: 44 NVm (449 kgfVcm, 32 ftVlbf)
Page 532 of 969
1419L-03
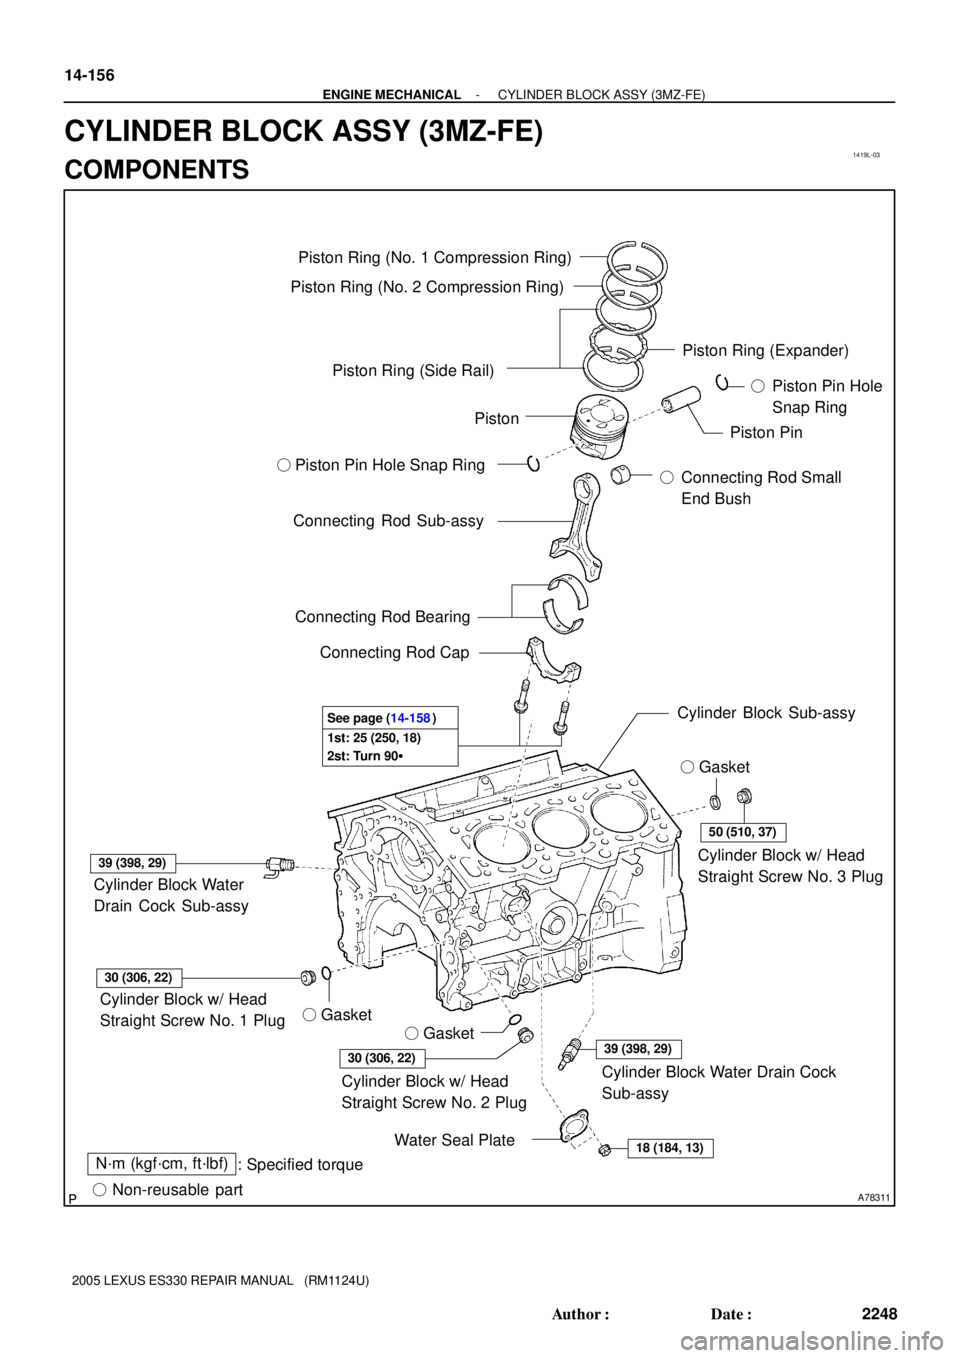
A78311
1st: 25 (250, 18)
2st: Turn 90� See page (14-158)
N´m (kgf´cm, ft´lbf)
: Specified torque
� Non-reusable partPiston Pin Hole
Snap Ring
� Piston Pin Hole Snap Ring
Connecting Rod Small
End Bush
� Gasket
� Gasket � Gasket
50 (510, 37)
39 (398, 29)
18 (184, 13)
30 (306, 22)
30 (306, 22)
39 (398, 29)
Piston Ring (No. 1 Compression Ring)
Piston Ring (No. 2 Compression Ring)
Piston Ring (Side Rail)Piston Ring (Expander)
Connecting Rod Sub-assy
Connecting Rod Bearing
Connecting Rod Cap
Cylinder Block Sub-assy
Cylinder Block w/ Head
Straight Screw No. 3 Plug
Cylinder Block Water Drain Cock
Sub-assy Cylinder Block w/ Head
Straight Screw No. 2 Plug Cylinder Block w/ Head
Straight Screw No. 1 Plug Cylinder Block Water
Drain Cock Sub-assy
Water Seal Plate
�
�
Piston PinPiston
14-156
- ENGINE MECHANICALCYLINDER BLOCK ASSY (3MZ-FE)
2248 Author�: Date�:
2005 LEXUS ES330 REPAIR MANUAL (RM1124U)
CYLINDER BLOCK ASSY (3MZ-FE)
COMPONENTS
Page 533 of 969
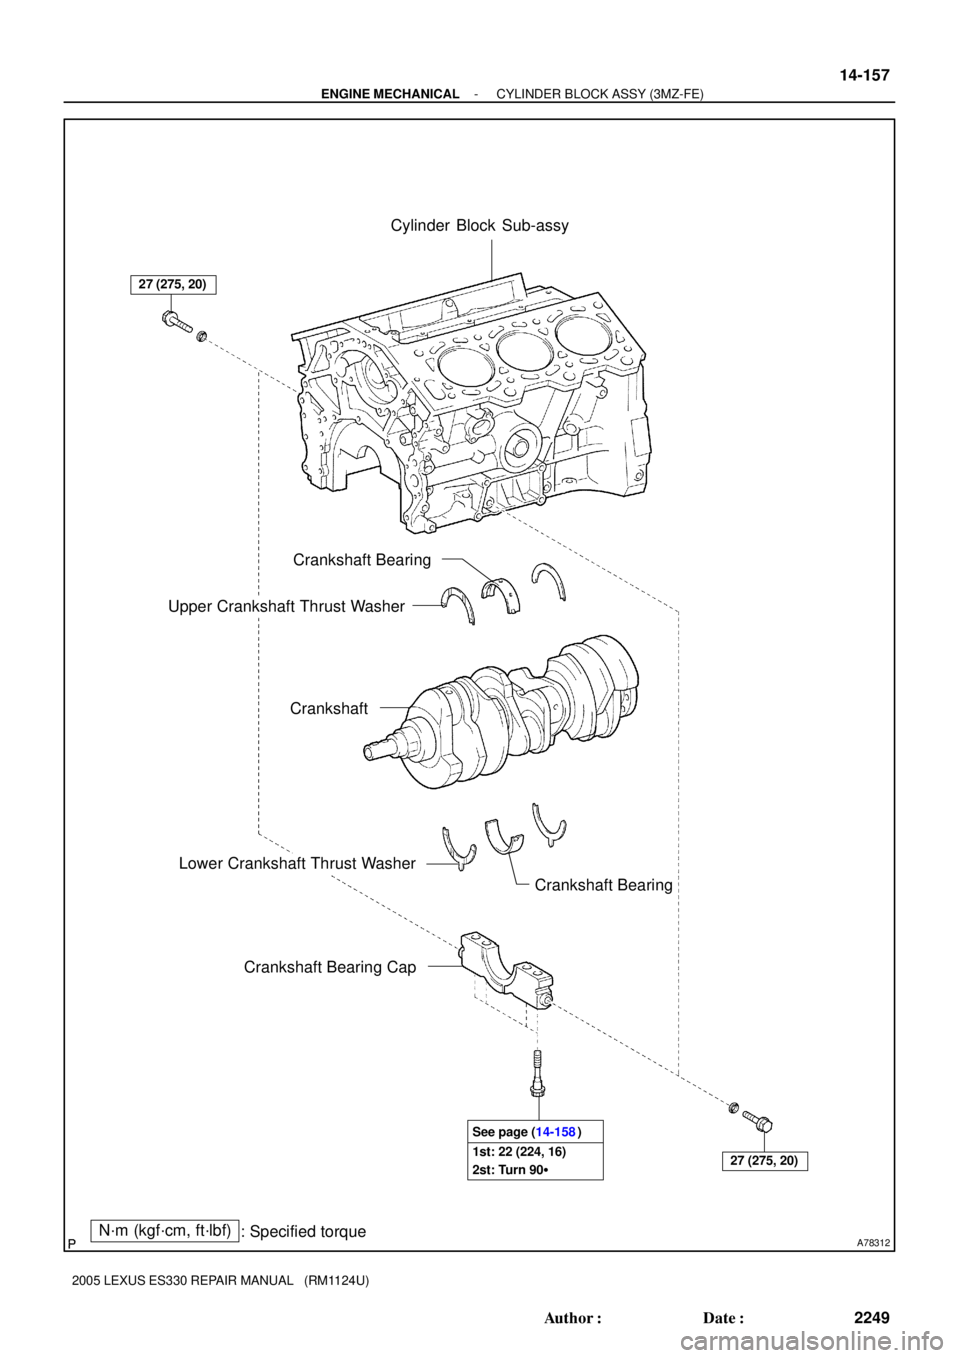
A78312N´m (kgf´cm, ft´lbf)
: Specified torque
27 (275, 20)
27 (275, 20)1st: 22 (224, 16)
2st: Turn 90� See page (14-158)
Cylinder Block Sub-assy
Upper Crankshaft Thrust WasherCrankshaft Bearing
Crankshaft Bearing
Lower Crankshaft Thrust Washer
Crankshaft Bearing CapCrankshaft
- ENGINE MECHANICALCYLINDER BLOCK ASSY (3MZ-FE)
14-157
2249 Author�: Date�:
2005 LEXUS ES330 REPAIR MANUAL (RM1124U)
Page 535 of 969

14-159
2251 Author�: Date�:
2005 LEXUS ES330 REPAIR MANUAL (RM1124U)
(h) Tighten the")
P12697
A78795
90�
Front90�Painted Mark
P12698
A79803
Number Mark
- ENGINE MECHANICALCYLINDER BLOCK ASSY (3MZ-FE)
14-159
2251 Author�: Date�:
2005 LEXUS ES330 REPAIR MANUAL (RM1124U)
(h) Tighten the cap bolts in several steps by the specified
torque.
Torque: 25 NVm (250 kgfVcm, 18 ftVlbf)
(i) Mark the front side of each cap bolt with paint.
(j) Retighten the cap bolts by 90� as shown in the illustration.
NOTICE:
Do not turn the crankshaft.
(k) Remove the cap bolts, cap and lower bearing.
(l) Measure the Plastigage at its widest point.
Standard oil clearance:
0.038 to 0.066 mm (0.0015 to 0.0026 in.)
Maximum oil clearance: 0.08 mm (0.0031 in.)
NOTICE:
Completely remove the Plastigage.
�If the oil clearance is greater than maximum, re-
place the bearing.
�If necessary, grind or replace the crankshaft.
HINT:
If replacing the bearing, replace it with one having the same
number as marked on the connecting rod. There are 4 sizes of
standard bearings, marked º1 º, º2º, º3º and º4º accordingly.
Reference:
Standard bearing center wall thickness:
Markmm (in.)
º1º1.484 to 1.487 (0.0584 to 0.0585)
º2º1.487 to 1.490 (0.0585 to 0.0587)
º3º1.490 to 1.493 (0.0587 to 0.0588)
º4º1.493 to 1.496 (0.0588 to 0.0589)
Page 545 of 969

14-169
2261 Author�: Date�:
2005 LEXUS ES33")
A10529
A78810
1
3
4
5
6
7
8
2
10
11
13
12
14
15
16
9
A78811
Painted Mark
90�
Front90�
A78812
1
2
3
4
5
6
7
8
- ENGINE MECHANICALCYLINDER BLOCK ASSY (3MZ-FE)
14-169
2261 Author�: Date�:
2005 LEXUS ES330 REPAIR MANUAL (RM1124U)
(j) Using a plastic-faced hammer, lightly tap the bearing cap
to ensure proper fit.
(k) Apply a light coat of engine oil to the threads of the bear-
ing cap bolts.
(l) Using several steps, install and tighten the 16 bearing cap
bolts uniformly in the sequence shown in the illustration.
Torque: 22 NVm (224 kgfVcm, 16 ftVlbf)
(m) Mark the front side of the bearing cap bolts with paint.
(n) Retighten the bearing cap bolts by 90� in the same se-
quence as step (l).
(o) Check that each painted mark is now at a 90� angle to the
front.
NOTICE:
Do not turn the crankshaft.
(p) Using several steps, install and tighten the 8 bearing cap
bolts uniformly in the sequence shown in the illustration.
Torque: 27 NVm (275 kgfVcm, 20 ftVlbf)
HINT:
Use the short bolt for the position marked with the arrow.
(q) Remove the bearing caps.
Page 549 of 969
A78318
Front Side: Front Side:
Front Side:
Upper Side:Left Side:
80 mm
(3.15 in.)
M1099 mm
(3.90 in.)
M8
27.5 mm
(1.08 in.)28.5mm
(1.12 in.) M6
M6M8 29 mm
(1.14 in.)
Torque: 6.0 NVm (60 kgfVcm, 53 in.Vlbf)
Torque: 7.0 NVm (70 kgfVcm, 62 in.Vlbf)
Torque: 4.0 NVm (40 kgfVcm, 35 in.Vlbf) Torque: 21 NVm (220 kgfVcm, 15 ftVlbf)Torque: 15 NVm (145 kgfVcm, 11 ftVlbf)
52.5 mm
(2.07 in.) Upper Side:
Torque: 12 NVm (122 kgfVcm, 9 ftVlbf)
- ENGINE MECHANICALCYLINDER BLOCK ASSY (3MZ-FE)
14-173
2265 Author�: Date�:
2005 LEXUS ES330 REPAIR MANUAL (RM1124U)
31. INSTALL STUD BOLT
Page 554 of 969

A10529
A78810
1
3
4
5
6
7
8
2
10
11
13
12
14
15
16
9
A78811
Painted Mark
90�
Front90�
A78812
1
2
3
4
5
6
7
8 14-178
- ENGINE MECHANICALCYLINDER BLOCK ASSY (3MZ-FE)
2270")
A78809Less than 6 mm (0.23 in.)
A10529
A78810
1
3
4
5
6
7
8
2
10
11
13
12
14
15
16
9
A78811
Painted Mark
90�
Front90�
A78812
1
2
3
4
5
6
7
8 14-178
- ENGINE MECHANICALCYLINDER BLOCK ASSY (3MZ-FE)
2270 Author�: Date�:
2005 LEXUS ES330 REPAIR MANUAL (RM1124U)
(d) Temporarily install the 8 bearing cap bolts to the inside
positions.
(e) Install the bearing cap by hand using the inner bolt as a
guide. Stop when the bearing cap is about 6 mm (0.23 in.)
away from contact with the cylinder block.
(f) Using a plastic-faced hammer, lightly tap the bearing cap
to ensure proper fit.
(g) Apply a light coat of engine oil to the threads of the bear-
ing cap bolts.
(h) Using several steps, install and tighten the 16 bearing cap
bolts uniformly in the sequence shown in the illustration.
Torque: 22 NVm (224 kgfVcm, 16 ftVlbf)
(i) Mark the front side of the bearing cap bolts with paint.
(j) Retighten the bearing cap bolts by 90� in the same se-
quence as step (h).
(k) Check that each painted mark is now at a 90� angle to the
front.
(l) Check that the crankshaft turns smoothly.
(m) Using several steps, install and tighten the 8 bearing cap
bolts uniformly in the sequence shown in the illustration.
Torque: 27 NVm (275 kgfVcm, 20 ftVlbf)
HINT:
Use the short bolt for the position marked with the arrow.
Page 555 of 969

Front
A78794
Protrusion Front
P12697
A78795
90�
Front90�Painted Mark
A78822
Front Side:
- ENGINE MECHANICALCYLINDER BLOCK ASSY (3MZ-FE)
14-179
2271 Author�: Date�:
2005 LEXU")
A78322
Front Mark (Cavity)
Front
A78794
Protrusion Front
P12697
A78795
90�
Front90�Painted Mark
A78822
Front Side:
- ENGINE MECHANICALCYLINDER BLOCK ASSY (3MZ-FE)
14-179
2271 Author�: Date�:
2005 LEXUS ES330 REPAIR MANUAL (RM1124U)
42. INSTALL PISTON SUB-ASSY W/CONNECTING ROD
(a) Apply engine oil to the cylinder walls, pistons, and sur-
faces of the connecting rod bearings.
(b) Check the position of the piston ring ends.
(c) Using a piston ring compressor, push the numbered pis-
ton and connecting rod assemblies correctly into each
cylinder with the front mark of the piston facing forward.
NOTICE:
Match the numbered connecting rod cap with the connect-
ing rod.
(d) Check that the protrusion of the cap is facing the correct
direction.
(e) Apply a light coat of engine oil to the threads of the cap
bolts.
(f) Tighten the cap bolts in several steps by the specified
torque.
Torque: 25 NVm (250 kgfVcm, 18 ftVlbf)
(g) Mark the front side of each cap bolt with paint.
(h) Retighten the cap bolts by 90� as shown in the illustration.
(i) Check that the crankshaft turns smoothly.
43. INSTALL CYLINDER BLOCK W/HEAD STRAIGHT
SCREW NO.1 PLUG
(a) Using a socket hexagon wrench 10, install a new gasket
and the screw plug.
Torque: 30 NVm (306 kgfVcm, 22 ftVlbf)


M1099 mm
(3.90 in.)
M8
27.5 mm
(1.08 in.)28.5mm
(1.12 in.) M6
M6M8 29 mm
(1.14 in.)
Torque: 6.0 NVm (60 kgfVcm, 5")