Page 607 of 969
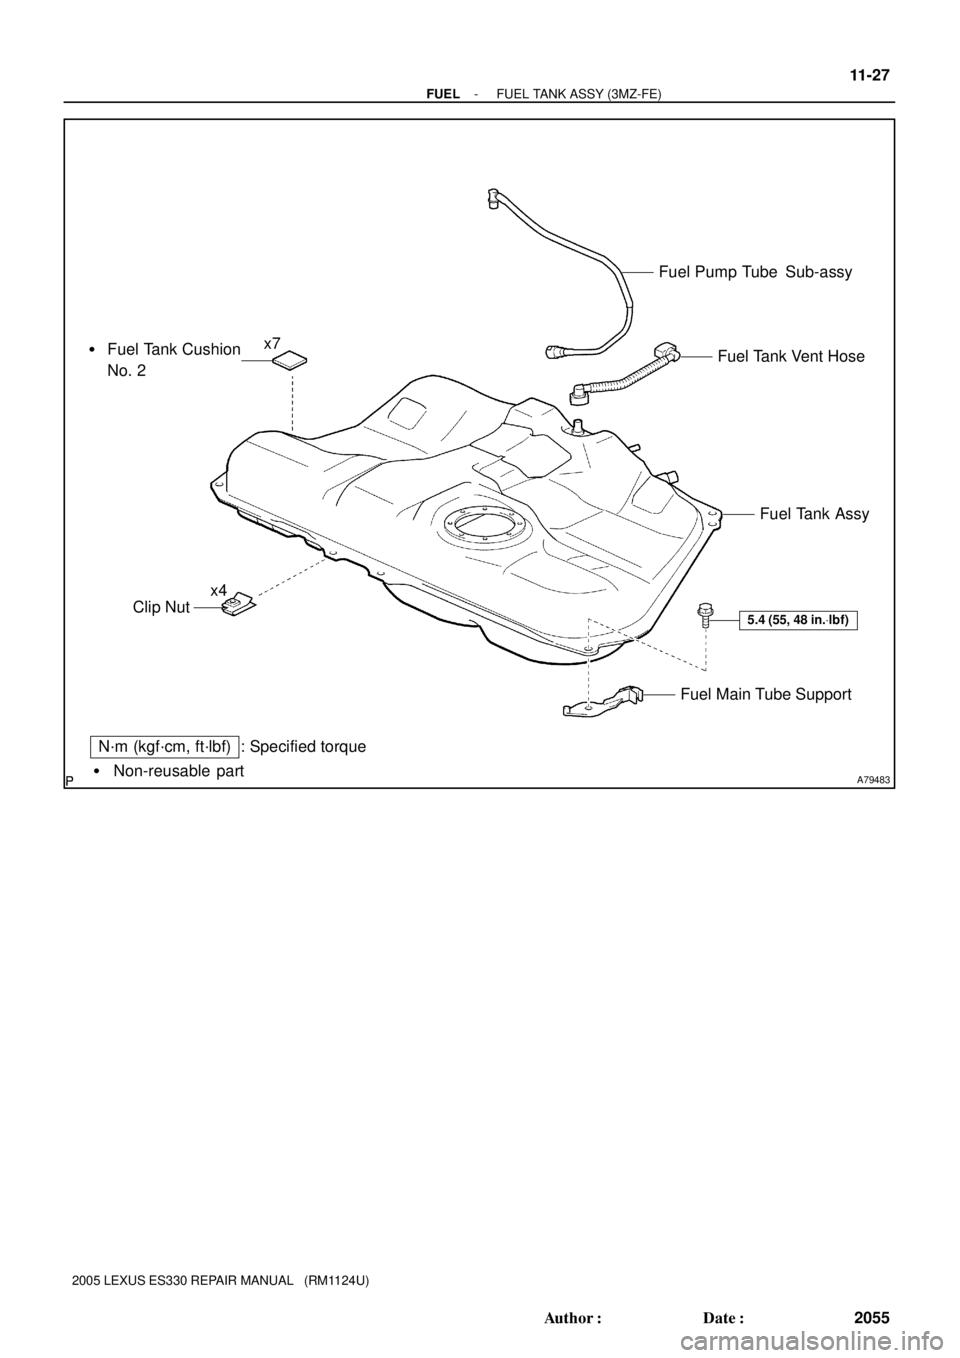
A79483� Non-reusable part
N´m (kgf´cm, ft´lbf) : Specified torqueFuel Tank Vent Hose Fuel Pump Tube Sub-assy
� Fuel Tank Cushion
No. 2
Clip Nut
Fuel Main Tube SupportFuel Tank Assy
x7
5.4 (55, 48 in.Vlbf)
x4
- FUELFUEL TANK ASSY (3MZ-FE)
11-27
2055 Author�: Date�:
2005 LEXUS ES330 REPAIR MANUAL (RM1124U)
Page 612 of 969

2060 Author�: Date�:
2005 LEXUS ES330 REPAIR MANUAL (RM1124U)
17. INSTALL FUEL TANK CUSHION NO.2
(a) Install 7 new fuel tank c")
A86279
Push
A86339
Push
A86280
Push 11-32
- FUELFUEL TANK ASSY (3MZ-FE)
2060 Author�: Date�:
2005 LEXUS ES330 REPAIR MANUAL (RM1124U)
17. INSTALL FUEL TANK CUSHION NO.2
(a) Install 7 new fuel tank cushions to the fuel tank.
18. INSTALL FUEL MAIN TUBE SUPPORT
Torque: 5.4 NVm (55 kgfVcm, 48 in.Vlbf)
19. INSTALL FUEL PUMP TUBE SUB-ASSY
20. INSTALL FUEL TANK VENT HOSE
(a) Push in the quick connector to the pipe until the quick con-
nector makes a ºclickº sound.
NOTICE:
�Check the connected part for damage or foreign ob-
jects.
�After connecting, check if the quick connector and
pipe are securely connected by pulling on them.
21. INSTALL FUEL TANK ASSY
(a) Install the 4 clip nuts.
(b) Install the 2 fuel tank bands with the 2 pins.
(c) Set up the fuel tank to the transmission jack.
(d) Connect the fuel tank vent hose to the charcoal canister.
(1) Push in the quick connector to the pipe until the
quick connector makes a ºclickº sound.
NOTICE:
�Check the connected part for damage or foreign ob-
jects.
�After connecting, check if the connector and pipe are
securely connected by pulling on them.
(e) Operate the transmission jack, then connect the fuel tank
filler pipe.
(f) Tighten the clamp bolt.
(g) Tighten the 2 bolts which hold the fuel tank bands.
Torque: 39 NVm (400 kgfVcm, 29 ftVlbf)
(h) Connect the fuel tube No. 1.
(1) Push in the quick connector to the pipe until the
quick connector makes a ºclickº sound.
NOTICE:
�Check the connected part for damage or foreign ob-
jects.
�After connecting, check if the quick connector and
pipe are securely connected by pulling on them.
Page 613 of 969

11-33
2061 Author�: Date�:
2005 LEXUS ES330 REPAIR MANUAL (RM1124U)
(i) Connect the fuel pump tube.
(1) Push in the quick connector to the pipe un")
A81598
Retainer
Push
- FUELFUEL TANK ASSY (3MZ-FE)
11-33
2061 Author�: Date�:
2005 LEXUS ES330 REPAIR MANUAL (RM1124U)
(i) Connect the fuel pump tube.
(1) Push in the quick connector to the pipe until the
quick connector makes a ºclickº sound, then push
up the retainer until the claws lock.
NOTICE:
�Check the connected part for damage or foreign ob-
jects.
�After connecting, check if the connector and pipe are
securely connected by pulling on them.
22. INSTALL FUEL TANK PROTECTOR LOWER CENTER
Torque: 5.4 NVm (55 kgfVcm, 48 in.Vlbf)
23. INSTALL PARKING BRAKE CABLE ASSY NO.3
Torque: 5.4 NVm (55 kgfVcm, 48 in.Vlbf)
24. INSTALL PARKING BRAKE CABLE ASSY NO.2
Torque: 5.4 NVm (55 kgfVcm, 48 in.Vlbf)
25. INSTALL EXHAUST PIPE ASSY CENTER
(a) Install 2 new gaskets and the exhaust pipe center to the 2 exhaust pipe supports.
(b) Tighten the 2 bolts and 4 new nuts.
Torque: 56 NVm (571 kgfVcm, 41 ftVlbf)
26. INSTALL FUEL SUCTION W/ PUMP & GAUGE TUBE ASSY (See page 11-20)
27. ADD FUEL
28. CONNECT ENGINE WIRE NO. 3 (BATTERY NEGATIVE TERMINAL)
Torque: 5.4 NVm (55 kgfVcm, 48 in.Vlbf)
29. CHECK FOR FUEL LEAKS (See page 11-5)
30. CHECK FOR EXHAUST GAS LEAKS
31. INSTALL REAR FLOOR SERVICE HOLE COVER (See page 11-20)
32. INSTALL REAR SEAT CUSHION ASSY
33. INSTALL FLOOR PANEL BRACE REAR (See page 15-2)
34. SYSTEM INITIALIZATION (See page 19-15)
Page 630 of 969

12-17
2078 Author�: Date�:
2005 LEXUS ES330 REPAIR MANUAL (RM1124U)
14. REMOVE FUEL EMISSION TUBE FUEL HOSE
(a) Remove the fuel e")
A87557
A86389
Push
- EMISSION CONTROLCHARCOAL CANISTER ASSY (3MZ-FE)
12-17
2078 Author�: Date�:
2005 LEXUS ES330 REPAIR MANUAL (RM1124U)
14. REMOVE FUEL EMISSION TUBE FUEL HOSE
(a) Remove the fuel emission tube fuel hose.
15. INSTALL FUEL EMISSION TUBE FUEL HOSE
16. INSTALL CHARCOAL CANISTER ASSY
(a) Install the charcoal canister with the 2 bolts.
Torque: 40 NVm (400 kgfVcm, 29 ftVlbf)
(b) Connect the fuel tank vent hose.
(1) Push in the quick connector to the pipe until the
quick connector makes a ºclickº sound.
NOTICE:
�Check the connected part for damage or foreign ob-
jects.
�After connecting, check if the quick connector and
pipe are securely connected by pulling on them.
(c) Connect the fuel hose No. 1.
(d) Install the 3 wire harness clamps.
(e) Connect the VSV connector.
17. INSTALL FUEL TANK ASSY (See page 11-28)
18. INSTALL FUEL TANK PROTECTOR LOWER CENTER (See page 11-28)
19. INSTALL PARKING BRAKE CABLE ASSY NO.3 (See page 11-28)
20. INSTALL PARKING BRAKE CABLE ASSY NO.2 (See page 11-28)
21. INSTALL EXHAUST PIPE ASSY CENTER (See page 11-28)
22. INSTALL FUEL SUCTION W/ PUMP & GAUGE TUBE ASSY (See page 11-20)
23. CONNECT ENGINE WIRE NO. 3 (BATTERY NEGATIVE TERMINAL)
Torque: 5.4 NVm (55 kgfVcm, 48 in.Vlbf)
24. ADD FUEL
25. CHECK FOR FUEL LEAKS (See page 11-5)
26. CHECK FOR EXHAUST GAS LEAKS
27. INSTALL REAR FLOOR SERVICE HOLE COVER (See page 11-20)
28. INSTALL REAR SEAT CUSHION ASSY
29. INSTALL FLOOR PANEL BRACE REAR (See page 15-2)
30. SYSTEM INITIALIZATION (See page 19-15)
Page 631 of 969
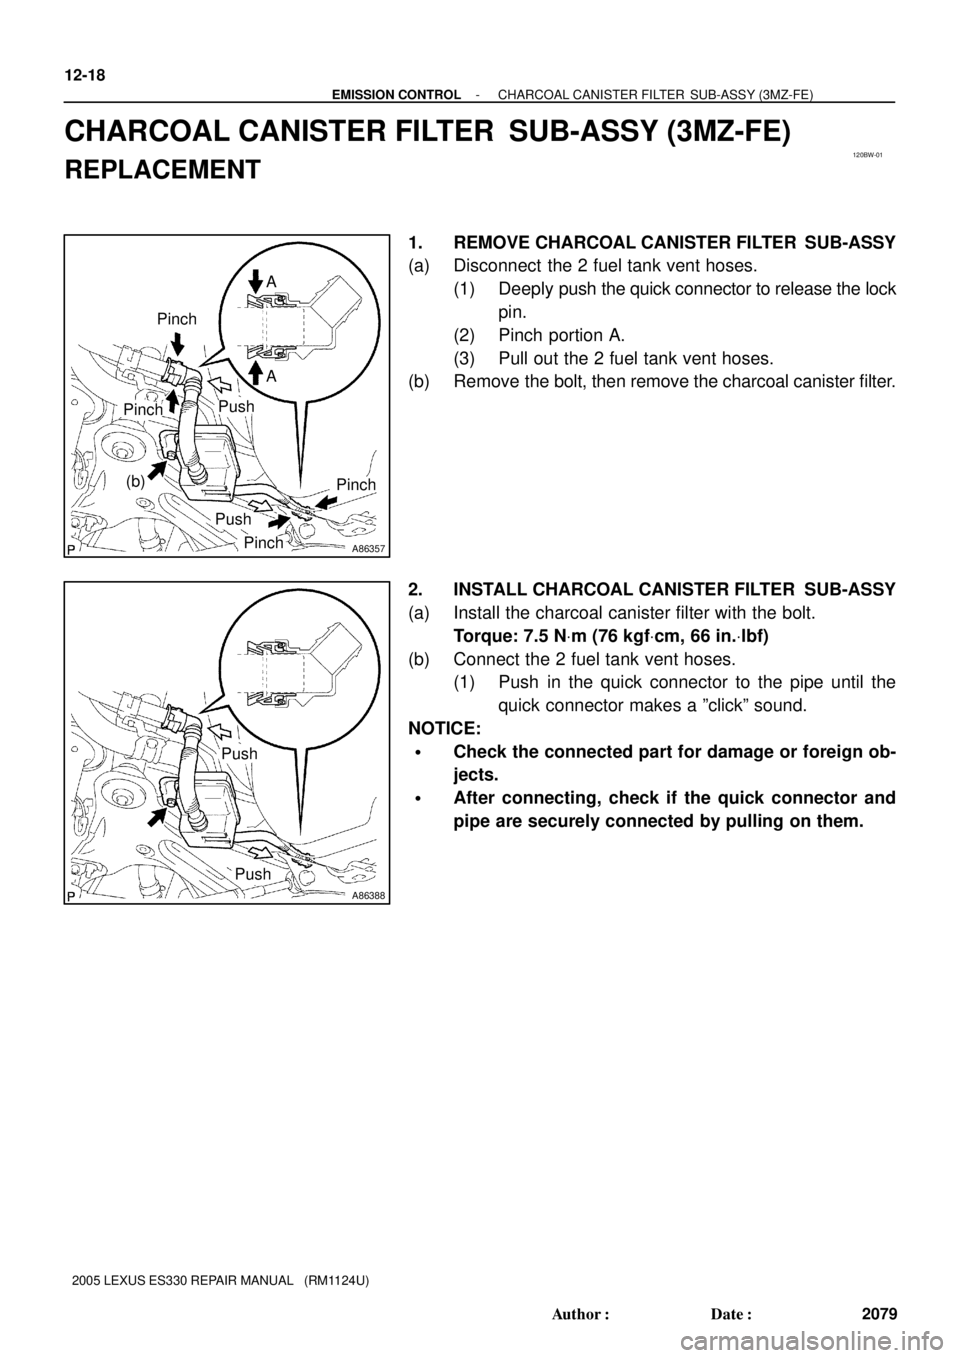
120BW-01
A86357
A A
Push
Pinch
Pinch
PushPinch
Pinch
(b)
A86388
Push
Push 12-18
- EMISSION CONTROLCHARCOAL CANISTER FILTER SUB-ASSY (3MZ-FE)
2079 Author�: Date�:
2005 LEXUS ES330 REPAIR MANUAL (RM1124U)
CHARCOAL CANISTER FILTER SUB-ASSY (3MZ-FE)
REPLACEMENT
1. REMOVE CHARCOAL CANISTER FILTER SUB-ASSY
(a) Disconnect the 2 fuel tank vent hoses.
(1) Deeply push the quick connector to release the lock
pin.
(2) Pinch portion A.
(3) Pull out the 2 fuel tank vent hoses.
(b) Remove the bolt, then remove the charcoal canister filter.
2. INSTALL CHARCOAL CANISTER FILTER SUB-ASSY
(a) Install the charcoal canister filter with the bolt.
Torque: 7.5 NVm (76 kgfVcm, 66 in.Vlbf)
(b) Connect the 2 fuel tank vent hoses.
(1) Push in the quick connector to the pipe until the
quick connector makes a ºclickº sound.
NOTICE:
�Check the connected part for damage or foreign ob-
jects.
�After connecting, check if the quick connector and
pipe are securely connected by pulling on them.
Page 632 of 969
(a)
(a)
A86217
(c)
(d)
(e)(f)
(g)
(g)
A86278
(a)
(b)
(a)
- EMISSION CONTROLDUTY VACUUM SWITCHING VALVE (3MZ-FE)
12-19
2080 Author�: Date�:
2005 LEXUS ES330 REPAIR MANUAL (RM1124U)")
120BU-01
A79751
(b)(a)
(a)
A86217
(c)
(d)
(e)(f)
(g)
(g)
A86278
(a)
(b)
(a)
- EMISSION CONTROLDUTY VACUUM SWITCHING VALVE (3MZ-FE)
12-19
2080 Author�: Date�:
2005 LEXUS ES330 REPAIR MANUAL (RM1124U)
DUTY VACUUM SWITCHING VALVE (3MZ-FE)
REPLACEMENT
1. DISCONNECT ENGINE WIRE NO. 3 (BATTERY NEGATIVE TERMINAL)
2. REMOVE V-BANK COVER SUB-ASSY (See page 10-1 1)
3. REMOVE EMISSION CONTROL VALVE SET
(a) Disconnect the 2 VSV connectors.
(b) Remove the wire harness clamp.
(c) Disconnect the fuel vapor feed hose No. 1.
(d) Disconnect the fuel vapor feed hose No. 2.
(e) Disconnect the vacuum hose.
(f) Remove the vacuum hose from the clamp.
(g) Remove the 2 nuts, then remove the emission control
valve set.
4. REMOVE DUTY VACUUM SWITCHING VALVE
(a) Disconnect the 2 vacuum hoses.
(b) Remove the screw, then remove the duty vacuum switch-
ing valve.
5. INSTALL DUTY VACUUM SWITCHING VALVE
6. INSTALL EMISSION CONTROL VALVE SET
Torque: 8.0 NVm (82 kgfVcm, 71 in.Vlbf)
7. CHECK CONNECTION OF VACUUM HOSE (See page 14-29)
8. INSTALL V-BANK COVER SUB-ASSY (See page 10-1 1)
9. CONNECT ENGINE WIRE NO. 3 (BATTERY NEGATIVE TERMINAL)
Torque: 5.4 NVm (55 kgfVcm, 48 in.Vlbf)
10. SYSTEM INITIALIZATION (See page 19-15)
Page 634 of 969

12-21
2082 Author�: Date�:
2005 LEXUS ES330 REPAIR MANUAL (RM1124U)
8. INST")
A86272
Cover
Tube Joint Clip
A79489Mark
A81595
Tube Joint ClipCollar
- EMISSION CONTROLVAPOR PRESSURE SENSOR ASSY (3MZ-FE)
12-21
2082 Author�: Date�:
2005 LEXUS ES330 REPAIR MANUAL (RM1124U)
8. INSTALL VAPOR PRESSURE SENSOR ASSY
(a) Install the vapor pressure sensor with the tube joint clip.
NOTICE:
�Check the connected part for scratch or foreign ob-
jects.
�Check that the vapor pressure sensor is inserted se-
curely.
�Check that the tube joint clip is on the collar of the va-
por pressure sensor.
�After installing the tube joint clip, check that the vapor
pressure sensor has not been pulled off.
(b) Install the cover.
9. INSTALL FUEL TANK VENT TUBE SET PLATE
(a) Align the mark of the fuel tank vent tube set plate with the
fuel suction tube w/ pump & gauge.
(b) Install the fuel tank vent tube set plate with the 8 bolts.
Torque: 5.9 NVm (60 kgfVcm, 52 in.Vlbf)
10. CONNECT FUEL PUMP TUBE SUB-ASSY
(a) Install the fuel pump tube with the tube joint clip.
NOTICE:
�Check the connected part for scratch or foreign ob-
jects.
�Check that the fuel tube joint is inserted securely.
�Check that the tube joint clip is on the collar of the fuel
tube joint.
�After installing the tube joint clip, check that the fuel
tube joint has not been pulled off.
11. CONNECT ENGINE WIRE NO. 3 (BATTERY NEGATIVE TERMINAL)
Torque: 5.4 NVm (55 kgfVcm, 48 in.Vlbf)
12. CHECK FOR FUEL LEAKS (See page 11-5)
13. INSTALL REAR FLOOR SERVICE HOLE COVER (See page 11-20)
14. INSTALL REAR SEAT CUSHION ASSY
15. SYSTEM INITIALIZATION (See page 19-15)
Page 635 of 969

(b)
(b)(b)
A86354
SST
A86354
SST
12-22
- EMISSION CONTROLAIR FUEL RATIO SENSOR (3MZ-FE (RH BANK))
2083 Author�: Date�:
2005 LEXUS ES330 REPAIR MANUAL (RM1124U)
AIR FUEL RATIO SEN")
120BY-01
A86340
(a)
(b)
(b)(b)
A86354
SST
A86354
SST
12-22
- EMISSION CONTROLAIR FUEL RATIO SENSOR (3MZ-FE (RH BANK))
2083 Author�: Date�:
2005 LEXUS ES330 REPAIR MANUAL (RM1124U)
AIR FUEL RATIO SENSOR (3MZ-FE (RH BANK))
REPLACEMENT
1. DISCONNECT ENGINE WIRE NO. 3 (BATTERY NEGATIVE TERMINAL)
2. REMOVE EXHAUST PIPE NO.1 SUPPORT BRACKET FRONT (See page 15-2)
3. REMOVE EXHAUST PIPE NO.1 SUPPORT BRACKET REAR (See page 15-2)
4. REMOVE EXHAUST PIPE ASSY FRONT (See page 15-2)
5. REMOVE EXHAUST MANIFOLD HEAT INSULATOR
NO.1
(a) Disconnect the air fuel ratio sensor connector.
(b) Remove the 3 bolts, then remove the exhaust manifold
heat insulator No. 1.
6. REMOVE AIR FUEL RATIO SENSOR
(a) Using SST, remove the air fuel ratio sensor.
SST 09224-00010
7. INSTALL AIR FUEL RATIO SENSOR
(a) Using SST, install the air fuel ratio sensor.
SST 09224-00010
Torque: 44 NVm (449 kgfVcm, 32 ftVlbf)
8. INSTALL EXHAUST MANIFOLD HEAT INSULATOR NO.1
Torque: 8.5 NVm (87 kgfVcm, 75 in.Vlbf)
9. INSTALL EXHAUST PIPE ASSY FRONT (See page 15-2)
10. INSTALL EXHAUST PIPE NO.1 SUPPORT BRACKET REAR (See page 15-2)
11. INSTALL EXHAUST PIPE NO.1 SUPPORT BRACKET FRONT (See page 15-2)
12. CONNECT ENGINE WIRE NO. 3 (BATTERY NEGATIVE TERMINAL)
Torque: 5.4 NVm (55 kgfVcm, 48 in.Vlbf)
13. CHECK FOR EXHAUST GAS LEAKS
14. SYSTEM INITIALIZATION (See page 19-15)