Page 636 of 969
120BZ-01
A86359
(a)
(b)
A86353
(c)
SST
A86353
SST
- EMISSION CONTROLAIR FUEL RATIO SENSOR (3MZ-FE (LH BANK))
12-23
2084 Author�: Date�:
2005 LEXUS ES330 REPAIR MANUAL (RM1124U)
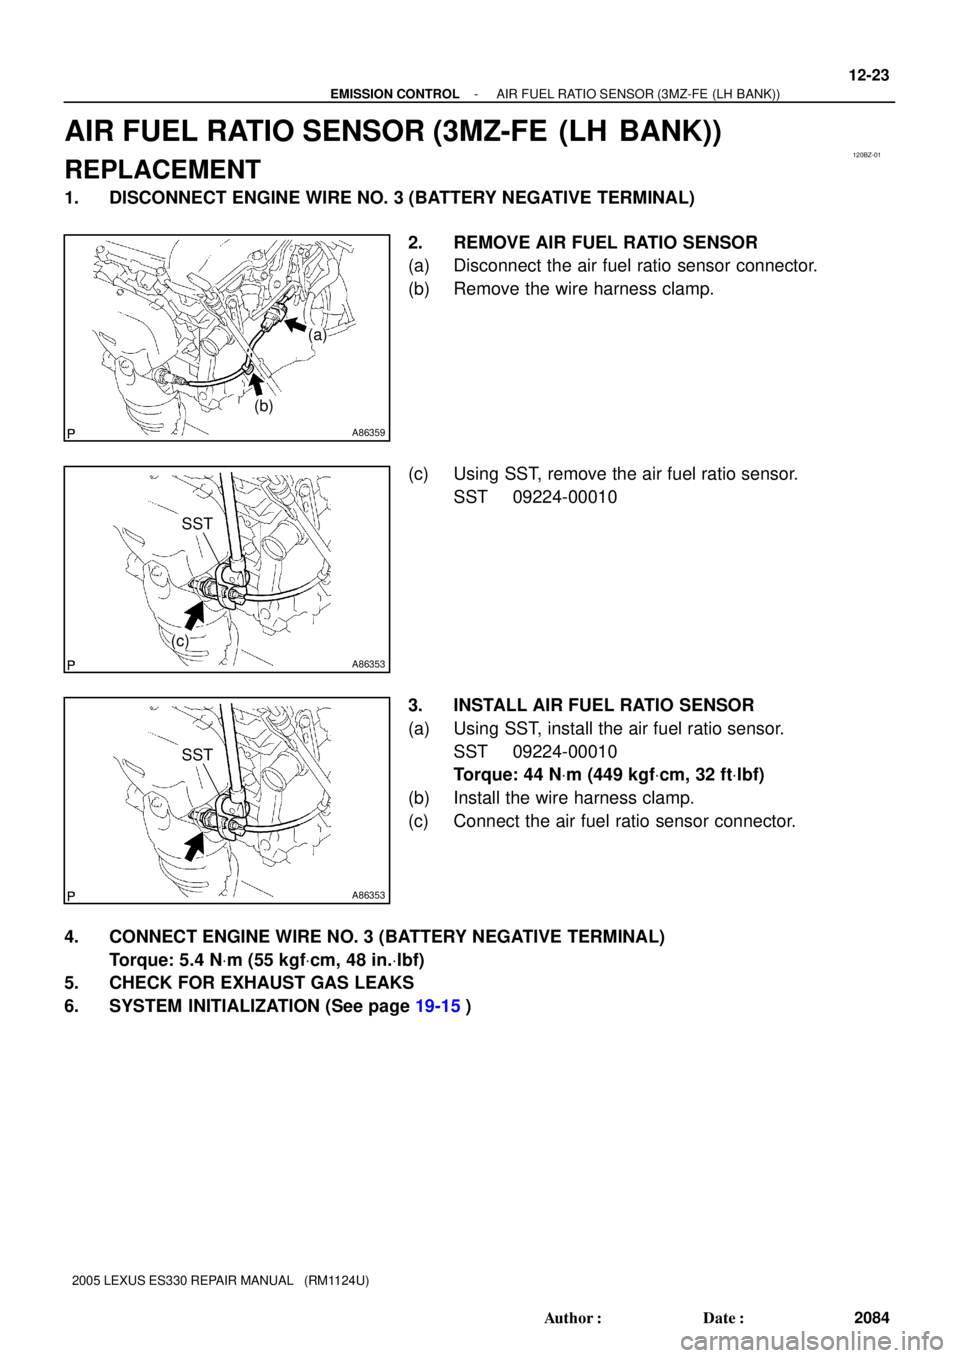
AIR FUEL RATIO SENSOR (3MZ-FE (LH BANK))
REPLACEMENT
1. DISCONNECT ENGINE WIRE NO. 3 (BATTERY NEGATIVE TERMINAL)
2. REMOVE AIR FUEL RATIO SENSOR
(a) Disconnect the air fuel ratio sensor connector.
(b) Remove the wire harness clamp.
(c) Using SST, remove the air fuel ratio sensor.
SST 09224-00010
3. INSTALL AIR FUEL RATIO SENSOR
(a) Using SST, install the air fuel ratio sensor.
SST 09224-00010
Torque: 44 NVm (449 kgfVcm, 32 ftVlbf)
(b) Install the wire harness clamp.
(c) Connect the air fuel ratio sensor connector.
4. CONNECT ENGINE WIRE NO. 3 (BATTERY NEGATIVE TERMINAL)
Torque: 5.4 NVm (55 kgfVcm, 48 in.Vlbf)
5. CHECK FOR EXHAUST GAS LEAKS
6. SYSTEM INITIALIZATION (See page 19-15)
Page 637 of 969
120BZ-01
A86359
(a)
(b)
A86353
(c)
SST
A86353
SST
- EMISSION CONTROLAIR FUEL RATIO SENSOR (3MZ-FE (LH BANK))
12-23
2084 Author�: Date�:
2005 LEXUS ES330 REPAIR MANUAL (RM1124U)
AIR FUEL RATIO SENSOR (3MZ-FE (LH BANK))
REPLACEMENT
1. DISCONNECT ENGINE WIRE NO. 3 (BATTERY NEGATIVE TERMINAL)
2. REMOVE AIR FUEL RATIO SENSOR
(a) Disconnect the air fuel ratio sensor connector.
(b) Remove the wire harness clamp.
(c) Using SST, remove the air fuel ratio sensor.
SST 09224-00010
3. INSTALL AIR FUEL RATIO SENSOR
(a) Using SST, install the air fuel ratio sensor.
SST 09224-00010
Torque: 44 NVm (449 kgfVcm, 32 ftVlbf)
(b) Install the wire harness clamp.
(c) Connect the air fuel ratio sensor connector.
4. CONNECT ENGINE WIRE NO. 3 (BATTERY NEGATIVE TERMINAL)
Torque: 5.4 NVm (55 kgfVcm, 48 in.Vlbf)
5. CHECK FOR EXHAUST GAS LEAKS
6. SYSTEM INITIALIZATION (See page 19-15)
Page 642 of 969
1307X-01
A79700
(a)
A79701
(b)
A79702
Lever(c)
(c)
(c)
(c)
- INTAKEINTAKE AIR CONTROL VALVE ASSY NO.2 (3MZ-FE)
13-5
2090 Author�: Date�:
2005 LEXUS ES330 REPAIR MANUAL (RM1124U)
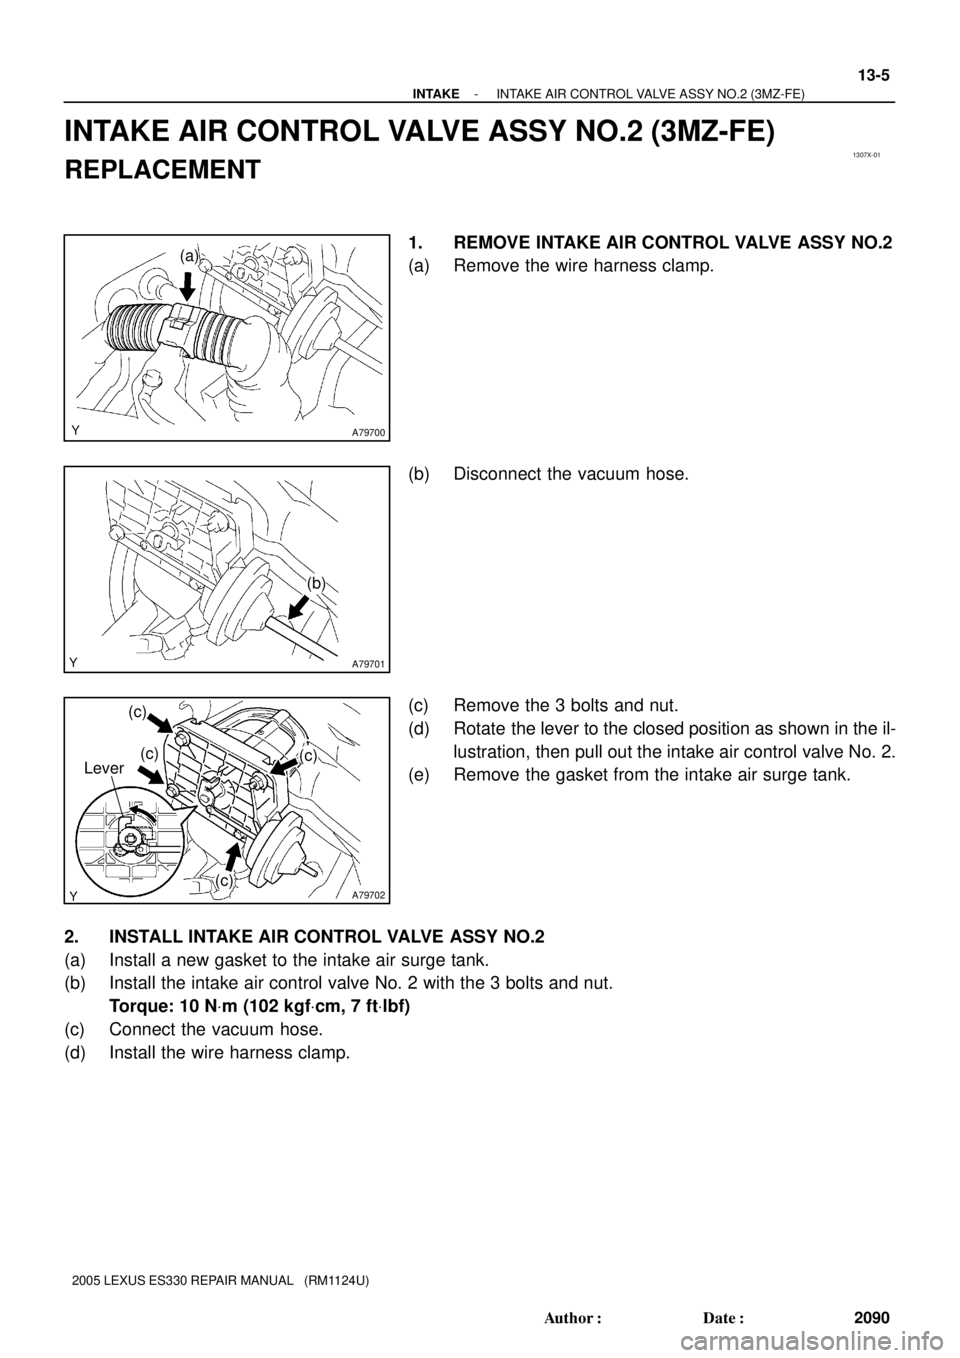
INTAKE AIR CONTROL VALVE ASSY NO.2 (3MZ-FE)
REPLACEMENT
1. REMOVE INTAKE AIR CONTROL VALVE ASSY NO.2
(a) Remove the wire harness clamp.
(b) Disconnect the vacuum hose.
(c) Remove the 3 bolts and nut.
(d) Rotate the lever to the closed position as shown in the il-
lustration, then pull out the intake air control valve No. 2.
(e) Remove the gasket from the intake air surge tank.
2. INSTALL INTAKE AIR CONTROL VALVE ASSY NO.2
(a) Install a new gasket to the intake air surge tank.
(b) Install the intake air control valve No. 2 with the 3 bolts and nut.
Torque: 10 NVm (102 kgfVcm, 7 ftVlbf)
(c) Connect the vacuum hose.
(d) Install the wire harness clamp.
Page 643 of 969

(b)(d)
(d)
(c)
(b)
(b)
(b)
A86221
(a)
(b)
(c)
(c) 13-6
- INTAKEINTAKE AIR CONTROL VALVE ASSY NO.3 (3MZ-FE)
2091 Author�: Date�:
2005 LEXUS ES330 REPAIR MANUAL (RM1124U)
INTAKE AI")
1307Y-01
A86220
(a)
(b)(d)
(d)
(c)
(b)
(b)
(b)
A86221
(a)
(b)
(c)
(c) 13-6
- INTAKEINTAKE AIR CONTROL VALVE ASSY NO.3 (3MZ-FE)
2091 Author�: Date�:
2005 LEXUS ES330 REPAIR MANUAL (RM1124U)
INTAKE AIR CONTROL VALVE ASSY NO.3 (3MZ-FE)
REPLACEMENT
1. DISCONNECT ENGINE WIRE NO. 3 (BATTERY NEGATIVE TERMINAL)
2. REMOVE RADIATOR LOWER AIR DEFLECTOR (See page 19-5)
3. REMOVE AIR CLEANER INLET ASSY (See page 19-5)
4. REMOVE AIR CLEANER CAP SUB-ASSY
(a) Disconnect the mass air flow meter connector.
(b) Disconnect the 4 vacuum hoses.
(c) Loosen the hose clamp bolt.
(d) Loosen the 2 bolts, then remove the air cleaner cap.
(e) Remove the air cleaner filter element.
5. REMOVE INTAKE AIR CONTROL VALVE ASSY NO.3
(a) Disconnect the VSV connector.
(b) Disconnect the vacuum hose.
(c) Unfasten the 2 claws, then remove the intake air control
valve No. 3.
6. INSTALL INTAKE AIR CONTROL VALVE ASSY NO.3
7. INSTALL AIR CLEANER CAP SUB-ASSY
Torque: 5.0 NVm (51 kgfVcm, 44 in.Vlbf)
8. INSTALL AIR CLEANER INLET ASSY (See page 19-5)
9. CHECK CONNECTION OF VACUUM HOSE (See page 14-29)
10. INSTALL RADIATOR LOWER AIR DEFLECTOR
11. CONNECT ENGINE WIRE NO. 3 (BATTERY NEGATIVE TERMINAL)
Torque: 5.4 NVm (55 kgfVcm, 48 in.Vlbf)
12. SYSTEM INITIALIZATION (See page 19-15)
Page 644 of 969
1307Z-01
A86218
(a)
(a)
A86219
(b)(c)
(d)
- INTAKEVACUUM SWITCHING VALVE ASSY NO.1 (3MZ-FE)
13-7
2092 Author�: Date�:
2005 LEXUS ES330 REPAIR MANUAL (RM1124U)
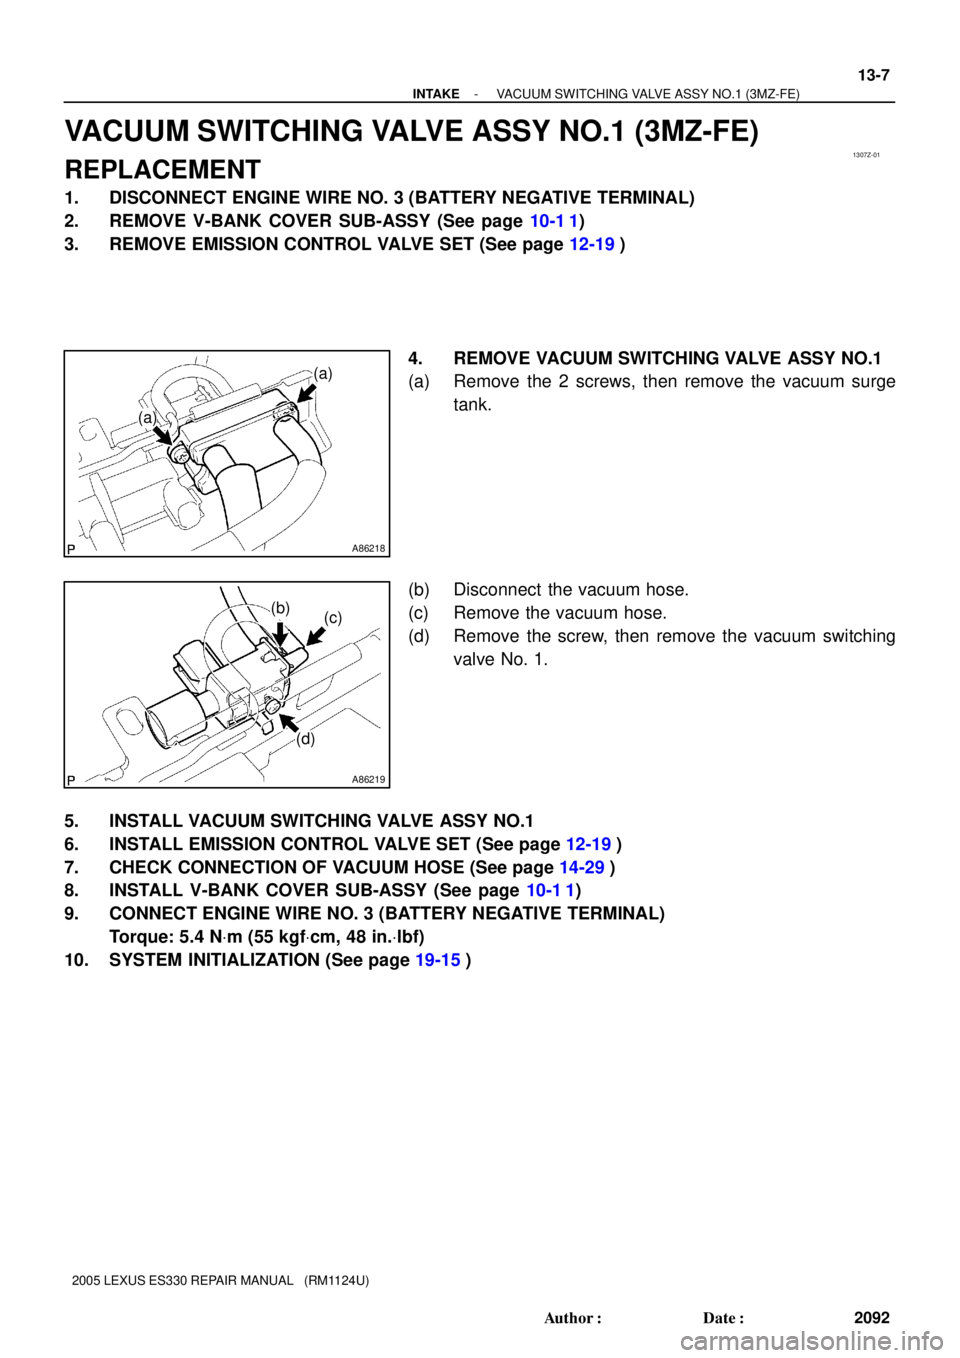
VACUUM SWITCHING VALVE ASSY NO.1 (3MZ-FE)
REPLACEMENT
1. DISCONNECT ENGINE WIRE NO. 3 (BATTERY NEGATIVE TERMINAL)
2. REMOVE V-BANK COVER SUB-ASSY (See page 10-1 1)
3. REMOVE EMISSION CONTROL VALVE SET (See page 12-19)
4. REMOVE VACUUM SWITCHING VALVE ASSY NO.1
(a) Remove the 2 screws, then remove the vacuum surge
tank.
(b) Disconnect the vacuum hose.
(c) Remove the vacuum hose.
(d) Remove the screw, then remove the vacuum switching
valve No. 1.
5. INSTALL VACUUM SWITCHING VALVE ASSY NO.1
6. INSTALL EMISSION CONTROL VALVE SET (See page 12-19)
7. CHECK CONNECTION OF VACUUM HOSE (See page 14-29)
8. INSTALL V-BANK COVER SUB-ASSY (See page 10-1 1)
9. CONNECT ENGINE WIRE NO. 3 (BATTERY NEGATIVE TERMINAL)
Torque: 5.4 NVm (55 kgfVcm, 48 in.Vlbf)
10. SYSTEM INITIALIZATION (See page 19-15)
Page 645 of 969
150B7-01
A86208
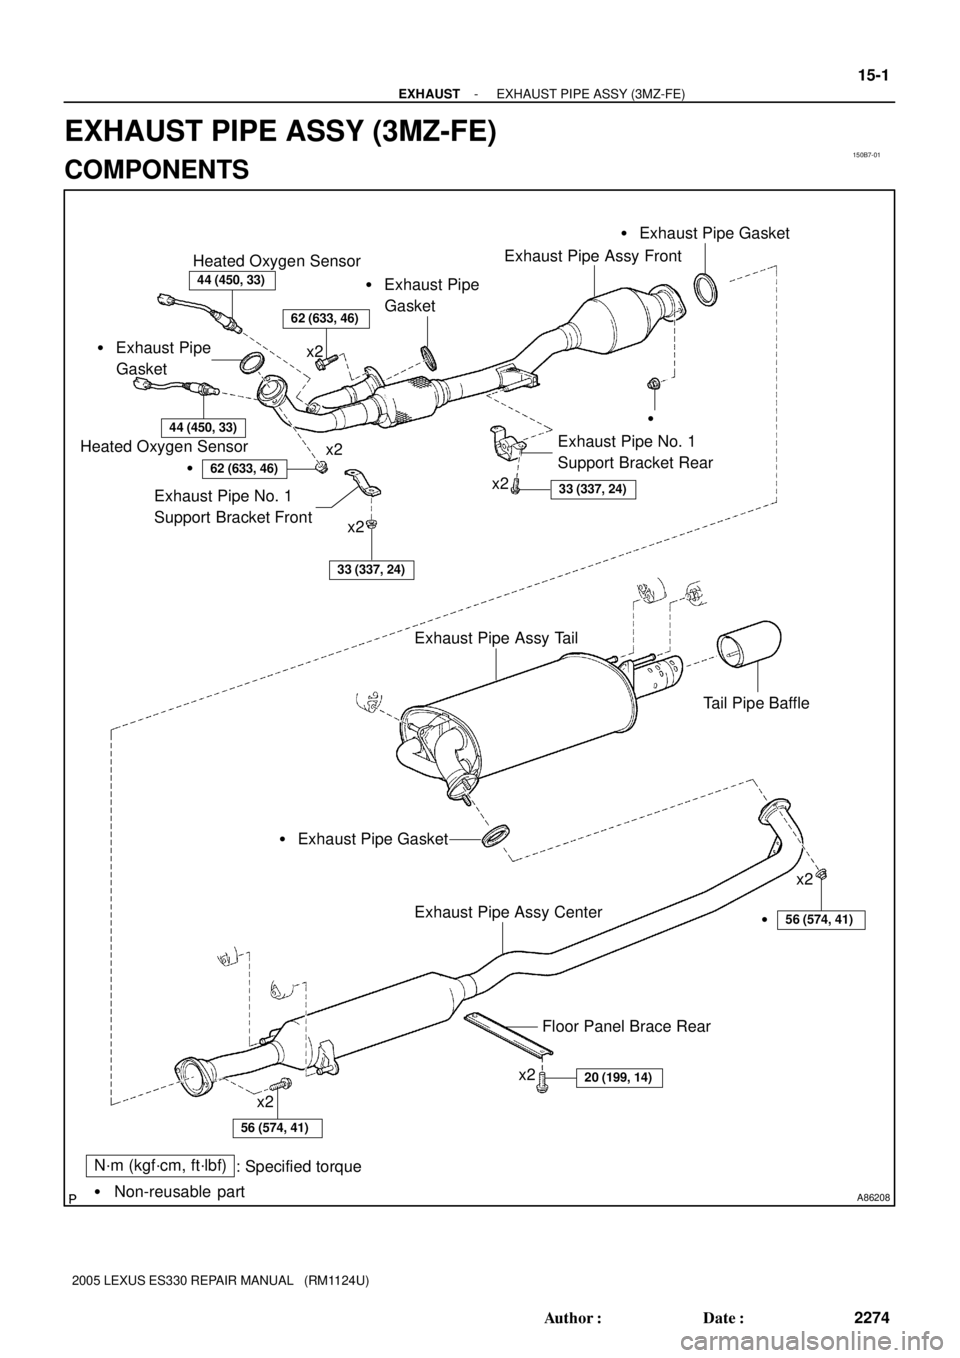
N´m (kgf´cm, ft´lbf)
: Specified torque
� Non-reusable part � Exhaust Pipe
Gasket
44 (450, 33)
Heated Oxygen Sensor
44 (450, 33)
Heated Oxygen Sensor
�
�
62 (633, 46)
Exhaust Pipe No. 1
Support Bracket Front
33 (337, 24)
Exhaust Pipe No. 1
Support Bracket Rear
33 (337, 24)
x2
x2
x2
Exhaust Pipe Assy Tail
Tail Pipe Baffle
Exhaust Pipe Assy Center
x2
x2
x2
20 (199, 14)
x2
56 (574, 41)
Floor Panel Brace Rear
� Exhaust Pipe Gasket� Exhaust Pipe Gasket
� Exhaust Pipe
Gasket
Exhaust Pipe Assy Front
�56 (574, 41)
62 (633, 46)
- EXHAUSTEXHAUST PIPE ASSY (3MZ-FE)
15-1
2274 Author�: Date�:
2005 LEXUS ES330 REPAIR MANUAL (RM1124U)
EXHAUST PIPE ASSY (3MZ-FE)
COMPONENTS
Page 648 of 969
A86215
(a)
(a)
(a)
(a)
A60823
Exhaust Pipe
No. 1 Support Bracket
15-4
- EXHAUSTEXHAUST PIPE ASSY (3MZ-FE)
2277 Author�: Date�:
2005 LEXUS ES330 REPAIR MANUAL (RM1124U)
9. REMOVE EXHAUST PIPE ASSY FRONT
(a) Remove the 2 bolts and 2 nuts, then remove the exhaust
pipe front and 2 gaskets.
10. INSTALL EXHAUST PIPE ASSY FRONT
(a) Install 2 new gaskets and the exhaust pipe front with the 2 bolts.
Torque: 62 NVm (633 kgfVcm, 46 ftVlbf)
(b) Tighten 2 new nuts.
Torque: 62 NVm (633 kgfVcm, 46 ftVlbf)
11. INSTALL EXHAUST PIPE NO.1 SUPPORT BRACKET
REAR
Torque: 33 NVm (337 kgfVcm, 24 ftVlbf)
HINT:
Be careful not to install the exhaust pipe No. 1 support bracket
rear in the wrong direction.
12. INSTALL EXHAUST PIPE NO.1 SUPPORT BRACKET FRONT
Torque: 33 NVm (337 kgfVcm, 24 ftVlbf)
13. INSTALL EXHAUST PIPE ASSY CENTER
(a) Install a new gasket and the exhaust pipe center to the 2 exhaust pipe supports.
(b) Tighten the 2 bolts and 2 new nuts.
Torque: 56 NVm (574 kgfVcm, 41 ftVlbf)
Page 649 of 969
A86216
Keyway
KeyPlastic-faced
Hammer
- EXHAUSTEXHAUST PIPE ASSY (3MZ-FE)
15-5
2278 Author�: Date�:
2005 LEXUS ES330 REPAIR MANUAL (RM1124U)
14. INSTALL TAIL PIPE BAFFLE
(a) Align the keyway of the tail pipe baffle with the key on the
exhaust pipe tail.
(b) Using a plastic-faced hammer, tap the tail pipe baffle to
install.
15. INSTALL EXHAUST PIPE ASSY TAIL
(a) Install a new gasket and the exhaust pipe tail to the 3 exhaust pipe supports.
(b) Tighten the 2 new nuts.
Torque: 56 NVm (574 kgfVcm, 41 ftVlbf)
16. INSTALL HEATED OXYGEN SENSOR (See page 12-24)
SST 09224-00010
17. CONNECT ENGINE WIRE NO. 3 (BATTERY NEGATIVE TERMINAL)
Torque: 5.4 NVm (55 kgfVcm, 48 in.Vlbf)
18. CHECK FOR EXHAUST GAS LEAKS
19. INSTALL FLOOR PANEL BRACE REAR
Torque: 20 NVm (199 kgfVcm, 14 ftVlbf)
20. SYSTEM INITIALIZATION (See page 19-15)