2004 SUBARU FORESTER relay box
[x] Cancel search: relay boxPage 44 of 2870
AC-42
HVAC SYSTEM (HEATER, VENTILATOR AND A/C)
Relay and Fuse
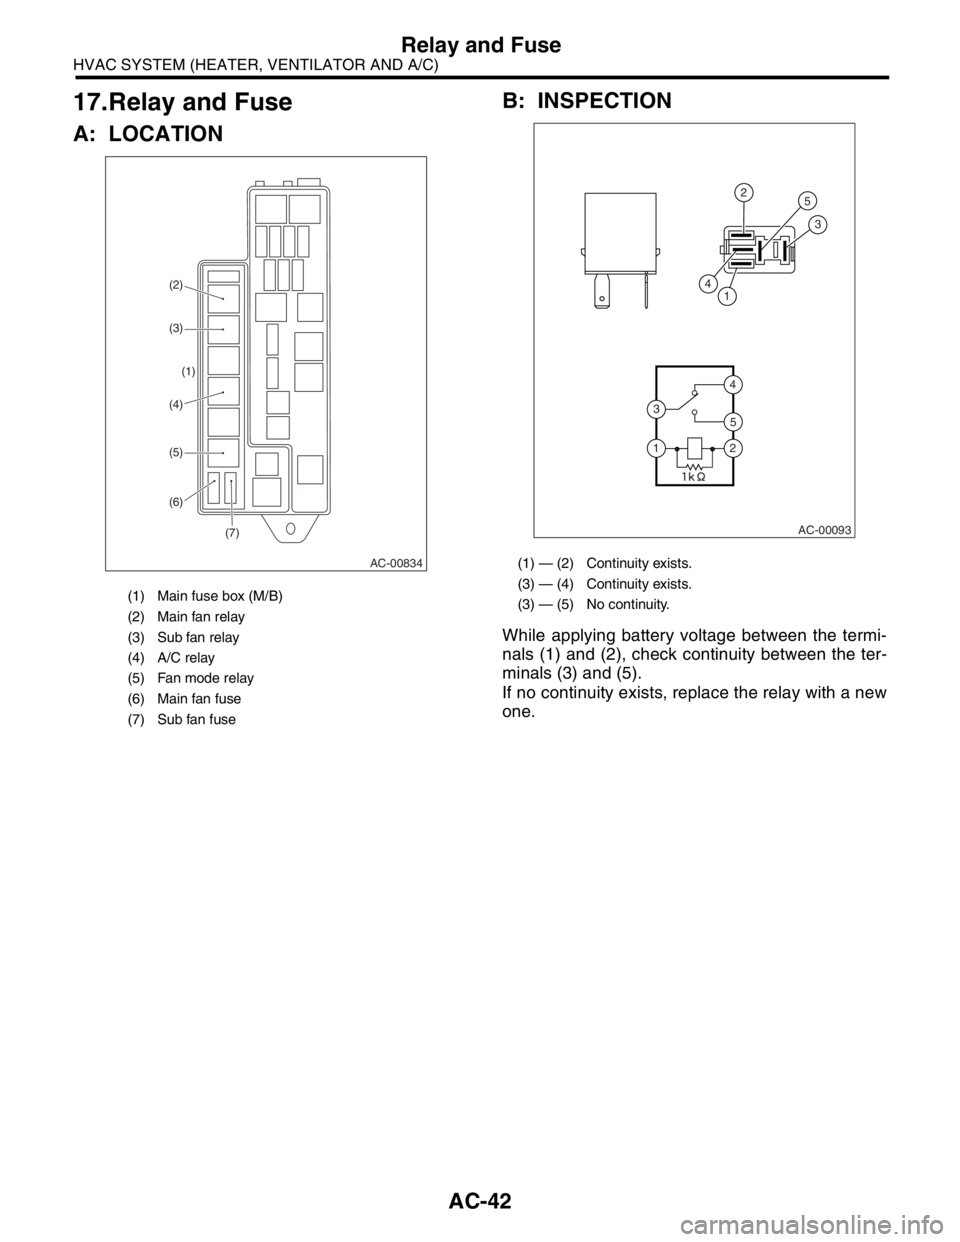
17.Relay and Fuse
A: LOCATIONB: INSPECTION
While applying battery voltage between the termi-
nals (1) and (2), check continuity between the ter-
minals (3) and (5).
If no continuity exists, replace the relay with a new
one.
(1) Main fuse box (M/B)
(2) Main fan relay
(3) Sub fan relay
(4) A/C relay
(5) Fan mode relay
(6) Main fan fuse
(7) Sub fan fuse
AC-00834
(7) (6) (5) (4)(1) (3) (2)
(1) — (2) Continuity exists.
(3) — (4) Continuity exists.
(3) — (5) No continuity.
AC-00093
4
4
5
2
25
3
3
1
1
Page 69 of 2870

AC-13
HVAC SYSTEM (AUTO A/C)(DIAGNOSTIC)
Diagnostics for A/C System Malfunction
Step Check Yes No
1 CHECK FUSE.
1) Turn the ignition switch to OFF.
2) Remove the fuse No. 2 from main fuse box.
3) Check the condition of fuse.Is the fuse blown-out? Replace the fuse. Go to step 2.
2 CHECK FUSE.
1) Turn the ignition switch to OFF.
2) Remove the fuse No. 17 from fuse & relay
box.
3) Check the condition of fuse.Is the fuse blown-out? Replace the fuse. Go to step 3.
3 CHECK AUTO A/C CONTROL MODULE
POWER CIRCUIT.
1) Pull out the auto A/C control module con-
nector.
2) Measure the voltage between auto A/C
control module connector terminal and chassis
ground after turning the ignition switch to OFF
position.
Connector & terminal
(i49) No. 4 (+) — Chassis ground (
−):Is the voltage more than 10 V? Go to step 4.Check open or
short circuit in har-
ness between auto
A/C control mod-
ule and fuse.
4 CHECK AUTO A/C CONTROL MODULE
POWER CIRCUIT.
Measure the voltage between auto A/C control
module connector terminal and chassis ground
after turning the ignition switch to ON position.
Connector & terminal
(i49) No. 5 (+) — Chassis ground (
−):Is the voltage more than 10 V? Go to step 5.Check open or
short circuit in har-
ness between auto
A/C control mod-
ule and fuse.
5 CHECK AUTO A/C CONTROL MODULE
GROUND CIRCUIT.
Measure the resistance in harness between
auto A/C control module and chassis ground.
Connector & terminal
(i49) No. 11 — Chassis ground:Is the resistance less than 1
Ω?Go to step 6.Repair the har-
ness for ground
line.
6 CHECK POOR CONTACT.
Check poor contact in auto A/C control module
connector.Is there poor contact in con-
nector?Repair the con-
nector.Replace the auto
A/C control mod-
ule.
Page 71 of 2870

AC-15
HVAC SYSTEM (AUTO A/C)(DIAGNOSTIC)
Diagnostics for A/C System Malfunction
Step Check Yes No
1 CHECK FUSE.
1) Remove the fuse No. 1, 2 and 17 from fuse
& relay box.
2) Check the condition of fuse.Is any fuse blown-out? Replace the fuse. Go to step 2.
2 CHECK POWER SUPPLY FOR BLOWER
MOTOR.
1) Turn the ignition switch to ON.
2) Turn the fan speed control dial clockwise.
3) Measure the voltage between blower motor
and chassis ground.
Connector & terminal
(B87) No. 1 (+) — Chassis ground (
−):Is the voltage more than 8 V (at
normal temperature)?Go to step 3.Repair the open
circuit of blower
motor power sup-
ply line harness.
3 CHECK BLOWER MOTOR RELAY.
1) Turn the ignition switch to OFF.
2) Remove the blower motor relay.
3) Connect the battery positive (+) terminal to
terminal No. 1 of blower motor relay, and nega-
tive (−) terminal to terminal No. 3.
4) Measure the resistance between terminals
No. 2 and 4.
Te r m i n a l s
No. 2 — No. 4:Is the resistance less than 1
Ω?Go to step 4.Replace the
blower motor relay.
4 CHECK BLOWER MOTOR.
1) Disconnect the connector from blower
motor.
2) Connect the battery positive (+) terminal to
terminal No. 1 of blower motor connector, and
negative (−) terminal to terminal No. 2 and No.
5.
3) Make sure the blower motor runs.Does the blower motor run? Go to step 5.Replace the
blower motor.
5 CHECK POOR CONTACT.
Check poor contact in auto A/C control module
connector.Is there poor contact in con-
nector?Repair the con-
nector.Replace the auto
A/C control mod-
ule.
Page 74 of 2870
AC-18
HVAC SYSTEM (AUTO A/C)(DIAGNOSTIC)
Diagnostics for A/C System Malfunction
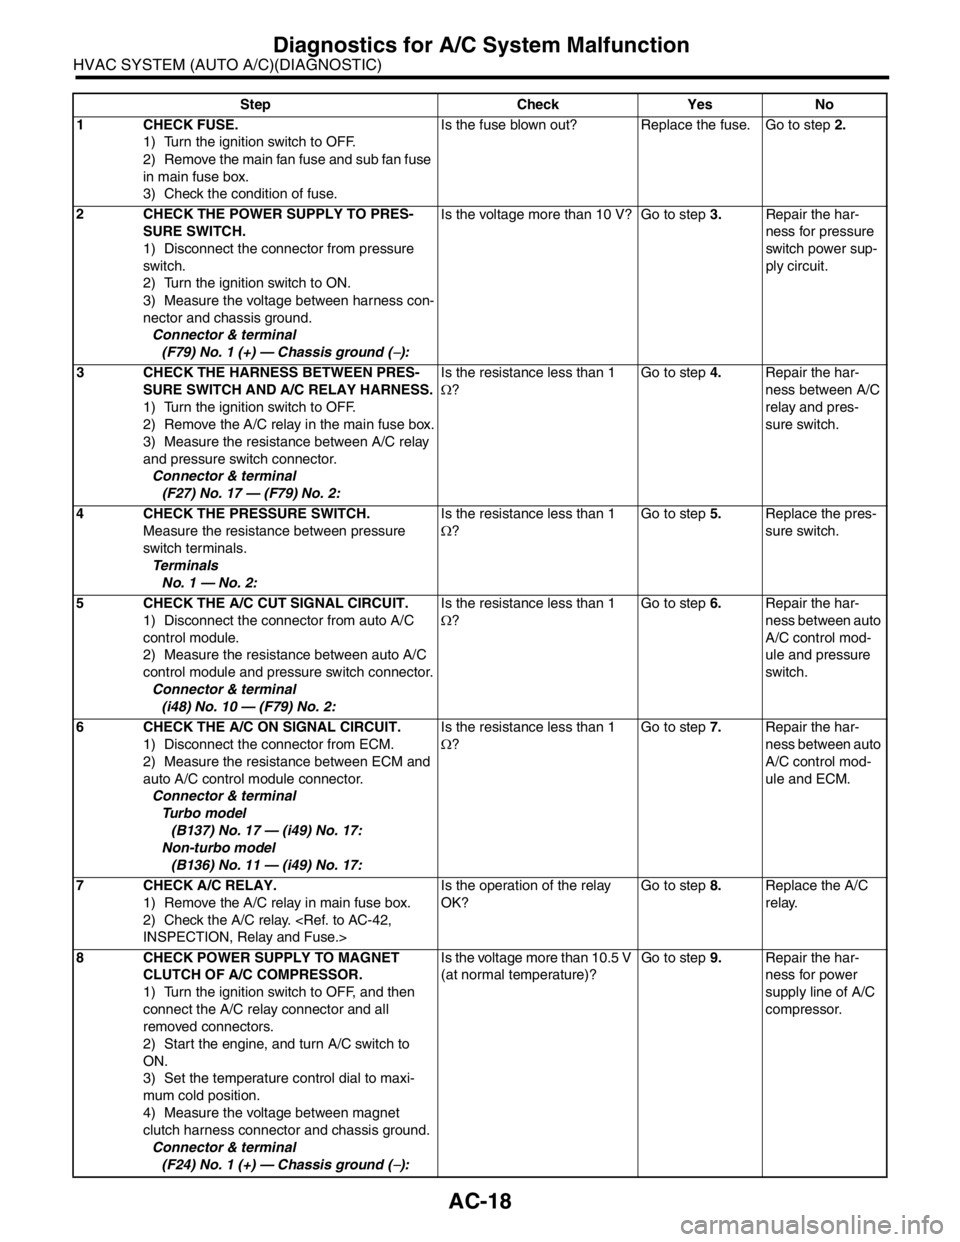
Step Check Yes No
1 CHECK FUSE.
1) Turn the ignition switch to OFF.
2) Remove the main fan fuse and sub fan fuse
in main fuse box.
3) Check the condition of fuse.Is the fuse blown out? Replace the fuse. Go to step 2.
2 CHECK THE POWER SUPPLY TO PRES-
SURE SWITCH.
1) Disconnect the connector from pressure
switch.
2) Turn the ignition switch to ON.
3) Measure the voltage between harness con-
nector and chassis ground.
Connector & terminal
(F79) No. 1 (+) — Chassis ground (
−):Is the voltage more than 10 V? Go to step 3.Repair the har-
ness for pressure
switch power sup-
ply circuit.
3 CHECK THE HARNESS BETWEEN PRES-
SURE SWITCH AND A/C RELAY HARNESS.
1) Turn the ignition switch to OFF.
2) Remove the A/C relay in the main fuse box.
3) Measure the resistance between A/C relay
and pressure switch connector.
Connector & terminal
(F27) No. 17 — (F79) No. 2:Is the resistance less than 1
Ω?Go to step 4.Repair the har-
ness between A/C
relay and pres-
sure switch.
4 CHECK THE PRESSURE SWITCH.
Measure the resistance between pressure
switch terminals.
Te r m i n a l s
No. 1 — No. 2:Is the resistance less than 1
Ω?Go to step 5.Replace the pres-
sure switch.
5 CHECK THE A/C CUT SIGNAL CIRCUIT.
1) Disconnect the connector from auto A/C
control module.
2) Measure the resistance between auto A/C
control module and pressure switch connector.
Connector & terminal
(i48) No. 10 — (F79) No. 2:Is the resistance less than 1
Ω?Go to step 6.Repair the har-
ness between auto
A/C control mod-
ule and pressure
switch.
6 CHECK THE A/C ON SIGNAL CIRCUIT.
1) Disconnect the connector from ECM.
2) Measure the resistance between ECM and
auto A/C control module connector.
Connector & terminal
Turbo model
(B137) No. 17 — (i49) No. 17:
Non-turbo model
(B136) No. 11 — (i49) No. 17:Is the resistance less than 1
Ω?Go to step 7.Repair the har-
ness between auto
A/C control mod-
ule and ECM.
7 CHECK A/C RELAY.
1) Remove the A/C relay in main fuse box.
2) Check the A/C relay.
OK?Go to step 8.Replace the A/C
relay.
8 CHECK POWER SUPPLY TO MAGNET
CLUTCH OF A/C COMPRESSOR.
1) Turn the ignition switch to OFF, and then
connect the A/C relay connector and all
removed connectors.
2) Start the engine, and turn A/C switch to
ON.
3) Set the temperature control dial to maxi-
mum cold position.
4) Measure the voltage between magnet
clutch harness connector and chassis ground.
Connector & terminal
(F24) No. 1 (+) — Chassis ground (
−):Is the voltage more than 10.5 V
(at normal temperature)?Go to step 9.Repair the har-
ness for power
supply line of A/C
compressor.
Page 172 of 2870
AB-40
AIRBAG SYSTEM (DIAGNOSTIC)
Airbag Warning Light Failure
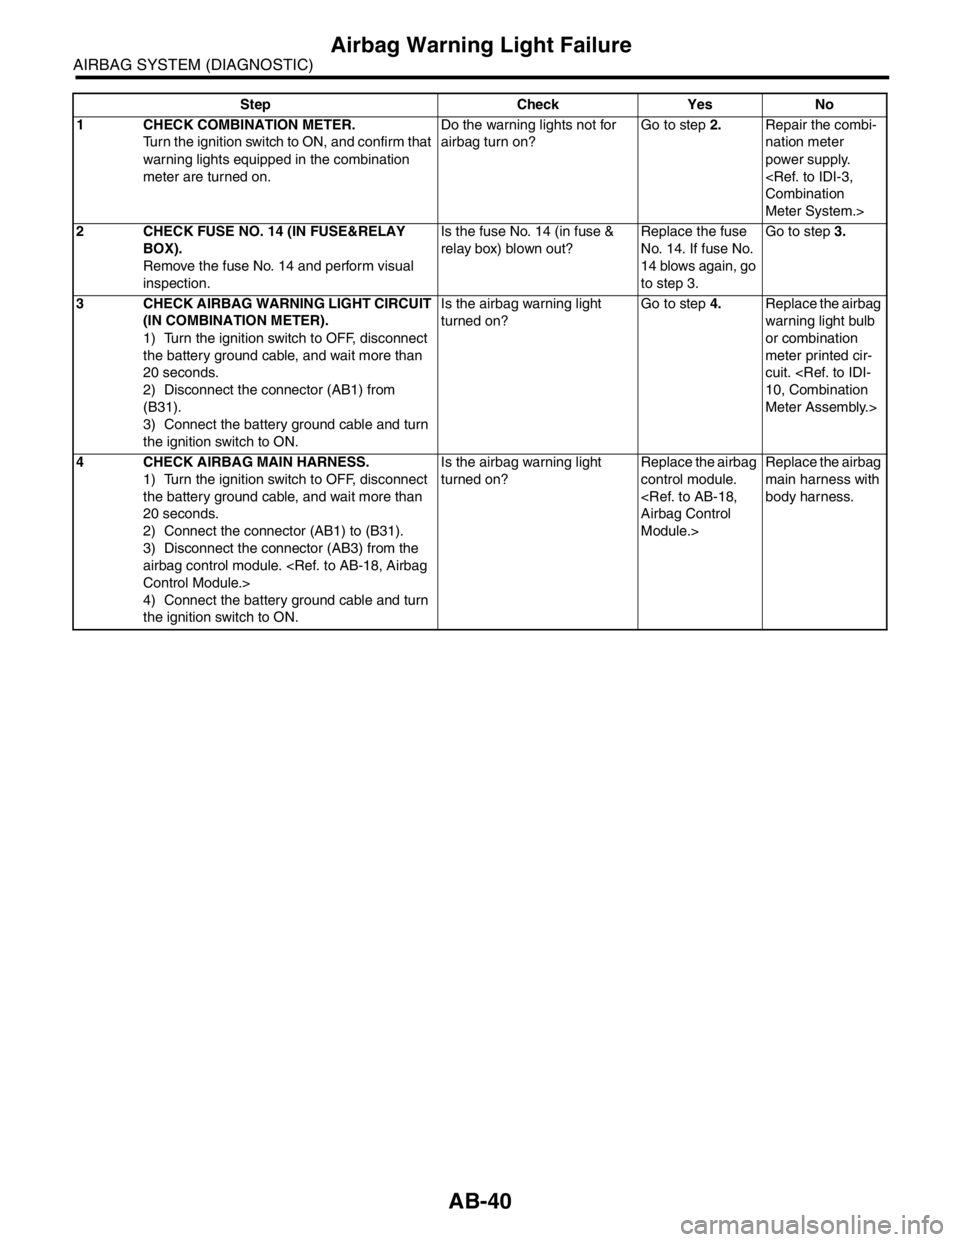
Step Check Yes No
1 CHECK COMBINATION METER.
Turn the ignition switch to ON, and confirm that
warning lights equipped in the combination
meter are turned on.Do the warning lights not for
airbag turn on?Go to step 2.Repair the combi-
nation meter
power supply.
Meter System.>
2 CHECK FUSE NO. 14 (IN FUSE&RELAY
BOX).
Remove the fuse No. 14 and perform visual
inspection.Is the fuse No. 14 (in fuse &
relay box) blown out? Replace the fuse
No. 14. If fuse No.
14 blows again, go
to step 3. Go to step 3.
3 CHECK AIRBAG WARNING LIGHT CIRCUIT
(IN COMBINATION METER).
1) Turn the ignition switch to OFF, disconnect
the battery ground cable, and wait more than
20 seconds.
2) Disconnect the connector (AB1) from
(B31).
3) Connect the battery ground cable and turn
the ignition switch to ON.Is the airbag warning light
turned on?Go to step 4.Replace the airbag
warning light bulb
or combination
meter printed cir-
cuit.
Meter Assembly.>
4 CHECK AIRBAG MAIN HARNESS.
1) Turn the ignition switch to OFF, disconnect
the battery ground cable, and wait more than
20 seconds.
2) Connect the connector (AB1) to (B31).
3) Disconnect the connector (AB3) from the
airbag control module.
4) Connect the battery ground cable and turn
the ignition switch to ON.Is the airbag warning light
turned on?Replace the airbag
control module.
Module.>Replace the airbag
main harness with
body harness.
Page 174 of 2870
AB-42
AIRBAG SYSTEM (DIAGNOSTIC)
Airbag Warning Light Failure
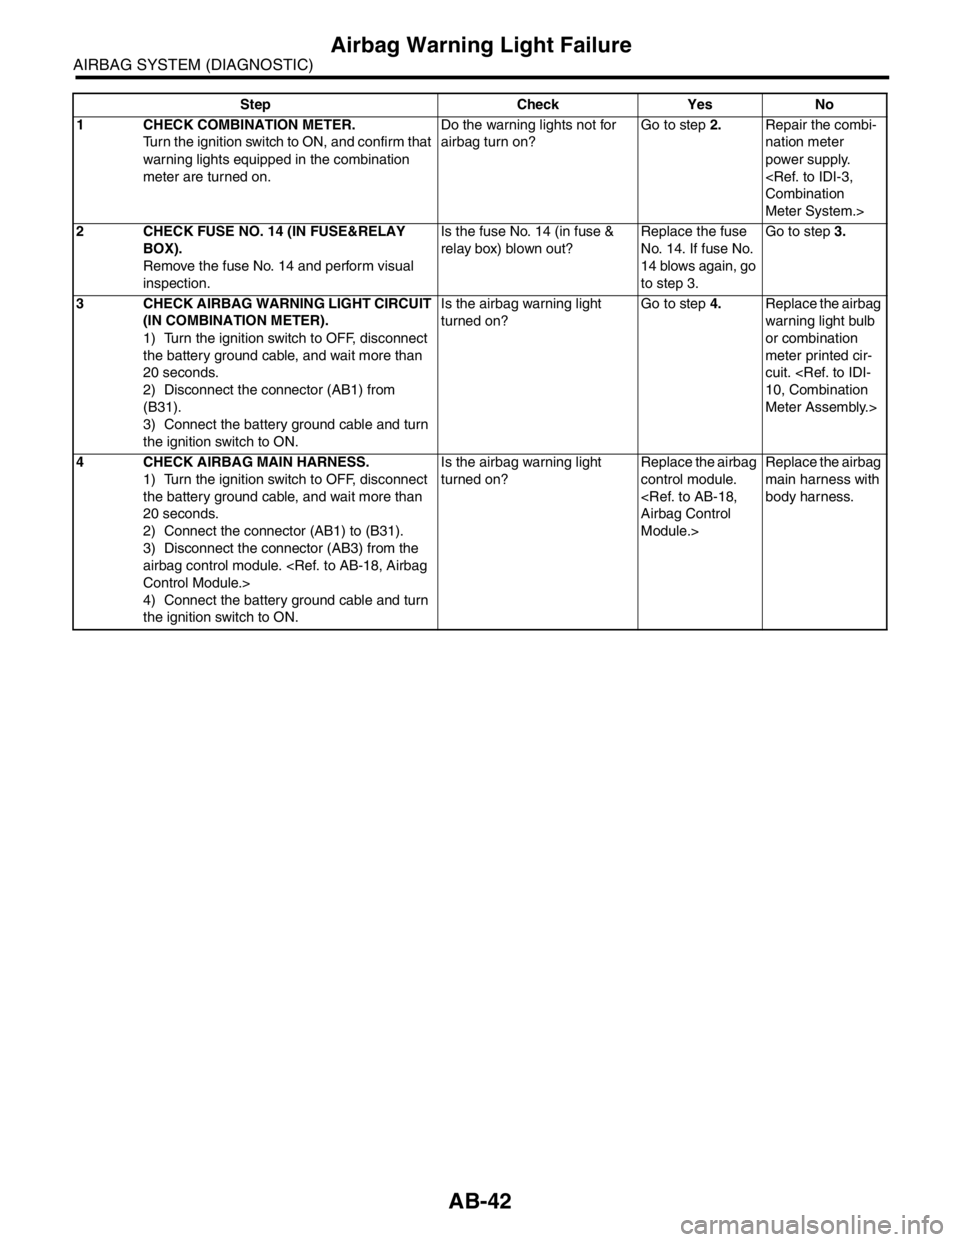
Step Check Yes No
1 CHECK COMBINATION METER.
Turn the ignition switch to ON, and confirm that
warning lights equipped in the combination
meter are turned on.Do the warning lights not for
airbag turn on?Go to step 2.Repair the combi-
nation meter
power supply.
Meter System.>
2 CHECK FUSE NO. 14 (IN FUSE&RELAY
BOX).
Remove the fuse No. 14 and perform visual
inspection.Is the fuse No. 14 (in fuse &
relay box) blown out?Replace the fuse
No. 14. If fuse No.
14 blows again, go
to step 3. Go to step 3.
3 CHECK AIRBAG WARNING LIGHT CIRCUIT
(IN COMBINATION METER).
1) Turn the ignition switch to OFF, disconnect
the battery ground cable, and wait more than
20 seconds.
2) Disconnect the connector (AB1) from
(B31).
3) Connect the battery ground cable and turn
the ignition switch to ON.Is the airbag warning light
turned on?Go to step 4.Replace the airbag
warning light bulb
or combination
meter printed cir-
cuit.
Meter Assembly.>
4 CHECK AIRBAG MAIN HARNESS.
1) Turn the ignition switch to OFF, disconnect
the battery ground cable, and wait more than
20 seconds.
2) Connect the connector (AB1) to (B31).
3) Disconnect the connector (AB3) from the
airbag control module.
4) Connect the battery ground cable and turn
the ignition switch to ON.Is the airbag warning light
turned on?Replace the airbag
control module.
Module.>Replace the airbag
main harness with
body harness.
Page 190 of 2870

AB-58
AIRBAG SYSTEM (DIAGNOSTIC)
Diagnostic Procedure with Diagnostic Trouble Code (DTC)
H: DTC 24
DIAGNOSIS:
Airbag control module is faulty.
Airbag main harness circuit is open.
Fuse No. 11 (in fuse and relay box) is blown.
Body harness circuit is open.
CAUTION:
Before diagnosing the airbag system, be sure to turn the ignition switch to OFF, disconnect the
ground cable from battery, and wait more than 20 seconds before starting to work.
After replacing the airbag module, seat belt pretensioner, roll connector, control module or sensor,
reconnect each part and confirm that the airbag warning light operates properly.
When inspecting the airbag main harness, disconnect the driver’s airbag module and passenger’s
airbag module connectors for safety reasons.
1. LHD MODEL
WIRING DIAGRAM:
AB-00623
AB3
AIRBAG CONTROL MODULEAB3
B31
AB1
AB1
1
6
BATTERY
IG SW
NO.11
B31
12
34561
23 45 61234567891011121314151617
1819202122232425262728
Page 191 of 2870
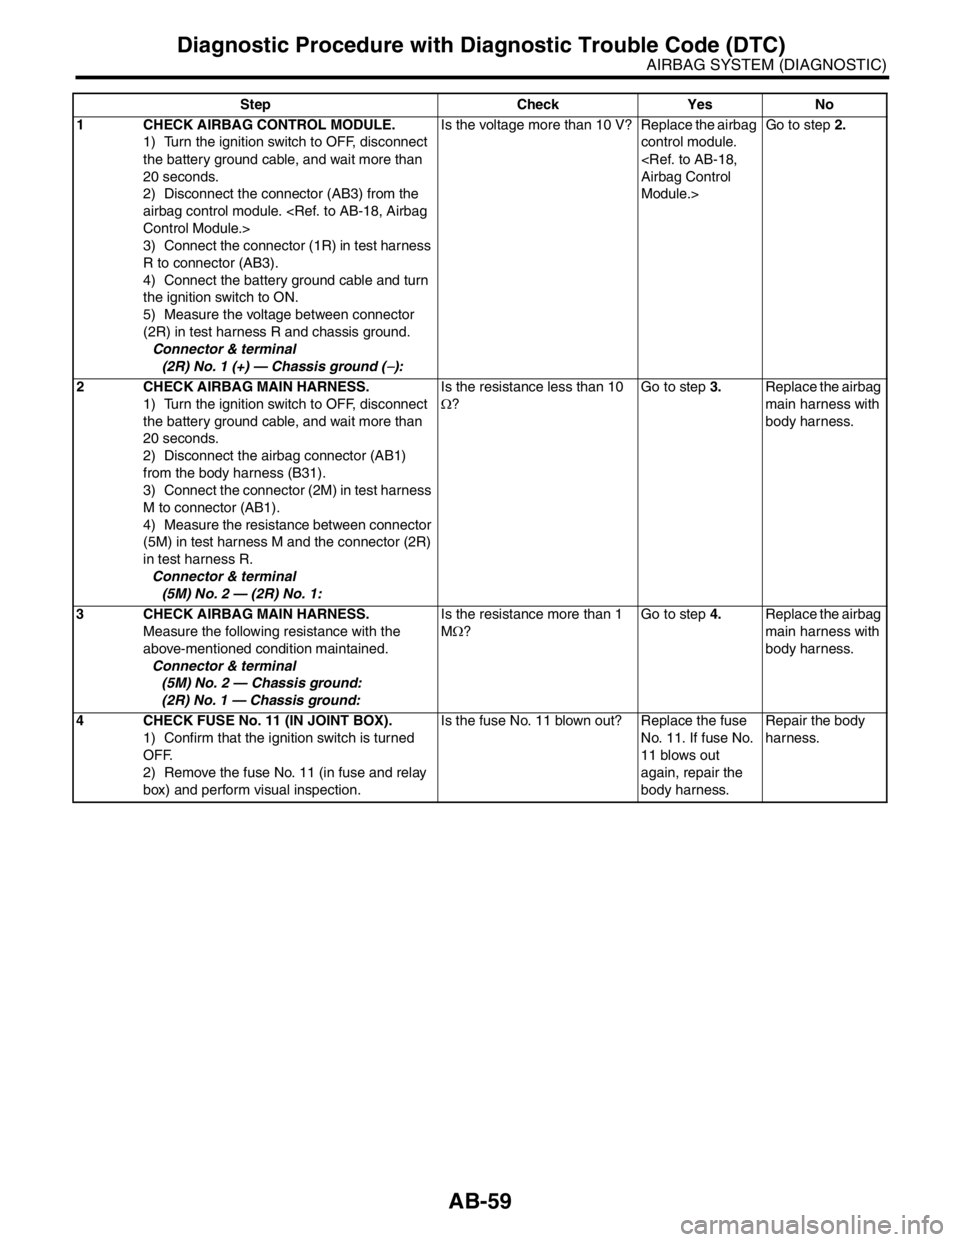
AB-59
AIRBAG SYSTEM (DIAGNOSTIC)
Diagnostic Procedure with Diagnostic Trouble Code (DTC)
Step Check Yes No
1 CHECK AIRBAG CONTROL MODULE.
1) Turn the ignition switch to OFF, disconnect
the battery ground cable, and wait more than
20 seconds.
2) Disconnect the connector (AB3) from the
airbag control module.
3) Connect the connector (1R) in test harness
R to connector (AB3).
4) Connect the battery ground cable and turn
the ignition switch to ON.
5) Measure the voltage between connector
(2R) in test harness R and chassis ground.
Connector & terminal
(2R) No. 1 (+) — Chassis ground (
−): Is the voltage more than 10 V? Replace the airbag
control module.
Module.>Go to step 2.
2 CHECK AIRBAG MAIN HARNESS.
1) Turn the ignition switch to OFF, disconnect
the battery ground cable, and wait more than
20 seconds.
2) Disconnect the airbag connector (AB1)
from the body harness (B31).
3) Connect the connector (2M) in test harness
M to connector (AB1).
4) Measure the resistance between connector
(5M) in test harness M and the connector (2R)
in test harness R.
Connector & terminal
(5M) No. 2 — (2R) No. 1: Is the resistance less than 10
Ω?Go to step 3.Replace the airbag
main harness with
body harness.
3 CHECK AIRBAG MAIN HARNESS.
Measure the following resistance with the
above-mentioned condition maintained.
Connector & terminal
(5M) No. 2 — Chassis ground:
(2R) No. 1 — Chassis ground:Is the resistance more than 1
MΩ?Go to step 4.Replace the airbag
main harness with
body harness.
4 CHECK FUSE No. 11 (IN JOINT BOX).
1) Confirm that the ignition switch is turned
OFF.
2) Remove the fuse No. 11 (in fuse and relay
box) and perform visual inspection.Is the fuse No. 11 blown out? Replace the fuse
No. 11. If fuse No.
11 blows out
again, repair the
body harness. Repair the body
harness.