2004 SUBARU FORESTER sensor
[x] Cancel search: sensorPage 2163 of 2870

EN(H4DOTC 2.5)-139
ENGINE (DIAGNOSTIC)
Diagnostic Procedure with Diagnostic Trouble Code (DTC)
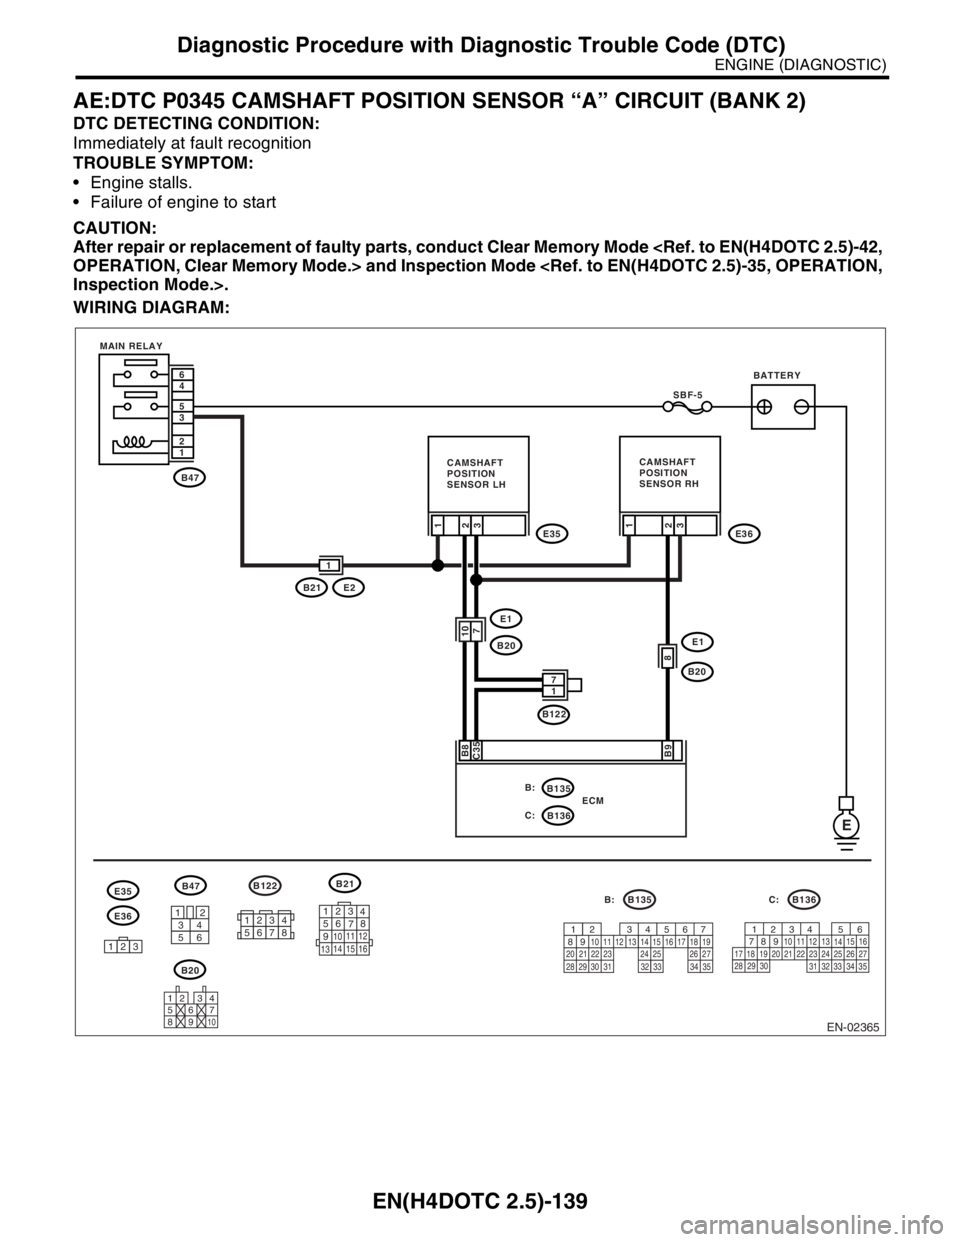
AE:DTC P0345 CAMSHAFT POSITION SENSOR “A” CIRCUIT (BANK 2)
DTC DETECTING CONDITION:
Immediately at fault recognition
TROUBLE SYMPTOM:
Engine stalls.
Failure of engine to start
CAUTION:
After repair or replacement of faulty parts, conduct Clear Memory Mode
WIRING DIAGRAM:
EN-02365
B47 1 2 3 5 4 6
E
E1
B20
B8
3 C35
SBF-5
E35
E1
B20
2E36
B21E2
1
107
3
B9
7
1
B122
2 1
ECM
B136B135 B:
C:
1
8
3412
56
123
4
56
78
9
1011 12
1314 15 16
B21
E36
B47
123
12 34
567
89
10
B20
B136
56
782 1
94 3
10
24 22 23 2511 12 13
1415
26 27
2816
17 18 19 20 21
33 34 29
32 30
31 35
B135
567
82 1
94 3
10
24 22 23 2511 12 13 14 15
26 27
2816 17 18 19
20 21
29 30 31 32 33 34 35
E35
B:C:
MAIN RELAY
BATTERY
CAMSHAFT
POSITION
SENSOR LHCAMSHAFT
POSITION
SENSOR RH
B122
12345678
Page 2164 of 2870

EN(H4DOTC 2.5)-140
ENGINE (DIAGNOSTIC)
Diagnostic Procedure with Diagnostic Trouble Code (DTC)
Step Check Yes No
1 CHECK POWER SUPPLY OF CAMSHAFT
POSITION SENSOR.
1) Turn the ignition switch to OFF.
2) Disconnect the connector from camshaft
position sensor.
3) Measure the voltage between camshaft
position sensor and engine ground.
Connector & terminal
(E35) No. 1 (+) — Engine ground (
−):Is the voltage more than 10 V? Repair the battery
short circuit
between main relay
connector and cam-
shaft position sen-
sor connector.Go to step 2.
2 CHECK POWER SUPPLY OF CAMSHAFT
POSITION SENSOR.
1) Turn the ignition switch to ON.
2) Measure the voltage between camshaft
position sensor and engine ground.
Connector & terminal
(E35) No. 1 (+) — Engine ground (
−):Is the voltage more than 10 V? Go to step 3.Repair open or
battery short cir-
cuit between main
relay connector
and camshaft
position sensor
connector.
3 CHECK HARNESS BETWEEN CAMSHAFT
POSITION SENSOR AND ECM.
1) Turn the ignition switch to OFF.
2) Disconnect the connector from ECM.
3) Measure the resistance between camshaft
position sensor and ECM.
Connector & terminal
(E35) No. 2 — (B135) No. 8:
(E35) No. 3 — (B136) No. 35:Is the resistance less than 1 Ω? Go to step 4.Repair open circuit
between camshaft
position sensor
and ECM.
4 CHECK HARNESS BETWEEN CAMSHAFT
POSITION SENSOR AND ECM.
Measure the resistance between camshaft
position sensor and engine ground.
Connector & terminal
(E35) No. 2 — Engine ground:
(E35) No. 3 — Engine ground:Is the resistance more than 1
MΩ?Go to step 5.Repair ground short
circuit between
camshaft position
sensor and ECM.
5 CHECK CONDITION OF CAMSHAFT POSI-
TION SENSOR.Is the camshaft position sensor
installation bolt tightened
securely?Go to step 6.Tighten the cam-
shaft position sen-
sor installation bolt
securely.
6 CHECK CAMSHAFT POSITION SENSOR.
Check waveform of camshaft position sensor.
waveform?Replace the cam-
shaft position sen-
sor.
28, Camshaft
Position Sensor.>Go to step 7.
7 CHECK POOR CONTACT.
Check poor contact in ECM connector.Is there poor contact in ECM
connector?Repair the poor
contact in ECM
connector.Replace the ECM.
41, Engine Con-
trol Module
(ECM).>
Page 2169 of 2870

EN(H4DOTC 2.5)-145
ENGINE (DIAGNOSTIC)
Diagnostic Procedure with Diagnostic Trouble Code (DTC)
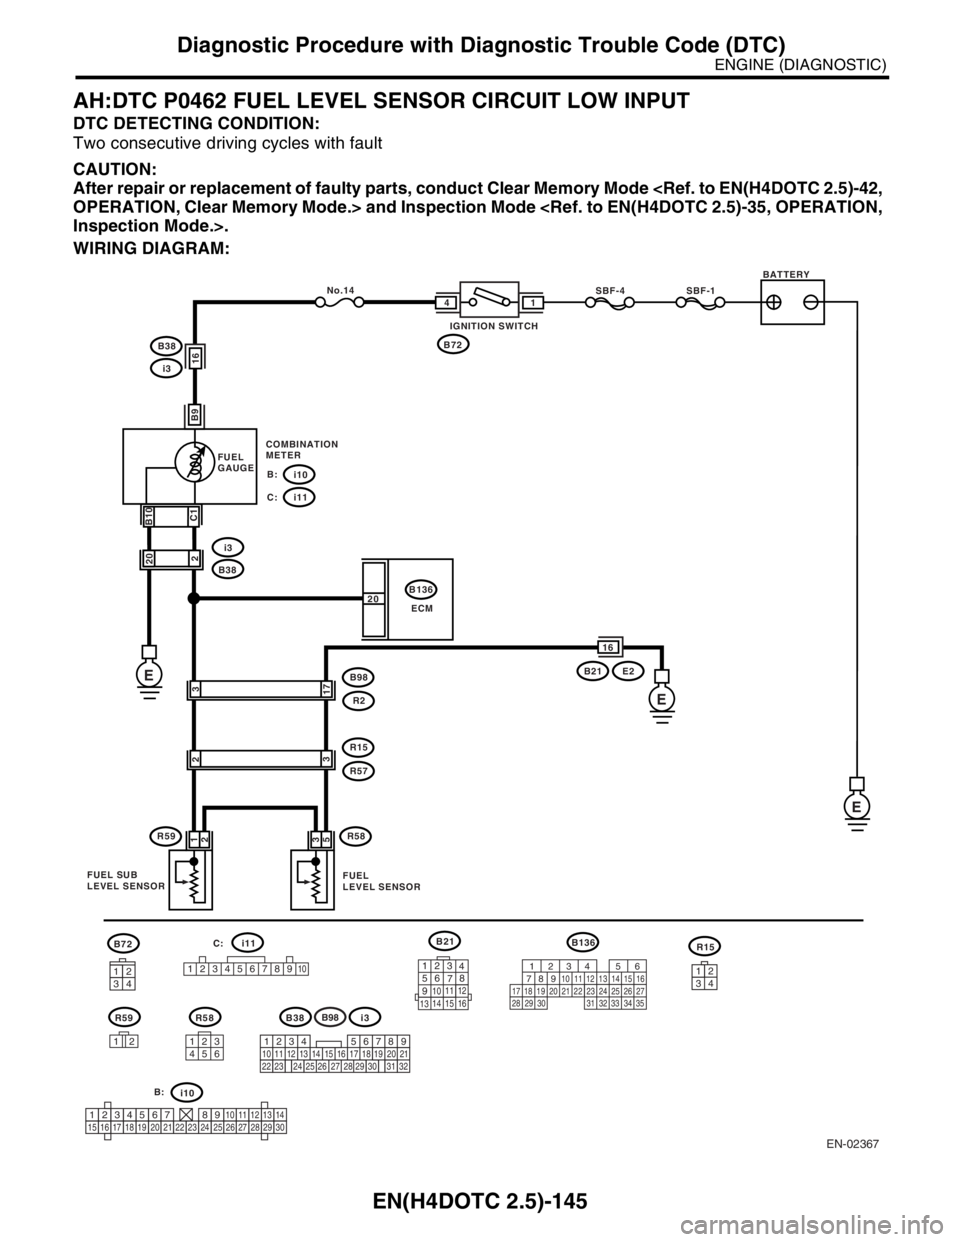
AH:DTC P0462 FUEL LEVEL SENSOR CIRCUIT LOW INPUT
DTC DETECTING CONDITION:
Two consecutive driving cycles with fault
CAUTION:
After repair or replacement of faulty parts, conduct Clear Memory Mode
WIRING DIAGRAM:
EN-02367
B72
R59 R58B21
B136
i11
1
2345678910
R15 B136
ECM No.14
i10
B38
B21 E2
B98
R2 i3 B38
i3
E E E
FUEL
GAUGE
B:
i11 C: SBF-4 SBF-1
B721 4
B9 B10
C1
3
17
R15
R59R572 1
2
R583
53
16 20
12 1 3
4562123
4
56
78
9
1011 12
1314 15 16
C:
56
782 1
94 310
24 22 23 2511 12 13
1415
26 27
2816
17 18 19 20 21
33 34 29
32 30
31 35
2 20
16
BATTERY
IGNITION SWITCH
COMBINATION
METER
FUEL SUB
LEVEL SENSORFUEL
LEVEL SENSOR
3412
123456789101112131415161718192021222324252627282930
i10 B:
B38i3
3412
B98
219
32
1234
5610 11 12 13 14 15716
23 3019 20
22 26 27 28 29817
24 3118
25
Page 2170 of 2870

EN(H4DOTC 2.5)-146
ENGINE (DIAGNOSTIC)
Diagnostic Procedure with Diagnostic Trouble Code (DTC)
Step Check Yes No
1 CHECK SPEEDOMETER AND TACHOME-
TER OPERATION IN COMBINATION
METER.Does the speedometer and
tachometer operate normally?Go to step 2.Repair or replace
the combination
meter.
Meter System.>
2 CHECK INPUT SIGNAL FROM ECM.
1) Turn the ignition switch to ON. (engine
OFF)
2) Measure the voltage between ECM con-
nector and chassis ground.
Connector & terminal
(B136) No. 20 (+) — Chassis ground (
−):Is the voltage less than 0.12
V?Go to step 4.Go to step 3.
3 CHECK INPUT SIGNAL FOR ECM WITH
SUBARU SELECT MONITOR.
Read the data of fuel level sensor signal using
Subaru Select Monitor.
N
OTE:
Subaru Select Monitor
For detailed operation procedure, refer to
“READ CURRENT DATA SHOWN ON DIS-
PLAY FOR ENGINE”.
shaking the ECM harness and
connector?Repair the poor
contact in ECM
connector.Even if the mal-
function indicator
light illuminates,
the circuit has
returned to a nor-
mal condition at
this time. A tempo-
rary poor contact
of the connector
may be the cause.
NOTE:
In this case repair
the following:
Poor contact in
combination meter
connector
Poor contact in
ECM connector.
Poor contact in
coupling connector
4 CHECK INPUT VOLTAGE OF ECM.
1) Turn the ignition switch to OFF.
2) Separate fuel tank cord connector (R57)
and rear wiring harness connector (R15).
3) Turn the ignition switch to ON.
4) Measure the voltage of harness between
ECM connector and chassis ground.
Connector & terminal
(B136) No. 20 (+) — Chassis ground (
−):Is the voltage more than 0.12
V?Go to step 5.Go to step 6.
5 CHECK HARNESS BETWEEN ECM AND
COMBINATION METER.
1) Turn the ignition switch to OFF.
2) Disconnect the connector from connector
(i10), (i11) and ECM connector.
3) Measure the resistance between ECM and
chassis ground.
Connector & terminal
(B136) No. 20 — Chassis ground:Is the resistance
more than 1 MΩ?Go to step 7.Repair the ground
short in harness
between ECM and
combination meter
connector.
6 CHECK HARNESS BETWEEN ECM AND
COMBINATION METER.
Measure the resistance between ECM and
combination meter connector.
Connector & terminal
(B136) No. 20 — (i11) No. 1:Is the resistance less than 10
Ω?Repair or replace
the combination
meter.
Meter System.>Repair open circuit
between ECM and
combination meter
connector.
NOTE:
In this case repair
the following:
Poor contact in
coupling connector
Page 2171 of 2870

EN(H4DOTC 2.5)-147
ENGINE (DIAGNOSTIC)
Diagnostic Procedure with Diagnostic Trouble Code (DTC)
7 CHECK FUEL TANK CORD.
1) Turn the ignition switch to OFF.
2) Disconnect the connector from fuel sub
level sensor.
3) Measure the resistance between fuel sub
level sensor and chassis ground.
Connector & terminal
(R59) No. 1 — Chassis ground:Is the resistance more than 1
MΩ?Go to step 8.Repair ground
short circuit in fuel
tank cord.
8 CHECK FUEL TANK CORD.
1) Disconnect the connector from fuel pump
assembly.
2) Measure the resistance between fuel pump
assembly and chassis ground.
Connector & terminal
(R59) No. 2 — Chassis ground:Is the resistance more than 1
MΩ?Go to step 9.Repair ground
short circuit in fuel
tank cord.
9 CHECK FUEL LEVEL SENSOR.
1) Remove the fuel pump assembly.
2) Measure the resistance between fuel level
sensor and terminals with its float set to the full
position.
Te r m i n a l s
No. 2 — No. 3:Is the resistance 0.5 — 2.5 Ω? Go to step 10.Replace the fuel
level sensor.
10 CHECK FUEL SUB LEVEL SENSOR.
1) Remove the fuel sub level sensor.
2) Measure the resistance between fuel sub
level sensor and terminals with its float set to
the full position.
Te r m i n a l s
No. 1 — No. 2:Is the resistance 0.5 — 2.5 Ω? Repair poor con-
tact in harness
between ECM and
combination meter
connector.Replace the fuel
sub level sensor. Step Check Yes No
Page 2172 of 2870

EN(H4DOTC 2.5)-148
ENGINE (DIAGNOSTIC)
Diagnostic Procedure with Diagnostic Trouble Code (DTC)
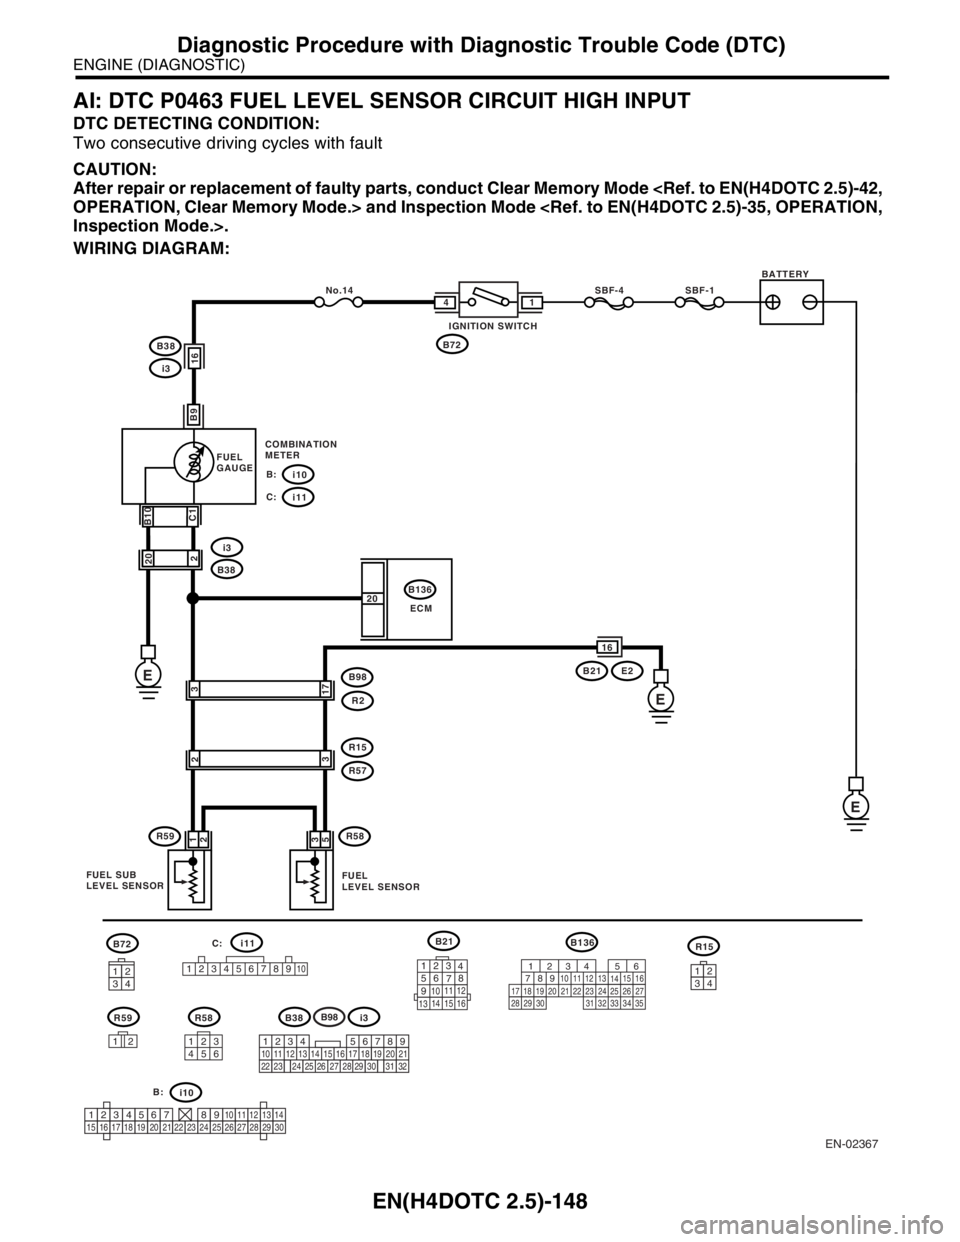
AI: DTC P0463 FUEL LEVEL SENSOR CIRCUIT HIGH INPUT
DTC DETECTING CONDITION:
Two consecutive driving cycles with fault
CAUTION:
After repair or replacement of faulty parts, conduct Clear Memory Mode
WIRING DIAGRAM:
EN-02367
B72
R59 R58B21
B136
i11
1
2345678910
R15 B136
ECM No.14
i10
B38
B21 E2
B98
R2 i3 B38
i3
E E E
FUEL
GAUGE
B:
i11 C: SBF-4 SBF-1
B721 4
B9 B10
C1
3
17
R15
R59R572 1
2
R583
53
16 20
12 1 3
4562123
4
56
78
9
1011 12
1314 15 16
C:
56
782 1
94 310
24 22 23 2511 12 13
1415
26 27
2816
17 18 19 20 21
33 34 29
32 30
31 35
2 20
16
BATTERY
IGNITION SWITCH
COMBINATION
METER
FUEL SUB
LEVEL SENSORFUEL
LEVEL SENSOR
3412
123456789101112131415161718192021222324252627282930
i10 B:
B38i3
3412
B98
219
32
1234
5610 11 12 13 14 15716
23 3019 20
22 26 27 28 29817
24 3118
25
Page 2173 of 2870

EN(H4DOTC 2.5)-149
ENGINE (DIAGNOSTIC)
Diagnostic Procedure with Diagnostic Trouble Code (DTC)
Step Check Yes No
1 CHECK SPEEDOMETER AND TACHOME-
TER OPERATION IN COMBINATION
METER.Does the speedometer and
tachometer operate normally?Go to step 2.Repair or replace
the combination
meter.
Meter System.>
2 CHECK INPUT SIGNAL FROM ECM.
1) Turn the ignition switch to ON. (engine OFF)
2) Measure the voltage between ECM con-
nector and chassis ground.
Connector & terminal
(B136) No. 20 (+) — Chassis ground (
−):Is the voltage more than 4.75
V?Go to step 3.Even if the malfunc-
tion indicator light
illuminates, the cir-
cuit has returned to
a normal condition
at this time. A tem-
porary poor contact
of the connector
may be the cause.
N
OTE:
In this case repair
the following:
Poor contact in
fuel pump connec-
tor
Poor contact in
coupling connector
3 CHECK INPUT VOLTAGE OF ECM.
1) Turn the ignition switch to OFF.
2) Disconnect the combination meter connec-
tor (i11) and ECM connector.
3) Turn the ignition switch to ON.
4) Measure the voltage of harness between
ECM and chassis ground.
Connector & terminal
(B136) No. 20 (+) — Chassis ground (
−):Is the voltage more than 4.75
V?Go to step 4.Repair battery
short circuit
between ECM and
combination meter
connector.
4 CHECK HARNESS BETWEEN ECM AND
FUEL TANK CORD.
1) Turn the ignition switch to OFF.
2) Separate fuel tank cord connector (R57)
and rear wiring harness connector (R15).
3) Measure the resistance between ECM and
fuel tank cord.
Connector & terminal
(B136) No. 20 — (R15) No. 7:Is the resistance less than 5
Ω?Go to step 5.Repair open circuit
between ECM and
fuel tank cord.
5 CHECK HARNESS BETWEEN FUEL TANK
CORD AND CHASSIS GROUND.
Measure the resistance between fuel tank cord
and chassis ground.
Connector & terminal
(R15) No. 3 — Chassis ground:Is the resistance less than 5
Ω?Go to step 6.Repair open circuit
between fuel tank
cord and chassis
ground.
N
OTE:
In this case repair
the following:
Poor contact in
coupling connector
6 CHECK FUEL TANK CORD.
1) Disconnect the connector from fuel level
sensor.
2) Measure the resistance between fuel level
sensor and coupler connector.
Connector & terminal
(R57) No. 3 — (R58) No. 5:Is the resistance less than 10
Ω?Go to step 7.Repair open circuit
between coupling
connector and fuel
level sensor.
Page 2174 of 2870

EN(H4DOTC 2.5)-150
ENGINE (DIAGNOSTIC)
Diagnostic Procedure with Diagnostic Trouble Code (DTC)
7 CHECK FUEL TANK CORD.
1) Disconnect the connector from fuel sub
level sensor.
2) Measure the resistance between fuel level
sensor and fuel sub level sensor.
Connector & terminal
(R58) No. 3 — (R59) No. 2:Is the resistance less than 10
Ω?Go to step 8.Repair open circuit
between fuel level
sensor and fuel
sub level sensor.
8 CHECK FUEL TANK CORD.
Measure the resistance between fuel sub level
sensor and coupler connector.
Connector & terminal
(R57) No. 2 — (R59) No. 1:Is the resistance less than 10
Ω?Go to step 9.Repair open circuit
between coupling
connector and fuel
sub level sensor.
9 CHECK FUEL LEVEL SENSOR.
1) Remove the fuel pump assembly.
2) While moving the fuel level sensor float up
and down, measure resistance between fuel
level sensor terminals.
Te r m i n a l s
No. 2 — No. 3:Is the resistance more than 53
Ω?Replace the fuel
level sensor.
2.5)-54, Fuel Level
Sensor.>Go to step 10.
10 CHECK FUEL SUB LEVEL SENSOR.
1) Remove the fuel sub level sensor.
2) While moving the fuel sub level sensor float
up and down, measure resistance between
fuel sub level sensor terminals.
Te r m i n a l s
No. 1 — No. 2:Is the resistance more than 45
Ω?Replace the fuel
sub level sensor.
55, Fuel Sub Level
Sensor.>Replace the com-
bination meter.
Meter Assembly.> Step Check Yes No