2004 SUBARU FORESTER meter
[x] Cancel search: meterPage 1495 of 2870
ME(H4DOTC)-39
MECHANICAL
Valve Clearance
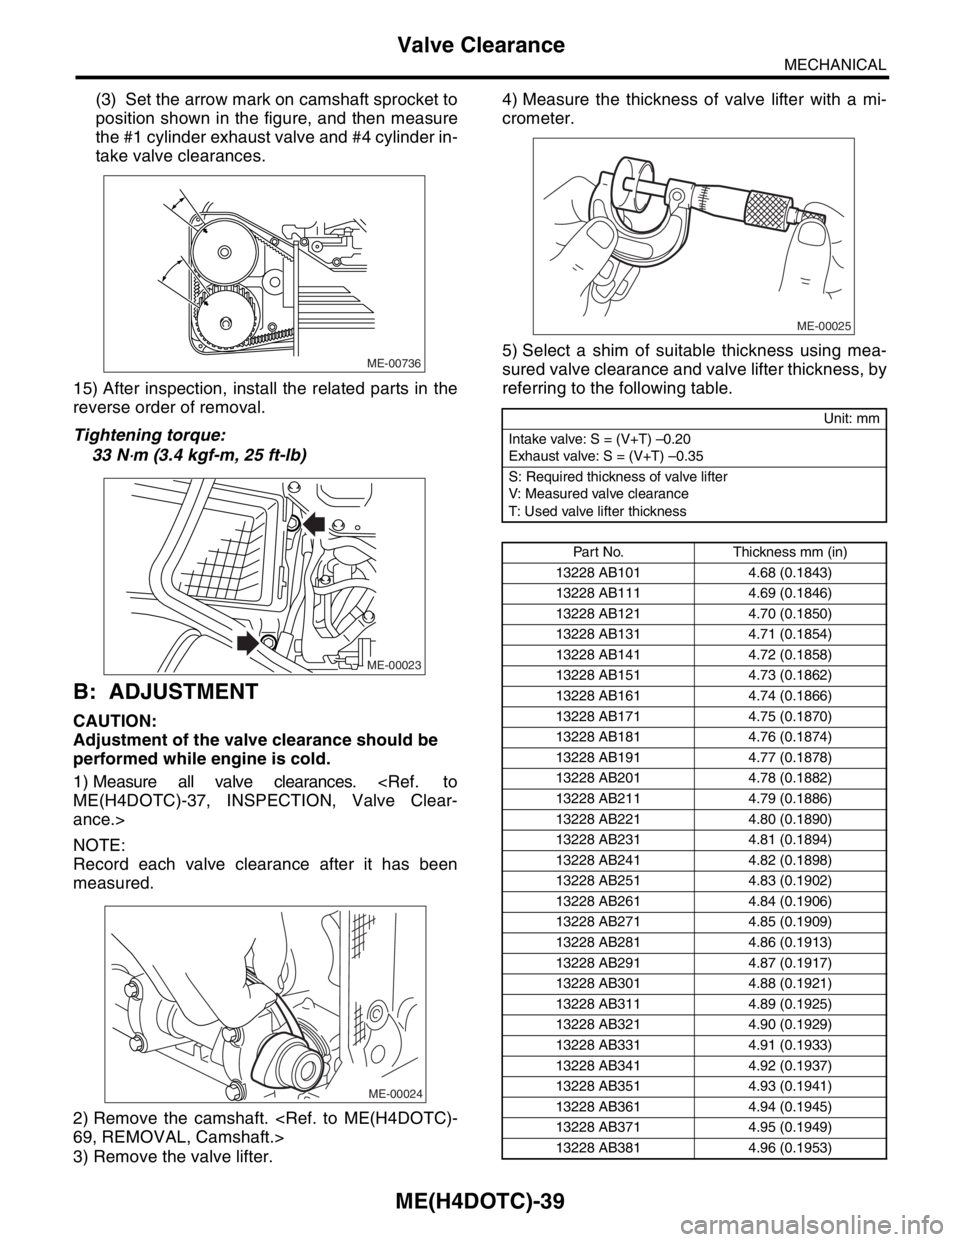
(3) Set the arrow mark on camshaft sprocket to
position shown in the figure, and then measure
the #1 cylinder exhaust valve and #4 cylinder in-
take valve clearances.
15) After inspection, install the related parts in the
reverse order of removal.
Tightening torque:
33 N
⋅m (3.4 kgf-m, 25 ft-lb)
B: ADJUSTMENT
CAUTION:
Adjustment of the valve clearance should be
performed while engine is cold.
1) Measure all valve clearances.
ance.>
NOTE:
Record each valve clearance after it has been
measured.
2) Remove the camshaft.
3) Remove the valve lifter.4) Measure the thickness of valve lifter with a mi-
crometer.
5) Select a shim of suitable thickness using mea-
sured valve clearance and valve lifter thickness, by
referring to the following table.
ME-00736
ME-00023
ME-00024
Unit: mm
Intake valve: S = (V+T) –0.20
Exhaust valve: S = (V+T) –0.35
S: Required thickness of valve lifter
V: Measured valve clearance
T: Used valve lifter thickness
Part No. Thickness mm (in)
13228 AB101 4.68 (0.1843)
13228 AB111 4.69 (0.1846)
13228 AB121 4.70 (0.1850)
13228 AB131 4.71 (0.1854)
13228 AB141 4.72 (0.1858)
13228 AB151 4.73 (0.1862)
13228 AB161 4.74 (0.1866)
13228 AB171 4.75 (0.1870)
13228 AB181 4.76 (0.1874)
13228 AB191 4.77 (0.1878)
13228 AB201 4.78 (0.1882)
13228 AB211 4.79 (0.1886)
13228 AB221 4.80 (0.1890)
13228 AB231 4.81 (0.1894)
13228 AB241 4.82 (0.1898)
13228 AB251 4.83 (0.1902)
13228 AB261 4.84 (0.1906)
13228 AB271 4.85 (0.1909)
13228 AB281 4.86 (0.1913)
13228 AB291 4.87 (0.1917)
13228 AB301 4.88 (0.1921)
13228 AB311 4.89 (0.1925)
13228 AB321 4.90 (0.1929)
13228 AB331 4.91 (0.1933)
13228 AB341 4.92 (0.1937)
13228 AB351 4.93 (0.1941)
13228 AB361 4.94 (0.1945)
13228 AB371 4.95 (0.1949)
13228 AB381 4.96 (0.1953)
ME-00025
Page 1531 of 2870
ME(H4DOTC)-73
MECHANICAL
Camshaft
C: INSPECTION
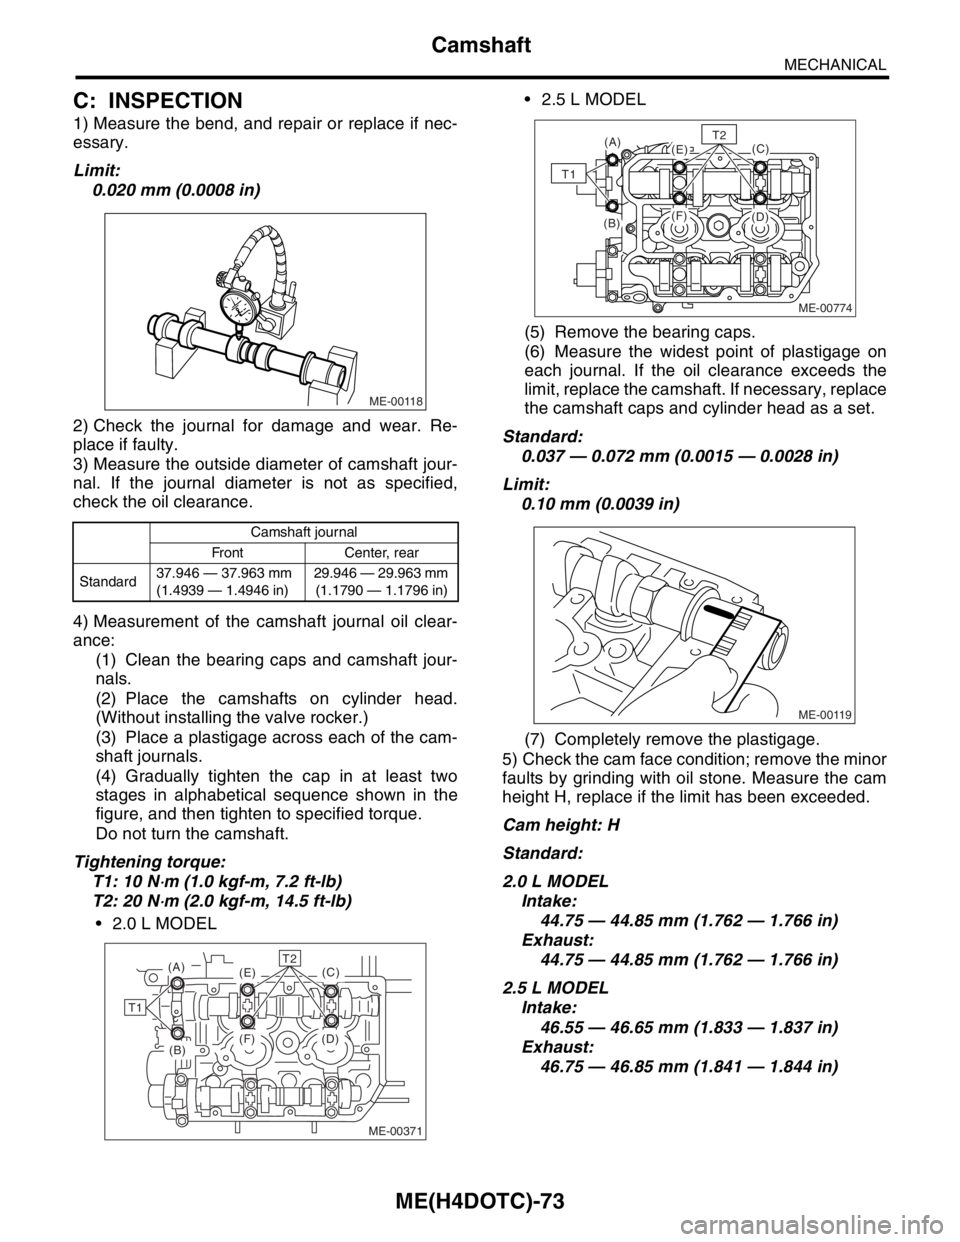
1) Measure the bend, and repair or replace if nec-
essary.
Limit:
0.020 mm (0.0008 in)
2) Check the journal for damage and wear. Re-
place if faulty.
3) Measure the outside diameter of camshaft jour-
nal. If the journal diameter is not as specified,
check the oil clearance.
4) Measurement of the camshaft journal oil clear-
ance:
(1) Clean the bearing caps and camshaft jour-
nals.
(2) Place the camshafts on cylinder head.
(Without installing the valve rocker.)
(3) Place a plastigage across each of the cam-
shaft journals.
(4) Gradually tighten the cap in at least two
stages in alphabetical sequence shown in the
figure, and then tighten to specified torque.
Do not turn the camshaft.
Tightening torque:
T1: 10 N
⋅m (1.0 kgf-m, 7.2 ft-lb)
T2: 20 N
⋅m (2.0 kgf-m, 14.5 ft-lb)
2.0 L MODEL 2.5 L MODEL
(5) Remove the bearing caps.
(6) Measure the widest point of plastigage on
each journal. If the oil clearance exceeds the
limit, replace the camshaft. If necessary, replace
the camshaft caps and cylinder head as a set.
Standard:
0.037 — 0.072 mm (0.0015 — 0.0028 in)
Limit:
0.10 mm (0.0039 in)
(7) Completely remove the plastigage.
5) Check the cam face condition; remove the minor
faults by grinding with oil stone. Measure the cam
height H, replace if the limit has been exceeded.
Cam height: H
Standard:
2.0 L MODEL
Intake:
44.75 — 44.85 mm (1.762 — 1.766 in)
Exhaust:
44.75 — 44.85 mm (1.762 — 1.766 in)
2.5 L MODEL
Intake:
46.55 — 46.65 mm (1.833 — 1.837 in)
Exhaust:
46.75 — 46.85 mm (1.841 — 1.844 in)
Camshaft journal
Front Center, rear
Standard37.946 — 37.963 mm
(1.4939 — 1.4946 in)29.946 — 29.963 mm
(1.1790 — 1.1796 in)
ME-00118
ME-00371
(F) (D)(C)
T1
T2(A)(E)
(B)
ME-00774
(A)(E)
(F)(B)(D)
(C)T2
T1
ME-00119
Page 1532 of 2870
ME(H4DOTC)-74
MECHANICAL
Camshaft
Limit:
2.0 L MODEL
Intake:
44.65 mm (1.758 in)
Exhaust:
44.65 mm (1.758 in)
2.5 L MODEL
Intake:
46.45 mm (1.829 in)
Exhaust:
46.65 mm (1.837 in)
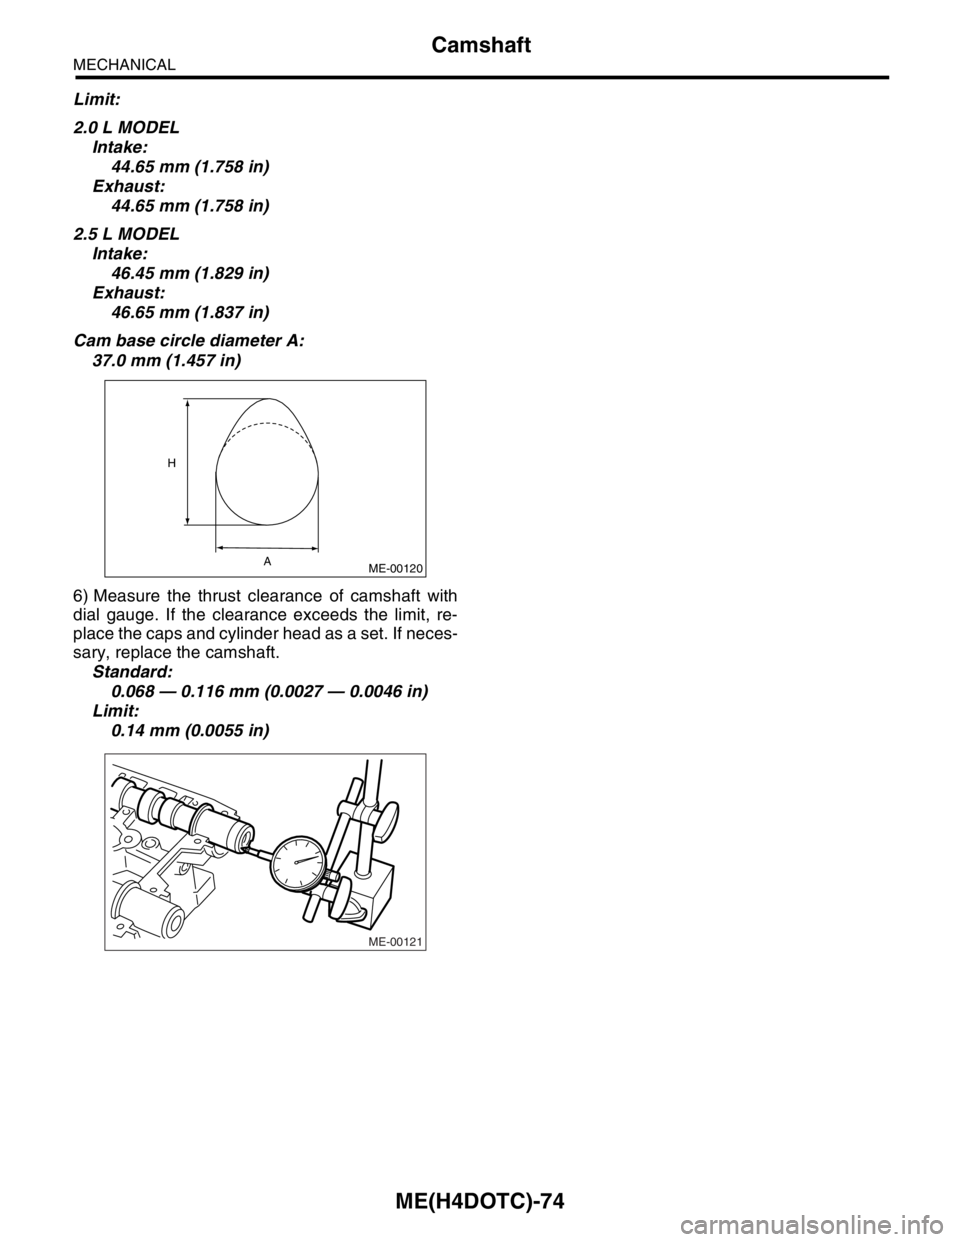
Cam base circle diameter A:
37.0 mm (1.457 in)
6) Measure the thrust clearance of camshaft with
dial gauge. If the clearance exceeds the limit, re-
place the caps and cylinder head as a set. If neces-
sary, replace the camshaft.
Standard:
0.068 — 0.116 mm (0.0027 — 0.0046 in)
Limit:
0.14 mm (0.0055 in)
ME-00120
H
A
ME-00121
Page 1537 of 2870
ME(H4DOTC)-79
MECHANICAL
Cylinder Head Assembly
3. VALVE GUIDE
1) Check the clearance between valve guide and
stem. The clearance can be checked by measuring
the outside diameter of valve stem and the inside
diameter of valve guide with outside and inside mi-
crometers respectively.
Clearance between the valve guide and valve
stem:
Standard
Intake
0.030 — 0.057 mm (0.0012 — 0.0022 in)
Exhaust
0.040 — 0.067 mm (0.0016 — 0.0026 in)
Limit
0.15 mm (0.0059 in)
2) If the clearance between valve guide and stem
exceeds the limit, replace the valve guide or valve
itself whichever shows greater amount of wear.
See the following procedure for valve guide re-
placement.
Valve guide inner diameter:
6.000 — 6.012 mm (0.2362 — 0.2367 in)
Valve stem outer diameters:
Intake
5.955 — 5.970 mm (0.2344 — 0.2350 in)
Exhaust
5.945 — 5.960 mm (0.2341 — 0.2346 in)
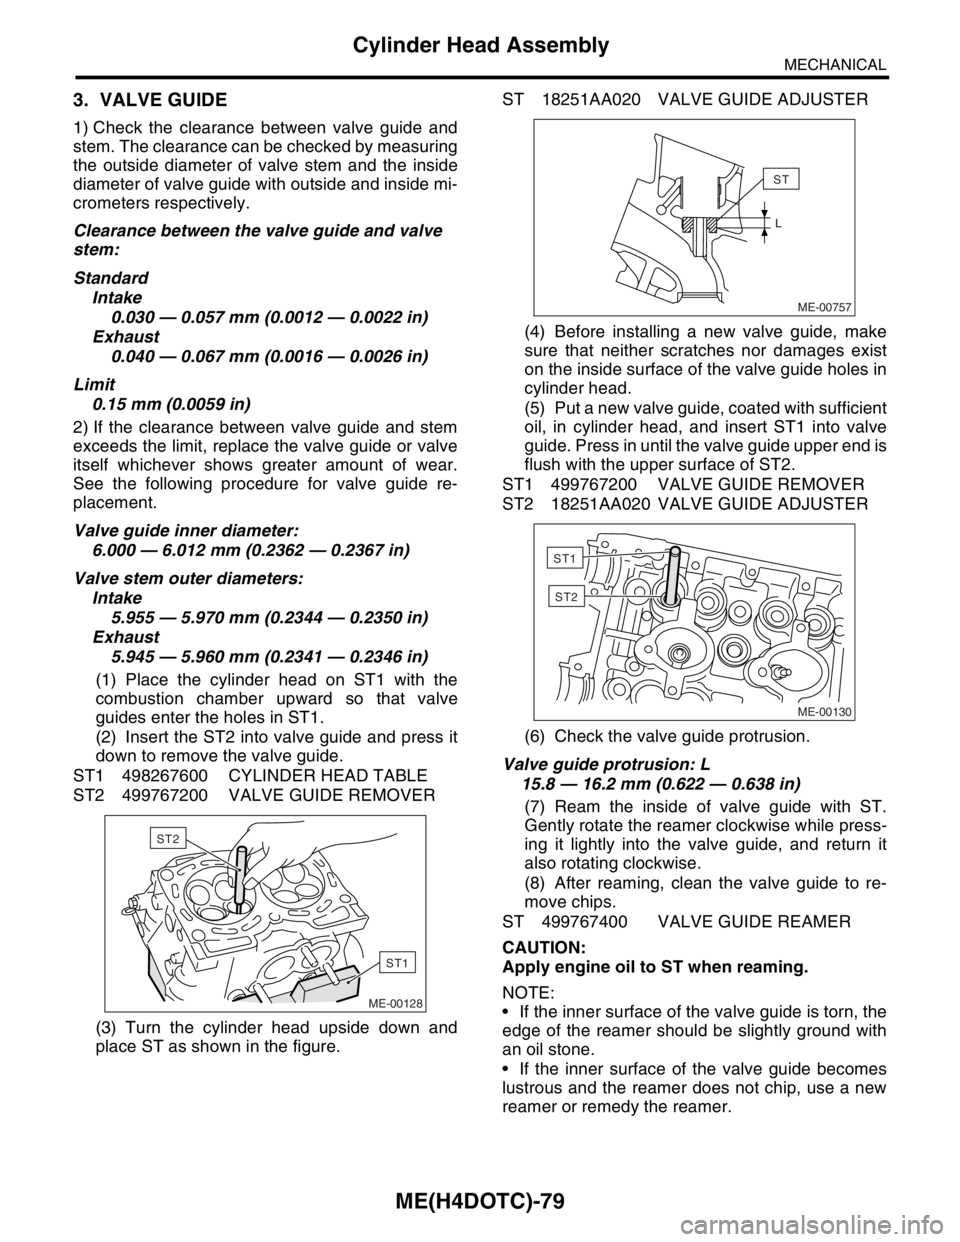
(1) Place the cylinder head on ST1 with the
combustion chamber upward so that valve
guides enter the holes in ST1.
(2) Insert the ST2 into valve guide and press it
down to remove the valve guide.
ST1 498267600 CYLINDER HEAD TABLE
ST2 499767200 VALVE GUIDE REMOVER
(3) Turn the cylinder head upside down and
place ST as shown in the figure.ST 18251AA020 VALVE GUIDE ADJUSTER
(4) Before installing a new valve guide, make
sure that neither scratches nor damages exist
on the inside surface of the valve guide holes in
cylinder head.
(5) Put a new valve guide, coated with sufficient
oil, in cylinder head, and insert ST1 into valve
guide. Press in until the valve guide upper end is
flush with the upper surface of ST2.
ST1 499767200 VALVE GUIDE REMOVER
ST2 18251AA020 VALVE GUIDE ADJUSTER
(6) Check the valve guide protrusion.
Valve guide protrusion: L
15.8 — 16.2 mm (0.622 — 0.638 in)
(7) Ream the inside of valve guide with ST.
Gently rotate the reamer clockwise while press-
ing it lightly into the valve guide, and return it
also rotating clockwise.
(8) After reaming, clean the valve guide to re-
move chips.
ST 499767400 VALVE GUIDE REAMER
CAUTION:
Apply engine oil to ST when reaming.
NOTE:
If the inner surface of the valve guide is torn, the
edge of the reamer should be slightly ground with
an oil stone.
If the inner surface of the valve guide becomes
lustrous and the reamer does not chip, use a new
reamer or remedy the reamer.
ME-00128
ST1
ST2ME-00757
ST
L
ME-00130
ST1
ST2
Page 1539 of 2870
ME(H4DOTC)-81
MECHANICAL
Cylinder Head Assembly
6. INTAKE AND EXHAUST VALVE OIL
SEAL
1) Replace the oil seal with a new one in the follow-
ing condition, Refer to procedure 2) for replace-
ment procedure.
Lip portion is damaged.
Spring is out of place.
Valve and valve seat are reconditioned.
Valve guide is replaced.
2) Place the cylinder head on ST1.
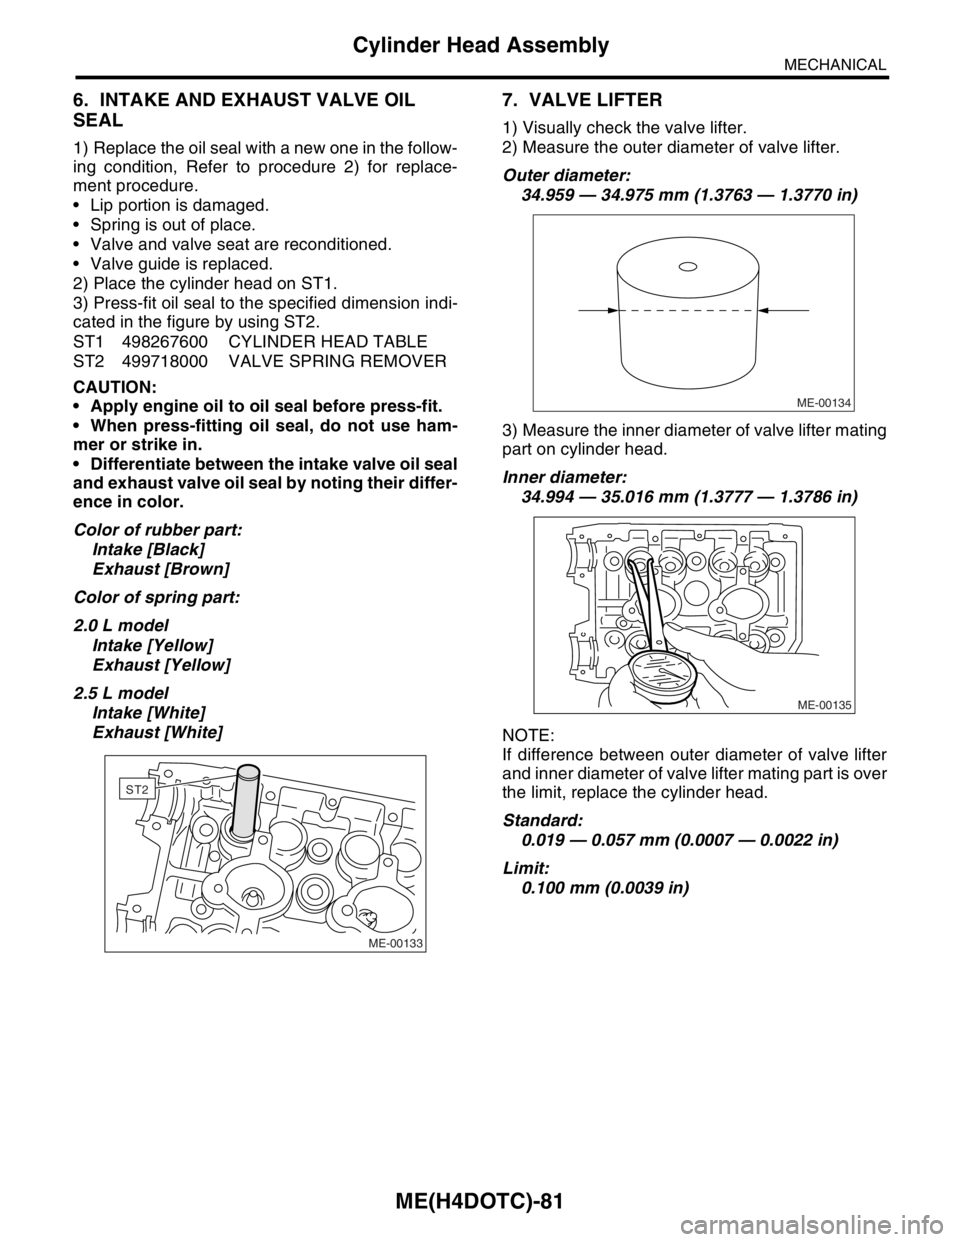
3) Press-fit oil seal to the specified dimension indi-
cated in the figure by using ST2.
ST1 498267600 CYLINDER HEAD TABLE
ST2 499718000 VALVE SPRING REMOVER
CAUTION:
Apply engine oil to oil seal before press-fit.
When press-fitting oil seal, do not use ham-
mer or strike in.
Differentiate between the intake valve oil seal
and exhaust valve oil seal by noting their differ-
ence in color.
Color of rubber part:
Intake [Black]
Exhaust [Brown]
Color of spring part:
2.0 L model
Intake [Yellow]
Exhaust [Yellow]
2.5 L model
Intake [White]
Exhaust [White]
7. VALVE LIFTER
1) Visually check the valve lifter.
2) Measure the outer diameter of valve lifter.
Outer diameter:
34.959 — 34.975 mm (1.3763 — 1.3770 in)
3) Measure the inner diameter of valve lifter mating
part on cylinder head.
Inner diameter:
34.994 — 35.016 mm (1.3777 — 1.3786 in)
NOTE:
If difference between outer diameter of valve lifter
and inner diameter of valve lifter mating part is over
the limit, replace the cylinder head.
Standard:
0.019 — 0.057 mm (0.0007 — 0.0022 in)
Limit:
0.100 mm (0.0039 in)
ME-00133
ST2
ME-00134
ME-00135
Page 1566 of 2870
ME(H4DOTC)-106
MECHANICAL
Cylinder Block
2.0 L MODEL
Standard diameter:
A: 92.005 — 92.015 mm (3.6222 — 3.6226 in)
B: 91.995 — 92.005 mm (3.6218 — 3.6222 in)
2.5 L MODEL
Standard diameter:
A: 99.505 — 99.515 mm (3.9175 — 3.9179 in)
B: 99.495 — 99.505 mm (3.9171 — 3.9175 in)
2) How to measure the inner diameter of each cyl-
inder:
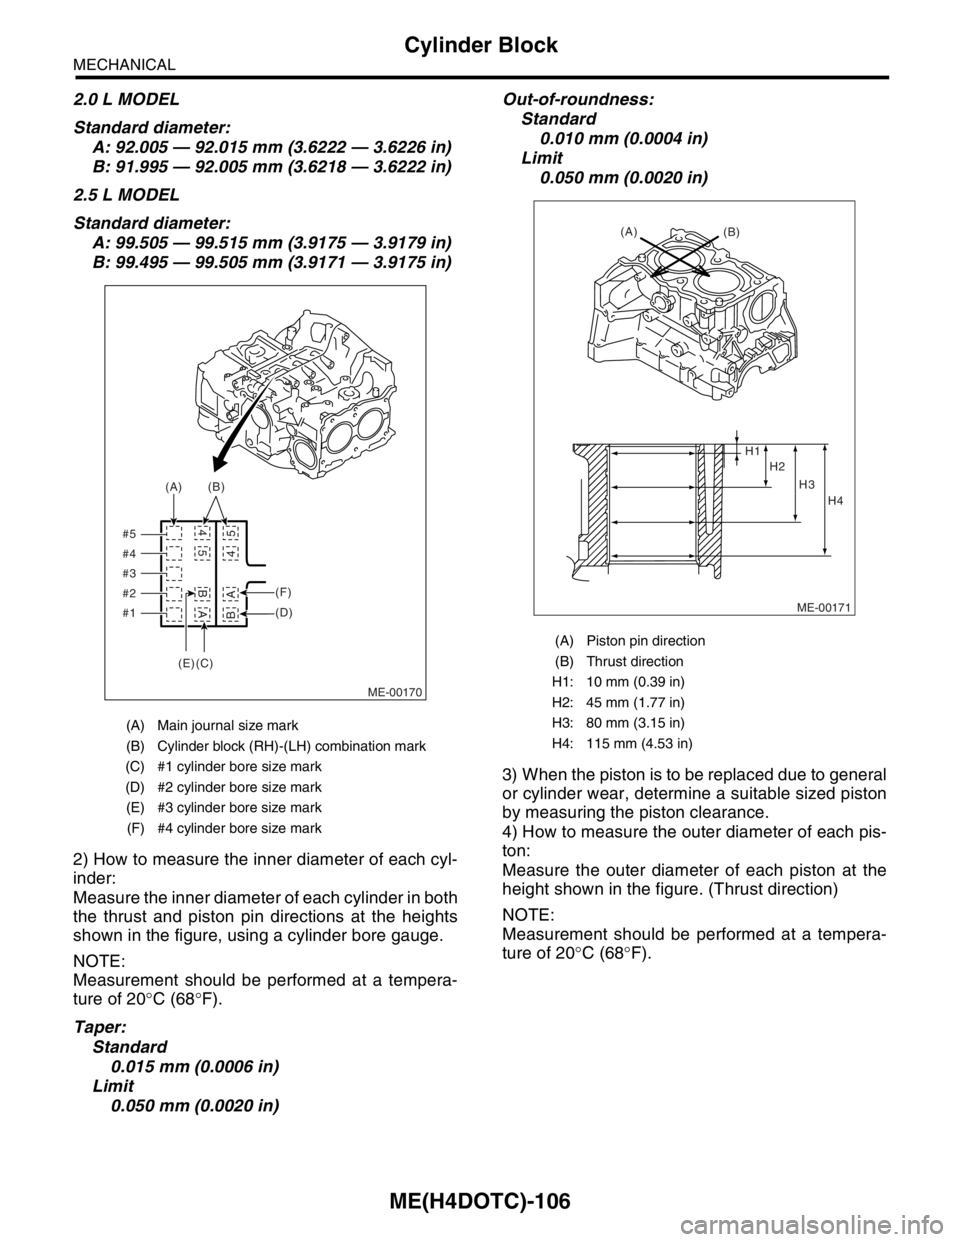
Measure the inner diameter of each cylinder in both
the thrust and piston pin directions at the heights
shown in the figure, using a cylinder bore gauge.
NOTE:
Measurement should be performed at a tempera-
ture of 20°C (68°F).
Taper:
Standard
0.015 mm (0.0006 in)
Limit
0.050 mm (0.0020 in)Out-of-roundness:
Standard
0.010 mm (0.0004 in)
Limit
0.050 mm (0.0020 in)
3) When the piston is to be replaced due to general
or cylinder wear, determine a suitable sized piston
by measuring the piston clearance.
4) How to measure the outer diameter of each pis-
ton:
Measure the outer diameter of each piston at the
height shown in the figure. (Thrust direction)
NOTE:
Measurement should be performed at a tempera-
ture of 20°C (68°F).
(A) Main journal size mark
(B) Cylinder block (RH)-(LH) combination mark
(C) #1 cylinder bore size mark
(D) #2 cylinder bore size mark
(E) #3 cylinder bore size mark
(F) #4 cylinder bore size mark
ME-00170 #5
#4
#3
#2
#1(A)(B)
(F)
(D)
A BA B
5 45 4
(C) (E)
(A) Piston pin direction
(B) Thrust direction
H1: 10 mm (0.39 in)
H2: 45 mm (1.77 in)
H3: 80 mm (3.15 in)
H4: 115 mm (4.53 in)
ME-00171
(A)
(B)
H2 H1
H3
H4
Page 1567 of 2870
ME(H4DOTC)-107
MECHANICAL
Cylinder Block
2.0 L MODEL
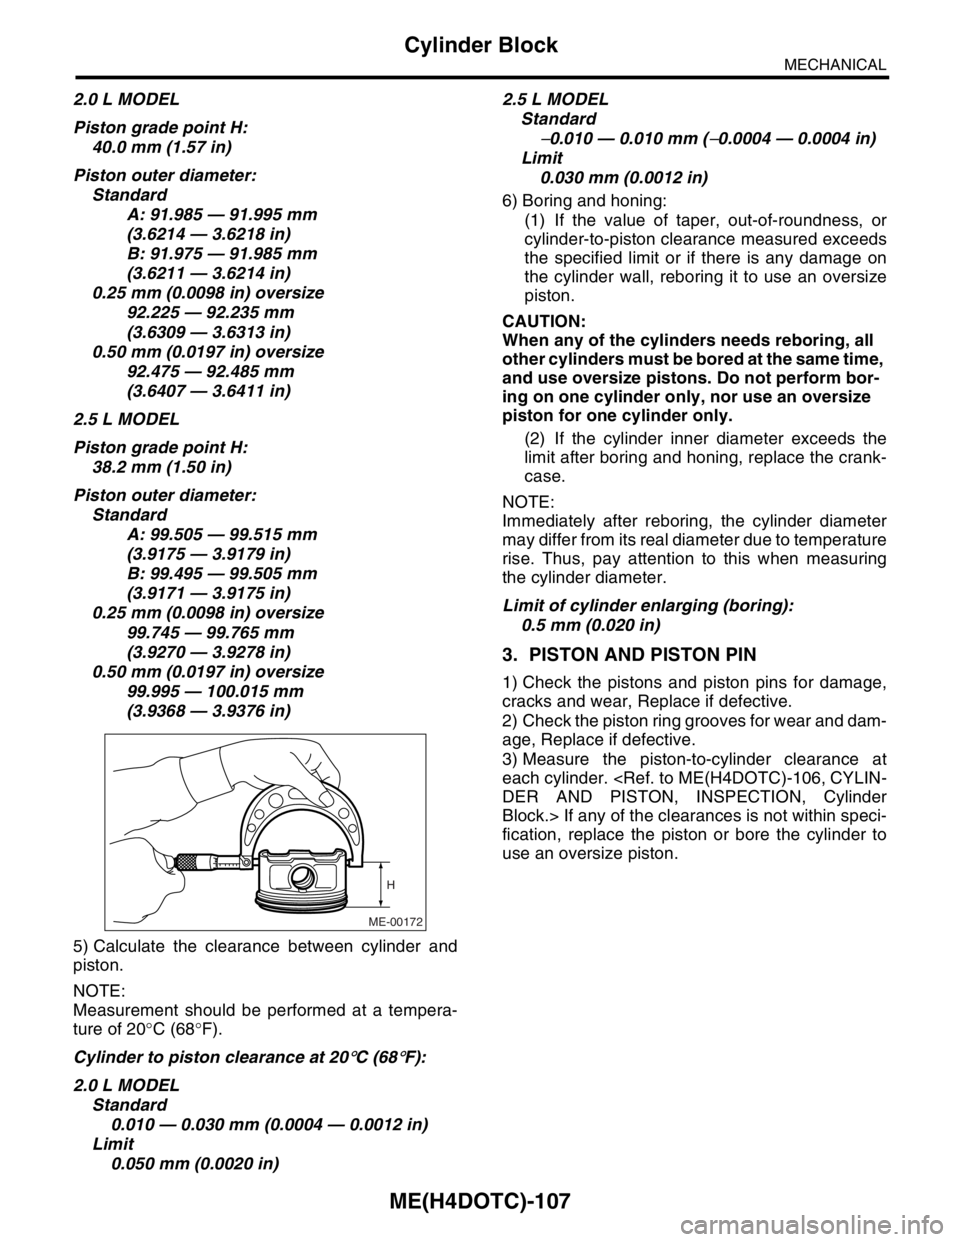
Piston grade point H:
40.0 mm (1.57 in)
Piston outer diameter:
Standard
A: 91.985 — 91.995 mm
(3.6214 — 3.6218 in)
B: 91.975 — 91.985 mm
(3.6211 — 3.6214 in)
0.25 mm (0.0098 in) oversize
92.225 — 92.235 mm
(3.6309 — 3.6313 in)
0.50 mm (0.0197 in) oversize
92.475 — 92.485 mm
(3.6407 — 3.6411 in)
2.5 L MODEL
Piston grade point H:
38.2 mm (1.50 in)
Piston outer diameter:
Standard
A: 99.505 — 99.515 mm
(3.9175 — 3.9179 in)
B: 99.495 — 99.505 mm
(3.9171 — 3.9175 in)
0.25 mm (0.0098 in) oversize
99.745 — 99.765 mm
(3.9270 — 3.9278 in)
0.50 mm (0.0197 in) oversize
99.995 — 100.015 mm
(3.9368 — 3.9376 in)
5) Calculate the clearance between cylinder and
piston.
NOTE:
Measurement should be performed at a tempera-
ture of 20°C (68°F).
Cylinder to piston clearance at 20
°C (68°F):
2.0 L MODEL
Standard
0.010 — 0.030 mm (0.0004 — 0.0012 in)
Limit
0.050 mm (0.0020 in)2.5 L MODEL
Standard
−0.010 — 0.010 mm (−0.0004 — 0.0004 in)
Limit
0.030 mm (0.0012 in)
6) Boring and honing:
(1) If the value of taper, out-of-roundness, or
cylinder-to-piston clearance measured exceeds
the specified limit or if there is any damage on
the cylinder wall, reboring it to use an oversize
piston.
CAUTION:
When any of the cylinders needs reboring, all
other cylinders must be bored at the same time,
and use oversize pistons. Do not perform bor-
ing on one cylinder only, nor use an oversize
piston for one cylinder only.
(2) If the cylinder inner diameter exceeds the
limit after boring and honing, replace the crank-
case.
NOTE:
Immediately after reboring, the cylinder diameter
may differ from its real diameter due to temperature
rise. Thus, pay attention to this when measuring
the cylinder diameter.
Limit of cylinder enlarging (boring):
0.5 mm (0.020 in)
3. PISTON AND PISTON PIN
1) Check the pistons and piston pins for damage,
cracks and wear, Replace if defective.
2) Check the piston ring grooves for wear and dam-
age, Replace if defective.
3) Measure the piston-to-cylinder clearance at
each cylinder.
Block.> If any of the clearances is not within speci-
fication, replace the piston or bore the cylinder to
use an oversize piston.
ME-00172
H
Page 1570 of 2870
ME(H4DOTC)-110
MECHANICAL
Cylinder Block
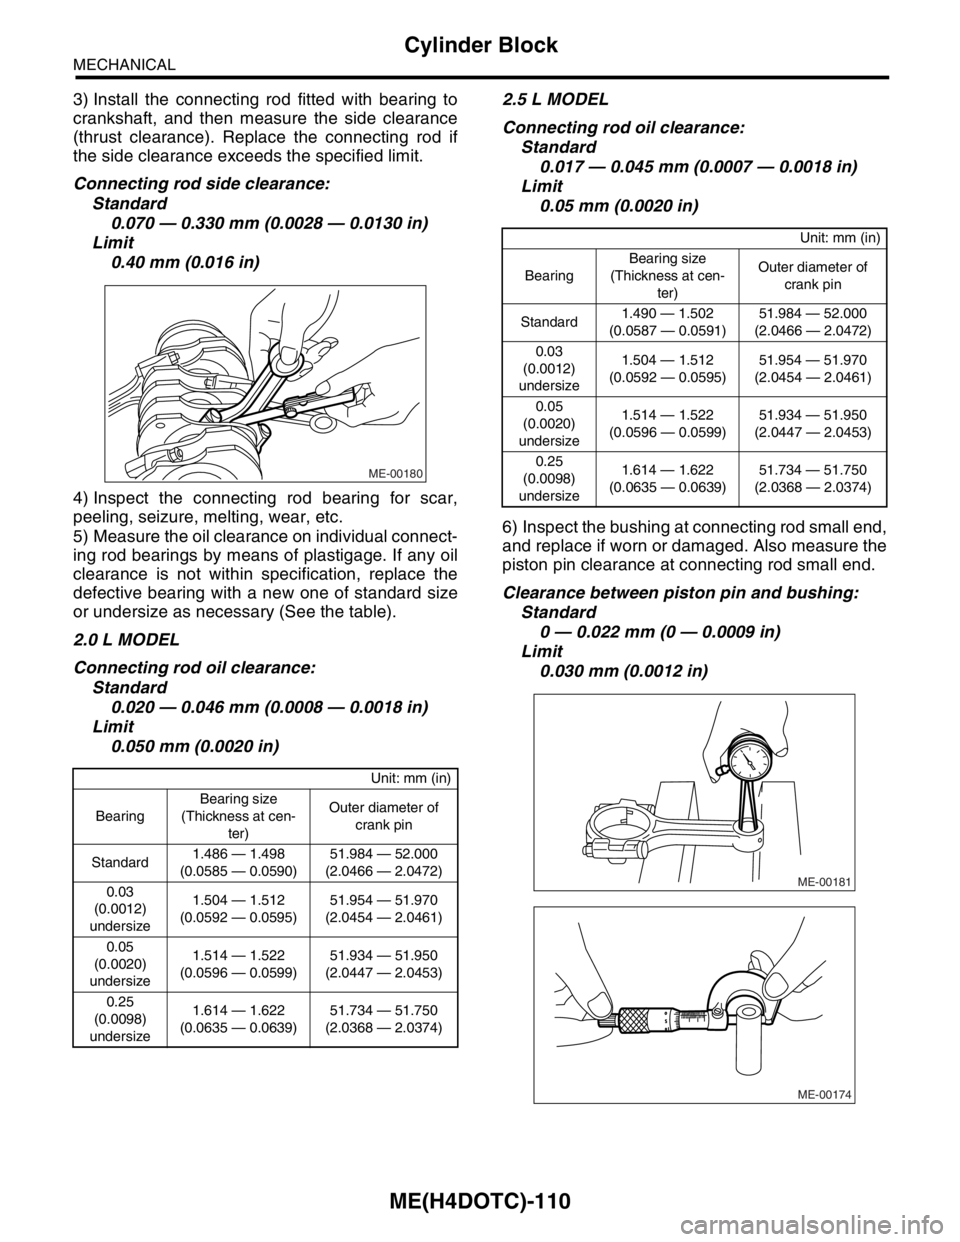
3) Install the connecting rod fitted with bearing to
crankshaft, and then measure the side clearance
(thrust clearance). Replace the connecting rod if
the side clearance exceeds the specified limit.
Connecting rod side clearance:
Standard
0.070 — 0.330 mm (0.0028 — 0.0130 in)
Limit
0.40 mm (0.016 in)
4) Inspect the connecting rod bearing for scar,
peeling, seizure, melting, wear, etc.
5) Measure the oil clearance on individual connect-
ing rod bearings by means of plastigage. If any oil
clearance is not within specification, replace the
defective bearing with a new one of standard size
or undersize as necessary (See the table).
2.0 L MODEL
Connecting rod oil clearance:
Standard
0.020 — 0.046 mm (0.0008 — 0.0018 in)
Limit
0.050 mm (0.0020 in)2.5 L MODEL
Connecting rod oil clearance:
Standard
0.017 — 0.045 mm (0.0007 — 0.0018 in)
Limit
0.05 mm (0.0020 in)
6) Inspect the bushing at connecting rod small end,
and replace if worn or damaged. Also measure the
piston pin clearance at connecting rod small end.
Clearance between piston pin and bushing:
Standard
0 — 0.022 mm (0 — 0.0009 in)
Limit
0.030 mm (0.0012 in)
Unit: mm (in)
BearingBearing size
(Thickness at cen-
ter)Outer diameter of
crank pin
Standard1.486 — 1.498
(0.0585 — 0.0590)51.984 — 52.000
(2.0466 — 2.0472)
0.03
(0.0012)
undersize1.504 — 1.512
(0.0592 — 0.0595)51.954 — 51.970
(2.0454 — 2.0461)
0.05
(0.0020)
undersize1.514 — 1.522
(0.0596 — 0.0599)51.934 — 51.950
(2.0447 — 2.0453)
0.25
(0.0098)
undersize1.614 — 1.622
(0.0635 — 0.0639)51.734 — 51.750
(2.0368 — 2.0374)
ME-00180
Unit: mm (in)
BearingBearing size
(Thickness at cen-
ter)Outer diameter of
crank pin
Standard1.490 — 1.502
(0.0587 — 0.0591)51.984 — 52.000
(2.0466 — 2.0472)
0.03
(0.0012)
undersize1.504 — 1.512
(0.0592 — 0.0595)51.954 — 51.970
(2.0454 — 2.0461)
0.05
(0.0020)
undersize1.514 — 1.522
(0.0596 — 0.0599)51.934 — 51.950
(2.0447 — 2.0453)
0.25
(0.0098)
undersize1.614 — 1.622
(0.0635 — 0.0639)51.734 — 51.750
(2.0368 — 2.0374)
ME-00181
ME-00174