2004 SUBARU FORESTER meter
[x] Cancel search: meterPage 932 of 2870
ME(H4SO)-61
MECHANICAL
Camshaft
C: INSPECTION
1. CAMSHAFT
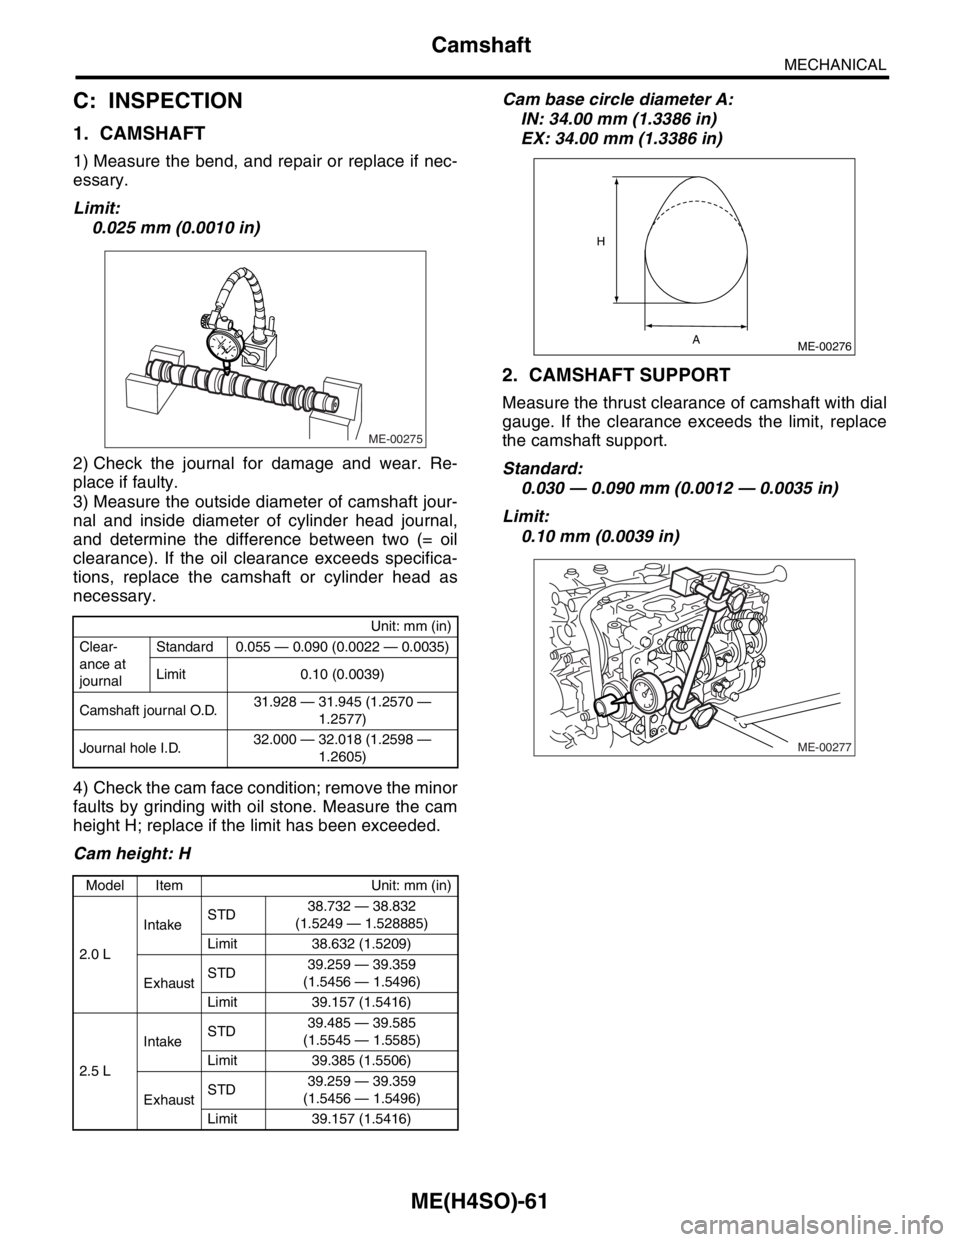
1) Measure the bend, and repair or replace if nec-
essary.
Limit:
0.025 mm (0.0010 in)
2) Check the journal for damage and wear. Re-
place if faulty.
3) Measure the outside diameter of camshaft jour-
nal and inside diameter of cylinder head journal,
and determine the difference between two (= oil
clearance). If the oil clearance exceeds specifica-
tions, replace the camshaft or cylinder head as
necessary.
4) Check the cam face condition; remove the minor
faults by grinding with oil stone. Measure the cam
height H; replace if the limit has been exceeded.
Cam height: HCam base circle diameter A:
IN: 34.00 mm (1.3386 in)
EX: 34.00 mm (1.3386 in)
2. CAMSHAFT SUPPORT
Measure the thrust clearance of camshaft with dial
gauge. If the clearance exceeds the limit, replace
the camshaft support.
Standard:
0.030 — 0.090 mm (0.0012 — 0.0035 in)
Limit:
0.10 mm (0.0039 in)
Unit: mm (in)
Clear-
ance at
journalStandard 0.055 — 0.090 (0.0022 — 0.0035)
Limit 0.10 (0.0039)
Camshaft journal O.D.31.928 — 31.945 (1.2570 —
1.2577)
Journal hole I.D.32.000 — 32.018 (1.2598 —
1.2605)
Model Item Unit: mm (in)
2.0 LIntakeSTD38.732 — 38.832
(1.5249 — 1.528885)
Limit 38.632 (1.5209)
ExhaustSTD39.259 — 39.359
(1.5456 — 1.5496)
Limit 39.157 (1.5416)
2.5 LIntakeSTD39.485 — 39.585
(1.5545 — 1.5585)
Limit 39.385 (1.5506)
ExhaustSTD39.259 — 39.359
(1.5456 — 1.5496)
Limit 39.157 (1.5416)
ME-00275
ME-00276
H
A
ME-00277
Page 937 of 2870
ME(H4SO)-66
MECHANICAL
Cylinder Head
NOTE:
Uneven torque for the cylinder head bolts can cause
warping. When reassembling, pay special attention
to the torque so as to tighten evenly.
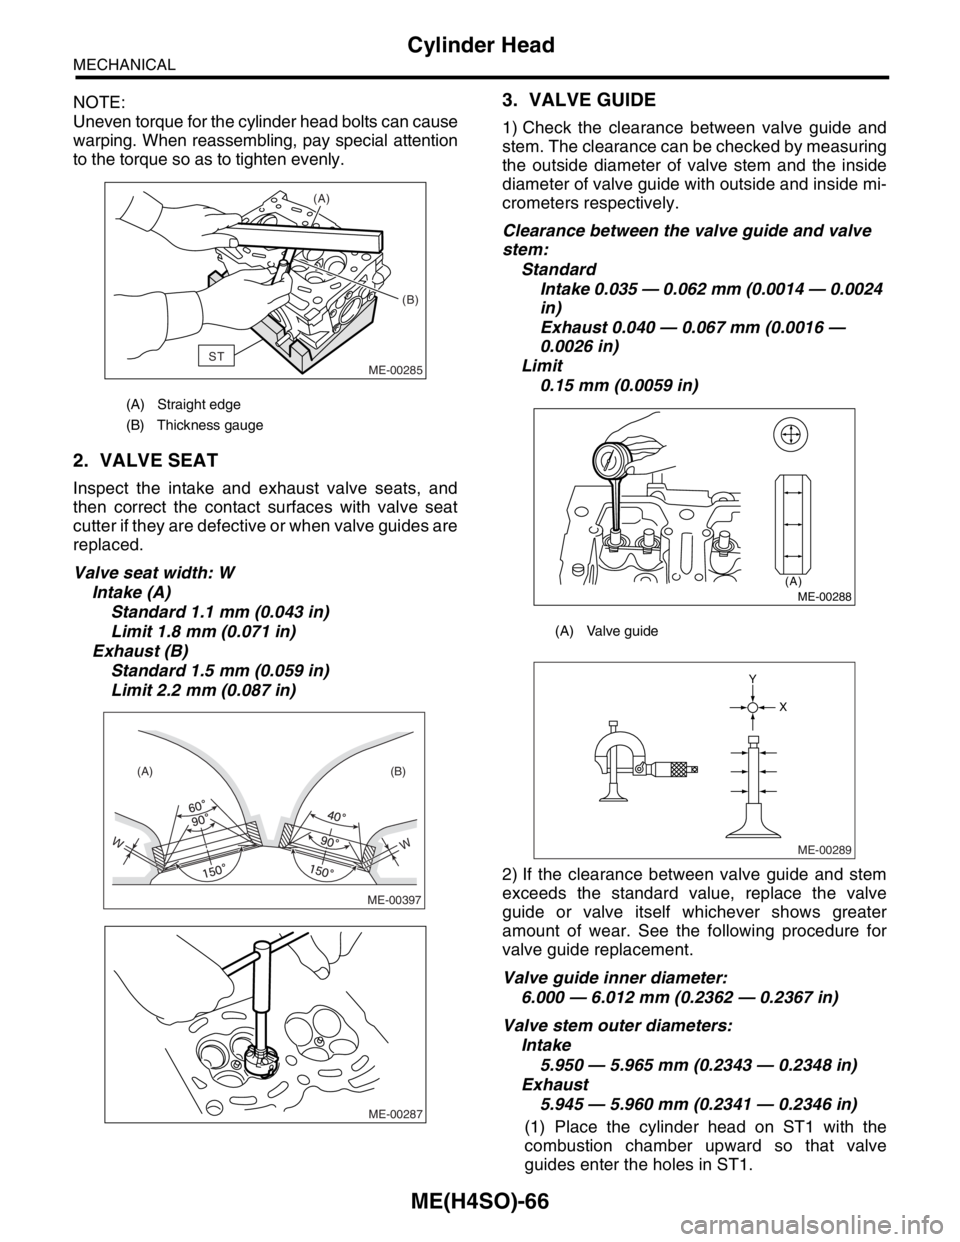
2. VALVE SEAT
Inspect the intake and exhaust valve seats, and
then correct the contact surfaces with valve seat
cutter if they are defective or when valve guides are
replaced.
Valve seat width: W
Intake (A)
Standard 1.1 mm (0.043 in)
Limit 1.8 mm (0.071 in)
Exhaust (B)
Standard 1.5 mm (0.059 in)
Limit 2.2 mm (0.087 in)
3. VALVE GUIDE
1) Check the clearance between valve guide and
stem. The clearance can be checked by measuring
the outside diameter of valve stem and the inside
diameter of valve guide with outside and inside mi-
crometers respectively.
Clearance between the valve guide and valve
stem:
Standard
Intake 0.035 — 0.062 mm (0.0014 — 0.0024
in)
Exhaust 0.040 — 0.067 mm (0.0016 —
0.0026 in)
Limit
0.15 mm (0.0059 in)
2) If the clearance between valve guide and stem
exceeds the standard value, replace the valve
guide or valve itself whichever shows greater
amount of wear. See the following procedure for
valve guide replacement.
Valve guide inner diameter:
6.000 — 6.012 mm (0.2362 — 0.2367 in)
Valve stem outer diameters:
Intake
5.950 — 5.965 mm (0.2343 — 0.2348 in)
Exhaust
5.945 — 5.960 mm (0.2341 — 0.2346 in)
(1) Place the cylinder head on ST1 with the
combustion chamber upward so that valve
guides enter the holes in ST1.
(A) Straight edge
(B) Thickness gauge
ST(A)
(B)
ME-00285
WW
(A) (B)
ME-00397
ME-00287
(A) Valve guide
(A)
ME-00288
ME-00289
X Y
Page 952 of 2870
ME(H4SO)-81
MECHANICAL
Cylinder Block
Model with ATF warmer
28) Install the water by-pass pipe for heater.
29) Get a engine oil filter and apply a thin coat of
engine oil to the seal rubber.
30) Install the oil filter by turning it by hand, being
careful not to damage the seal rubber.
Tighten the oil filter 80 mm (3.15 in) or 65 mm
(2.56 in) in diameter by approx. 2/3 — 3/4 rotation
more after the seal rubber of oil filter comes in con-
tact with cylinder block or oil cooler.
Tighten the oil filter 68 mm (2.68 in) in diameter
by approx. 1 rotation more after the seal rubber of
oil filter comes in contact with cylinder block or oil
cooler.
CAUTION:
Do not tighten excessively, or oil may leak.
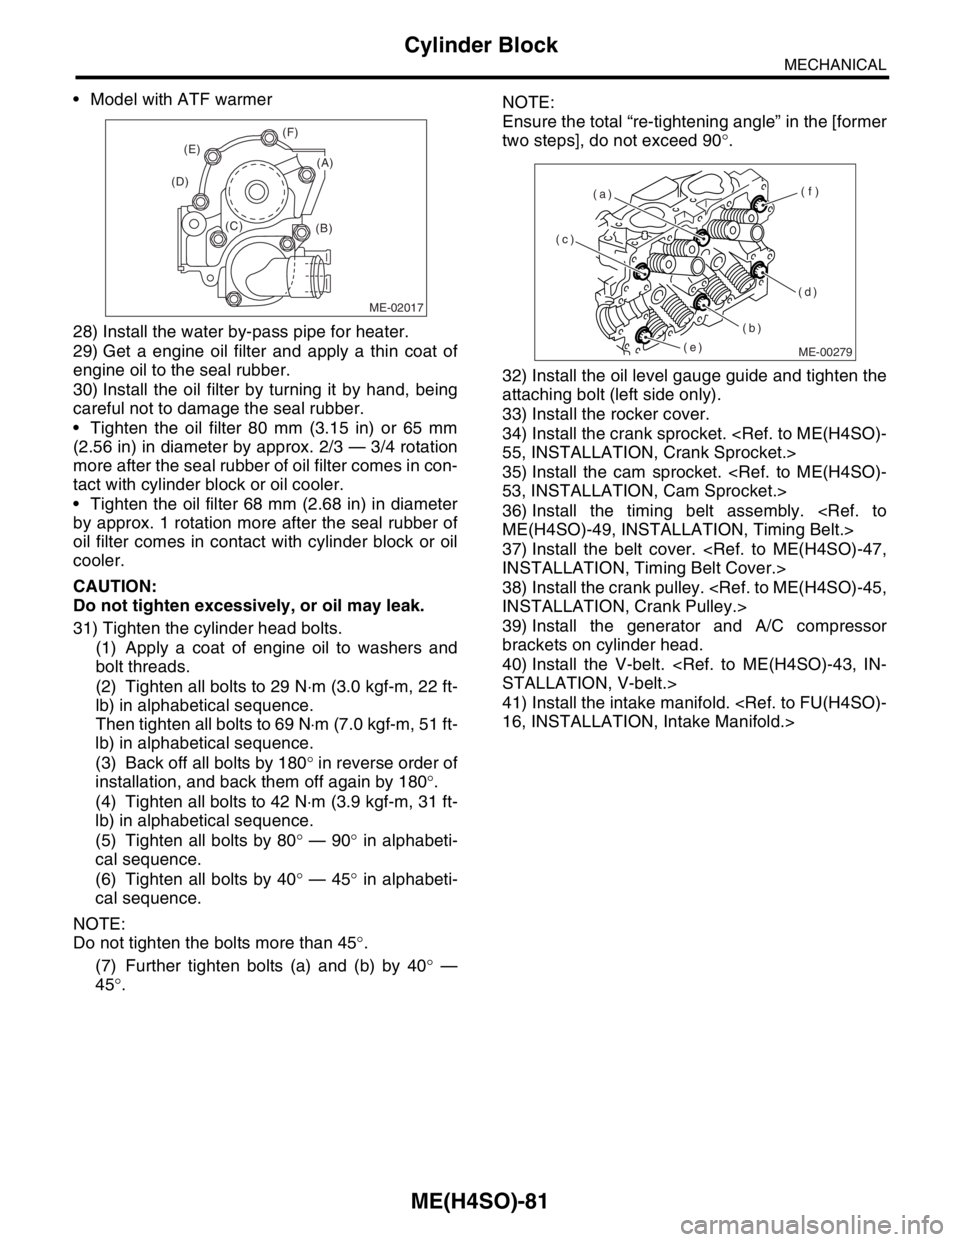
31) Tighten the cylinder head bolts.
(1) Apply a coat of engine oil to washers and
bolt threads.
(2) Tighten all bolts to 29 N⋅m (3.0 kgf-m, 22 ft-
lb) in alphabetical sequence.
Then tighten all bolts to 69 N⋅m (7.0 kgf-m, 51 ft-
lb) in alphabetical sequence.
(3) Back off all bolts by 180° in reverse order of
installation, and back them off again by 180°.
(4) Tighten all bolts to 42 N⋅m (3.9 kgf-m, 31 ft-
lb) in alphabetical sequence.
(5) Tighten all bolts by 80° — 90° in alphabeti-
cal sequence.
(6) Tighten all bolts by 40° — 45° in alphabeti-
cal sequence.
NOTE:
Do not tighten the bolts more than 45°.
(7) Further tighten bolts (a) and (b) by 40° —
45°.NOTE:
Ensure the total “re-tightening angle” in the [former
two steps], do not exceed 90°.
32) Install the oil level gauge guide and tighten the
attaching bolt (left side only).
33) Install the rocker cover.
34) Install the crank sprocket.
35) Install the cam sprocket.
36) Install the timing belt assembly.
37) Install the belt cover.
38) Install the crank pulley.
39) Install the generator and A/C compressor
brackets on cylinder head.
40) Install the V-belt.
41) Install the intake manifold.
ME-02017
(B) (C) (D)(E)(F)
(A)
ME-00279
(c)
(b)(f)
(d) (a)
(e)
Page 955 of 2870
ME(H4SO)-84
MECHANICAL
Cylinder Block
E: INSPECTION
1. CYLINDER BLOCK
1) Visually check for cracks and damage. Especial-
ly, inspect the important parts by means of red lead
check.
2) Check the oil passages for clogging.
3) Inspect the crankcase surface that mates with
cylinder head for warping by using a straight edge,
and correct by grinding if necessary.
Warping limit:
0.05 mm (0.0020 in)
Grinding limit:
0.1 mm (0.004 in)
Standard height of cylinder block:
201.0 mm (7.91 in)
2. CYLINDER AND PISTON
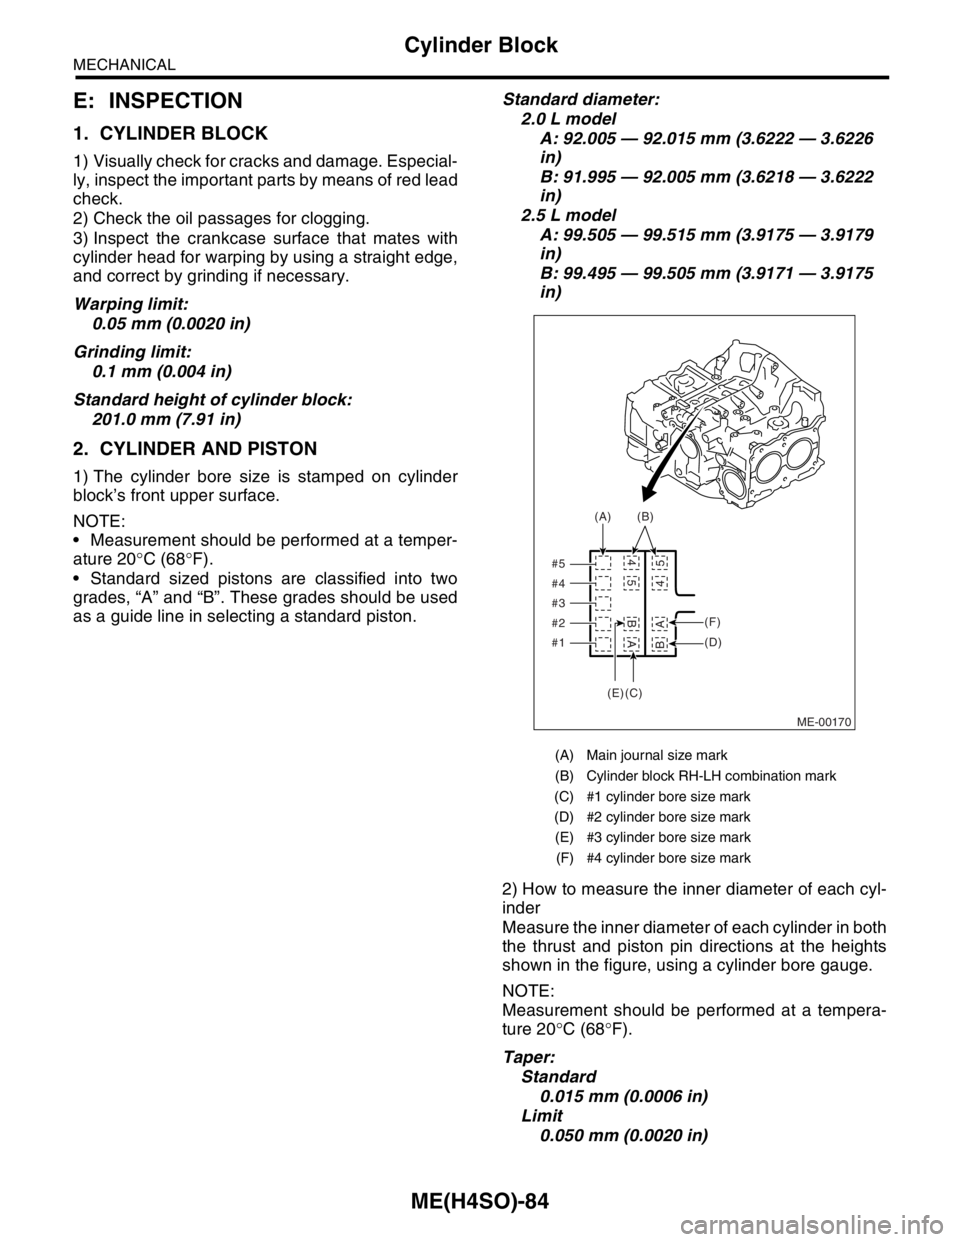
1) The cylinder bore size is stamped on cylinder
block’s front upper surface.
NOTE:
Measurement should be performed at a temper-
ature 20°C (68°F).
Standard sized pistons are classified into two
grades, “A” and “B”. These grades should be used
as a guide line in selecting a standard piston.Standard diameter:
2.0 L model
A: 92.005 — 92.015 mm (3.6222 — 3.6226
in)
B: 91.995 — 92.005 mm (3.6218 — 3.6222
in)
2.5 L model
A: 99.505 — 99.515 mm (3.9175 — 3.9179
in)
B: 99.495 — 99.505 mm (3.9171 — 3.9175
in)
2) How to measure the inner diameter of each cyl-
inder
Measure the inner diameter of each cylinder in both
the thrust and piston pin directions at the heights
shown in the figure, using a cylinder bore gauge.
NOTE:
Measurement should be performed at a tempera-
ture 20°C (68°F).
Taper:
Standard
0.015 mm (0.0006 in)
Limit
0.050 mm (0.0020 in)
(A) Main journal size mark
(B) Cylinder block RH-LH combination mark
(C) #1 cylinder bore size mark
(D) #2 cylinder bore size mark
(E) #3 cylinder bore size mark
(F) #4 cylinder bore size mark
ME-00170 #5
#4
#3
#2
#1(A)(B)
(F)
(D)
A BA B
5 45 4
(C) (E)
Page 956 of 2870
ME(H4SO)-85
MECHANICAL
Cylinder Block
Out-of-roundness:
Standard
0.010 mm (0.0004 in)
Limit
0.050 mm (0.0020 in)
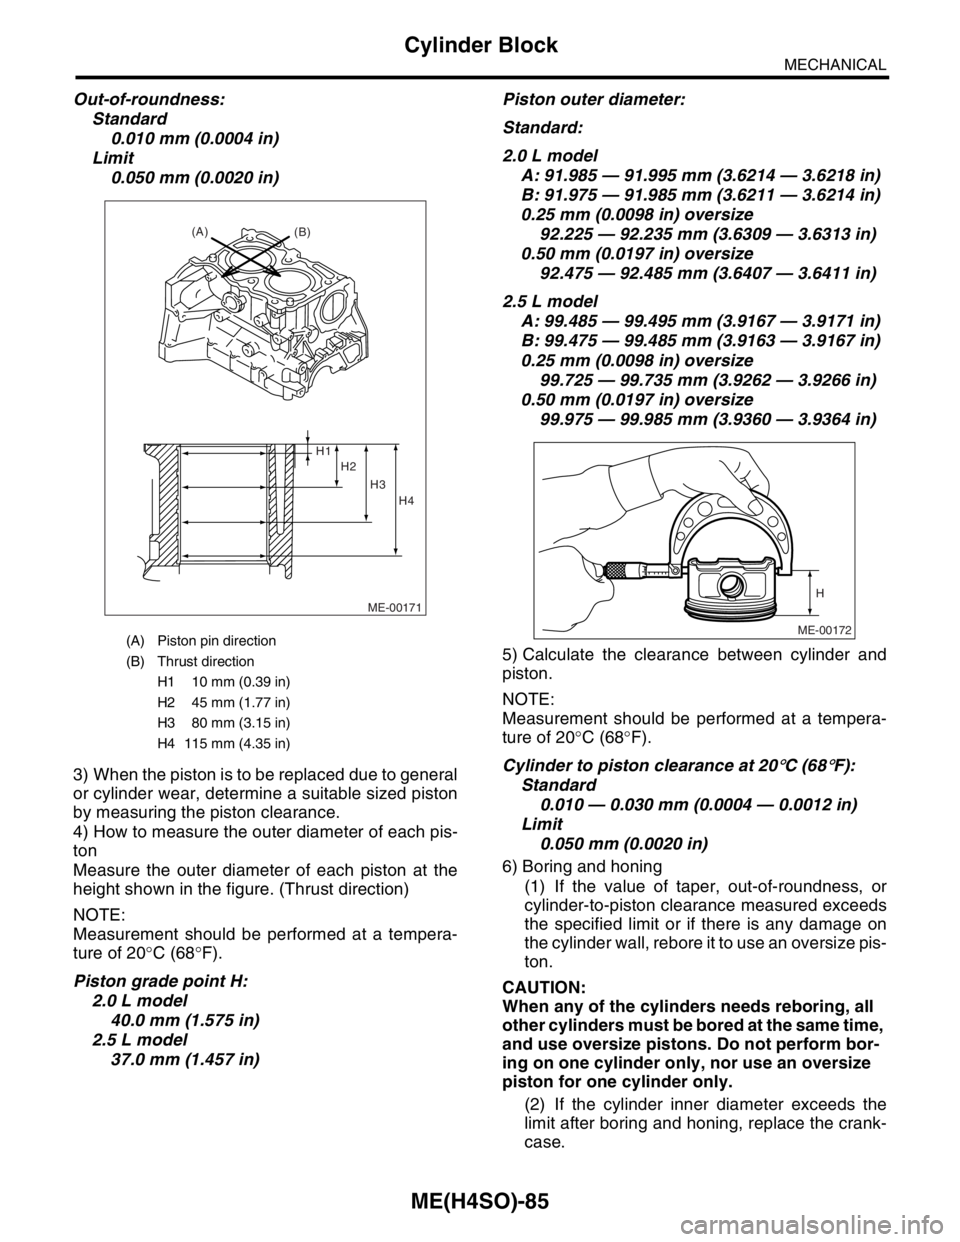
3) When the piston is to be replaced due to general
or cylinder wear, determine a suitable sized piston
by measuring the piston clearance.
4) How to measure the outer diameter of each pis-
ton
Measure the outer diameter of each piston at the
height shown in the figure. (Thrust direction)
NOTE:
Measurement should be performed at a tempera-
ture of 20°C (68°F).
Piston grade point H:
2.0 L model
40.0 mm (1.575 in)
2.5 L model
37.0 mm (1.457 in)Piston outer diameter:
Standard:
2.0 L model
A: 91.985 — 91.995 mm (3.6214 — 3.6218 in)
B: 91.975 — 91.985 mm (3.6211 — 3.6214 in)
0.25 mm (0.0098 in) oversize
92.225 — 92.235 mm (3.6309 — 3.6313 in)
0.50 mm (0.0197 in) oversize
92.475 — 92.485 mm (3.6407 — 3.6411 in)
2.5 L model
A: 99.485 — 99.495 mm (3.9167 — 3.9171 in)
B: 99.475 — 99.485 mm (3.9163 — 3.9167 in)
0.25 mm (0.0098 in) oversize
99.725 — 99.735 mm (3.9262 — 3.9266 in)
0.50 mm (0.0197 in) oversize
99.975 — 99.985 mm (3.9360 — 3.9364 in)
5) Calculate the clearance between cylinder and
piston.
NOTE:
Measurement should be performed at a tempera-
ture of 20°C (68°F).
Cylinder to piston clearance at 20
°C (68°F):
Standard
0.010 — 0.030 mm (0.0004 — 0.0012 in)
Limit
0.050 mm (0.0020 in)
6) Boring and honing
(1) If the value of taper, out-of-roundness, or
cylinder-to-piston clearance measured exceeds
the specified limit or if there is any damage on
the cylinder wall, rebore it to use an oversize pis-
ton.
CAUTION:
When any of the cylinders needs reboring, all
other cylinders must be bored at the same time,
and use oversize pistons. Do not perform bor-
ing on one cylinder only, nor use an oversize
piston for one cylinder only.
(2) If the cylinder inner diameter exceeds the
limit after boring and honing, replace the crank-
case.
(A) Piston pin direction
(B) Thrust direction
H1 10 mm (0.39 in)
H2 45 mm (1.77 in)
H3 80 mm (3.15 in)
H4 115 mm (4.35 in)
ME-00171
(A)
(B)
H2 H1
H3
H4
ME-00172
H
Page 957 of 2870
ME(H4SO)-86
MECHANICAL
Cylinder Block
NOTE:
Immediately after reboring, the cylinder diameter
may differ from its real diameter due to temperature
rise. Thus, pay attention to this when measuring
the cylinder diameter.
Limit of cylinder enlarging (boring):
0.5 mm (0.020 in)
3. PISTON AND PISTON PIN
1) Check the pistons and piston pins for damage,
cracks, and wear and the piston ring grooves for
wear and damage. Replace if defective.
2) Measure the piston-to-cylinder clearance at
each cylinder.
any of the clearances is not to specification, re-
place the piston or bore the cylinder to use an over-
size piston.
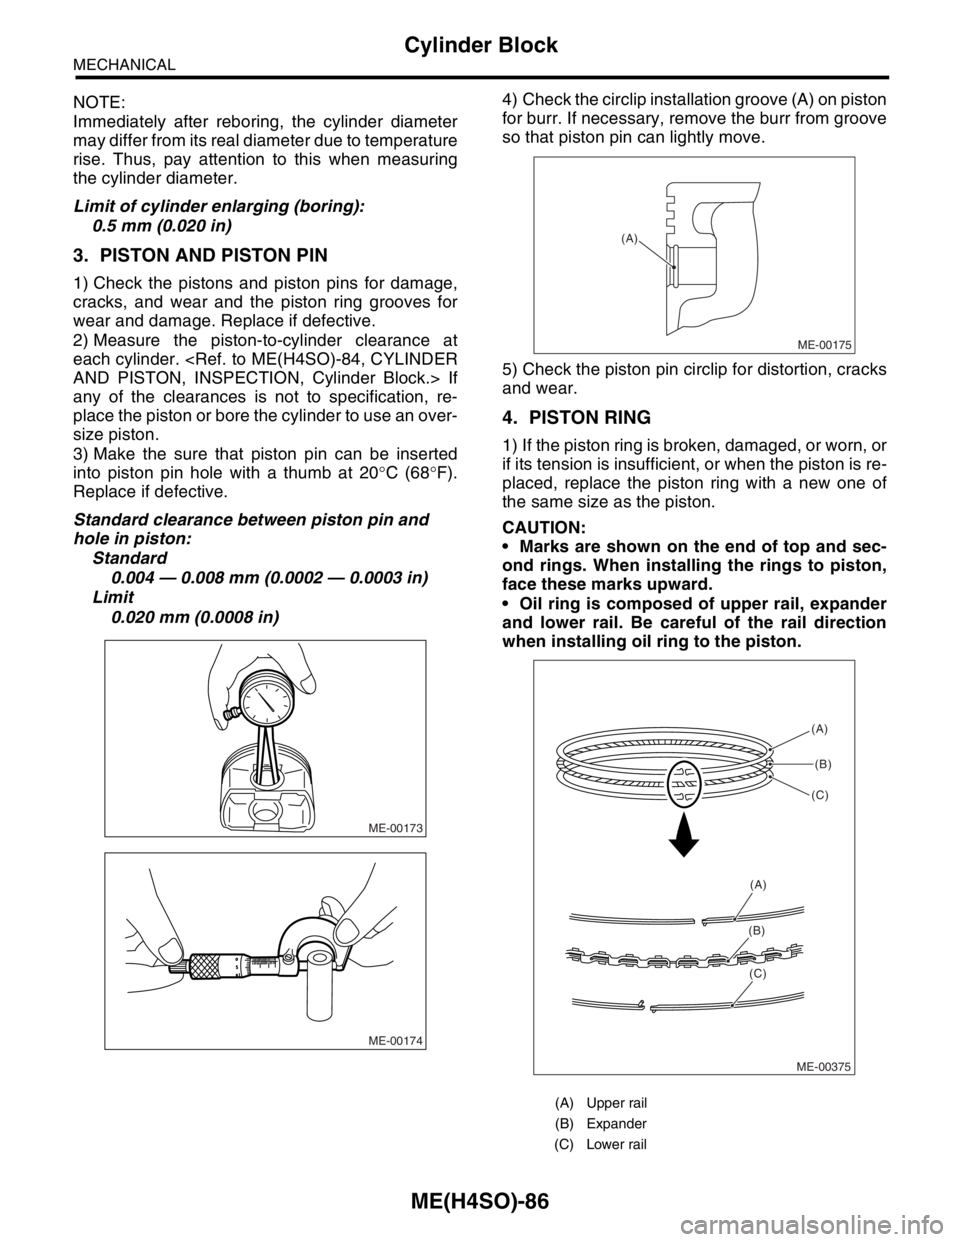
3) Make the sure that piston pin can be inserted
into piston pin hole with a thumb at 20°C (68°F).
Replace if defective.
Standard clearance between piston pin and
hole in piston:
Standard
0.004 — 0.008 mm (0.0002 — 0.0003 in)
Limit
0.020 mm (0.0008 in)4) Check the circlip installation groove (A) on piston
for burr. If necessary, remove the burr from groove
so that piston pin can lightly move.
5) Check the piston pin circlip for distortion, cracks
and wear.
4. PISTON RING
1) If the piston ring is broken, damaged, or worn, or
if its tension is insufficient, or when the piston is re-
placed, replace the piston ring with a new one of
the same size as the piston.
CAUTION:
Marks are shown on the end of top and sec-
ond rings. When installing the rings to piston,
face these marks upward.
Oil ring is composed of upper rail, expander
and lower rail. Be careful of the rail direction
when installing oil ring to the piston.
ME-00173
ME-00174
(A) Upper rail
(B) Expander
(C) Lower rail
ME-00175
(A)
ME-00375(A)
(B)
(C)
(A)
(B)
(C)
Page 959 of 2870
ME(H4SO)-88
MECHANICAL
Cylinder Block
Connecting rod oil clearance:
Standard
0.0158 — 0.0438 mm (0.0006 — 0.0017 in)
Limit
0.05 mm (0.0020 in)
6) Inspect the bushing at connecting rod small end,
and replace if worn or damaged. Also measure the
piston pin clearance at connecting rod small end.
Clearance between piston pin and bushing:
Standard
0 — 0.022 mm (0 — 0.0009 in)
Limit
0.030 mm (0.0012 in)
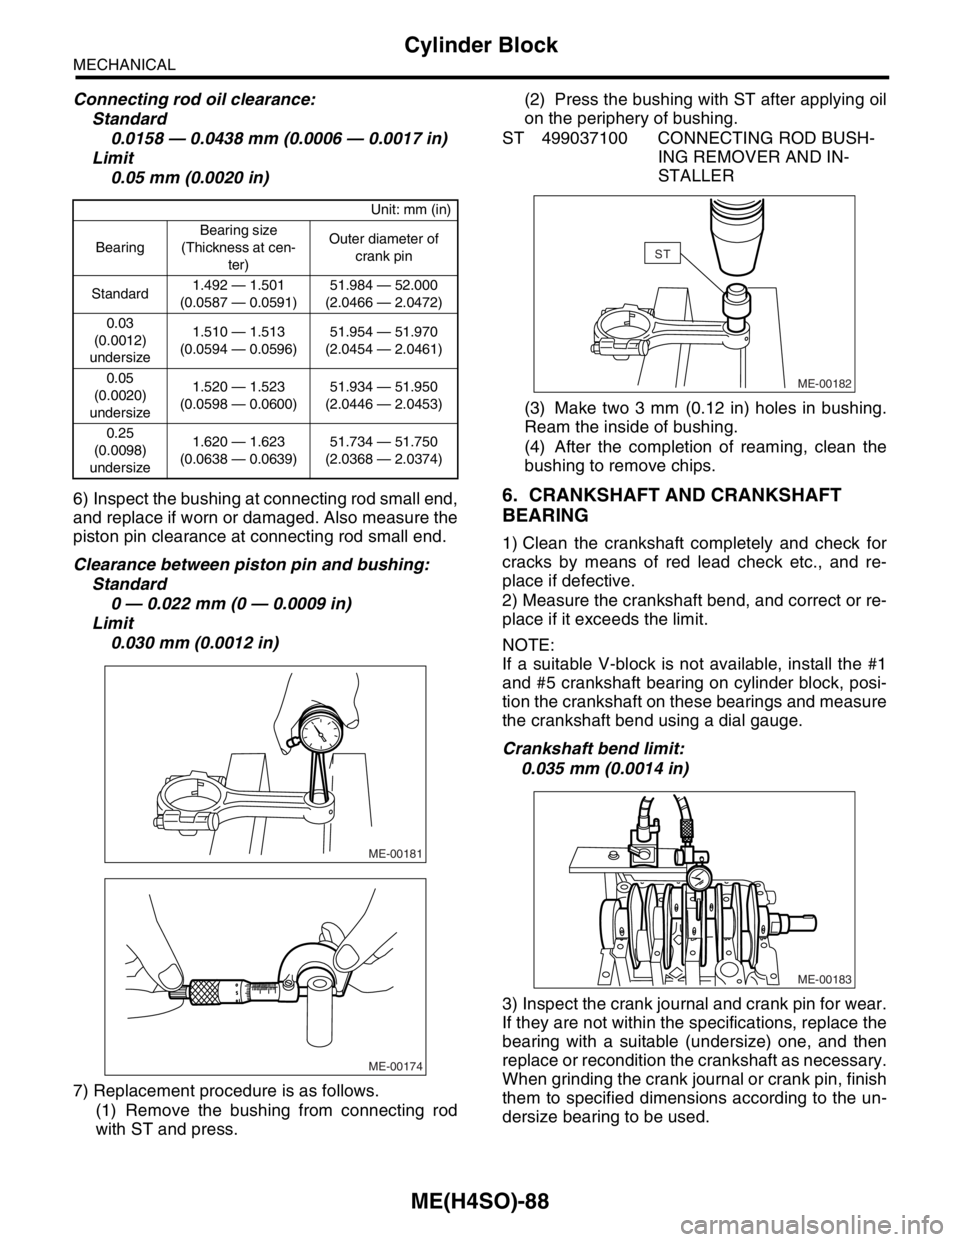
7) Replacement procedure is as follows.
(1) Remove the bushing from connecting rod
with ST and press.(2) Press the bushing with ST after applying oil
on the periphery of bushing.
ST 499037100 CONNECTING ROD BUSH-
ING REMOVER AND IN-
STALLER
(3) Make two 3 mm (0.12 in) holes in bushing.
Ream the inside of bushing.
(4) After the completion of reaming, clean the
bushing to remove chips.
6. CRANKSHAFT AND CRANKSHAFT
BEARING
1) Clean the crankshaft completely and check for
cracks by means of red lead check etc., and re-
place if defective.
2) Measure the crankshaft bend, and correct or re-
place if it exceeds the limit.
NOTE:
If a suitable V-block is not available, install the #1
and #5 crankshaft bearing on cylinder block, posi-
tion the crankshaft on these bearings and measure
the crankshaft bend using a dial gauge.
Crankshaft bend limit:
0.035 mm (0.0014 in)
3) Inspect the crank journal and crank pin for wear.
If they are not within the specifications, replace the
bearing with a suitable (undersize) one, and then
replace or recondition the crankshaft as necessary.
When grinding the crank journal or crank pin, finish
them to specified dimensions according to the un-
dersize bearing to be used.
Unit: mm (in)
BearingBearing size
(Thickness at cen-
ter)Outer diameter of
crank pin
Standard1.492 — 1.501
(0.0587 — 0.0591)51.984 — 52.000
(2.0466 — 2.0472)
0.03
(0.0012)
undersize1.510 — 1.513
(0.0594 — 0.0596)51.954 — 51.970
(2.0454 — 2.0461)
0.05
(0.0020)
undersize1.520 — 1.523
(0.0598 — 0.0600)51.934 — 51.950
(2.0446 — 2.0453)
0.25
(0.0098)
undersize1.620 — 1.623
(0.0638 — 0.0639)51.734 — 51.750
(2.0368 — 2.0374)
ME-00181
ME-00174
ME-00182
ST
ME-00183
Page 961 of 2870
ME(H4SO)-90
MECHANICAL
Cylinder Block
O.D.: Outer Diameter
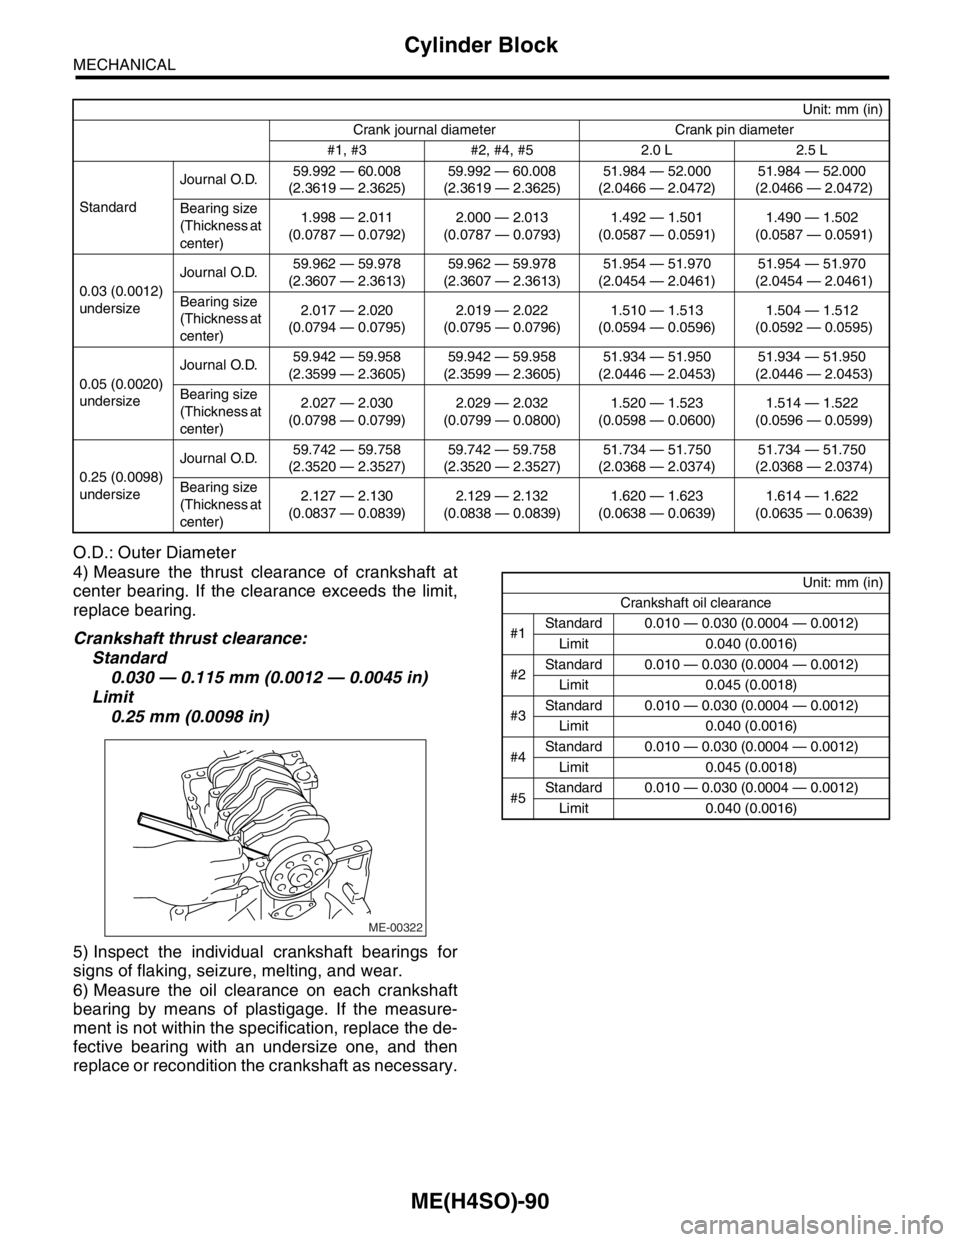
4) Measure the thrust clearance of crankshaft at
center bearing. If the clearance exceeds the limit,
replace bearing.
Crankshaft thrust clearance:
Standard
0.030 — 0.115 mm (0.0012 — 0.0045 in)
Limit
0.25 mm (0.0098 in)
5) Inspect the individual crankshaft bearings for
signs of flaking, seizure, melting, and wear.
6) Measure the oil clearance on each crankshaft
bearing by means of plastigage. If the measure-
ment is not within the specification, replace the de-
fective bearing with an undersize one, and then
replace or recondition the crankshaft as necessary.
Unit: mm (in)
Crank journal diameter Crank pin diameter
#1, #3 #2, #4, #5 2.0 L 2.5 L
StandardJournal O.D.59.992 — 60.008
(2.3619 — 2.3625)59.992 — 60.008
(2.3619 — 2.3625)51.984 — 52.000
(2.0466 — 2.0472)51.984 — 52.000
(2.0466 — 2.0472)
Bearing size
(Thickness at
center)1.998 — 2.011
(0.0787 — 0.0792)2.000 — 2.013
(0.0787 — 0.0793)1.492 — 1.501
(0.0587 — 0.0591)1.490 — 1.502
(0.0587 — 0.0591)
0.03 (0.0012)
undersizeJournal O.D.59.962 — 59.978
(2.3607 — 2.3613)59.962 — 59.978
(2.3607 — 2.3613)51.954 — 51.970
(2.0454 — 2.0461)51.954 — 51.970
(2.0454 — 2.0461)
Bearing size
(Thickness at
center)2.017 — 2.020
(0.0794 — 0.0795)2.019 — 2.022
(0.0795 — 0.0796)1.510 — 1.513
(0.0594 — 0.0596)1.504 — 1.512
(0.0592 — 0.0595)
0.05 (0.0020)
undersizeJournal O.D.59.942 — 59.958
(2.3599 — 2.3605)59.942 — 59.958
(2.3599 — 2.3605)51.934 — 51.950
(2.0446 — 2.0453)51.934 — 51.950
(2.0446 — 2.0453)
Bearing size
(Thickness at
center)2.027 — 2.030
(0.0798 — 0.0799)2.029 — 2.032
(0.0799 — 0.0800)1.520 — 1.523
(0.0598 — 0.0600)1.514 — 1.522
(0.0596 — 0.0599)
0.25 (0.0098)
undersizeJournal O.D.59.742 — 59.758
(2.3520 — 2.3527)59.742 — 59.758
(2.3520 — 2.3527)51.734 — 51.750
(2.0368 — 2.0374)51.734 — 51.750
(2.0368 — 2.0374)
Bearing size
(Thickness at
center)2.127 — 2.130
(0.0837 — 0.0839)2.129 — 2.132
(0.0838 — 0.0839)1.620 — 1.623
(0.0638 — 0.0639)1.614 — 1.622
(0.0635 — 0.0639)
ME-00322
Unit: mm (in)
Crankshaft oil clearance
#1Standard 0.010 — 0.030 (0.0004 — 0.0012)
Limit 0.040 (0.0016)
#2Standard 0.010 — 0.030 (0.0004 — 0.0012)
Limit 0.045 (0.0018)
#3Standard 0.010 — 0.030 (0.0004 — 0.0012)
Limit 0.040 (0.0016)
#4Standard 0.010 — 0.030 (0.0004 — 0.0012)
Limit 0.045 (0.0018)
#5Standard 0.010 — 0.030 (0.0004 — 0.0012)
Limit 0.040 (0.0016)