Page 137 of 264

FOR PLEASANT DRIVING
1. After checking to be sure the tape in
the cassette is wound tightly, push a
cassette straight into the slot; the tape
player will automatically start playing.
When a cassette is inserted, the tape
player will begin playing even if the ra-
dio is being used. The tape player will
also start playing when the TAPE but-
ton (9) is pressed with a tape cassette
in the player even if the radio is being
used.
2. Press the (Dolby noise reduction)
button (8) to activate the circuitry
when playing Dolby NR-encoded
tapes. The Dolby noise reduction cir-
cuitry reduces tape hiss. the indicator
(13) illuminates when the circuit is ac-
tivated. Pressing the (Dolby noise
reduction) button a second time will
switch off the Dolby system.
NOTE
Dolby noise-reduction is manufactured
under license from Dolby Laboratories Li-
censing Corporation.
“DOLBY” and the Double-D symbol
are trademarks of Dolby Laboratories Li-
censing Corporation.How to fast forward/rewind
the tape
Fast forward
Press the button (6) for about half a
second or longer, the tape will be fast for-
warded.
Fast rewind
Press the button (5) for about half a
second or longer; the tape will be re-
wound.
During fast forwarding, pressing the
button (10) or button (6) starts the tape
playing from the point when either button
is pressed. Likewise, pressing the but-
ton or button (5) during fast rewinding
starts the tape playing from the point when
either button is pressed.
How to repeat the same selection
You can repeatedly listen to the same
tape selection by pressing the RPT button
(7). Press the RPT button, and the RPT in-
dicator (12) will come on.
To cancel, press the RPT button.
3. To adjust the volume and tone, refer
to the section “How to adjust the vol-
ume and tone” on page 6-4.
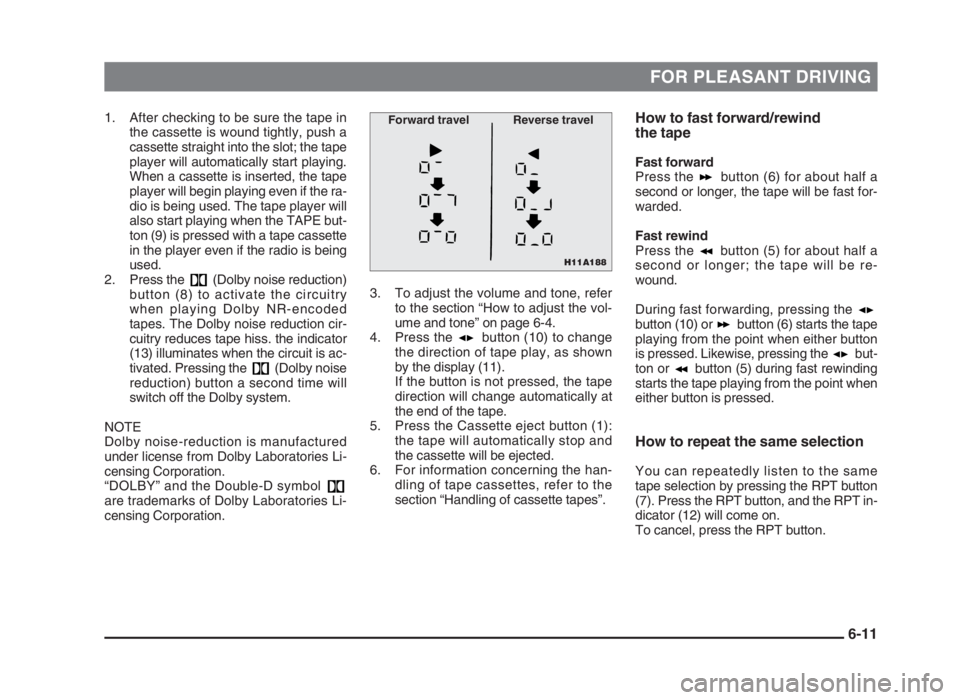
4. Press the button (10) to change
the direction of tape play, as shown
by the display (11).
If the button is not pressed, the tape
direction will change automatically at
the end of the tape.
5. Press the Cassette eject button (1):
the tape will automatically stop and
the cassette will be ejected.
6. For information concerning the han-
dling of tape cassettes, refer to the
section “Handling of cassette tapes”.
6-11
H11A188
Forward travel Reverse travel
06engL2_240082_4 22-01-2004 13:07 Page 6-11
Page 138 of 264

FOR PLEASANT DRIVING
How to operate the APS
(Auto Program Sensor) system
The start of each song on a prerecorded
music tape can be found by using the APS
or button (3 or 4).
As many as 7 programs can be skipped
over in this manner.
Forward APS operation:
Press the APS button (4) the number
of songs you desire to skip over.
The frequency-display window will display
the number of songs selected. The tape
will be fast-forwarded to the start of the
song, and playback will begin.
Rewind APS operation:
Press the APS button (3) the number
of songs you desire to skip over. Do not
forget to count the song now being played
back. The frequency-display window will
display the number of songs selected. The
tape will be rewound to the start of the
song, and playback will begin.
NOTE
(1) The tape may not stop at the begin-
ning of the song if the unrecorded
space between selections is less than
4 seconds, or if there is excessive
noise, etc. within a tune.
(2) The tape may stop at places in a
voice tape where there are pauses by
the speaker, if such pauses are long,
or for music tapes at places where the
music is at a very low volume level.
6-12
H11A196
APS APS
2 21 1
06engL2_240082_4 22-01-2004 13:07 Page 6-12
Page 139 of 264
FOR PLEASANT DRIVING
Connection of a CD player or a CD autochangerEH30E-Fa
The radio may be connected to a CD player or CD autochanger.
Consult an authorized MITSUBISHI dealer for more details.
1 - PWR (On-off switch)
2 - TAPE button
3 - UML button
4 - CD (CD mode changeover) button
5 - DISC (Disc selection) button*
6 - (Reverse skip) button
7 - (Forward skip) button
8 - (Fast-reverse) button
9 - (Fast-forward) button
10 - RPT (Repeat) button
11 - RDM (Random) button
12 - DISC indicator*
13 - CD indicator
14 - TRACK indicator
15 - RPT (Repeat-mode) indicator
16 - RDM (Random-mode) indicator
*: Operates only when a CD autochanger is equipped.
6-13
H11A1982 1
34 5 6 7 8 9 10 1112 13 14 15 16
06engL2_240082_4 22-01-2004 13:07 Page 6-13
Page 140 of 264

FOR PLEASANT DRIVING
To listen to a CD
1. Press the CD button (4), and the CD
mode will be selected, starting a play-
back.
NOTE
If the system is equipped with a CD auto-
changer, press the DISC button (5), to se-
lect another disc.
Every time the side of the DISC button
is pressed, the next disc is selected and
every time the side of the button is
pressed, changeover to the previous disc
is made.
2. To adjust the volume and tone, refer
to the section “How to adjust the vol-
ume and tone” on page 6-4.
3. To stop the CD, turn off the power by
pressing the PWR switch (1) to make
changeover to the other mode by
pressing the TAPE button (2) or UML
button (3).
4. For information concerning the han-
dling of compact discs, refer to the
section “Handling of compact discs”
on page 6-17.
How to fast forward/reverse the
disc
Fast forward
The disc is fast forwarded only while the
button (9) is kept pressed. Release the
button, and playback will start.
Fast reverse
The disc is turned back only while the
button (8) is kept pressed. Release the
button, and playback will start.
To find the start of a desired track
The start of each track on a disc can
be found by using the or button
(6 or 7).
Track up:
Press the button (7) the number of
tracks to skip over.
The frequency-display window will display
the number of tracks selected.
Track down:
Press the button (6) the number of
tracks to skip over.
The frequency-display window will display
the number of tracks selected.
How to repeat the same track
You can repeatedly listen to the same
track by pressing the RPT button (10).
Press the RPT button, and the RPT indi-
cator (15) will light.
To release, press the button again.
To change the order of discs
played back
Press the RDM button (11), and the RDM
indicator (16) will light and random tracks
for playback will be selected randomly
from all discs loaded into the CD auto-
changer. To release, press the button
again.
6-14
06engL2_240082_4 22-01-2004 13:07 Page 6-14
Page 141 of 264

FOR PLEASANT DRIVING
Procedure for input of
security code to audio
system with anti-theft
system
EH11F-Dd
When the vehicle not only has its audio
stolen but left in the following conditions,
the audio system with anti-theft system
does not operate even if the power supply
from the battery is returned to the normal
condition.
(1) The battery is discharged.
(2) The fuse has blown.
(3) Power supply from the battery has
been disconnected.
In these cases, input the security code by
the procedure shown below.
Security code input procedure
1. Return the power supply from the bat-
tery to the normal condition.
2. Place the ignition key in the “ACC” po-
sition.
3. Press the PWR button (1), and
“CODE” will be shown on the display
window (2). NOTE
(1) The security code (A) is indicated on
the cards delivered to you when you
purchased the vehicle or replaced the
audio system.
(2) If you lose the cards, call the nearest
authorized MITSUBISHI dealer.
(3) When you sell your vehicle or trade it
in, deliver the cards together with the
vehicle.
WARNINGYou are furnished with two cards in
the glove box. Keep them separately
from each other in appropriate
places outside the vehicle.
6-15
H11F022AH11F019
12
3 4
06engL2_240082_4 22-01-2004 13:07 Page 6-15
Page 142 of 264

FOR PLEASANT DRIVING
4. Press NO.1 through NO.4 memory
select button (3) to set the four-digit
security code indicated on the card.
Every time each digit key is pressed,
the figure changes as follows:
0 ➔1 ➔2 ... 9 ➔0
5. Press the UML button (4), and the au-
dio system will be in the operating
condition.
6. If the security codes do not match,
“1 ERROR” is shown on the display
window (2). In a few seconds, it will
change to “CODE”. So repeat the
steps 4 and 5.NOTE
(1) If a mistake is made during input of
the security code, the anti-theft sys-
tem will allow up to three attempts to
enter the correct code.
(2) The second error is displayed as
“2 ERROR”. When the third error is
made, “3 ERROR” is displayed and
then the display changes to “OFF”.
If this should occur, the unit will
not operate. Contact an authorized
MITSUBISHI dealer for assistance.
Handling of cassette tapesEH02B-Ad
CAUTIONTo maintain the cassette tape player
in good condition, observe the fol-
lowing precautions.
(1) Do not use cassette tapes
longer than C-90, otherwise
sound quality and tape durabil-
ity will be greatly diminished.
(2) Keep the cassette tape in
its case to protect from tape
looseness and dust when it
is not used.
(3) Keep the cassette tape away
from direct sunlight, heat and
magnetic fields such as the ra-
dio speakers.
(4) Before inserting the cassette,
make sure that the label is ad-
hered securely to the cassette.
(5) A loose tape should be correct-
ed before use.
(6) Do not oil any part of the player
and do not insert any object
other than tape cassettes into
the slot, or the tape player may
be damaged. Also, avoid insert-
ing your fingers into the slot.
There is a danger of being burnt
by the hot internal parts.
6-16
H11F020
06engL2_240082_4 22-01-2004 13:07 Page 6-16
Page 143 of 264

FOR PLEASANT DRIVING
Handling of compact discsEH12E-Dc
(1) Use only the compact discs with the
mark shown in the illustration above.
(Playback of CD-R discs may cause
problems. CD-RW discs cannot be
played.) The use of heart-shaped, oc-
tagonal, or any other non-circular
discs will result in damage.
(2) When the temperature suddenly
rises, i.e. immediately after the heater
is turned on in cold weather, dew con-
densation on the disc or in the player
might occur resulting in failure of op-
eration. In such a case, allow some
time before use.
(3) When the CD player is subjected to
violent vibration as during off-road
driving, detracking may result.(7) Do not use a disc that is cracked or
badly warped. Doing so might cause
a malfunction of the disc player.
(8) Do not use a ballpoint pen, felt pen,
pencil, etc. to write on the label sur-
face of the disc, and do not attach any
other labels, seals, etc.
CD player laser warning
Use of controls or adjustments, or per-
formance of procedures other than
normal use, may result in hazardous
radiation exposure.
Avoid direct exposure to beam. (4) When storing compact discs, always
store them in their individual cases.
Never place compact discs in direct
sunlight, or in any place where the
temperature or humidity is high.
(5) Take care never to touch the flat sur-
face of the disc where there is no
label. Doing so will contaminate the
disc surface and might adversely
affect the sound quality. When han-
dling a compact disc, always hold it by
grasping the outer circumference and
the centre hole.
(6) To clean the disc, use a soft, clean,
dry cloth. Wipe directly from the cen-
tre hole toward the outer-edge, do not
wipe in a circular pattern.
Never use any substances such as
benzine, paint thinner, a disc spray
cleaner, or an anti-static agent on the
disc.
6-17
H12F004H12F003
06engL2_240082_4 22-01-2004 13:07 Page 6-17
Page 144 of 264
FOR PLEASANT DRIVING
Pillar antennaEH11D-Cd
When listen to the radio, fully extend the
antenna. Before entering an automatic car
wash or other low-roofed area, be sure to
retract the antenna.
NOTE
Be sure to put down the pillar antenna in
the following cases:
• When entering a place with low clear-
ance.
• When going into an automatic car wash.
• When placing a car cover over the
vehicle.
VentilatorsEH16AAGf
1 - Centre ventilators
2 - Side ventilators
Air flow and direction adjustments
3 - Knob
4 - Ventilator dial
Ventilator dial
The ventilator can be opened and closed
with the dials.
- Open
- Close
Knob
Adjust the direction of the air flow by mov-
ing the knob.
6-18
H11D045H16A118
1
2
2
H16A324
3Centre ventilators
06engL2_240082_4 22-01-2004 13:07 Page 6-18