Page 81 of 264

INSTRUMENTS AND CONTROLS
4-17
Headlamp washer switch*
EE02A-La
The headlamp washer can be operated
with the ignition switch “ON” position and
the lamp switch at “ ” or “ ” position.
1 - Push the button once and the washer
fluid will be sprayed on to the head-
lamps for about 0.5 second.
NOTE
Check the headlamp washers periodically
to confirm that the washer fluid is being
sprayed properly on to the headlamp
lenses.
Precautions to observe when
using wipers and washers
EE13C-Af
(1) If the moving wipers become blocked
by ice or other deposits on the glass,
the motor may burn out even if the
wiper switch is turned to OFF. If ob-
struction occurs, park your vehicle in
a safe place, turn off the ignition, and
clean the deposits from the glass so
that the wipers operate smoothly.
(2) Do not use the wipers when the glass
is dry. They may scratch the glass
surface or the blades may prema-
turely wear out.
(3)
Before using the wipers in cold
weather, check that the wiper blades
are not frozen onto the glass. The mo-
tor may burn out if the wipers are used
with the blades frozen onto the glass.
(4) Avoid using the washer continuously
for more than 20 seconds. Do not
operate the washer when the fluid
reservoir is empty.
Otherwise, the motor may burn out.
(5) Periodically check the level of washer
fluid in the reservoir and refill if required
During cold weather, add a recom-
mended washer solution that will not
freeze in the washer reservoir. Failure
to do so could result in loss of washer
function and frost damage to the sys-
tem components.
(6) If the washer is used in cold weather,
the washer fluid sprayed against the
glass may freeze resulting in poor vis-
ibility. Heat the glass with the
defroster or demister before using the
washer.
E02A004
1
04engL2_240082_4 22-01-2004 13:20 Page 4-17
Page 82 of 264

INSTRUMENTS AND CONTROLS
4-18
Hazard warning flasher
switch
EE16A-Dd
Use the hazard warning flasher switch
when the vehicle has to be parked on the
road for any emergency.
The hazard warning flashers can always
be operated, regardless of the position of
the ignition key.
Push the switch to turn on the hazard
warning flashers; push the switch again to
turn them off.
When this switch is operated, all turn-sig-
nal lamps flash continuously, as do the
turn-signal indication lamps in the instru-
ment cluster.
Rear window demister
switch*
EE17ABAa
The rear window demister switch can be
operated with the ignition switch in the
“ON” position.
Push the switch to turn on the rear window
demister.
To turn off the demister, press the switch
once again.
If your vehicle is equipped with the rear
window demister timer, this will be turned
off automatically in about 11 minutes.
To turn off the demister within 11 minutes,
push the switch again.
The indication lamp (A) will illuminate
while the demister is on.
If your vehicle is equipped with heated
mirrors, these operate in conjunction with
the demister.
CAUTION
If the lamps are kept flashing for a
long time, the battery will be dis-
charged, resulting in hard engine
starting or a no starting at all.
E17A025
A
E16A026
04engL2_240082_4 22-01-2004 13:20 Page 4-18
Page 83 of 264

INSTRUMENTS AND CONTROLS
4-19
Refer to “Electric remote-controlled out-
side rear-view mirrors” on page 5-38.
CAUTION(1) The demister switch is not for
melting snow but for cleaning
mist. Remove snow before us-
ing the demister switch.
(2) To avoid unnecessary battery
discharge, do not use the rear
window demister during starting
of the engine or when the engine
is not running. Turn the demist-
er off immediately after the win-
dow is clear.
(3) When cleaning the inside of the
rear window, use a soft cloth
and wipe gently along the heater
wires, being careful not to dam-
age the wires.
(4) Do not allow objects to touch
the inside of the rear window
glass, damaged or broken wires
may result.
Rear fog lamp switch*EE08B-Ma
The rear fog lamp can only be operated
when the headlamps turn on.
1 - Rear fog lamp on.
2 - Rear fog lamp off.
The indication lamp in the instrument clus-
ter will illuminate while the rear fog lamp is
on.NOTE
(1) The rear fog lamp is automatically
turned off when the headlamp is
turned off.
(2) In case of vehicles with Daytime Run-
ning Lamp, the front fog lamp can be
operated even if the lamp switch is set
to the “ ” (OFF) position, because
the low beam of the headlamps, tail
lamps, etc. illuminate when the igni-
tion key is at the “ON” position.
(3) The rear fog lamp is installed only on
the driver’s side.
E08B037
2 1
Type 2
E08B020
1
2
Type 1
04engL2_240082_4 22-01-2004 13:20 Page 4-19
Page 84 of 264
INSTRUMENTS AND CONTROLS
4-20
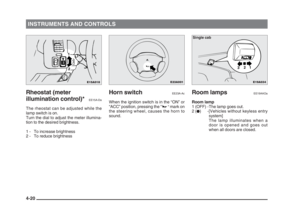
Rheostat (meter
illumination control)*
EE15A-Da
The rheostat can be adjusted while the
lamp switch is on.
Turn the dial to adjust the meter illumina-
tion to the desired brightness.
1 - To increase brightness
2 - To reduce brightness
Room lampsEE19AAOa
Room lamp
1 (OFF) -The lamp goes out.
2 (
•) -[Vehicles without keyless entry
system]
The lamp illuminates when a
door is opened and goes out
when all doors are closed.
Horn switchEE23A-Ac
When the ignition switch is in the “ON” or
“ACC” position, pressing the “”mark on
the steering wheel, causes the horn to
sound.
E19A034
1 2
3
Single cab
E23A001E15A018
1
2
04engL2_240082_4 22-01-2004 13:20 Page 4-20
Page 85 of 264
![MITSUBISHI L200 2004 Owners Manual (in English) INSTRUMENTS AND CONTROLS
4-21
[Vehicles with keyless entry system]
The room lamp goes on when a door
is opened. When all doors are closed,
the room lamp is illuminated and
dimmed gradually for 30 seco MITSUBISHI L200 2004 Owners Manual (in English) INSTRUMENTS AND CONTROLS
4-21
[Vehicles with keyless entry system]
The room lamp goes on when a door
is opened. When all doors are closed,
the room lamp is illuminated and
dimmed gradually for 30 seco](/manual-img/19/34872/w960_34872-84.png)
INSTRUMENTS AND CONTROLS
4-21
[Vehicles with keyless entry system]
The room lamp goes on when a door
is opened. When all doors are closed,
the room lamp is illuminated and
dimmed gradually for 30 seconds
then goes out.
However, the lamp goes out immedi-
ately without being dimmed in case of
the followings:
• The ignition switch is turned “ON”.
• All doors are locked using the key
mechanism of the driver’s door, the
lock knob of the driver’s door, or the
remote control switch of the keyless
entry system.NOTE
If the ignition key is removed with the
doors closed, the room lamp is dimmed
gradually for 30 seconds and then goes
out.
3 (ON) -The lamp illuminates.Personal lamps*
Push the button to turn on the lamp. Push
it again to turn it off.
NOTE
If you leave the lamps on without running
the engine, you will run down the battery.
Before you leave the vehicle, make sure
that all the lamps are off.
E19A058E19A052
1
2
3
Club cab, Double cab
04engL2_240082_4 22-01-2004 13:20 Page 4-21
Page 86 of 264
04engL2_240082_4 22-01-2004 13:20 Page 4-22
Page 87 of 264

Running-in recommendations .................... 5-2
Fuel selection ............................................... 5-3
Filling the fuel tank ...................................... 5-3
Catalytic converter* ..................................... 5-5
Economical driving ...................................... 5-6
Trailer towing ............................................... 5-7
Ignition switch .............................................. 5-9
Starting ......................................................... 5-11
Manual transmission ................................... 5-14
Automatic transmission .............................. 5-16
Operation of the automatic transmission .. 5-18
Transfer shift lever (4WD vehicles) ............ 5-20
Rear differential lock* .................................. 5-23
Correct 4-wheel drive operation ................. 5-26
Cautions on handling of 4WD vehicles ...... 5-29
Parking brake ............................................... 5-30
Parking .......................................................... 5-32
Braking.......................................................... 5-32
Anti-lock brake system (ABS)* ................... 5-33
Limited-slip differential* .............................. 5-35
Steering wheel height adjustment .............. 5-36
Power steering system* .............................. 5-37
Day/Night type inside rearview mirror ....... 5-37
Manual outside rear-view mirrors* ............. 5-37
Electric remote-controlled outside
rear-view mirrors* .................................. 5-38
Starting and driving
5
05engL2_240082_4 22-01-2004 13:04 Page 5-1
Page 88 of 264

Vehicles with automatic transmission
2WD
*1with overdrive switched OFF
*2with overdrive switched ON
4WD
*1with overdrive switched OFF
*2with overdrive switched ON
STARTING AND DRIVING
Running-in
recommendations
EA01APD
During the running-in period for the first
1,000 km, it is advisable to drive your new
vehicle using the following precautions as
a guideline to aid long life as well as future
economy and performance.
(1) Do not race the engine at high speeds.
(2) Avoid rapid starting, accelerating,
braking and prolonged high-speed
running.
(3) Keep to the running-in speed limit
shown below.
Please note that the legal speed limits
displayed must be adhered to.
(4) Do not exceed loading capacity.
(5) Refrain from towing a trailer.
Vehicles with manual transmission
2WD4WD
Petrol-powered vehicles
Diesel-powered vehicles
5-2
Drive rangeSpeed limit km/h (mph)
With
turbochargerWithout
turbocharger
1st 20 (12) 20 (12)
2nd 40 (24) 35 (21)
3rd 65 (40) 55 (34)
4th 85 (52) 85 (52)
5th 100 (62) 105 (65)
Drive range
Speed limit km/h (mph)
2H, 4H4L
1st 25 (15) 10 (6)
2nd 50 (31) 25 (15)
3rd 75 (46) 40 (24)
4th 105 (65) 55 (34)
5th 125 (77) 65 (40)
Drive range
Speed limit km/h (mph)
“L” (LOW)
25 (15)
“2” (SECOND)
50 (31)
“D” (DRIVE)
75 (46)*
1
105 (65)*
2
Drive
range
Speed limit km/h (mph)
Vehicles with
205/80R16
tyre sizeVehicles with
265/70R16
tyre size
2H, 4H4L2H, 4H4L
“L”
(LOW)30 (18) 15 (9) 30 (18) 15 (9)
“2”
(SECOND)55 (34) 30 (18) 60 (37) 30 (18)
“D”
(DRIVE)85 (52)*1
125 (77)*245 (27)*1
65 (40)*285 (52)*1
125 (77)*245 (27)*1
65 (40)*2
Drive
range
Speed limit km/h (mph)
Vehicles with
205/80R16 tyre size
Vehicles with
265/70R16 tyre size
2H, 4H4L2H, 4H4L
1st20 (12) 10 (6) 20 (12) 10 (6)
2nd35 (21) 20 (12) 40 (24) 20 (12)
3rd60 (37) 30 (18) 65 (40) 30 (18)
4th85 (52) 45 (27) 90 (55) 45 (27)
5th105 (65) 55 (34) 110 (68) 55 (34)
05engL2_240082_4 22-01-2004 13:04 Page 5-2