Page 158 of 578

5Clutch cable
6Throttle cable
7Main switch lead
8Start switch leadÅFasten the clutch switch")
2 - 31
SPEC
1Clamp
2Clutch switch lead
3Engine stop switch lead
4Brake hose (Brake cable for the
TT-R125E)
5Clutch cable
6Throttle cable
7Main switch lead
8Start switch leadÅFasten the clutch switch lead
and engine stop switch lead to 3
clicks.
ıPass the brake hose (brake
cable for the TT-R125E) in front
of the number plate and through
the cable guide.
ÇPass the clutch cable in back of
the number plate.
ÎStarting at the forepart, pass the
main switch lead, clutch cable
and start switch lead in that
order.
‰Pass the start switch lead in
back of the starter cable.ÏPass the main switch lead on
the right of the number plate
stay.
ÌFasten the throttle cable
adjuster cover and start switch
lead with a plastic locking tie
ends downward.
ÓFasten the start switch lead to 3
clicks.
ÈPass the start switch lead in the
middle of the brake master cyl-
inder bracket. (TT-R125LWE
only)
ÔPass the engine stop switch
lead in the middle of the clutch
holder.
A
A
87
3
11
2
3
4
5 67 1 8ÓÅ
ı
ÇÎ ‰Ï ÌÔ È
CABLE ROUTING DIAGRAM
Page 160 of 578

3 - 1
INSP
ADJ
MAINTENANCE INTERVALS
EC300000
REGULAR INSPECTION AND ADJUSTMENTS
MAINTENANCE INTERVALS
The following schedule is intended as a general guide to maintenance and lubrication. Bear in mind
that such factors as weather, terrain, geographical location, and individual usage will alter the
required maintenance and lubrication intervals. If you are a doubt as to what intervals to follow in
maintaining and lubricating your machine, consult your Yamaha dealer.
Dealer
NoteItem Checks and maintenance jobsInitial Every
10 hours
(1 month)60 hours
(6 months)120 hours
(12 months)
*
Fuel lineCheck fuel hoses for cracks or damage.
Replace if necessary.
Spark plugCheck condition.
Clean, regap or replace if necessary.
*
ValvesCheck valve clearance.
Adjust if necessary.
Air filter Clean or replace element if necessary.
*
CarburetorCheck engine idling speed and starter operation.
Adjust if necessary.
Exhaust systemsCheck for leakage.
Retighten if necessary.
Replace gasket if necessary.
Engine oilCheck oil level and vehicle for oil leakage.
Correct if necessary.
Change. (Warm engine before draining.)
ClutchCheck operation.
Adjust or replace cable.
*
Front brakeCheck operation.
Adjust brake lever free play.
Check fluid level and leakage. (TT-R125LWE only)Every ride
*
Rear brakeCheck operation.
Adjust brake pedal free play and replace brake
shoes if necessary.Every ride
*
WheelsCheck balance, runout, spoke tightness and for
damage.
Tighten spokes and rebalance, replace if
necessary.
*
TiresCheck tread depth and for damage.
Replace if necessary.
Check air pressure.
Correct if necessary.
*
Wheel bearingsCheck bearing for looseness or damage.
Replace if necessary.
*
SwingarmCheck swingarm pivoting point for play.
Correct if necessary.
Lubricate with molybdenum disulfide grease.
Drive chainCheck chain slack.
Adjust if necessary. Make sure that the rear wheel
is properly aligned.
Clean and lubricate.Every ride
*
Steering bearingsCheck bearing play and steering for roughness.
Correct accordingly.
Lubricate with lithium soap base grease every 120
hours.
SidestandCheck operation.
Lubricate and repair if necessary.
Page 166 of 578

3 - 3
INSP
ADJ
PRE-OPERATION INSPECTION AND MAINTENANCE
PRE-OPERATION INSPECTION AND MAINTENANCE
Before riding for break-in operation or practice, make sure the machine is in good operating condi-
tion.
Before using this machine, check the following points.
GENERAL INSPECTION AND MAINTENANCE
Item Routine Page
FuelCheck that a fresh gasoline is filled in the fuel tank. Check the
fuel line for leakage.P.1-12
Engine oilCheck that the oil level is correct. Check the crankcase for leak-
age.P.3-7 ~ 10
Gear shifter and clutchCheck that gears can be shifted correctly in order and that the
clutch operates smoothly.P.3-4
Throttle grip/housingCheck that the throttle grip operation and free play are correctly
adjusted. Lubricate the throttle grip and housing, if necessary.P.3-4 ~ 5
BrakesCheck the play of front and rear brake and effect of front and
rear brake.
Check fluid level and leakage. (TT-R125LWE only)P.3-15 ~ 20
Drive chainCheck chain slack and alignment. Check that the chain is lubri-
cated properly.P.3-21 ~ 22
WheelsCheck for excessive wear and tire pressure. Check for loose
spokes and have no excessive play.P.3-27 ~ 28
SteeringCheck that the handlebar can be turned smoothly and have no
excessive play.P.3-28 ~ 30
Front forks and rear shock
absorber assemblyCheck that they operate smoothly and there is no oil leakage. P.3-23 ~ 26
Cables (wires)Check that the clutch and throttle cables move smoothly. Check
that they are not caught when the handlebars are turned or
when the front forks travel up and down.—
Muffler Check that the muffler is tightly mounted and has no cracks. P.4-2
Sprocket Check that the driven sprocket tightening nut is not loose. P.3-20
Lubrication Check for smooth operation. Lubricate if necessary. P.3-31
Bolts and nuts Check the chassis and engine for loose bolts and nuts. —
Lead connectorsCheck that the CDI magneto, CDI unit, and ignition coil are con-
nected tightly.P.1-5
Page 170 of 578
3 - 4
INSP
ADJ
ENGINE/CLUTCH ADJUSTMENT/
THROTTLE CABLE ADJUSTMENT
EC350000
ENGINE
CLUTCH ADJUSTMENT
1. Check:
�
Clutch lever free play
a
Out of specification
→
Adjust.
Clutch lever free play
a
:
10 ~ 15 mm (0.39 ~ 0.59 in)
2. Adjust:
�
Clutch lever free play
NOTE:
�
Make minute adjustment on the lever side.
�
After adjustment, check proper operation of
clutch lever.
Clutch lever free play adjustment steps:
�
Loosen the locknut
1
.
�
Turn the adjuster
2
until free play
a
is
within the specified limits.
�
Tighten the locknut.
EC35A001
THROTTLE CABLE ADJUSTMENT
1. Check:
�
Throttle grip free play
a
Out of specification
→
Adjust.
Throttle grip free play
a
:
3 ~ 5 mm (0.12 ~ 0.20 in)
2. Adjust:
�
Throttle grip free play
Throttle grip free play adjustment steps:
�
Loosen the locknut
1
.
�
Turn the adjuster
2
until the specified free
play is obtained.
�
Tighten the locknut.
Page 172 of 578
3 - 5
INSP
ADJ
THROTTLE LUBRICATION/AIR FILTER CLEANING
THROTTLE LUBRICATION
1. Remove:
�
Throttle cable cap
1
NOTE:
Before adjusting the throttle cable free play,
the engine idle speed should be adjusted.
WARNING
After adjusting, turn the handlebar to
right and left and make sure that the
engine idling does not run faster.
2. Apply:
�
Lithium soap base grease
On the throttle cable end
a
and tube
guide cable winding portion
b
.
3. Install:
�
Throttle cable cap
T R..2 Nm (0.2 m · kg, 1.4 ft · lb)
AIR FILTER CLEANING
NOTE:
Proper air filter maintenance is the biggest key
to preventing premature engine wear and
damage.
CAUTION:
Never run the engine without the air filter
element in place; this would allow dirt and
dust to enter the engine and cause rapid
wear and possible engine damage.
Page 176 of 578
3 - 7
INSP
ADJ
ENGINE OIL LEVEL INSPECTION
6. Apply:
�Foam-air-filter oil or engine mixing oil
To the element.
NOTE:
Squeeze out the excess oil. Element should be
wet but not dripping.
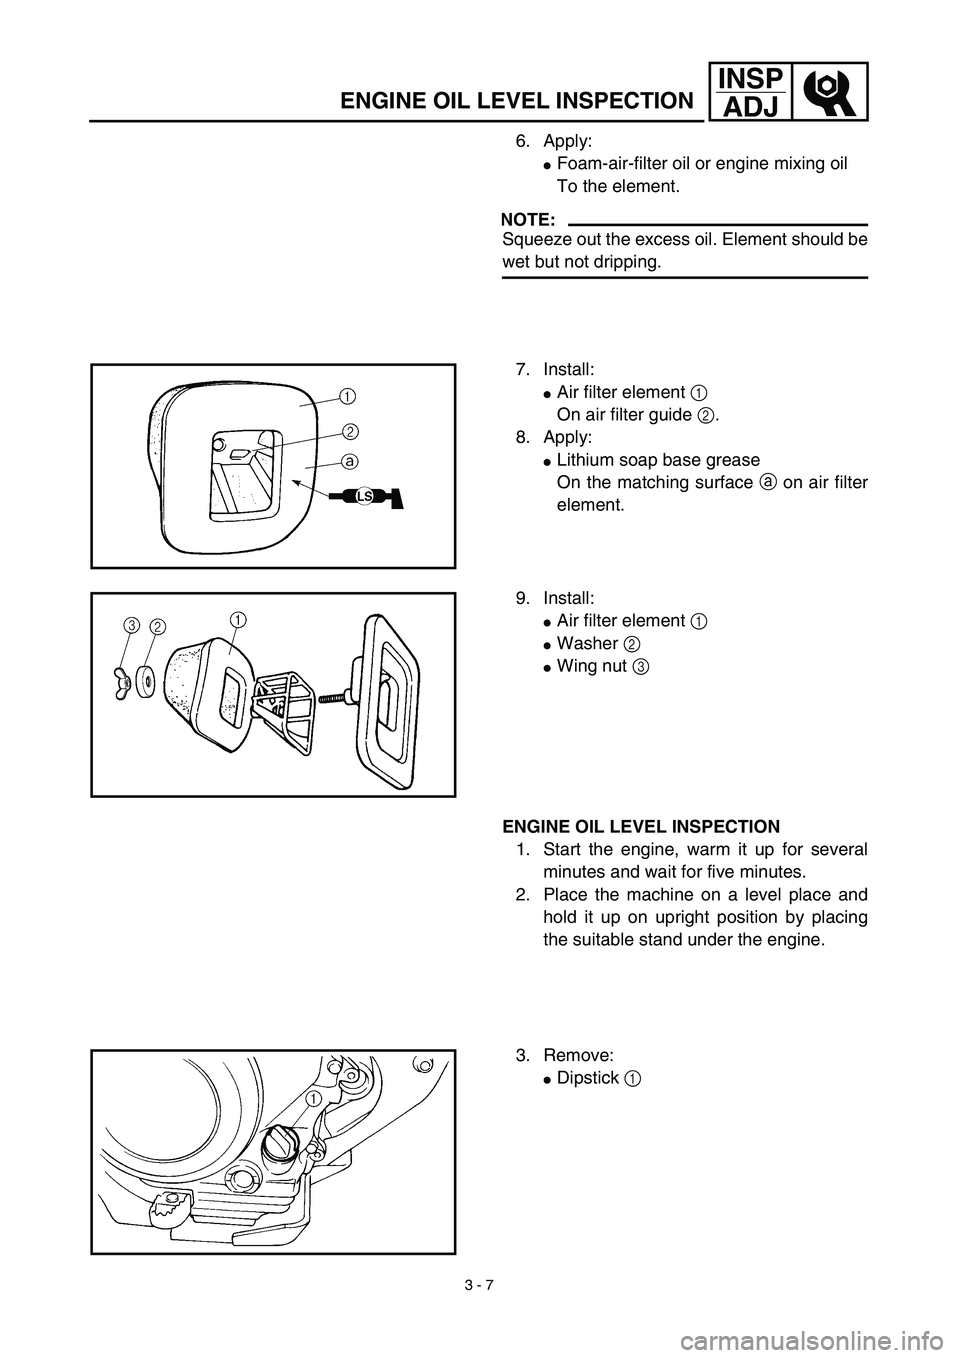
7. Install:
�Air filter element 1
On air filter guide 2.
8. Apply:
�Lithium soap base grease
On the matching surface a on air filter
element.
9. Install:
�Air filter element 1
�Washer 2
�Wing nut 3
ENGINE OIL LEVEL INSPECTION
1. Start the engine, warm it up for several
minutes and wait for five minutes.
2. Place the machine on a level place and
hold it up on upright position by placing
the suitable stand under the engine.
3. Remove:
�Dipstick 1
Page 178 of 578

3 - 8
INSP
ADJ
ENGINE OIL LEVEL INSPECTION
4. Check:
�Oil level
Oil level should be between maximum
a and minimum b marks.
Oil level is low → Add oil to proper
level.
NOTE:
When inspecting the oil level, do not screw the
dipstick into the oil tank. Insert the gauge
lightly.
(For USA and CDN)
CAUTION:
�Do not add any chemical additives.
Engine oil also lubricates the clutch and
additives could cause clutch slippage.
�Do not allow foreign material to enter the
crankcase.
Recommended oil:
At –10 ˚C (10 ˚F) or higher Å:
Yamalube 4 (10W-30) or SAE
10W-30 type SE motor oil
At 5 ˚C (40 ˚F) or higher ı:
Yamalube 4 (20W-40) or SAE
20W-40 type SE motor oil
(Except for USA and CDN)
CAUTION:
�Do not add any chemical additives or use
oils with a grade of CD a or higher.
�Do not use oils labeled “ENERGY CON-
SERVING II” b or higher. Engine oil also
lubricates the clutch and additives could
cause clutch slippage.
�Do not allow foreign materials to enter the
crankcase.
Recommended oil:
Refer to the following chart for
selection of oils which are suited
to the atmospheric temperatures.
Recommended engine oil classi-
fication:
API STANDARD:
API “SE” or higher grade
(Designed primarily for motor-
cycles)
Page 180 of 578
3 - 9
INSP
ADJ
ENGINE OIL REPLACEMENT
5. Install:
�Dipstick
6. Start the engine and let it warm up for
several minutes.
7. Turn off the engine and inspect the oil
level once again.
NOTE:
Wait a few minutes until the oil settles before
inspecting the oil level.
ENGINE OIL REPLACEMENT
1. Start the engine and warm it up for sev-
eral minutes and wait for five minute.
2. Place the machine on a level place and
hold it on upright position by placing the
suitable stand under the engine.
3. Place a suitable container under the
engine.
4. Remove:
�Oil drain bolt 1
�Dipstick 2
Drain the engine oil.
5. Install:
�Copper washer
�Oil drain bolt 1
New
T R..20 Nm (2.0 m · kg, 14 ft · lb)
6. Fill:
�Engine oil
7. Check:
�Oil leakage
8. Check:
�Engine oil level
9. Install:
�Dipstick 2
Oil capacity:
Periodic oil change:
1.0 L (0.88 Imp qt, 1.06 US qt)