Page 2961 of 3502
![NISSAN TEANA 2003 Service Manual OIL PUMP
LU-11
[QR]
C
D
E
F
G
H
I
J
K
L
MA
LU
OIL PUMPPFP:15010
Removal and InstallationBBS0059S
REMOVAL
Remove front cover. Refer to EM-53, "TIMING CHAIN" .
NOTE:
Oil pump is built into front cove](/manual-img/5/57392/w960_57392-2960.png "NISSAN TEANA 2003 Service Manual OIL PUMP
LU-11
[QR]
C
D
E
F
G
H
I
J
K
L
MA
LU
OIL PUMPPFP:15010
Removal and InstallationBBS0059S
REMOVAL
Remove front cover. Refer to EM-53, \"TIMING CHAIN\" .
NOTE:
Oil pump is built into front cove")
OIL PUMP
LU-11
[QR]
C
D
E
F
G
H
I
J
K
L
MA
LU
OIL PUMPPFP:15010
Removal and InstallationBBS0059S
REMOVAL
Remove front cover. Refer to EM-53, "TIMING CHAIN" .
NOTE:
Oil pump is built into front cover.
INSTALLATION
Note the following, and install in the reverse order of removal.
�When installing, align oil pump drive spacer flat faces with inner rotor flat faces.
INSPECTION AFTER INSTALLATION
1. Check the engine oil level. Refer to LU-7, "ENGINE OIL" .
2. Start engine, and make sure there is no leaks of engine oil.
3. Stop engine and wait for 10 minutes.
4. Check the engine oil level and adjust engine oil. Refer to LU-7, "
ENGINE OIL" .
Disassembly and AssemblyBBS0059T
DISASSEMBLY
1. Remove oil pump cover.
2. Remove inner rotor and outer rotor from front cover.
3. After removing regulator valve plug, remove regulator valve spring and regulator valve.
PBIC2430E
1. Front cover (Oil pump body is united) 2. Outer rotor 3. Inner rotor
4. Oil pump cover 5. Regulator valve 6. Regulator valve spring
7. Regulator valve plug
Page 2963 of 3502
OIL PUMP
LU-13
[QR]
C
D
E
F
G
H
I
J
K
L
MA
LU
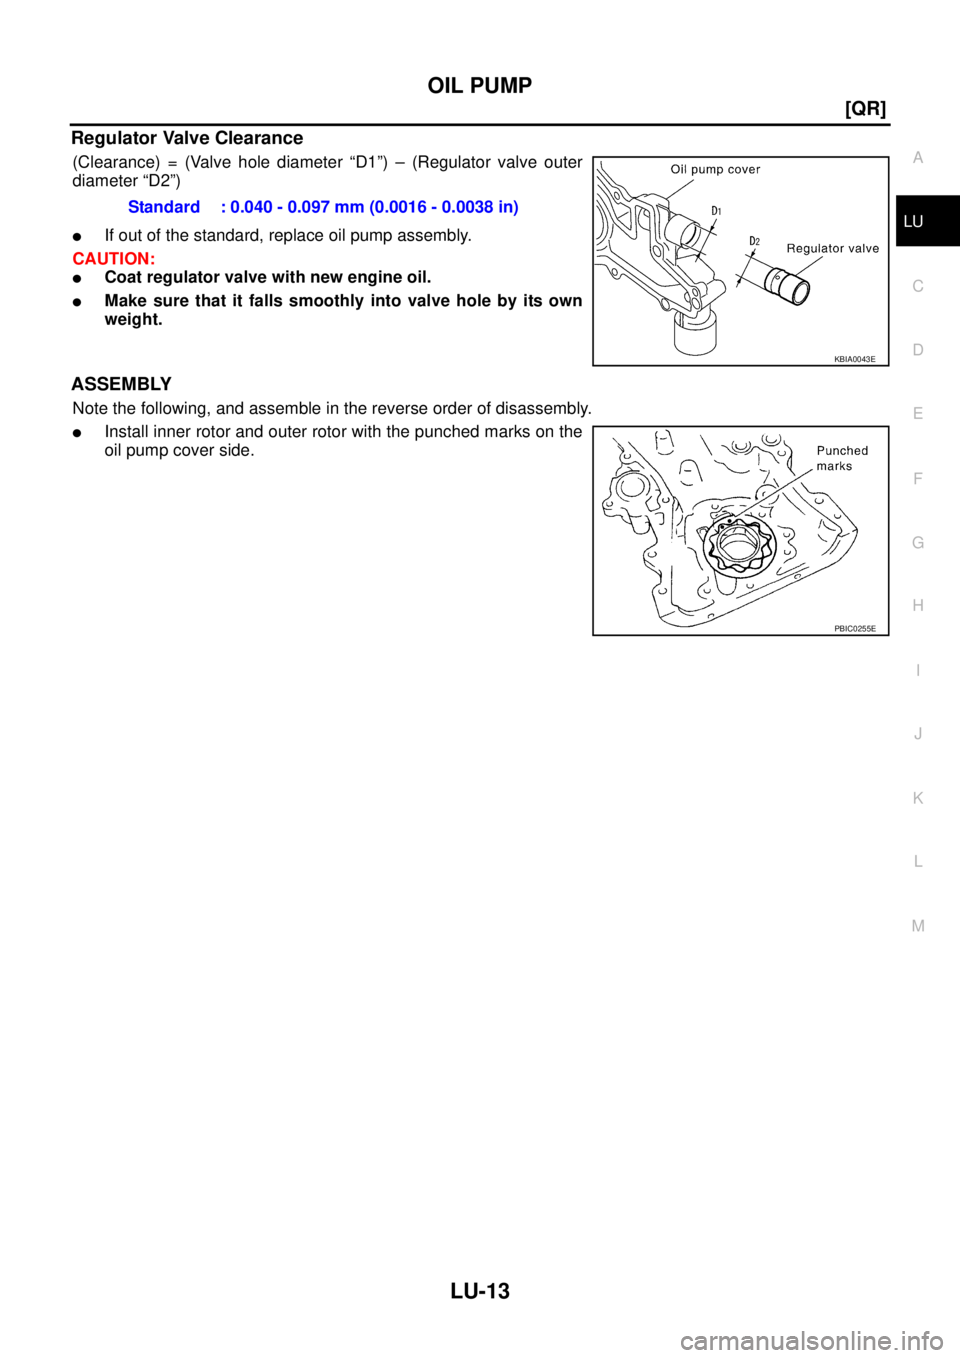
Regulator Valve Clearance
(Clearance) = (Valve hole diameter “D1”) – (Regulator valve outer
diameter “D2”)
�If out of the standard, replace oil pump assembly.
CAUTION:
�Coat regulator valve with new engine oil.
�Make sure that it falls smoothly into valve hole by its own
weight.
ASSEMBLY
Note the following, and assemble in the reverse order of disassembly.
�Install inner rotor and outer rotor with the punched marks on the
oil pump cover side.Standard : 0.040 - 0.097 mm (0.0016 - 0.0038 in)
KBIA0043E
PBIC0255E
Page 2974 of 3502
![NISSAN TEANA 2003 Service Manual LU-24
[VQ]
OIL COOLER (VQ35DE)
CAUTION:
�Perform this step when engine is cold.
�Do not spill engine coolant on drive belts.
5. Remove connector bolt, and remove oil cooler.
CAUTION:
Do not spill en](/manual-img/5/57392/w960_57392-2973.png "NISSAN TEANA 2003 Service Manual LU-24
[VQ]
OIL COOLER (VQ35DE)
CAUTION:
�Perform this step when engine is cold.
�Do not spill engine coolant on drive belts.
5. Remove connector bolt, and remove oil cooler.
CAUTION:
Do not spill en")
LU-24
[VQ]
OIL COOLER (VQ35DE)
CAUTION:
�Perform this step when engine is cold.
�Do not spill engine coolant on drive belts.
5. Remove connector bolt, and remove oil cooler.
CAUTION:
Do not spill engine oil to rubber parts such as drive belts and engine mounting insulator.
6. Remove water pipes, as necessary.
INSPECTION AFTER REMOVAL
Oil Cooler
Check oil cooler for cracks. Check oil cooler for clogging by blowing through engine coolant inlet. If necessary,
replace oil cooler.
Relief Valve
Check relief valve for movement, cracks and breaks by pushing the ball. If replacement is necessary, remove
relief valve by prying it out with suitable tool. Install a new relief valve in place by tapping it.
INSTALLATION
Note the following, and install in the reverse order of removal.
�Make sure that no foreign objects are adhering to the installation surfaces of oil cooler and oil pan (upper).
�Align cutout on oil cooler with protrusion on oil pan (upper) side,
and tighten connector bolt.
INSPECTION AFTER INSTALLATION
1. Check the engine oil level and the engine coolant level, and add engine oil and engine coolant. Refer to
LU-19, "
ENGINE OIL" and CO-34, "ENGINE COOLANT" .
2. Start engine, and make sure that there is no leaks of engine oil or engine coolant.
3. Stop engine and wait for 10 minutes.
4. Check the engine oil level and the engine coolant level again. Refer to LU-19, "
ENGINE OIL" and CO-34,
"ENGINE COOLANT" .
PBIC2508E
Page 2975 of 3502
![NISSAN TEANA 2003 Service Manual OIL PUMP
LU-25
[VQ]
C
D
E
F
G
H
I
J
K
L
MA
LU
OIL PUMPPFP:15010
Removal and InstallationBBS004WO
REMOVAL
1. Remove oil pans (lower and upper) and oil strainer. Refer to EM-145, "OIL PAN AND OIL STRA](/manual-img/5/57392/w960_57392-2974.png "NISSAN TEANA 2003 Service Manual OIL PUMP
LU-25
[VQ]
C
D
E
F
G
H
I
J
K
L
MA
LU
OIL PUMPPFP:15010
Removal and InstallationBBS004WO
REMOVAL
1. Remove oil pans (lower and upper) and oil strainer. Refer to EM-145, \"OIL PAN AND OIL STRA")
OIL PUMP
LU-25
[VQ]
C
D
E
F
G
H
I
J
K
L
MA
LU
OIL PUMPPFP:15010
Removal and InstallationBBS004WO
REMOVAL
1. Remove oil pans (lower and upper) and oil strainer. Refer to EM-145, "OIL PAN AND OIL STRAINER" .
2. Remove front timing chain case and timing chain (primary). Refer to EM-173, "
TIMING CHAIN" .
3. Remove oil pump assembly.
INSTALLATION
Note the following, and install in the reverse order of removal.
�When installing, align crankshaft flat faces with inner rotor flat faces.
INSPECTION AFTER INSTALLATION
1. Check the engine oil level. Refer to LU-19, "ENGINE OIL" .
2. Start engine, and check there is no leaks of engine oil.
3. Stop engine and wait for 10 minutes.
4. Check the engine oil level and add engine oil. Refer to LU-19, "
ENGINE OIL" .
Disassembly and AssemblyBBS004WP
DISASSEMBLY
1. Remove oil pump cover.
2. Remove oil pump inner rotor and oil pump outer rotor from oil pump body.
3. After removing regulator valve plug, remove regulator valve spring and regulator valve.
1. Oil pump body 2. Oil pump outer rotor 3. Oil pump inner rotor
4. Oil pump cover 5. Regulator valve plug 6. Regulator valve spring
7. Regulator valve
PBIC2509E
Page 2977 of 3502
OIL PUMP
LU-27
[VQ]
C
D
E
F
G
H
I
J
K
L
MA
LU
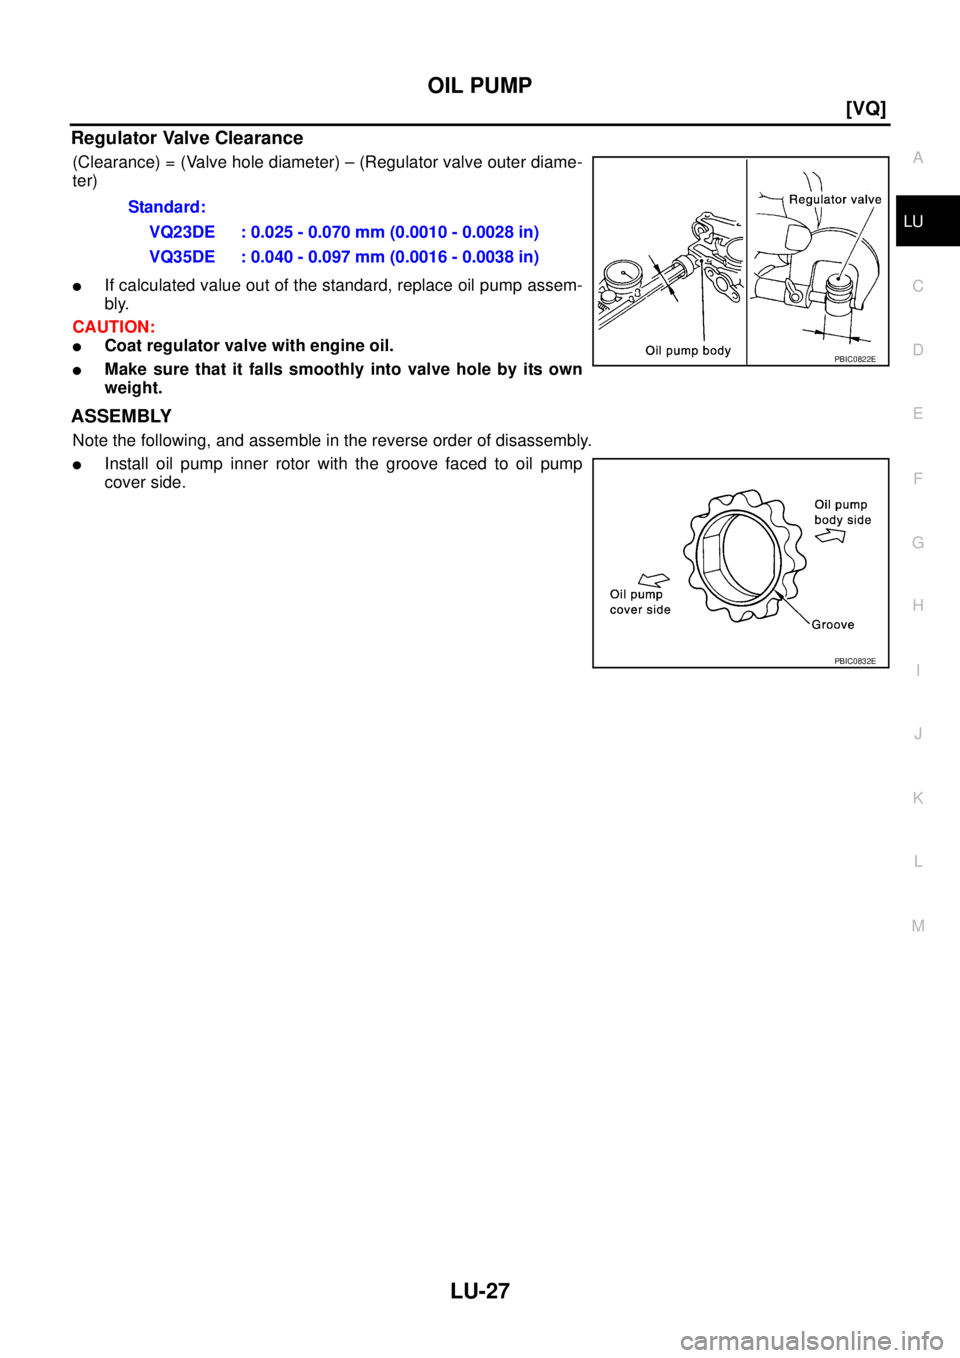
Regulator Valve Clearance
(Clearance) = (Valve hole diameter) – (Regulator valve outer diame-
ter)
�If calculated value out of the standard, replace oil pump assem-
bly.
CAUTION:
�Coat regulator valve with engine oil.
�Make sure that it falls smoothly into valve hole by its own
weight.
ASSEMBLY
Note the following, and assemble in the reverse order of disassembly.
�Install oil pump inner rotor with the groove faced to oil pump
cover side.Standard:
VQ23DE : 0.025 - 0.070 mm (0.0010 - 0.0028 in)
VQ35DE : 0.040 - 0.097 mm (0.0016 - 0.0038 in)
PBIC0822E
PBIC0832E
Page 2998 of 3502

CHECKING RADIATOR SYSTEM FOR LEAKS
�To check for leaks, apply pressure to the cooling system with
radiator cap tester (commercial service tool) and radiator cap
tes")
MA-20
ENGINE MAINTENANCE (QR20DE)
CHECKING RADIATOR SYSTEM FOR LEAKS
�To check for leaks, apply pressure to the cooling system with
radiator cap tester (commercial service tool) and radiator cap
tester adapter [SST].
WARNING:
Do not remove radiator cap when engine is hot. Serious
burns could occur from high-pressure engine coolant
escaping from radiator.
CAUTION:
Higher testing pressure than specified may cause radiator
damage.
NOTE:
In a case that engine coolant decreases, replenish radiator with engine coolant.
�If anything is found, repair or replace damaged parts.
Checking Fuel LinesBLS00094
Inspect fuel lines, fuel filler cap and fuel tank for improper attach-
ment, leaks, cracks, damage, loose connections, chafing or deterio-
ration.
If necessary, repair or replace damaged parts.
Changing Air Cleaner FilterBLS00095
VISCOUS PAPER TYPE
The viscous paper type filter does not need cleaning between replacement intervals. Refer to MA-8,
"PERIODIC MAINTENANCE".
Removal
1. Unhook air cleaner case (lower) side clips and lift up air cleaner case (upper).
2. Remove air cleaner filter.
Installation
Installation is the reverse order of removal.
Changing Engine OilBLS00096
WARNING:
�Be careful not to burn yourself, as engine oil may be hot.Testing pressure
: 157 kPa (1.57 bar, 1.6 kg/cm
2 , 23 psi)
SLC756AA
SMA803A
PBIC2452E
Page 3001 of 3502

MA-23
C
D
E
F
G
H
I
J
K
MA
B
MA
INSPECTION AFTER REMOVAL
Use standard type spark plug for normal condition.
Hot type spark plug is suitable when fouling occurs with stand")
ENGINE MAINTENANCE (QR20DE)
MA-23
C
D
E
F
G
H
I
J
K
MA
B
MA
INSPECTION AFTER REMOVAL
Use standard type spark plug for normal condition.
Hot type spark plug is suitable when fouling occurs with standard type spark plug under conditions such as:
�Frequent engine starts
�Low ambient temperatures
Cold type spark plug is suitable when spark plug knock occurs with standard type spark plug under conditions
such as:
�Extended highway driving
�Frequent high engine revolution
CAUTION:
�Do not drop or shock spark plug.
�Do not use wire brush for cleaning.
�If plug tip is covered with carbon, spark plug cleaner may
be used.
�Checking and adjusting plug gap is not required between
change intervals.
INSTALLATION
Installation is the reverse order of removal.
Checking EVAP Vapor LinesBLS0009A
1. Visually inspect EVAP vapor lines for improper attachment and for cracks, damage, loose connections,
chafing and deterioration.
2. Inspect fuel tank filler cap vacuum relief valve for clogging, sticking, etc.
Refer to EC-27, "
EVAPORATIVE EMISSION SYSTEM" .
MakeNGK
Standard typePLFR5A-11
Hot typePLFR4A-11
Cold typePLFR6A-11
Gap (Nominal) : 1.1 mm (0.043 in)
Cleaner air pressure:
Less than 588 kPa (5.88 bar, 6 kg/cm
2 , 85 psi)
Cleaning time:
Less than 20 seconds
SMA773C
SMA806CA
Spark plug:
: 24.5 N·m (2.5 kg-m, 18 ft-lb)
Page 3008 of 3502

Checking Fuel LinesBLS0005N
Inspect fuel lines, fuel filler cap and fuel tank for improper attach-
ment, leaks, cracks, damage, loose connections, chafin")
MA-30
ENGINE MAINTENANCE (VQ23DE AND VQ35DE)
Checking Fuel LinesBLS0005N
Inspect fuel lines, fuel filler cap and fuel tank for improper attach-
ment, leaks, cracks, damage, loose connections, chafing or deterio-
ration.
If necessary, repair or replace damaged parts.
Changing Air Cleaner FilterBLS0005O
VISCOUS PAPER TYPE
The viscous paper type filter does not need cleaning between replacement intervals. Refer to MA-8, "PERI-
ODIC MAINTENANCE" .
Removal
1. Unhook air cleaner case (lower) side clips and lift up air cleaner case (upper).
2. Remove air cleaner filter.
Installation
Installation is the reverse order of removal.
Changing Engine OilBLS0005P
WARNING:
�Be careful not to burn yourself, as engine oil may be hot.
�Prolonged and repeated contact with used engine oil may cause skin cancer; try to avoid direct
skin contact with used engine oil. If skin contact is made, wash thoroughly with soap or hand
cleaner as soon as possible.
1. Warm up engine, put vehicle horizontally and check for engine oil leakage from engine components. Refer
to LU-19, "
ENGINE OIL LEAKAGE" .
2. Stop engine and wait for 10 minutes.
3. Loosen oil filler cap and then remove drain plug.
4. Drain engine oil.
5. Install drain plug with new washer. Refer to EM-145, "
OIL PAN AND OIL STRAINER" .
CAUTION:
Be sure to clean drain plug and install with new washer.
6. Refill with new engine oil.
Engine oil specification and viscosity:
Refer to MA-14, "
RECOMMENDED FLUIDS AND LUBRICANTS" .
SMA803A
PBIC2452E
Oil pan drain plug:
: 34.3 N·m (3.5 kg-m, 25 ft-lb)