Page 462 of 3502
ATC-84
TROUBLE DIAGNOSIS
Insufficient CoolingBJS000G7
SYMPTOM: Insufficient cooling
INSPECTION FLOW
*1AT C - 4 7 , "FUNCTION CONFIRMA-
TION PROCEDURE", see No. 2 to 6.*2ATC-66, "
Air Mix Door Motor Circuit"*3ATC-87, "Test Reading"
*4AT C - 5 2 , "AUXILIARY MECHANISM:
TEMPERATURE SETTING TRIM-
MER"
*5ATC-47, "FUNCTION CONFIRMA-
TION PROCEDURE", see No. 13.*6ATC-59, "
LAN System Circuit"
*7AT C - 7 2 , "Blower Motor Circuit"*8ATC-78, "Magnet Clutch Circuit"*9ATC-85, "PERFORMANCE TEST
DIAGNOSIS"
*10AT C - 5 4 , "Operational Check"*11EM-14, "Checking Drive Belts" (QR
engine) or EM-128, "
Checking Drive
Belts" (VQ engine)*12EC-218, "
System Description" (QR
engine) or EC-575, "
System
Description" (VQ engine)
SJIA1652E
Page 464 of 3502
ATC-86
TROUBLE DIAGNOSIS
*1ATC-136, "Check Disc to Pulley
Clearance"
*2ATC-72, "Blower Motor Circuit"*3EM-14, "Checking Drive Belts" (QR
engine) or EM-128, "
Checking Drive
Belts" (VQ engine)
SJIA1642E
Page 466 of 3502

ATC-88
TROUBLE DIAGNOSIS
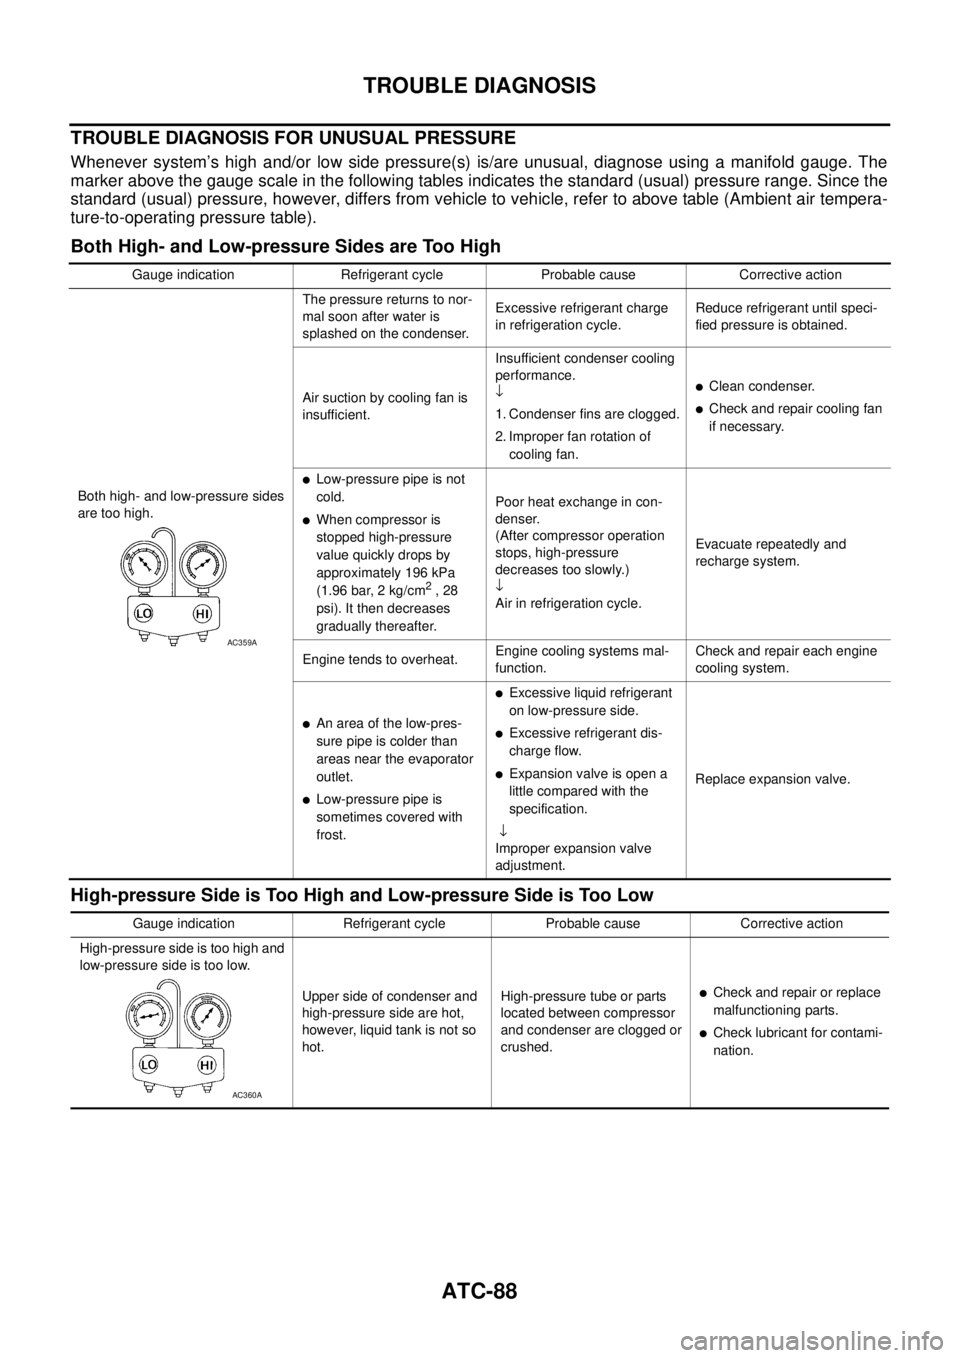
TROUBLE DIAGNOSIS FOR UNUSUAL PRESSURE
Whenever system’s high and/or low side pressure(s) is/are unusual, diagnose using a manifold gauge. The
marker above the gauge scale in the following tables indicates the standard (usual) pressure range. Since the
standard (usual) pressure, however, differs from vehicle to vehicle, refer to above table (Ambient air tempera-
ture-to-operating pressure table).
Both High- and Low-pressure Sides are Too High
High-pressure Side is Too High and Low-pressure Side is Too Low
Gauge indication Refrigerant cycle Probable cause Corrective action
Both high- and low-pressure sides
are too high.The pressure returns to nor-
mal soon after water is
splashed on the condenser.Excessive refrigerant charge
in refrigeration cycle.Reduce refrigerant until speci-
fied pressure is obtained.
Air suction by cooling fan is
insufficient.Insufficient condenser cooling
performance.
↓
1. Condenser fins are clogged.
2. Improper fan rotation of
cooling fan.
�Clean condenser.
�Check and repair cooling fan
if necessary.
�Low-pressure pipe is not
cold.
�When compressor is
stopped high-pressure
value quickly drops by
approximately 196 kPa
(1.96 bar, 2 kg/cm
2 , 28
psi). It then decreases
gradually thereafter.Poor heat exchange in con-
denser.
(After compressor operation
stops, high-pressure
decreases too slowly.)
↓
Air in refrigeration cycle.Evacuate repeatedly and
recharge system.
Engine tends to overheat.Engine cooling systems mal-
function.Check and repair each engine
cooling system.
�An area of the low-pres-
sure pipe is colder than
areas near the evaporator
outlet.
�Low-pressure pipe is
sometimes covered with
frost.
�Excessive liquid refrigerant
on low-pressure side.
�Excessive refrigerant dis-
charge flow.
�Expansion valve is open a
little compared with the
specification.
↓
Improper expansion valve
adjustment.Replace expansion valve.
AC359A
Gauge indication Refrigerant cycle Probable cause Corrective action
High-pressure side is too high and
low-pressure side is too low.
Upper side of condenser and
high-pressure side are hot,
however, liquid tank is not so
hot.High-pressure tube or parts
located between compressor
and condenser are clogged or
crushed.
�Check and repair or replace
malfunctioning parts.
�Check lubricant for contami-
nation.
AC360A
Page 469 of 3502
TROUBLE DIAGNOSIS
ATC-91
C
D
E
F
G
H
I
K
L
MA
B
AT C
Insufficient HeatingBJS000G8
SYMPTOM: Insufficient heating
INSPECTION FLOW
*1ATC-54, "Operational Check"*2ATC-66, "Air Mix Door Motor Circuit"*3AT C - 4 7 , "FUNCTION CONFIRMA-
TION PROCEDURE", see No. 2 to
6.
*4ATC-47, "
FUNCTION CONFIRMA-
TION PROCEDURE", see No. 13.*5ATC-59, "
LAN System Circuit"*6AT C - 7 2 , "Blower Motor Circuit"
*7EC-131, "DTC P0117, P0118 ECT
SENSOR" (QR engine) or EC-474,
"DTC P0117, P0118 ECT SEN-
SOR" (VQ engine)*8CO-10, "
Changing Engine Coolant"
(QR engine) or CO-34, "
Changing
Engine Coolant" (VQ engine)*9CO-14, "
Checking Radiator Cap"
(QR engine) or CO-38, "
Checking
Radiator Cap" (VQ engine)
RJIA3273E
Page 471 of 3502
TROUBLE DIAGNOSIS
ATC-93
C
D
E
F
G
H
I
K
L
MA
B
AT C
*1AT C - 5 4 , "Operational Check"*2ATC-136, "Check Disc to Pulley
Clearance"
*3AT C - 2 1 , "Maintenance of Lubricant
Quantity in Compressor"
*4EM-14, "Checking Drive Belts" (QR
engine) or EM-128, "
Checking Drive
Belts" (VQ engine)
Page 474 of 3502

ATC-96
TROUBLE DIAGNOSIS
Ambient Sensor CircuitBJS000GC
COMPONENT DESCRIPTION
Ambient Sensor
The ambient sensor is attached on the hood lock stay. It detects
ambient temperature and converts it into a resistance value which is
then input into the unified meter and A/C amp.
AMBIENT TEMPERATURE INPUT PROCESS
The unified meter and A/C amp. includes a processing circuit for the ambient sensor input. However, when the
temperature detected by the ambient sensor increases quickly, the processing circuit retards the unified meter
and A/C amp. function. It only allows the unified meter and A/C amp. to recognize an ambient temperature
increase of 0.33°C (0.6°F) per 100 seconds.
As an example, consider stopping for a few minutes after high speed driving. Although the actual ambient tem-
perature has not changed, the temperature detected by the ambient sensor will increase. This is because the
heat from the engine compartment can radiate to the front grille area, location of the ambient sensor.
DIAGNOSIS PROCEDURE FOR AMBIENT SENSOR
SYMPTOM: Ambient sensor circuit is open or shorted. (21 or − 21 is
indicated on unified meter and A/C amp. as a result of performing
self-diagnosis STEP-2.)
1. CHECK VOLTAGE BETWEEN AMBIENT SENSOR AND GROUND
1. Disconnect ambient sensor connector.
2. Turn ignition switch ON.
3. Check voltage between ambient sensor harness connector
E257 terminal 1 and ground.
OK or NG
OK >> GO TO 2.
NG >> GO TO 4.
RJIA2779E
RJIA1461E
1 – Ground : Approx. 5 V
RJIA2017E
Page 498 of 3502
ATC-120
HEATER & COOLING UNIT ASSEMBLY
10. Remove mounting bolts from heater & cooling unit.
11. Remove steering column mounting nuts.
12. Remove steering member mounting bolts.
13. Remove steering member, and then remove heater & cooling unit.
INSTALLATION
Installation is basically the reverse order of removal.
CAUTION:
�Replace O-rings of A/C piping with new ones, and then apply compressor oil to it when installing
it.
�Female-side piping connection is thin and easy to deform. Slowly insert the male-side piping
straight in axial direction.
�Insert piping securely until a click is heard.
�After piping connection is completed, pull male-side piping by hand to make sure that connection
does not come loose.
�When recharging refrigerant, check for leaks.
NOTE:
�When filling radiator with coolant, refer to CO-10, "Changing Engine Coolant" (QR engine) or CO-34,
"Changing Engine Coolant" (VQ engine).
�Recharge the refrigerant.
RJIA3303E
RJIA3304E
Page 515 of 3502

REFRIGERANT LINES
ATC-137
C
D
E
F
G
H
I
K
L
MA
B
AT C
Removal and Installation of Low-pressure Flexible Hose and Low-pressure Pipe
1
BJS000HR
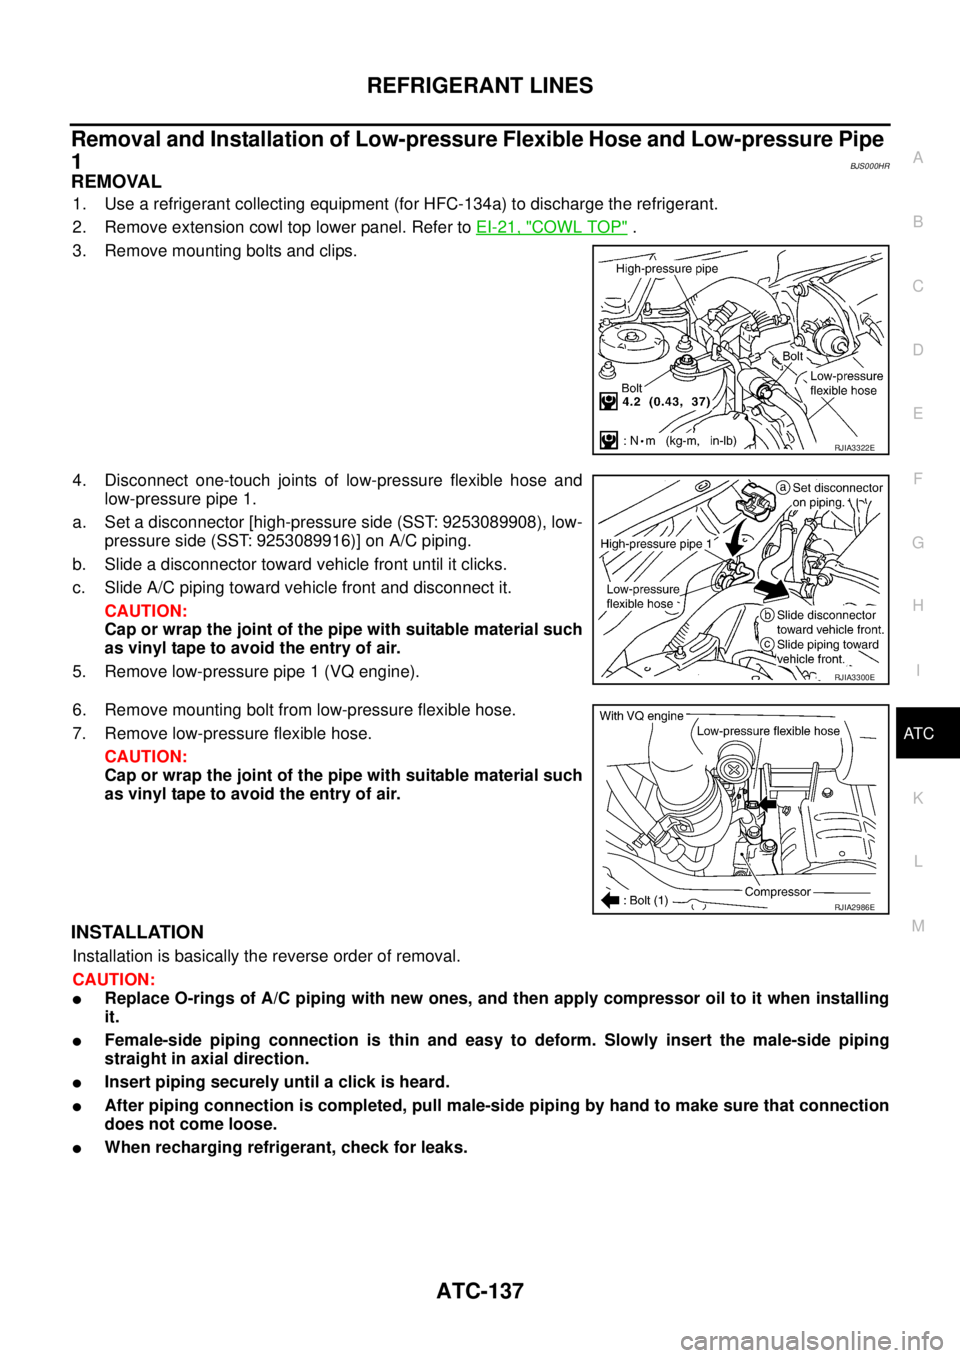
REMOVAL
1. Use a refrigerant collecting equipment (for HFC-134a) to discharge the refrigerant.
2. Remove extension cowl top lower panel. Refer to EI-21, "
COWL TOP" .
3. Remove mounting bolts and clips.
4. Disconnect one-touch joints of low-pressure flexible hose and
low-pressure pipe 1.
a. Set a disconnector [high-pressure side (SST: 9253089908), low-
pressure side (SST: 9253089916)] on A/C piping.
b. Slide a disconnector toward vehicle front until it clicks.
c. Slide A/C piping toward vehicle front and disconnect it.
CAUTION:
Cap or wrap the joint of the pipe with suitable material such
as vinyl tape to avoid the entry of air.
5. Remove low-pressure pipe 1 (VQ engine).
6. Remove mounting bolt from low-pressure flexible hose.
7. Remove low-pressure flexible hose.
CAUTION:
Cap or wrap the joint of the pipe with suitable material such
as vinyl tape to avoid the entry of air.
INSTALLATION
Installation is basically the reverse order of removal.
CAUTION:
�Replace O-rings of A/C piping with new ones, and then apply compressor oil to it when installing
it.
�Female-side piping connection is thin and easy to deform. Slowly insert the male-side piping
straight in axial direction.
�Insert piping securely until a click is heard.
�After piping connection is completed, pull male-side piping by hand to make sure that connection
does not come loose.
�When recharging refrigerant, check for leaks.
RJIA3322E
RJIA3300E
RJIA2986E