Page 110 of 4500
Fig. 78: Checking Terminal Voltage (Steering Angle Sensor Connector)
Courtesy of TOYOTA MOTOR SALES, U.S.A., INC.
NG: REPAIR OR REPLACE HARNESS OR CONNECTOR
OK: REPLACE STEERING ANGLE SENSOR
CIRCUIT DESCRIPTION
The yaw rate and deceleration sensor detect any gravity applied to the vehicle and transmits the signal to skid
control ECU via CAN communication.
Page 112 of 4500
Fig. 80: Deceleration Sensor Wiring Diagram
Courtesy of TOYOTA MOTOR SALES, U.S.A., INC.
INSPECTION PROCEDURE
HINT:
Page 113 of 4500
When U0123/62, U0124/95 or U0126/63 are output together with C1232/32, C1234/34, C1243/43, C1244/44,
C1245/45, and C1381/97 inspect and repair the trouble areas indicated by U0121/94, U0123/62, U0124/95 or
U0126/63 first.
1.CHECK SENSOR INSTALLATION (YAW RATE SENSOR)
a. Check that the yaw rate and deceleration sensor has been installed properly (see
REPLACEMENT
).
OK: Go to next step
The sensor is tightened to the specified torque.
The sensor is not tilted.
NG: INSTALL YAW RATE SENSOR CORRECTLY
OK: Go to next step
2.CHECK HARNESS AND CONNECTOR (IG TERMINAL)
a. Disconnect the yaw rate and deceleration sensor connector.
b. Turn the ignition switch to the ON position.
c. Measure the voltage according to the value (s) in the table below.
Standard:
Page 114 of 4500
Fig. 81: Identifying Yaw Rate And Deceleration Sensor Connector Terminals (1 Of 2)
Courtesy of TOYOTA MOTOR SALES, U.S.A., INC.
TESTER CONNECTION SPECIFIED CONDITION
NG: REPAIR OR REPLACE HARNESS OR CONNECTOR
OK: Go to next step
3.CHECK HARNESS AND CONNECTOR (GND TERMINAL)
a. Disconnect the yaw rate and deceleration sensor connector.
b. Measure the resistance according to the value (s) in the table below.
Standard:
Tester ConnectionSpecified Condition
Y1-5 (IG) - Body ground10 to 14V
Page 115 of 4500
TESTER CONNECTION SPECIFIED CONDITION
NG: REPAIR OR REPLACE HARNESS OR CONNECTOR
Fig. 82: Identifying Yaw Rate And Deceleration Sensor Connector Terminals (2 Of 2)
Courtesy of TOYOTA MOTOR SALES, U.S.A., INC.
OK: REPLACE ABS & TRACTION ACTUATOR ASSY (SEE REPLACEMENT
)
Tester ConnectionSpecified Condition
Y1-1 (GND) - Body groundBelow 1 ohms
Page 116 of 4500
CIRCUIT DESCRIPTION
The speed sensor detects wheel speed and sends the appropriate signals to the ECU. These signals are used to
control the ABS control system. The front and rear rotors have 48 serrations each.
When the rotors rotate, the magnetic field emitted by the permanent magnet in the speed sensor generates an
AC voltage. Since the frequency of this AC voltage changes in direct proportion to the speed of the rotor, the
frequenc
y is used by the ECU to detect the speed of each wheel.
Page 117 of 4500
Fig. 83: Left Rear Sensor Circuit Description
Courtesy of TOYOTA MOTOR SALES, U.S.A., INC.
Page 118 of 4500

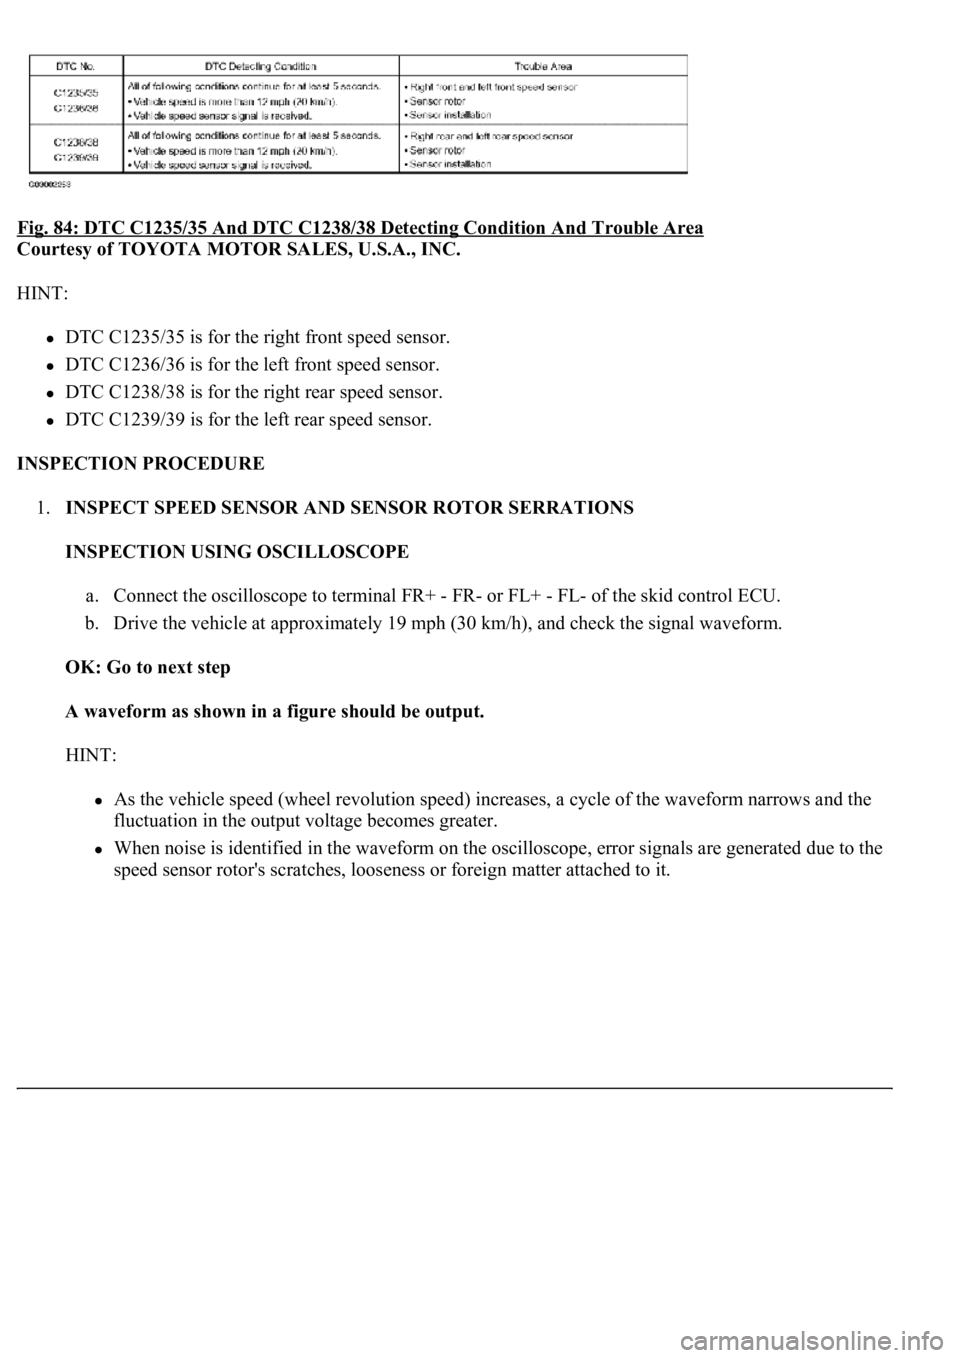
Fig. 84: DTC C1235/35 And DTC C1238/38 Detecting Condition And Trouble Area
Courtesy of TOYOTA MOTOR SALES, U.S.A., INC.
HINT:
DTC C1235/35 is for the right front speed sensor.
DTC C1236/36 is for the left front speed sensor.
DTC C1238/38 is for the right rear speed sensor.
DTC C1239/39 is for the left rear speed sensor.
INSPECTION PROCEDURE
1.INSPECT SPEED SENSOR AND SENSOR ROTOR SERRATIONS
INSPECTION USING OSCILLOSCOPE
a. Connect the oscilloscope to terminal FR+ - FR- or FL+ - FL- of the skid control ECU.
b. Drive the vehicle at approximately 19 mph (30 km/h), and check the signal waveform.
OK: Go to next step
A waveform as shown in a figure should be output.
HINT:
As the vehicle speed (wheel revolution speed) increases, a cycle of the waveform narrows and the
fluctuation in the output voltage becomes greater.
When noise is identified in the waveform on the oscilloscope, error signals are generated due to the
speed sensor rotor's scratches, looseness or forei
gn matter attached to it.